Instructions
Page 2
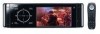
... that interference will not occur in such environments. 2 If this unit has been produced with optical instruments. 4. Cautions on the monitor: • The monitor built in this equipment does cause harmful interference to radio or television reception, which the receiver is very cold or very hot... ...and on, the user is encouraged to try to correct the interference by JVC could void the user's authority to operate the equipment. [European Union only] WARNINGS: To prevent accidents and damage • DO NOT install any unit or wire any cable in a location where; - CAUTION: Do...
... that interference will not occur in such environments. 2 If this unit has been produced with optical instruments. 4. Cautions on the monitor: • The monitor built in this equipment does cause harmful interference to radio or television reception, which the receiver is very cold or very hot... ...and on, the user is encouraged to try to correct the interference by JVC could void the user's authority to operate the equipment. [European Union only] WARNINGS: To prevent accidents and damage • DO NOT install any unit or wire any cable in a location where; - CAUTION: Do...

Instructions
Page 10
... Manual (separate volume) for connection. 1 • Turns on the unit. 5 • DVD: Displays the disc menu. • VCD: Resumes PBC playback (☞ page 23). • DVD-VR: Displays the Original Program screen. 10 Remote controller (RM-RK252) Installing the battery R03/LR03/AAA Main elements and features Insert the batteries into the remote...
... Manual (separate volume) for connection. 1 • Turns on the unit. 5 • DVD: Displays the disc menu. • VCD: Resumes PBC playback (☞ page 23). • DVD-VR: Displays the Original Program screen. 10 Remote controller (RM-RK252) Installing the battery R03/LR03/AAA Main elements and features Insert the batteries into the remote...
Instructions
Page 32
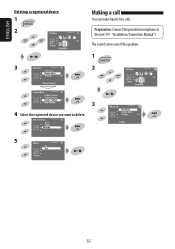
Preparation: Connect the provided microphone to the unit. (☞ "Installation/Connection Manual") The sound comes out of the speakers. 1 2 3 4 Select the registered device you want to delete. 5 32 ENGLISH Deleting a registered device 1 2 3 Making a call You can make hands-free calls.
Preparation: Connect the provided microphone to the unit. (☞ "Installation/Connection Manual") The sound comes out of the speakers. 1 2 3 4 Select the registered device you want to delete. 5 32 ENGLISH Deleting a registered device 1 2 3 Making a call You can make hands-free calls.
Instructions
Page 53
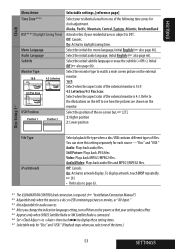
...artwork, touch DISP repeatedly. ☞ [9] • Refer also to page 63. *1 The ILLUMINATION CONTROL lead connection is required. (☞ "Installation/Connection Manual") *2 Adjustable only when the source is connected. *6 Set to then touch ¢ to see how the pictures are shown on...*7 Selectable only for clock adjustment. ENGLISH Clock Menu items Time Zone*5*6 DST*5*6 (Daylight Saving Time) Menu Language Audio Language Subtitle Monitor Type OSD Position Selectable settings, [reference page] Select your residential area from one of the items.) 53 SETTINGS Audio: Plays back ...
...artwork, touch DISP repeatedly. ☞ [9] • Refer also to page 63. *1 The ILLUMINATION CONTROL lead connection is required. (☞ "Installation/Connection Manual") *2 Adjustable only when the source is connected. *6 Set to then touch ¢ to see how the pictures are shown on...*7 Selectable only for clock adjustment. ENGLISH Clock Menu items Time Zone*5*6 DST*5*6 (Daylight Saving Time) Menu Language Audio Language Subtitle Monitor Type OSD Position Selectable settings, [reference page] Select your residential area from one of the items.) 53 SETTINGS Audio: Plays back ...

Instructions
Page 55
... close to the controls. Proxi/Motion-LCD: Light up when your finger touches the controls. Initialize all settings you have made in "Full" aspect ratio (regardless of the component detected through the camera appears on the monitor in . ENGLISH Input Menu items External... Input*5 Beep Telephone Muting*7 Illumination Initialize Selectable settings, [reference page] For connecting an external component to the CD changer jack is selected as the source. *4 The REVERSE GEAR SIGNAL lead connection is required ☞ "Installation/...
... close to the controls. Proxi/Motion-LCD: Light up when your finger touches the controls. Initialize all settings you have made in "Full" aspect ratio (regardless of the component detected through the camera appears on the monitor in . ENGLISH Input Menu items External... Input*5 Beep Telephone Muting*7 Illumination Initialize Selectable settings, [reference page] For connecting an external component to the CD changer jack is selected as the source. *4 The REVERSE GEAR SIGNAL lead connection is required ☞ "Installation/...

Instructions
Page 68
...(☞ "Installation/Connection Manual") • No picture appears on the external monitor. • Connect the video cord correctly. • Select the correct input on the external monitor. •... • Sound and pictures are sometimes • Stop playback while driving on the monitor. other players. the monitor. • Disc cannot be played back. • Change the disc. •...monitor and The track is not correct. ENGLISH Disc playback Symptoms Remedies/Causes • Playback does not start. • Insert the disc correctly again. • Region code of the DVD ...
...(☞ "Installation/Connection Manual") • No picture appears on the external monitor. • Connect the video cord correctly. • Select the correct input on the external monitor. •... • Sound and pictures are sometimes • Stop playback while driving on the monitor. other players. the monitor. • Disc cannot be played back. • Change the disc. •...monitor and The track is not correct. ENGLISH Disc playback Symptoms Remedies/Causes • Playback does not start. • Insert the disc correctly again. • Region code of the DVD ...
Instructions
Page 73
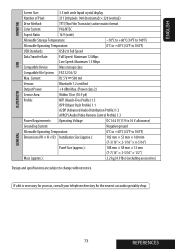
... 16 V allowance) Grounding System: Negative ground Allowable Operating Temperature: 0°C to +40°C (32°F to 104°F) Dimensions (W × H × D): Installation Size (approx.): 182 mm × 52 mm × 160 mm (7-3/16" × 2-1/16" × 6-5/16") Panel Size (approx.): 188 mm × 58 mm...Max. If a kit is necessary for your car, consult your telephone directory for the nearest car audio speciality shop. 73 REFERENCES ENGLISH MONITOR USB Screen Size: 3.5 inch wide liquid crystal display Number of Pixel: 211 200 pixels: 960 (horizontal) × 220 (vertical)...
... 16 V allowance) Grounding System: Negative ground Allowable Operating Temperature: 0°C to +40°C (32°F to 104°F) Dimensions (W × H × D): Installation Size (approx.): 182 mm × 52 mm × 160 mm (7-3/16" × 2-1/16" × 6-5/16") Panel Size (approx.): 188 mm × 58 mm...Max. If a kit is necessary for your car, consult your telephone directory for the nearest car audio speciality shop. 73 REFERENCES ENGLISH MONITOR USB Screen Size: 3.5 inch wide liquid crystal display Number of Pixel: 211 200 pixels: 960 (horizontal) × 220 (vertical)...


