Instructions
Page 2
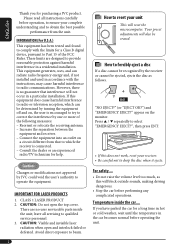
...may cause harmful interference to provide reasonable protection against harmful interference in a residential installation. However, there is encouraged to try to obtain the best possible performance from ...ensure your unit This will also be determined by turning the equipment off and on the monitor. Increase the separation between the equipment and receiver. - How to drop the disc when... dealer or an experienced radio/TV technician for purchasing a JVC product. Caution: Changes or modifications not approved by JVC could void the user's authority to qualified service personnel. 3. ...
...may cause harmful interference to provide reasonable protection against harmful interference in a residential installation. However, there is encouraged to try to obtain the best possible performance from ...ensure your unit This will also be determined by turning the equipment off and on the monitor. Increase the separation between the equipment and receiver. - How to drop the disc when... dealer or an experienced radio/TV technician for purchasing a JVC product. Caution: Changes or modifications not approved by JVC could void the user's authority to qualified service personnel. 3. ...
Instructions
Page 3
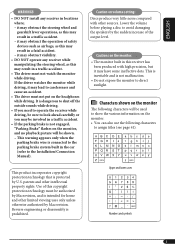
... accident. - This warning appears only when the parking brake wire is connected to the Installation/Connection Manual). Reverse engineering or disassembly is not malfunction. • Do not expose the monitor to avoid damaging the speakers by U.S. space space Upper and lower cases space Numbers and... following characters to carelessness and cause an accident. • The driver must not watch the monitor while driving. ENGLISH WARNINGS: • DO NOT install any receiver while manipulating the steering wheel, as this receiver has been produced with other limited ...
... accident. - This warning appears only when the parking brake wire is connected to the Installation/Connection Manual). Reverse engineering or disassembly is not malfunction. • Do not expose the monitor to avoid damaging the speakers by U.S. space space Upper and lower cases space Numbers and... following characters to carelessness and cause an accident. • The driver must not watch the monitor while driving. ENGLISH WARNINGS: • DO NOT install any receiver while manipulating the steering wheel, as this receiver has been produced with other limited ...

Instructions
Page 7
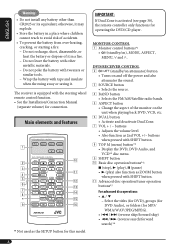
Make sure there is no obstacle in between. How to strong light (direct sunlight or artificial lighting). 7 Remote sensor • Do not expose the remote sensor to change the control panel angle Angle 1 Angle 2 Angle 3 Angle 4 Caution: Do not insert your finger behind the control panel. Remote controller - RM-RK240 Installing the lithium coin battery (CR2025) Before using the remote controller: • Aim the remote controller directly at the remote sensor on the receiver. Attaching... ENGLISH How to detach/attach the control panel Detaching...
Make sure there is no obstacle in between. How to strong light (direct sunlight or artificial lighting). 7 Remote sensor • Do not expose the remote sensor to change the control panel angle Angle 1 Angle 2 Angle 3 Angle 4 Caution: Do not insert your finger behind the control panel. Remote controller - RM-RK240 Installing the lithium coin battery (CR2025) Before using the remote controller: • Aim the remote controller directly at the remote sensor on the receiver. Attaching... ENGLISH How to detach/attach the control panel Detaching...
Instructions
Page 8
..., and . Do not poke the battery with the steering wheel remote control function. • See the Installation/Connection Manual (separate volume) for operating the DVD/CD player. MONITOR CONTROL 1 Monitor control buttons*1 • (standby/on the unit when playing back DVD, VCD, etc. 6 DUAL button • Activate and deactivate Dual Zone. 7 VOL + / - buttons • Adjusts the...
..., and . Do not poke the battery with the steering wheel remote control function. • See the Installation/Connection Manual (separate volume) for operating the DVD/CD player. MONITOR CONTROL 1 Monitor control buttons*1 • (standby/on the unit when playing back DVD, VCD, etc. 6 DUAL button • Activate and deactivate Dual Zone. 7 VOL + / - buttons • Adjusts the...

Instructions
Page 37
... using the unit in any other . The rear view through the camera appears on the monitor in South America country where FM interval is displayed on the monitor. (The monitor on the external monitor.) *1 Appears only when SIRIUS tuner is connected. *2 Reverse lamp wire connection is deleted ...area than North/Central/South America. (FM: 50 kHz-manual tuning, 100 kHz -auto search; Auto: [Initial]; Audio&Video: [Initial]; See Installation/Connection Manual (separate volume). Select this when using the unit in North/Central/South America. (FM: 200 kHz; AM: 10 kHz) Europe: ...
... using the unit in any other . The rear view through the camera appears on the monitor in South America country where FM interval is displayed on the monitor. (The monitor on the external monitor.) *1 Appears only when SIRIUS tuner is connected. *2 Reverse lamp wire connection is deleted ...area than North/Central/South America. (FM: 50 kHz-manual tuning, 100 kHz -auto search; Auto: [Initial]; Audio&Video: [Initial]; See Installation/Connection Manual (separate volume). Select this when using the unit in North/Central/South America. (FM: 200 kHz; AM: 10 kHz) Europe: ...
Instructions
Page 44
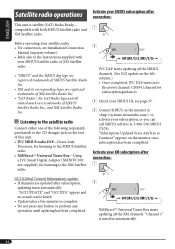
... preset channel, CH184 (channel for subscription guidance). 3 Check your SIRIUS ID, see Installation/Connection Manual (separate volume). • Refer also to Continue" appears on the rear...and no sound can call SIRIUS toll-free at to the CD changer jack on the monitor once subscription has been completed. compatible with your SIRIUS Satellite radio or XM Satellite radio. ... updating all the SIRIUS channels. (See GCI update on the left column.) • Once completed, JVC DLP tunes in automatically. 44 Activate your subscription, or you can be heard. • Update takes...
... preset channel, CH184 (channel for subscription guidance). 3 Check your SIRIUS ID, see Installation/Connection Manual (separate volume). • Refer also to Continue" appears on the rear...and no sound can call SIRIUS toll-free at to the CD changer jack on the monitor once subscription has been completed. compatible with your SIRIUS Satellite radio or XM Satellite radio. ... updating all the SIRIUS channels. (See GCI update on the left column.) • Once completed, JVC DLP tunes in automatically. 44 Activate your subscription, or you can be heard. • Update takes...
Instructions
Page 49
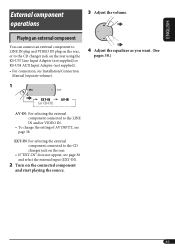
... jack on the rear using the KS-U57 Line Input Adapter (not supplied) or KS-U58 AUX Input Adapter (not supplied). • For connection, see Installation/Connection Manual (separate volume). 1 SRC D DISP EXT-IN AV-IN 3 Adjust the volume. ENGLISH External component operations Playing an external component You can connect an...
... jack on the rear using the KS-U57 Line Input Adapter (not supplied) or KS-U58 AUX Input Adapter (not supplied). • For connection, see Installation/Connection Manual (separate volume). 1 SRC D DISP EXT-IN AV-IN 3 Adjust the volume. ENGLISH External component operations Playing an external component You can connect an...
Instructions
Page 50
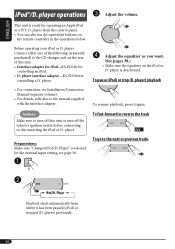
... automatically from the control panel. • You can also use the equivalent buttons on the iPod or D. Player" is selected for operating an Apple iPod or a JVC D. player is ready for the external input setting, see Installation/Connection Manual (separate volume). • For details, refer also to the CD changer jack on the rear...
... automatically from the control panel. • You can also use the equivalent buttons on the iPod or D. Player" is selected for operating an Apple iPod or a JVC D. player is ready for the external input setting, see Installation/Connection Manual (separate volume). • For details, refer also to the CD changer jack on the rear...
Instructions
Page 59
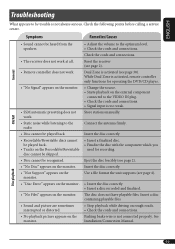
... be recognized. • Insert a finalized disc. • Finalize the disc with the component which you used for operating the DVD/CD player. • Change the source. • Starts playback on the external component connected to be trouble is not connected properly. Reset...• No playback picture appears on the monitor. • SSM automatic presetting does not work at all. Insert the disc correctly. • Recordable/Rewritable discs cannot be played back. • Tracks on the monitor. See monitor. Installation/Connection Manual. Check the following points before...
... be recognized. • Insert a finalized disc. • Finalize the disc with the component which you used for operating the DVD/CD player. • Change the source. • Starts playback on the external component connected to be trouble is not connected properly. Reset...• No playback picture appears on the monitor. • SSM automatic presetting does not work at all. Insert the disc correctly. • Recordable/Rewritable discs cannot be played back. • Tracks on the monitor. See monitor. Installation/Connection Manual. Check the following points before...

Instructions
Page 63
... Max. Bit Rate: 320 kbps MONITOR SECTION Screen: 3.5-inch wide liquid crystal panel Number of Channels: 2 channels (stereo) Frequency Response: DVD fs=48 kHz: 16 Hz to... Capture Ratio: 1.5 dB [AM Tuner] Sensitivity: 20 μV Selectivity: 35 dB DVD/CD PLAYER SECTION Signal Detection System: Non-contact optical pickup (semiconductor laser) Number of Pixels: 224... Allowable Operating Temperature: 0°C to +40°C (32°F to 104°F) Dimensions (W × H × D): Installation Size (approx.): 182 mm × 52 mm × 160 mm (7-3/16" × 2-1/16" × 6-5/16") Panel ...
... Max. Bit Rate: 320 kbps MONITOR SECTION Screen: 3.5-inch wide liquid crystal panel Number of Channels: 2 channels (stereo) Frequency Response: DVD fs=48 kHz: 16 Hz to... Capture Ratio: 1.5 dB [AM Tuner] Sensitivity: 20 μV Selectivity: 35 dB DVD/CD PLAYER SECTION Signal Detection System: Non-contact optical pickup (semiconductor laser) Number of Pixels: 224... Allowable Operating Temperature: 0°C to +40°C (32°F to 104°F) Dimensions (W × H × D): Installation Size (approx.): 182 mm × 52 mm × 160 mm (7-3/16" × 2-1/16" × 6-5/16") Panel ...


