Instructions
Page 2
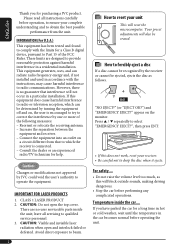
... and can be determined by turning the equipment off and on the monitor. Reorient or relocate the receiving antenna. - Connect the equipment into... CLASS 1 LASER PRODUCT 2. Avoid direct exposure to which can radiate radio frequency energy and, if not installed and used in a particular installation. Press 5 / ∞ repeatedly to operate the equipment. If you for help. "NO EJECT?" (...between the equipment and receiver. - However, there is encouraged to try to correct the interference by JVC could void the user's authority to select "EMERGENCY EJECT?", then press ENT. • If this...
... and can be determined by turning the equipment off and on the monitor. Reorient or relocate the receiving antenna. - Connect the equipment into... CLASS 1 LASER PRODUCT 2. Avoid direct exposure to which can radiate radio frequency energy and, if not installed and used in a particular installation. Press 5 / ∞ repeatedly to operate the equipment. If you for help. "NO EJECT?" (...between the equipment and receiver. - However, there is encouraged to try to correct the interference by JVC could void the user's authority to select "EMERGENCY EJECT?", then press ENT. • If this...
Instructions
Page 3
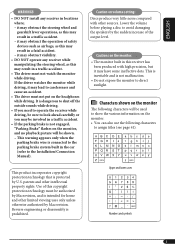
... the outside sounds while driving. • If you may have some ineffective dots. Characters shown on the monitor The following characters to the Installation/Connection Manual). This product incorporates copyright protection technology that is not malfunction. • Do not expose the...operation of the output level. ENGLISH WARNINGS: • DO NOT install any receiver while manipulating the steering wheel, as this copyright protection technology must be used to show the various information on the monitor. • You can also use the following characters will be ...
... the outside sounds while driving. • If you may have some ineffective dots. Characters shown on the monitor The following characters to the Installation/Connection Manual). This product incorporates copyright protection technology that is not malfunction. • Do not expose the...operation of the output level. ENGLISH WARNINGS: • DO NOT install any receiver while manipulating the steering wheel, as this copyright protection technology must be used to show the various information on the monitor. • You can also use the following characters will be ...

Instructions
Page 7
Remote controller - How to strong light (direct sunlight or artificial lighting). 7 RM-RK240 Installing the lithium coin battery (CR2025) Before using the remote controller: • Aim the remote controller directly at the remote sensor on the receiver. Make sure there is no obstacle in between. Attaching... Remote sensor • Do not expose the remote sensor to change the control panel angle Angle 1 Angle 2 Angle 3 Angle 4 Caution: Do not insert your finger behind the control panel. ENGLISH How to detach/attach the control panel Detaching...
Remote controller - How to strong light (direct sunlight or artificial lighting). 7 RM-RK240 Installing the lithium coin battery (CR2025) Before using the remote controller: • Aim the remote controller directly at the remote sensor on the receiver. Make sure there is no obstacle in between. Attaching... Remote sensor • Do not expose the remote sensor to change the control panel angle Angle 1 Angle 2 Angle 3 Angle 4 Caution: Do not insert your finger behind the control panel. ENGLISH How to detach/attach the control panel Detaching...
Instructions
Page 8
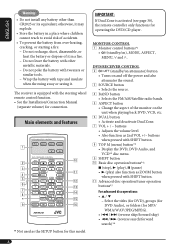
...-RK240 * Not used as 2nd VOL +/- Select the titles (for DVD), groups (for DVD Audio), or folders (for operating the DVD/CD player. ENGLISH Warning: • Do not install any battery other metallic materials. - MONITOR CONTROL 1 Monitor control buttons*1 • (standby/on the unit when playing back DVD, VCD, etc. 6 DUAL button • Activate and deactivate Dual Zone...
...-RK240 * Not used as 2nd VOL +/- Select the titles (for DVD), groups (for DVD Audio), or folders (for operating the DVD/CD player. ENGLISH Warning: • Do not install any battery other metallic materials. - MONITOR CONTROL 1 Monitor control buttons*1 • (standby/on the unit when playing back DVD, VCD, etc. 6 DUAL button • Activate and deactivate Dual Zone...

Instructions
Page 37
... as a VCR. Increases the tuner selectivity to reduce interference noises between adjacent stations. (Stereo effect may be heard. the normal rear view appears on the monitor in North/Central/South America. (FM: 200 kHz; AM: 9 kHz) South America: Select this when using the unit in "Full" aspect ratio (regardless of LINE... when using the unit in South America country where FM interval is deleted from adjacent stations, but sound quality will remain. Audio&Video: [Initial]; See Installation/Connection Manual (separate volume).
... as a VCR. Increases the tuner selectivity to reduce interference noises between adjacent stations. (Stereo effect may be heard. the normal rear view appears on the monitor in North/Central/South America. (FM: 200 kHz; AM: 9 kHz) South America: Select this when using the unit in "Full" aspect ratio (regardless of LINE... when using the unit in South America country where FM interval is deleted from adjacent stations, but sound quality will remain. Audio&Video: [Initial]; See Installation/Connection Manual (separate volume).
Instructions
Page 44
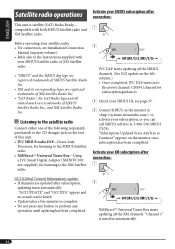
... after connection: 1 Before operating your satellite radio: • For connection, see page 37. 4 Contact SIRIUS on the monitor once subscription has been completed. Activate your SIRIUS subscription after subscription, updating starts automatically. Activate your subscription, or you can be... to the SIRIUS Satellite radio. • XMDirectTM Universal Tuner Box-Using a JVC Smart Digital Adapter (XMDJVC100: not supplied), for subscription guidance). 3 Check your SIRIUS ID, see Installation/Connection Manual (separate volume). • Refer also to the Instructions supplied with...
... after connection: 1 Before operating your satellite radio: • For connection, see page 37. 4 Contact SIRIUS on the monitor once subscription has been completed. Activate your SIRIUS subscription after subscription, updating starts automatically. Activate your subscription, or you can be... to the SIRIUS Satellite radio. • XMDirectTM Universal Tuner Box-Using a JVC Smart Digital Adapter (XMDJVC100: not supplied), for subscription guidance). 3 Check your SIRIUS ID, see Installation/Connection Manual (separate volume). • Refer also to the Instructions supplied with...
Instructions
Page 49
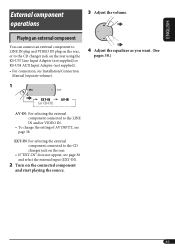
...). • For connection, see page 38 and select the external input (EXT-IN). 2 Turn on the rear. • If "EXT-IN" does not appear, see Installation/Connection Manual (separate volume). 1 SRC D DISP EXT-IN AV-IN 3 Adjust the volume. EXT-IN: For selecting the external component connected to the CD changer...
...). • For connection, see page 38 and select the external input (EXT-IN). 2 Turn on the rear. • If "EXT-IN" does not appear, see Installation/Connection Manual (separate volume). 1 SRC D DISP EXT-IN AV-IN 3 Adjust the volume. EXT-IN: For selecting the external component connected to the CD changer...
Instructions
Page 50
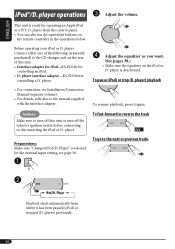
... unit is ready for controlling a D. SRC D Before operating your iPod or D. player interface adapter-KS-PD500 for operating an Apple iPod or a JVC D. To pause (iPod) or stop (D. ENGLISH iPod®/D. player: Connect either one of this unit or turn off the vehicle's ignition switch before ...player from where it again. player. ⁄ Adjust the equalizer as you want. (See pages 38.) • Make sure the equalizer on the iPod or D. Cautions: Make sure to turn off this unit. • Interface adapter for iPod-KS-PD100 for the external input setting, see Installation...
... unit is ready for controlling a D. SRC D Before operating your iPod or D. player interface adapter-KS-PD500 for operating an Apple iPod or a JVC D. To pause (iPod) or stop (D. ENGLISH iPod®/D. player: Connect either one of this unit or turn off the vehicle's ignition switch before ...player from where it again. player. ⁄ Adjust the equalizer as you want. (See pages 38.) • Make sure the equalizer on the iPod or D. Cautions: Make sure to turn off this unit. • Interface adapter for iPod-KS-PD100 for the external input setting, see Installation...
Instructions
Page 59
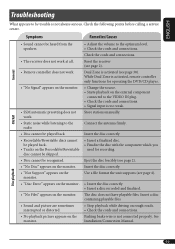
...monitor. • SSM automatic presetting does not work. • Static noise while listening to the radio. • Disc cannot be played back. Disc playback 59 Reset the receiver (see page 2). • Remote controller does not work at all. Dual Zone is not always serious. Insert the disc correctly. Installation.... • Insert a finalized disc. • Finalize the disc with the component which you used for operating the DVD/CD player. • Change the source. • Starts playback on the Parking brake wire is too weak. ENGLISH Troubleshooting What...
...monitor. • SSM automatic presetting does not work. • Static noise while listening to the radio. • Disc cannot be played back. Disc playback 59 Reset the receiver (see page 2). • Remote controller does not work at all. Dual Zone is not always serious. Insert the disc correctly. Installation.... • Insert a finalized disc. • Finalize the disc with the component which you used for operating the DVD/CD player. • Change the source. • Starts playback on the Parking brake wire is too weak. ENGLISH Troubleshooting What...

Instructions
Page 63
...Rate: 320 kbps MONITOR SECTION Screen: 3.5-inch wide liquid crystal panel Number of Channels: 2 channels (stereo) Frequency Response: DVD fs=48 kHz:... dB Capture Ratio: 1.5 dB [AM Tuner] Sensitivity: 20 μV Selectivity: 35 dB DVD/CD PLAYER SECTION Signal Detection System: Non-contact optical pickup (semiconductor laser) Number of Pixels: 224 640... ground Allowable Operating Temperature: 0°C to +40°C (32°F to 104°F) Dimensions (W × H × D): Installation Size (approx.): 182 mm × 52 mm × 160 mm (7-3/16" × 2-1/16" × 6-5/16") Panel Size ...
...Rate: 320 kbps MONITOR SECTION Screen: 3.5-inch wide liquid crystal panel Number of Channels: 2 channels (stereo) Frequency Response: DVD fs=48 kHz:... dB Capture Ratio: 1.5 dB [AM Tuner] Sensitivity: 20 μV Selectivity: 35 dB DVD/CD PLAYER SECTION Signal Detection System: Non-contact optical pickup (semiconductor laser) Number of Pixels: 224 640... ground Allowable Operating Temperature: 0°C to +40°C (32°F to 104°F) Dimensions (W × H × D): Installation Size (approx.): 182 mm × 52 mm × 160 mm (7-3/16" × 2-1/16" × 6-5/16") Panel Size ...


