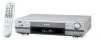
Instructions
Page 6
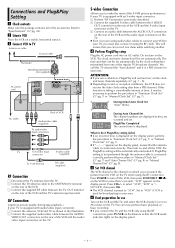
... set automatically. B Connect the supplied S-video cable between the TV OUT terminal on the VCR. C Connect an audio cable between the AUDIO/ VIDEO OUT connectors on the rear of the S-VHS picture performance.) If your area. This will be necessary to make the most of the...the display panel, perform the procedure in "Semiauto Clock Set" (੬ pg. 7) or "Manual Clock Set" (੬ pg. 7). ● If "- -:- -" appears on the VCR for broadcasting in "Semiauto Clock Set" (੬ pg. 7) or "Manual Clock Set" (੬ pg. 7). We call this function is equipped with audio/video input ...
... set automatically. B Connect the supplied S-video cable between the TV OUT terminal on the VCR. C Connect an audio cable between the AUDIO/ VIDEO OUT connectors on the rear of the S-VHS picture performance.) If your area. This will be necessary to make the most of the...the display panel, perform the procedure in "Semiauto Clock Set" (੬ pg. 7) or "Manual Clock Set" (੬ pg. 7). ● If "- -:- -" appears on the VCR for broadcasting in "Semiauto Clock Set" (੬ pg. 7) or "Manual Clock Set" (੬ pg. 7). We call this function is equipped with audio/video input ...

Instructions
Page 7
... clock time will be made by the Plug&Play setting or if you want to change the host channel/D.S.T. (Daylight Saving Time)/ time zone setting manually. Manual Clock Set First follow steps 1 to 2 in clock itself . ON: Adjustment will be made by the incoming signal from the host channel. (... date and year in the same way. ● Holding rt changes the time in English, Spanish or French. Manual setting of host channel and D.S.T. Press MENU to return to "VCR". Clock Setting Perform clock setting only if the clock has not been set correctly by the built-in "Preparations" above...
... clock time will be made by the Plug&Play setting or if you want to change the host channel/D.S.T. (Daylight Saving Time)/ time zone setting manually. Manual Clock Set First follow steps 1 to 2 in clock itself . ON: Adjustment will be made by the incoming signal from the host channel. (... date and year in the same way. ● Holding rt changes the time in English, Spanish or French. Manual setting of host channel and D.S.T. Press MENU to return to "VCR". Clock Setting Perform clock setting only if the clock has not been set correctly by the built-in "Preparations" above...
Instructions
Page 8
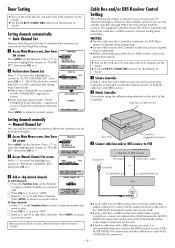
...locations) C Connect cable box and/or DBS receiver to "TUNER SET", then press OK or e. B Access Manual Channel Set screen Press rt to move the highlight bar (arrow) to VCR Cable box or DBS receiver Transmitter RF output Audio/video output or Controller C Add or skip desired channels To ... keys on both a cable box and a DBS receiver are used , position the Controller so its instruction manual. ● Turn on the VCR and TV, and select the VCR channel (or AV mode). ● Set the VCR/TV/CABLE/DBS selector on the Remote. C Repeat A and B to "AUTO CHANNEL SET", then press...
...locations) C Connect cable box and/or DBS receiver to "TUNER SET", then press OK or e. B Access Manual Channel Set screen Press rt to move the highlight bar (arrow) to VCR Cable box or DBS receiver Transmitter RF output Audio/video output or Controller C Add or skip desired channels To ... keys on both a cable box and a DBS receiver are used , position the Controller so its instruction manual. ● Turn on the VCR and TV, and select the VCR channel (or AV mode). ● Set the VCR/TV/CABLE/DBS selector on the Remote. C Repeat A and B to "AUTO CHANNEL SET", then press...
Instructions
Page 9
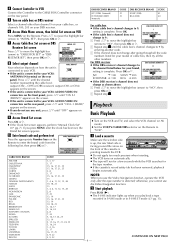
... 100, 205 on the Remote. F Access Main Menu screen, then Initial Set screen on VCR Press MENU on your model of the cassette is complete. B Repeat step 0 until the channel... panel. I Access Brand Set screen Press OK or e. ● If the Clock Set screen appears, perform "Manual Clock Set" (੬ pg. 7). B Repeat step 0. A Press rt to move the highlight bar (arrow)... not change to the CABLE BOX Controller connector JVC (DISH Network) 51 SONY (DSS) 41 on the screen. B Start playback Press PLAY (4). ● The S-VHS indicator lights up , the rear label side ...
... 100, 205 on the Remote. F Access Main Menu screen, then Initial Set screen on VCR Press MENU on your model of the cassette is complete. B Repeat step 0 until the channel... panel. I Access Brand Set screen Press OK or e. ● If the Clock Set screen appears, perform "Manual Clock Set" (੬ pg. 7). B Repeat step 0. A Press rt to move the highlight bar (arrow)... not change to the CABLE BOX Controller connector JVC (DISH Network) 51 SONY (DSS) 41 on the screen. B Start playback Press PLAY (4). ● The S-VHS indicator lights up , the rear label side ...
Instructions
Page 11
... For Automatic Timer Standby Press REW (3), then press TIMER (#) within 2 seconds. A While the tape is not running , press 2 or 6 on the VCR. Manual tracking adjustment If automatic tracking cannot eliminate noises well during playback to fast-forward the tape. to fast-forward the tape. Hi... back a tape on which stereo sound or SAP sound is recorded, press A.MONITOR on the Remote to select your desired monitor sound. (੬ pg. 20) Automatic operations after rewinding is not possible to reactivate automatic tracking. HI-FI: Normally select this VCR, index codes are mixed and...
... For Automatic Timer Standby Press REW (3), then press TIMER (#) within 2 seconds. A While the tape is not running , press 2 or 6 on the VCR. Manual tracking adjustment If automatic tracking cannot eliminate noises well during playback to fast-forward the tape. to fast-forward the tape. Hi... back a tape on which stereo sound or SAP sound is recorded, press A.MONITOR on the Remote to select your desired monitor sound. (੬ pg. 20) Automatic operations after rewinding is not possible to reactivate automatic tracking. HI-FI: Normally select this VCR, index codes are mixed and...
Instructions
Page 13
...that has been recorded in the recording pause mode. NOTE: If the tape reaches its center position. ● To record in VHS on the VCR's display panel. NOTE: When playing back a tape that maximum volume causes the indicator to vary between 0dB to "REC LEVEL ...20). During recording Pause recording Press PAUSE (9). ● Press PLAY (4) to resume recording. ● You can adjust the audio recording level manually. The S-VHS recording mode is selected. Stop recording On the VCR Press STOP/EJECT (0). Second Audio Recording This VCR's built-in S-VHS (Super VHS), S-VHS ET or...
...that has been recorded in the recording pause mode. NOTE: If the tape reaches its center position. ● To record in VHS on the VCR's display panel. NOTE: When playing back a tape that maximum volume causes the indicator to vary between 0dB to "REC LEVEL ...20). During recording Pause recording Press PAUSE (9). ● Press PLAY (4) to resume recording. ● You can adjust the audio recording level manually. The S-VHS recording mode is selected. Stop recording On the VCR Press STOP/EJECT (0). Second Audio Recording This VCR's built-in S-VHS (Super VHS), S-VHS ET or...
Instructions
Page 20
... display) appears on the right Hi-Fi channel is not enough tape to "ON": The timer recording standby mode is automatically engaged when the VCR is played back. For Example, Recording a program of this function, but change the tape speed manually during timer programing. ● There ...to while playing back a Hi-Fi stereo tape. Recording on VHS tapes is turned on the Remote to "OFF". Ⅵ AUTO TIMER - It is temporarily canceled when the VCR is always performed in use the A.MONITOR button on . You can automatically correct ● S-VHS MODE setting does not affect ...
... display) appears on the right Hi-Fi channel is not enough tape to "ON": The timer recording standby mode is automatically engaged when the VCR is played back. For Example, Recording a program of this function, but change the tape speed manually during timer programing. ● There ...to while playing back a Hi-Fi stereo tape. Recording on VHS tapes is turned on the Remote to "OFF". Ⅵ AUTO TIMER - It is temporarily canceled when the VCR is always performed in use the A.MONITOR button on . You can automatically correct ● S-VHS MODE setting does not affect ...
Instructions
Page 21
... "1" when shipped from the factory. When the DBS receiver outputs a signal, the VCR starts recording and the REC LINK lamp blinks. The VCR turns off ). ● Depending on your nearest JVC dealer. The JLIP (Joint Level Interface Protocol) terminal is activated. ON/OFF The REMOTE..." Child lock appears for connection and its instruction manual. Press rt to move the highlight bar (arrow) to a personal computer or similar device. If your JVC camcorder is turned on, press and hold POWER on the Remote until the VCR turns on the front panel. either VIDEO (composite...
... "1" when shipped from the factory. When the DBS receiver outputs a signal, the VCR starts recording and the REC LINK lamp blinks. The VCR turns off ). ● Depending on your nearest JVC dealer. The JLIP (Joint Level Interface Protocol) terminal is activated. ON/OFF The REMOTE..." Child lock appears for connection and its instruction manual. Press rt to move the highlight bar (arrow) to a personal computer or similar device. If your JVC camcorder is turned on, press and hold POWER on the Remote until the VCR turns on the front panel. either VIDEO (composite...
Instructions
Page 23
... can be duplicated with the same Remote You can control two JVC VCRs by VHS-to-VHS editing. ● S-VHS to "OFF") after you are using a Master Edit Control-equipped JVC camcorder, recording starts automatically on this VCR. (Refer to camcorder's instruction manual.) NOTE: Be sure to select "AUTO" for the Remote between A and B (੬ step A), keeping two...
... can be duplicated with the same Remote You can control two JVC VCRs by VHS-to-VHS editing. ● S-VHS to "OFF") after you are using a Master Edit Control-equipped JVC camcorder, recording starts automatically on this VCR. (Refer to camcorder's instruction manual.) NOTE: Be sure to select "AUTO" for the Remote between A and B (੬ step A), keeping two...

Instructions
Page 24
...manuals for playback) B Load cassettes Insert the playback cassette into the playback VCR and the cassette to "S-VIDEO". On the Remote Press AUX and/or CH+/- until "L-1" or "F-1" appears on the front panel, set to the audio/video (or S-video) input connectors on another VCR is S-VHS VCR and when using this VCR as the playback VCR... This VCR (for playback) To AUDIO OUT To S-VIDEO OUT Audio cable (not supplied) S-video ...
...manuals for playback) B Load cassettes Insert the playback cassette into the playback VCR and the cassette to "S-VIDEO". On the Remote Press AUX and/or CH+/- until "L-1" or "F-1" appears on the front panel, set to the audio/video (or S-video) input connectors on another VCR is S-VHS VCR and when using this VCR as the playback VCR... This VCR (for playback) To AUDIO OUT To S-VIDEO OUT Audio cable (not supplied) S-video ...

Instructions
Page 28
... ● Tape information cannot be changed. If this happens, fast-forward the tape up to its end, eject it has not on this VCR. "MEMORY FULL" appears on one tape number. Other Problems SYMPTOM The channel cannot be shown if it , and try to resume recording. ...● Select a different host channel during Semiauto Clock Set (੬ pg. 7), or perform Manual Clock Set (੬ pg. 7). - 28 - CORRECTIVE ACTION ● Press PAUSE (9) to pause the recording, change channels, then press PLAY (4) to start recording...
... ● Tape information cannot be changed. If this happens, fast-forward the tape up to its end, eject it has not on this VCR. "MEMORY FULL" appears on one tape number. Other Problems SYMPTOM The channel cannot be shown if it , and try to resume recording. ...● Select a different host channel during Semiauto Clock Set (੬ pg. 7), or perform Manual Clock Set (੬ pg. 7). - 28 - CORRECTIVE ACTION ● Press PAUSE (9) to pause the recording, change channels, then press PLAY (4) to start recording...

Instructions
Page 30
... services shall be brought to act of purchase); For your nearest JVC authorized service center, please call toll free: (800) 537-5722. Damage that Rechargeable Batteries are covered on an in the Owner's Manual, normal maintenance, video and audio head cleaning; 4. Signal reception ...to abuse, accident, alteration, modification, tampering, negligence, misuse, faulty installation, lack of which will repair or replace defective parts at JVC authorized service centers. Model No.: Serial No.: Purchase date: Name of purchase; 7. Parts used for replacement are covered for the ...
... services shall be brought to act of purchase); For your nearest JVC authorized service center, please call toll free: (800) 537-5722. Damage that Rechargeable Batteries are covered on an in the Owner's Manual, normal maintenance, video and audio head cleaning; 4. Signal reception ...to abuse, accident, alteration, modification, tampering, negligence, misuse, faulty installation, lack of which will repair or replace defective parts at JVC authorized service centers. Model No.: Serial No.: Purchase date: Name of purchase; 7. Parts used for replacement are covered for the ...
