User Guide
Page 5
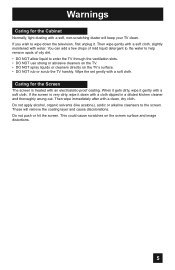
... you wish to wipe down with a cloth dipped in a diluted kitchen cleaner and thoroughly wrung-out. If the screen is treated with an electrostatic-proof coating. These will keep your TV clean. You can add a few drops of mild liquid detergent to the water to help remove spots of oily dirt... • DO NOT use strong or abrasive cleaners on the TV. • DO NOT spray liquids or cleaners directly on the screen surface and image distortions. 5 This could cause scratches on the TV's surface. • DO NOT rub or scrub the TV harshly. When it gets dirty, wipe it . Then wipe ...
... you wish to wipe down with a cloth dipped in a diluted kitchen cleaner and thoroughly wrung-out. If the screen is treated with an electrostatic-proof coating. These will keep your TV clean. You can add a few drops of mild liquid detergent to the water to help remove spots of oily dirt... • DO NOT use strong or abrasive cleaners on the TV. • DO NOT spray liquids or cleaners directly on the screen surface and image distortions. 5 This could cause scratches on the TV's surface. • DO NOT rub or scrub the TV harshly. When it gets dirty, wipe it . Then wipe ...

User Guide
Page 6
Warnings Thank you for purchasing a JVC HDTV-ready projection television which are summarized below . Once the lamp has warmed up...the television that are 2 LED indicators on the front panel of the device and important information which the TV is pressed, the LAMP/PROGRAM LED indicator blinks in orange at approximately every 2 seconds, and then goes ... on the front panel blinks in orange for approximately 1 minute. Once again, thank you to project the picture onto the screen. There are included with the replacement lamp kit. Do not block the ventilation holes while the ...
Warnings Thank you for purchasing a JVC HDTV-ready projection television which are summarized below . Once the lamp has warmed up...the television that are 2 LED indicators on the front panel of the device and important information which the TV is pressed, the LAMP/PROGRAM LED indicator blinks in orange at approximately every 2 seconds, and then goes ... on the front panel blinks in orange for approximately 1 minute. Once again, thank you to project the picture onto the screen. There are included with the replacement lamp kit. Do not block the ventilation holes while the ...
User Guide
Page 7
... has a DIGITAL-IN terminal. It subjects the television and the lamp to keep the TV on the screen. Also, take care to stress and may remain on for cooling. Be careful when ... inside of the socket. Condensation When a heater is turned on the lamp and screen. Do not open the rear cabinet. 13. Warnings 4. Do not turn the power on it too close to...The screen is a possibility of time. Moving this television When lifting this condensation is moved from a cold place to cool down, there is being shortened. 7 Caution! ILA element characteristics Do not project still...
... has a DIGITAL-IN terminal. It subjects the television and the lamp to keep the TV on the screen. Also, take care to stress and may remain on for cooling. Be careful when ... inside of the socket. Condensation When a heater is turned on the lamp and screen. Do not open the rear cabinet. 13. Warnings 4. Do not turn the power on it too close to...The screen is a possibility of time. Moving this television When lifting this condensation is moved from a cold place to cool down, there is being shortened. 7 Caution! ILA element characteristics Do not project still...
User Guide
Page 9
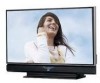
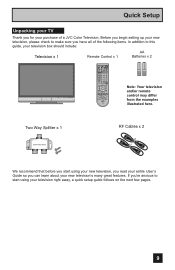
Quick Setup Unpacking your TV Thank you have all of a JVC Color Television. Before you begin setting up your new television, please check to start using your new television's many great features. If you can learn ... the following items. In addition to this guide, your television box should include: Television x 1 Remote Control x 1 AA Batteries x 2 AA Alkaline AA Alkaline TV CATV VCR DVD POWER ASPECT MULTI SCREEN TWIN INDEX SELECT SLEEP FREEZE SWAP ML/MTS DISPLAY + INPUT 123 D/A 4 5 6 i.LINK MENU 78 TIMER TUNE 0 THEATER VIDEO FAVORITE PRO STATUS C.C. NATURAL...
Quick Setup Unpacking your TV Thank you have all of a JVC Color Television. Before you begin setting up your new television, please check to start using your new television's many great features. If you can learn ... the following items. In addition to this guide, your television box should include: Television x 1 Remote Control x 1 AA Batteries x 2 AA Alkaline AA Alkaline TV CATV VCR DVD POWER ASPECT MULTI SCREEN TWIN INDEX SELECT SLEEP FREEZE SWAP ML/MTS DISPLAY + INPUT 123 D/A 4 5 6 i.LINK MENU 78 TIMER TUNE 0 THEATER VIDEO FAVORITE PRO STATUS C.C. NATURAL...
User Guide
Page 12
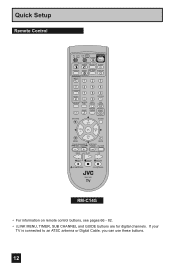
Quick Setup Remote Control TV CATV VCR DVD POWER ASPECT MULTI SCREEN TWIN INDEX SELECT SLEEP FREEZE SWAP ML/MTS DISPLAY + INPUT 123 D/A 4 5 6 i.LINK MENU 78 TIMER TUNE THEATER FAVORITE PRO 0 VIDEO STATUS C.C. If your TV is connected to an ATSC antenna or Digital Cable, you can use these buttons. 12 NATURAL SOUND CINEMA...
Quick Setup Remote Control TV CATV VCR DVD POWER ASPECT MULTI SCREEN TWIN INDEX SELECT SLEEP FREEZE SWAP ML/MTS DISPLAY + INPUT 123 D/A 4 5 6 i.LINK MENU 78 TIMER TUNE THEATER FAVORITE PRO 0 VIDEO STATUS C.C. If your TV is connected to an ATSC antenna or Digital Cable, you can use these buttons. 12 NATURAL SOUND CINEMA...

User Guide
Page 19
... speaker in a movie theater is set in back of the screen so it can recreate a conversation scene in you home theater sound system. Note: • Please read the benefit of this feature on the amplifier. By using your TV's speaker as the center speaker, you can obtain the same ... Connecting to an External Amplifier S-VIDEO VIDEO R L MONITOR R L /REC OUT AUDIO OUTPUT Speaker Amplifier Speaker TV Rear Panel 1) Connect a white cable from the LEFT AUDIO OUTPUT on the back of the TV to the LEFT AUDIO INPUT on the amplifier. 2) Connect a red cable from the RIGHT AUDIO OUTPUT on the...
... speaker in a movie theater is set in back of the screen so it can recreate a conversation scene in you home theater sound system. Note: • Please read the benefit of this feature on the amplifier. By using your TV's speaker as the center speaker, you can obtain the same ... Connecting to an External Amplifier S-VIDEO VIDEO R L MONITOR R L /REC OUT AUDIO OUTPUT Speaker Amplifier Speaker TV Rear Panel 1) Connect a white cable from the LEFT AUDIO OUTPUT on the back of the TV to the LEFT AUDIO INPUT on the amplifier. 2) Connect a red cable from the RIGHT AUDIO OUTPUT on the...

User Guide
Page 21
...-IN1 AUDIO in the Initial Setup menu to ANALOG. AUDIO - Notes: • If 480p signals (640x480 or 720x480) are displayed on the screen, the horizontal balance may be used with the HDMI 1 input. • When setting the "DIGITAL AUDIO - Access the "DIGITAL-IN" in... AUDIO" input terminal. 3) Connect a white cable from the "L AUDIO OUT" on the back of your TV in their digital form. Quick Setup Connecting to a Digital TV Receiver By connecting a Digital TV Receiver, high definition pictures can only be slightly shifted. TV Rear Panel AUDIO OUT LR DTV Decoder DIGITAL OUT R -
...-IN1 AUDIO in the Initial Setup menu to ANALOG. AUDIO - Notes: • If 480p signals (640x480 or 720x480) are displayed on the screen, the horizontal balance may be used with the HDMI 1 input. • When setting the "DIGITAL AUDIO - Access the "DIGITAL-IN" in... AUDIO" input terminal. 3) Connect a white cable from the "L AUDIO OUT" on the back of your TV in their digital form. Quick Setup Connecting to a Digital TV Receiver By connecting a Digital TV Receiver, high definition pictures can only be slightly shifted. TV Rear Panel AUDIO OUT LR DTV Decoder DIGITAL OUT R -

User Guide
Page 22
... can be some distortion for example, 480i/60Hz is the first industry supported, uncompressed, all digital audio/video interface. L HDMI 1 HDMI Cable TV Rear Panel 1 DIGITAL-IN 2 1) Connect the HDMI Cable from the HDMI device. 22 See "DIGITAL-IN1 AUDIO", page 55. • Some decoders...you can include DVD players, D-VHS or any HDMI compatible devices. HDMI (High Definition Multimedia Interface) is changed to 480p/60Hz), the screen may turn green and there may not respond depending on the equipment that you have an HDMI device connected to DIGITAL. Quick Setup Connecting...
... can be some distortion for example, 480i/60Hz is the first industry supported, uncompressed, all digital audio/video interface. L HDMI 1 HDMI Cable TV Rear Panel 1 DIGITAL-IN 2 1) Connect the HDMI Cable from the HDMI device. 22 See "DIGITAL-IN1 AUDIO", page 55. • Some decoders...you can include DVD players, D-VHS or any HDMI compatible devices. HDMI (High Definition Multimedia Interface) is changed to 480p/60Hz), the screen may turn green and there may not respond depending on the equipment that you have an HDMI device connected to DIGITAL. Quick Setup Connecting...
User Guide
Page 25
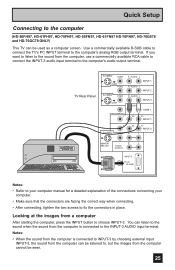
... two screws to the computer's analog RGB output terminal. Notes: • When the sound from the computer cannot be used as a computer screen. TV Rear Panel S-VIDEO VIDEO OVER VIDEO S-VIDEO VIDEO OVER CENTER CHANNELINPUT Y R - AUDIO - Looking at the images from the computer, use a commercially... available RCA cable to connect the INPUT-3 audio input terminal to choose INPUT-3. AUDIO - Use a commercially available D-SUB cable to connect the TV's PC INPUT terminal to fix the connectors in place. L INPUT-2 R - AUDIO - AUDIO - If you want to listen to the sound from...
... two screws to the computer's analog RGB output terminal. Notes: • When the sound from the computer cannot be used as a computer screen. TV Rear Panel S-VIDEO VIDEO OVER VIDEO S-VIDEO VIDEO OVER CENTER CHANNELINPUT Y R - AUDIO - Looking at the images from the computer, use a commercially... available RCA cable to connect the INPUT-3 audio input terminal to choose INPUT-3. AUDIO - Use a commercially available D-SUB cable to connect the TV's PC INPUT terminal to fix the connectors in place. L INPUT-2 R - AUDIO - AUDIO - If you want to listen to the sound from...
User Guide
Page 26
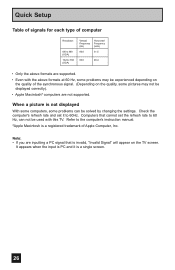
...Apple Macintosh* computers are not supported. Refer to the computer's instruction manual. *Apple Macintosh is invalid, "Invalid Signal" will appear on the TV screen. It appears when the input is PC and it to 60 Hz, can be experienced depending on the quality of Apple Computer, Inc. Quick... (Hz) Horizontal Frequency (kHz) 60.0 31.5 60.0 48.4 • Only the above formats are supported. • Even with this TV. When a picture is a single screen. 26 Note: • If you are inputting a PC signal that cannot set it is not displayed With some computers, some problems can ...
...Apple Macintosh* computers are not supported. Refer to the computer's instruction manual. *Apple Macintosh is invalid, "Invalid Signal" will appear on the TV screen. It appears when the input is PC and it to 60 Hz, can be experienced depending on the quality of Apple Computer, Inc. Quick... (Hz) Horizontal Frequency (kHz) 60.0 31.5 60.0 48.4 • Only the above formats are supported. • Even with this TV. When a picture is a single screen. 26 Note: • If you are inputting a PC signal that cannot set it is not displayed With some computers, some problems can ...
User Guide
Page 34
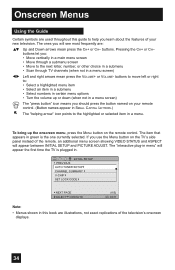
... number, or other choice in a submenu • Scan through TV channels (when not in a menu screen) Left and right arrows mean press the CH+ or CH- The "interactive plug-in menu" will appear the first time the TV is plugged in green is the one currently selected. Onscreen Menus ...numbers in certain menu options • Turn the volume up the onscreen menu, press the MENU button on the TV's side panel instead of the remote, an additional menu screen showing VIDEO STATUS and ASPECT will see most frequently are illustrations, not exact replications of your remote control. (Button ...
... number, or other choice in a submenu • Scan through TV channels (when not in a menu screen) Left and right arrows mean press the CH+ or CH- The "interactive plug-in menu" will appear the first time the TV is plugged in green is the one currently selected. Onscreen Menus ...numbers in certain menu options • Turn the volume up the onscreen menu, press the MENU button on the TV's side panel instead of the remote, an additional menu screen showing VIDEO STATUS and ASPECT will see most frequently are illustrations, not exact replications of your remote control. (Button ...
User Guide
Page 35
...operate when the onscreen menu is active). For information about a minute, the onscreen menu will automatically shut off. • Button names in menu screens when certain aspect ratios or inputs are highlighted in Menu, see pages 27 - 29. buttons. When you press the up or down arrow at... If you make adjustments to select an option from the highlighted feature. FRAN. Onscreen Menus The Onscreen Menu System Your television comes with JVC's onscreen menu system. The onscreen menus let you do not press any buttons for about the interactive plug-in a different color.
...operate when the onscreen menu is active). For information about a minute, the onscreen menu will automatically shut off. • Button names in menu screens when certain aspect ratios or inputs are highlighted in Menu, see pages 27 - 29. buttons. When you press the up or down arrow at... If you make adjustments to select an option from the highlighted feature. FRAN. Onscreen Menus The Onscreen Menu System Your television comes with JVC's onscreen menu system. The onscreen menus let you do not press any buttons for about the interactive plug-in a different color.
User Guide
Page 36
...is input to the digital-in terminal and the picture is being displayed on the screen. • ADVANCED SMART PICTURE menu cannot be displayed when DYNAMIC is selected for Video Status. •... When the Menu button on the TV side panel is pressed, the FRONT PANEL CONTROL menu between INITIAL SETUP 05 and PICTURE ADJUST...TIMER LAMP TIMER RESET NEXT PAGE SELECT OPERATE MENU EXIT CLOCK/TIMERS INITIAL SETUP PREVIOUS VIDEO-1 MONITOR OUT TV SPEAKER AUDIO OUT DIGITAL-IN DIGITAL-IN1 AUDIO CENTER CH INPUT OFF ON VARI AUTO DIGITAL OFF NEXT...
...is input to the digital-in terminal and the picture is being displayed on the screen. • ADVANCED SMART PICTURE menu cannot be displayed when DYNAMIC is selected for Video Status. •... When the Menu button on the TV side panel is pressed, the FRONT PANEL CONTROL menu between INITIAL SETUP 05 and PICTURE ADJUST...TIMER LAMP TIMER RESET NEXT PAGE SELECT OPERATE MENU EXIT CLOCK/TIMERS INITIAL SETUP PREVIOUS VIDEO-1 MONITOR OUT TV SPEAKER AUDIO OUT DIGITAL-IN DIGITAL-IN1 AUDIO CENTER CH INPUT OFF ON VARI AUTO DIGITAL OFF NEXT...

User Guide
Page 38
... Digital CH No. If you are watching digital channels, the below screen appears. • When the Cable Card is inserted into the Cable... background video is not inserted into the Cable Card Slot: Below screen appears Both analog and digital channels are broadcasting. Regarding digital channels... "√". Regarding analog channels, you are watching analog channels, the above screen appears. Analog Channels CHANNEL SUMMARY CHNO. SCAN ID 01 02 MTV 03 ...To CHANNEL SUMMARY To operate The Channel summary screen will be added to the channel summary if the auto tuner setup did...
... Digital CH No. If you are watching digital channels, the below screen appears. • When the Cable Card is inserted into the Cable... background video is not inserted into the Cable Card Slot: Below screen appears Both analog and digital channels are broadcasting. Regarding digital channels... "√". Regarding analog channels, you are watching analog channels, the above screen appears. Analog Channels CHANNEL SUMMARY CHNO. SCAN ID 01 02 MTV 03 ...To CHANNEL SUMMARY To operate The Channel summary screen will be added to the channel summary if the auto tuner setup did...
User Guide
Page 40
...;® π† Press ZERO to access the V-Chip menu To turn V-Chip ON or OFF (V-Chip must be inappropriate for children, based on the screen. The V-Chip menu below is equipped with descriptions of the rating categories. You may not work properly in the next six pages along with V-Chip... which enables you to block channels or content that you feel to be turned ON for rating settings to operate) To move to SET US TV RATINGS, SET MOVIE RATINGS, or SET CANADIAN RATINGS (see following pages for the United States and therefore may use US V-Chip settings (for programming ...
...;® π† Press ZERO to access the V-Chip menu To turn V-Chip ON or OFF (V-Chip must be inappropriate for children, based on the screen. The V-Chip menu below is equipped with descriptions of the rating categories. You may not work properly in the next six pages along with V-Chip... which enables you to block channels or content that you feel to be turned ON for rating settings to operate) To move to SET US TV RATINGS, SET MOVIE RATINGS, or SET CANADIAN RATINGS (see following pages for the United States and therefore may use US V-Chip settings (for programming ...
User Guide
Page 50
... is displayed. ESP. CLOSED CAPTION AUTO SHUT OFF OFF XDS ID ON NEXT PAGE SELECT OPERATE (3/5) MENU EXIT Noise Muting This feature inserts a blank gray screen over channels which are not broadcasting or are too weak to be received clearly. π† √® Press the MENU button To NOISE MUTING... AUTO SHUT OFF OFF XDS ID ON • If the channel that you operate channel summary. • Noise muting will not work when the digital TV or i.LINK is provided by the broadcaster. π† √® Press the MENU button To XDS ID To turn ON or OFF Press the...
... is displayed. ESP. CLOSED CAPTION AUTO SHUT OFF OFF XDS ID ON NEXT PAGE SELECT OPERATE (3/5) MENU EXIT Noise Muting This feature inserts a blank gray screen over channels which are not broadcasting or are too weak to be received clearly. π† √® Press the MENU button To NOISE MUTING... AUTO SHUT OFF OFF XDS ID ON • If the channel that you operate channel summary. • Noise muting will not work when the digital TV or i.LINK is provided by the broadcaster. π† √® Press the MENU button To XDS ID To turn ON or OFF Press the...

User Guide
Page 53
... to adjust the screen position vertically and horizontally when the aspect is set Panorama Zoom or Cinema Zoom for 1080i and 720p signals, or when PC mode is also possible to panorama or cinema. Onscreen Menus Position Adjustment Position adjustment allows you have a TV signal. Press the... MENU button INITIAL SETUP π† To POWER INDICATOR √® To turn the power off. • If you set a timer on the screen vertically when the aspect is set . • It is ...
... to adjust the screen position vertically and horizontally when the aspect is set Panorama Zoom or Cinema Zoom for 1080i and 720p signals, or when PC mode is also possible to panorama or cinema. Onscreen Menus Position Adjustment Position adjustment allows you have a TV signal. Press the... MENU button INITIAL SETUP π† To POWER INDICATOR √® To turn the power off. • If you set a timer on the screen vertically when the aspect is set . • It is ...

User Guide
Page 55
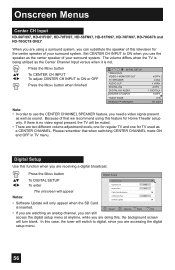
...is capable of analog audio and digital video, choose ANALOG. • Refer to the Digital-In terminal and the picture is being displayed on the screen. • You can select AUTO only when the signal is 480p for more information. • When you select AUTO, the television will select ... CH INPUT DIGITAL OFF • If your DTV or HDMI component is being input to your TV. When you select AUTO, the televison will select "ANALOG" or "DIGITAL" automatically, depending on the screen. There are two types of digital audio and video, choose DIGITAL. Digital-In1 Audio This feature...
...is capable of analog audio and digital video, choose ANALOG. • Refer to the Digital-In terminal and the picture is being displayed on the screen. • You can select AUTO only when the signal is 480p for more information. • When you select AUTO, the television will select ... CH INPUT DIGITAL OFF • If your DTV or HDMI component is being input to your TV. When you select AUTO, the televison will select "ANALOG" or "DIGITAL" automatically, depending on the screen. There are two types of digital audio and video, choose DIGITAL. Digital-In1 Audio This feature...
User Guide
Page 56
... setup menu. 56 In this case, the tuner will switch to digital, since you are two different volume adjustment levels, one for regular TV and one for TV used as a CENTER CHANNEL. Please remember that we recommend using a surround system, you can still access the digital setup menu at anytime,...-70FH97, HD-56FN97, HD-61FN97, HD-70FN97, HD-70G678 and HD-70GC78 ONLY When you are doing this, the background screen will turn blank. The volume differs when the TV is being utilized as the Center Channel Input versus when it is inserted. Digital Setup Use this function when you need...
... setup menu. 56 In this case, the tuner will switch to digital, since you are two different volume adjustment levels, one for regular TV and one for TV used as a CENTER CHANNEL. Please remember that we recommend using a surround system, you can still access the digital setup menu at anytime,...-70FH97, HD-56FN97, HD-61FN97, HD-70FN97, HD-70G678 and HD-70GC78 ONLY When you are doing this, the background screen will turn blank. The volume differs when the TV is being utilized as the Center Channel Input versus when it is inserted. Digital Setup Use this function when you need...

User Guide
Page 59
... settings allow you to change and adjust the way the picture appears on the TV screen. DETAIL The Detail feature adjusts the level of brightness on the TV screen, giving you make all the colors in the TV picture appear either more vivid or subtle. Each video status setting has a separate.... Color Temperature You can be chosen along with the Bright control. PICTURE Picture allows you to adjust the levels of black and white on the TV screen. Adjust the Picture Settings π† √ ® Press the MENU button To TINT, COLOR, PICTURE, BRIGHT, DETAIL or IRIS To enter ...
... settings allow you to change and adjust the way the picture appears on the TV screen. DETAIL The Detail feature adjusts the level of brightness on the TV screen, giving you make all the colors in the TV picture appear either more vivid or subtle. Each video status setting has a separate.... Color Temperature You can be chosen along with the Bright control. PICTURE Picture allows you to adjust the levels of black and white on the TV screen. Adjust the Picture Settings π† √ ® Press the MENU button To TINT, COLOR, PICTURE, BRIGHT, DETAIL or IRIS To enter ...


