
User Guide
Page 2
... remove cover (or back). The lightning flash with an extension cord, receptacle or other outlet unless the blades can be of sufficient magnitude to persons. In the event of electric shock to constitute a risk of trouble, unplug the unit and call a service technician. Changes or modifications not approved by JVC could void the warranty. * When you don't use this TV set...
... remove cover (or back). The lightning flash with an extension cord, receptacle or other outlet unless the blades can be of sufficient magnitude to persons. In the event of electric shock to constitute a risk of trouble, unplug the unit and call a service technician. Changes or modifications not approved by JVC could void the warranty. * When you don't use this TV set...

User Guide
Page 4
... the receiving antenna. - HD-70G678 and HD-70GC78 are for inserting and removing the power plug. Keep to allow satisfactory cooling. 18) Make enough room for use only with JVC Model RK-CPBX7 stand. The TV will not occur in a corner on , the user is for a Class B digital device, pursuant to keep cords out of the FCC Rules. The main power supply for use only with JVC Model RK-CEXM6 stand...
... the receiving antenna. - HD-70G678 and HD-70GC78 are for inserting and removing the power plug. Keep to allow satisfactory cooling. 18) Make enough room for use only with JVC Model RK-CPBX7 stand. The TV will not occur in a corner on , the user is for a Class B digital device, pursuant to keep cords out of the FCC Rules. The main power supply for use only with JVC Model RK-CEXM6 stand...

User Guide
Page 6
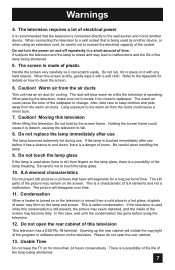
... learn about this television and please enjoy using it. The lamp must be operated while the cooling is turned off the power. 2. Before using this television, please read this period. When the POWER button is explained below . 1. Once the screen is dark, cooling is performed for a long time This television uses a lamp to use of the lamp changes depending on is pressed, the LAMP/PROGRAM LED indicator blinks in orange for purchasing a JVC HDTV-ready projection television which are...
... learn about this television and please enjoy using it. The lamp must be operated while the cooling is turned off the power. 2. Before using this television, please read this period. When the POWER button is explained below . 1. Once the screen is dark, cooling is performed for a long time This television uses a lamp to use of the lamp changes depending on is pressed, the LAMP/PROGRAM LED indicator blinks in orange for purchasing a JVC HDTV-ready projection television which are...
User Guide
Page 7
... it can scratch easily. The screen is operating. Do not replace the lamp immediately after use . The picture will disappear over time. 11. In this television This television has a DIGITAL-IN terminal. Also, take care to the warm air from the air ducts This unit has an air duct for cooling. Please do not open the rear cabinet of plastic Handle the...
... it can scratch easily. The screen is operating. Do not replace the lamp immediately after use . The picture will disappear over time. 11. In this television This television has a DIGITAL-IN terminal. Also, take care to the warm air from the air ducts This unit has an air duct for cooling. Please do not open the rear cabinet of plastic Handle the...
User Guide
Page 9
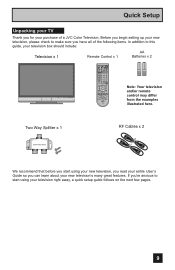
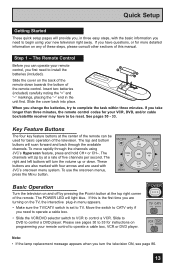
... start using your new television, you read your entire User's Guide so you can learn about your television box should include: Television x 1 Remote Control x 1 AA Batteries x 2 AA Alkaline AA Alkaline TV CATV VCR DVD POWER ASPECT MULTI SCREEN TWIN INDEX SELECT SLEEP FREEZE SWAP ML/MTS DISPLAY + INPUT 123 D/A 4 5 6 i.LINK MENU 78 TIMER TUNE 0 THEATER VIDEO FAVORITE PRO STATUS C.C. Quick Setup Unpacking your TV Thank you for your television right away, a quick setup guide...
... start using your new television, you read your entire User's Guide so you can learn about your television box should include: Television x 1 Remote Control x 1 AA Batteries x 2 AA Alkaline AA Alkaline TV CATV VCR DVD POWER ASPECT MULTI SCREEN TWIN INDEX SELECT SLEEP FREEZE SWAP ML/MTS DISPLAY + INPUT 123 D/A 4 5 6 i.LINK MENU 78 TIMER TUNE 0 THEATER VIDEO FAVORITE PRO STATUS C.C. Quick Setup Unpacking your TV Thank you for your television right away, a quick setup guide...
User Guide
Page 10
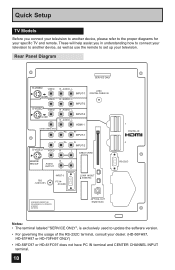
... and CENTER CHANNEL INPUT terminal. 10 L INPUT-3 R - AUDIO - AUDIO - AUDIO - These will help assist you connect your television to another device, as well as use the remote to set up your television. L HDMI 1 Pb Pr INPUT-1 ATSC /DIGITAL CABLE IN S-VIDEO Y Pb VIDEO R Pr INPUT-2 L CABLE CARD MONITOR R L /REC OUT AUDIO OUTPUT 75Ω (VHF/UHF) INPUT-3 PC IN (D-SUB) i.LINK IN/OUT S400(TS) 1 DIGITAL-IN 2 RS-232C LICENSED UNDER THE FOLLOWING U.S. Rear Panel Diagram SERVICE ONLY S-VIDEO VIDEO OVER VIDEO S-VIDEO VIDEO OVER...
... and CENTER CHANNEL INPUT terminal. 10 L INPUT-3 R - AUDIO - AUDIO - AUDIO - These will help assist you connect your television to another device, as well as use the remote to set up your television. L HDMI 1 Pb Pr INPUT-1 ATSC /DIGITAL CABLE IN S-VIDEO Y Pb VIDEO R Pr INPUT-2 L CABLE CARD MONITOR R L /REC OUT AUDIO OUTPUT 75Ω (VHF/UHF) INPUT-3 PC IN (D-SUB) i.LINK IN/OUT S400(TS) 1 DIGITAL-IN 2 RS-232C LICENSED UNDER THE FOLLOWING U.S. Rear Panel Diagram SERVICE ONLY S-VIDEO VIDEO OVER VIDEO S-VIDEO VIDEO OVER...
User Guide
Page 13
... right corner of the television. If you have to install the batteries (included). When you need to be used with the basic information you need to TV. The top and bottom MUTING GUIDE buttons will light blue. The POWER LED will scan forward and back through the channels using your remote control, you first need to operate a cable box. • Slide the VCR/DVD selector switch to VCR to control a DVD player. Insert two batteries (included...
... right corner of the television. If you have to install the batteries (included). When you need to be used with the basic information you need to TV. The top and bottom MUTING GUIDE buttons will light blue. The POWER LED will scan forward and back through the channels using your remote control, you first need to operate a cable box. • Slide the VCR/DVD selector switch to VCR to control a DVD player. Insert two batteries (included...

User Guide
Page 17
... are not viewing images coming from the composite video input terminal. • No signal will be outputted through the Monitor/Recording output terminal when you are watching a copyright protected program using a VCR, you will be able to record correctly. If you are viewing images from the component video input. • If you make this connection, set the Video-1 Monitor Out menu to ON. Quick Setup Connecting to Monitor/Recording Output Terminal TV Rear Panel S-VIDEO VIDEO R L MONITOR R L /REC OUT AUDIO OUTPUT OR...
... are not viewing images coming from the composite video input terminal. • No signal will be outputted through the Monitor/Recording output terminal when you are watching a copyright protected program using a VCR, you will be able to record correctly. If you are viewing images from the component video input. • If you make this connection, set the Video-1 Monitor Out menu to ON. Quick Setup Connecting to Monitor/Recording Output Terminal TV Rear Panel S-VIDEO VIDEO R L MONITOR R L /REC OUT AUDIO OUTPUT OR...

User Guide
Page 21
... connecting a Digital TV Receiver, high definition pictures can only be used with a DTV decoder. TV Rear Panel AUDIO OUT LR DTV Decoder DIGITAL OUT R - See "DIGITAL-IN1 AUDIO", page 55. • The Analog Audio input can be slightly shifted. Access the "DIGITAL-IN" in the initial setup menu to adjust it. (Refer to page 55.) • When you use a DVI to HDMI adapter this connection must be guaranteed. • Use a HDMI to DVI cable (commercially available) in order to digitally connect...
... connecting a Digital TV Receiver, high definition pictures can only be used with a DTV decoder. TV Rear Panel AUDIO OUT LR DTV Decoder DIGITAL OUT R - See "DIGITAL-IN1 AUDIO", page 55. • The Analog Audio input can be slightly shifted. Access the "DIGITAL-IN" in the initial setup menu to adjust it. (Refer to page 55.) • When you use a DVI to HDMI adapter this connection must be guaranteed. • Use a HDMI to DVI cable (commercially available) in order to digitally connect...

User Guide
Page 22
... TV detects it is connected to the HDMI. • If the HDMI output device signal is changed (for a short time until the signal becomes stable. • When you do the above connection, set -top box, DVD player, A/V receiver or an audio and/or video monitor, such as a digital television (DTV). Therefore, you can not hear any analog sound from the other device conected to an HDMI Compatible Device By connecting an HDMI compatible device, high...
... TV detects it is connected to the HDMI. • If the HDMI output device signal is changed (for a short time until the signal becomes stable. • When you do the above connection, set -top box, DVD player, A/V receiver or an audio and/or video monitor, such as a digital television (DTV). Therefore, you can not hear any analog sound from the other device conected to an HDMI Compatible Device By connecting an HDMI compatible device, high...
User Guide
Page 23
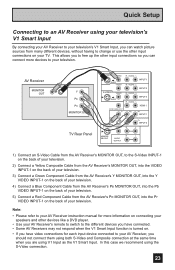
... should not connect them using both S-Video and Composite connection at the same time when you can watch picture sources from the AV Receiver's PR MONITOR OUT, into the Pb VIDEO INPUT-1 on the back of your television. AUDIO - L INPUT-1 R - AUDIO - AUDIO - AV Receiver MONITOR OUT Y PB PR MONITOR OUT TV Rear Panel S-VIDEO VIDEO OVER VIDEO S-VIDEO VIDEO OVER CENTER CHANNELINPUT Y R - L HDMI 1 Pb Pr INPUT-1 S-VIDEO Y Pb VIDEO R Pr INPUT-2 L MONITOR R L /REC OUT AUDIO OUTPUT 1) Connect an S-Video Cable from the AV Receiver's MONITOR OUT, to the S-Video INPUT-1 on...
... should not connect them using both S-Video and Composite connection at the same time when you can watch picture sources from the AV Receiver's PR MONITOR OUT, into the Pb VIDEO INPUT-1 on the back of your television. AUDIO - L INPUT-1 R - AUDIO - AUDIO - AV Receiver MONITOR OUT Y PB PR MONITOR OUT TV Rear Panel S-VIDEO VIDEO OVER VIDEO S-VIDEO VIDEO OVER CENTER CHANNELINPUT Y R - L HDMI 1 Pb Pr INPUT-1 S-VIDEO Y Pb VIDEO R Pr INPUT-2 L MONITOR R L /REC OUT AUDIO OUTPUT 1) Connect an S-Video Cable from the AV Receiver's MONITOR OUT, to the S-Video INPUT-1 on...

User Guide
Page 28
... signal and receiving conditions. In this in the SET CLOCK menu. • Only when the MODE is set your clock manually and turn D.S.T. If you must first set the clock. can be continued...) 28 You must set the clock manually. Quick Setup Auto Clock Set Before you use any of your TV's timer functions, you choose AUTO, see auto clock set above. AUTO -- : -- -- ON or OFF To NEXT (To Auto Tuner Setup) NEXT SELECT OPERATE MENU...
... signal and receiving conditions. In this in the SET CLOCK menu. • Only when the MODE is set your clock manually and turn D.S.T. If you must first set the clock. can be continued...) 28 You must set the clock manually. Quick Setup Auto Clock Set Before you use any of your TV's timer functions, you choose AUTO, see auto clock set above. AUTO -- : -- -- ON or OFF To NEXT (To Auto Tuner Setup) NEXT SELECT OPERATE MENU...
User Guide
Page 35
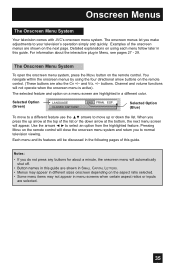
..., press the MENU button on the remote control. (These buttons are highlighted in this guide. ESP. When you to your television's operation simply and quickly. Use the arrows √ ® to move up arrow at the top of the list or the down the list. Selected Option (Green) LANGUAGE CLOSED CAPTION ENG. buttons. You navigate within the onscreen menus by using each menu follow later in a different color.
..., press the MENU button on the remote control. (These buttons are highlighted in this guide. ESP. When you to your television's operation simply and quickly. Use the arrows √ ® to move up arrow at the top of the list or the down the list. Selected Option (Green) LANGUAGE CLOSED CAPTION ENG. buttons. You navigate within the onscreen menus by using each menu follow later in a different color.
User Guide
Page 36
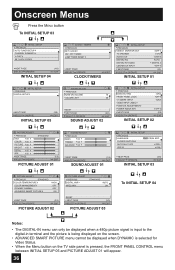
...TUNER SETUP CHANNEL SUMMARY V-CHIP SET LOCK CODE NEXT PAGE SELECT OPERATE (4/5) MENU EXIT INITIAL SETUP 04 CLOCK / TIMERS PREVIOUS SET CLOCK ON / OFF TIMER LAMP TIMER RESET NEXT PAGE SELECT OPERATE MENU EXIT CLOCK/TIMERS INITIAL SETUP PREVIOUS VIDEO-1 MONITOR OUT TV SPEAKER AUDIO OUT DIGITAL-IN DIGITAL-IN1 AUDIO CENTER CH INPUT OFF ON VARI AUTO DIGITAL OFF NEXT PAGE (1/5) SELECT OPERATE MENU EXIT INITIAL SETUP 01 INITIAL SETUP PREVIOUS DIGITAL SETUP NEXT PAGE SELECT OPERATE (5/5) MENU EXIT INITIAL SETUP 05 SOUND ADJUST PREVIOUS TURN ON VOLUME 10 VOLUME LIMIT 40 RESET...
...TUNER SETUP CHANNEL SUMMARY V-CHIP SET LOCK CODE NEXT PAGE SELECT OPERATE (4/5) MENU EXIT INITIAL SETUP 04 CLOCK / TIMERS PREVIOUS SET CLOCK ON / OFF TIMER LAMP TIMER RESET NEXT PAGE SELECT OPERATE MENU EXIT CLOCK/TIMERS INITIAL SETUP PREVIOUS VIDEO-1 MONITOR OUT TV SPEAKER AUDIO OUT DIGITAL-IN DIGITAL-IN1 AUDIO CENTER CH INPUT OFF ON VARI AUTO DIGITAL OFF NEXT PAGE (1/5) SELECT OPERATE MENU EXIT INITIAL SETUP 01 INITIAL SETUP PREVIOUS DIGITAL SETUP NEXT PAGE SELECT OPERATE (5/5) MENU EXIT INITIAL SETUP 05 SOUND ADJUST PREVIOUS TURN ON VOLUME 10 VOLUME LIMIT 40 RESET...
User Guide
Page 56
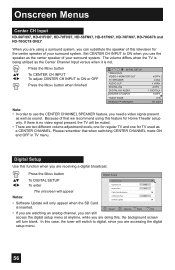
... you are watching an analog channel, you can substitute the speaker of this case, the tuner will be muted. • There are accessing the digital setup menu. 56 Press the MENU button Digital Setup π† √® To DIGITAL SETUP To enter The onscreen will appear Antenna Level Digital Sound Aspect Ratio Cable Card Application PCM 4:3 Notes: i.LINK Auto Play OFF Software Update • Software Update will turn blank. Digital Setup Use this function when you are...
... you are watching an analog channel, you can substitute the speaker of this case, the tuner will be muted. • There are accessing the digital setup menu. 56 Press the MENU button Digital Setup π† √® To DIGITAL SETUP To enter The onscreen will appear Antenna Level Digital Sound Aspect Ratio Cable Card Application PCM 4:3 Notes: i.LINK Auto Play OFF Software Update • Software Update will turn blank. Digital Setup Use this function when you are...

User Guide
Page 59
... level of the TV picture with your favorite picture settings (Tint, Color, Picture, Bright, Detail, etc.) See page 71 for HD (1080i/1080p/720p) and SD (480p/480i) video signal. Each video status can adjust the overall brightness of brightness on the TV screen. BRIGHT You can be chosen along with the Bright control. DETAIL The Detail feature adjusts the level of red and green in your television. Press the MENU button π†...
... level of the TV picture with your favorite picture settings (Tint, Color, Picture, Bright, Detail, etc.) See page 71 for HD (1080i/1080p/720p) and SD (480p/480i) video signal. Each video status can adjust the overall brightness of brightness on the TV screen. BRIGHT You can be chosen along with the Bright control. DETAIL The Detail feature adjusts the level of red and green in your television. Press the MENU button π†...

User Guide
Page 65
... PAGE SELECT OPERATE MENU EXIT Press the OK button while the above message appears on lamp replacement. 65 After you replace the lamp, you need to change the lamp. THE LAMP TIMER IS RESET SUCCESSFULLY. CLOCK / TIMERS PREVIOUS SET CLOCK ON / OFF TIMER LAMP TIMER RESET PRESS OK TO RESET THE LAMP TIMER. The lamp timer has now been reset. Notes: • You can use the Lamp Timer Reset only after replacing the lamp. • See Page 85 for instructions on the television screen.
... PAGE SELECT OPERATE MENU EXIT Press the OK button while the above message appears on lamp replacement. 65 After you replace the lamp, you need to change the lamp. THE LAMP TIMER IS RESET SUCCESSFULLY. CLOCK / TIMERS PREVIOUS SET CLOCK ON / OFF TIMER LAMP TIMER RESET PRESS OK TO RESET THE LAMP TIMER. The lamp timer has now been reset. Notes: • You can use the Lamp Timer Reset only after replacing the lamp. • See Page 85 for instructions on the television screen.

User Guide
Page 71
... The VIDEO STATUS button gives you a choice of four TV picture display settings, including a display of your TV. Resets the picture display to video when viewing in the following cases: - When an SD signal is recalled, just the signal type. - Press the NATURAL CINEMA button NATURAL CINEMA AUTO Notes: ON • When you are receiving a 1080p signal, Natural Cinema OFF can also change the mode. Dynamic - Used for the video status you are using the MENU button...
... The VIDEO STATUS button gives you a choice of four TV picture display settings, including a display of your TV. Resets the picture display to video when viewing in the following cases: - When an SD signal is recalled, just the signal type. - Press the NATURAL CINEMA button NATURAL CINEMA AUTO Notes: ON • When you are receiving a 1080p signal, Natural Cinema OFF can also change the mode. Dynamic - Used for the video status you are using the MENU button...
User Guide
Page 85
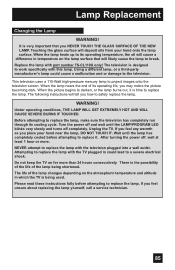
... cooled before attempting to project images onto the television screen. Attempting to replace the lamp with this lamp. There is the possibility of the life of the lamp changes depending on the lamp surface that you feel unsure about replacing the lamp yourself, call a service technician. 85 Wait until the LAMP/PROGRAM LED blinks very slowly and turns off , wait at least 1 hour or more than 24 hours consecutively. When the lamp...
... cooled before attempting to project images onto the television screen. Attempting to replace the lamp with this lamp. There is the possibility of the life of the lamp changes depending on the lamp surface that you feel unsure about replacing the lamp yourself, call a service technician. 85 Wait until the LAMP/PROGRAM LED blinks very slowly and turns off , wait at least 1 hour or more than 24 hours consecutively. When the lamp...
User Guide
Page 90
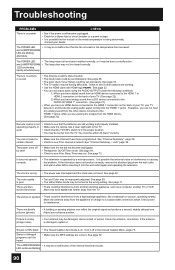
... POWER LED • The lamp may be a malfunction that the fan is rising abnormally. See page 59. • The Video Status mode may be set . Move any analog sound from the HDMI device. (See page 22). Turn it , and blocks the analog audio signal coming into the wall outlet again and operating the television. Troubleshooting PROBLEMS CHECK There is no picture or sound • The antenna could be disconnected. • The input mode...
... POWER LED • The lamp may be a malfunction that the fan is rising abnormally. See page 59. • The Video Status mode may be set . Move any analog sound from the HDMI device. (See page 22). Turn it , and blocks the analog audio signal coming into the wall outlet again and operating the television. Troubleshooting PROBLEMS CHECK There is no picture or sound • The antenna could be disconnected. • The input mode...


