

Instructions
Page 6
...of the lamp being shortened and the possibility of the device and important information which the TV is one minute for the lamp to warm up commences This television uses a lamp ... goes out. In order to use this instruction manual before the cooling process has completed, the internal circuits and lamp may overheat leading to project the picture onto the screen. After 1 or...the television is being shut down. Warnings Thank you for purchasing JVC's model HD-56FH96, HD-61FH96 or HD-70FH96 HDTV-ready projection television which are summarized below . It is being performed. There...
...of the lamp being shortened and the possibility of the device and important information which the TV is one minute for the lamp to warm up commences This television uses a lamp ... goes out. In order to use this instruction manual before the cooling process has completed, the internal circuits and lamp may overheat leading to project the picture onto the screen. After 1 or...the television is being shut down. Warnings Thank you for purchasing JVC's model HD-56FH96, HD-61FH96 or HD-70FH96 HDTV-ready projection television which are summarized below . It is being performed. There...

Instructions
Page 15
... will scan forward and back through the channels using your new television right away. Please see page 100. 15 If you have to begin using JVC's Hyperscan feature, press and hold CH+ or CH-. When you change the batteries, try to operate a cable box, VCR or DVD player. ... button at the top right corner of the remote can operate your remote control to complete the task within three minutes. If this manual. Slide to DVD to TV. Insert two batteries (included) carefully noting the "+" and "-" markings, placing the "-" end in the unit first. Quick Setup Getting Started ...
... will scan forward and back through the channels using your new television right away. Please see page 100. 15 If you have to begin using JVC's Hyperscan feature, press and hold CH+ or CH-. When you change the batteries, try to operate a cable box, VCR or DVD player. ... button at the top right corner of the remote can operate your remote control to complete the task within three minutes. If this manual. Slide to DVD to TV. Insert two batteries (included) carefully noting the "+" and "-" markings, placing the "-" end in the unit first. Quick Setup Getting Started ...
Instructions
Page 16
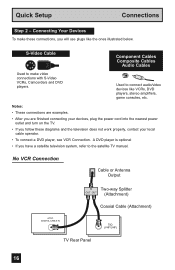
...these diagrams and the television does not work properly, contact your devices, plug the power cord into the nearest power outlet and turn on the TV. • If you have a satellite television system, refer to connect audio/video devices like the ones illustrated below. A DVD player is...8226; If you follow these connections, you will use plugs like VCRs, DVD players, stereo amplifiers, game consoles, etc. Used to the satellite TV manual. No VCR Connection Cable or Antenna Output IN Two-way Splitter OUT OUT (Attachment) Coaxial Cable (Attachment) ATSC /DIGITAL CABLE IN 75Ω...
...these diagrams and the television does not work properly, contact your devices, plug the power cord into the nearest power outlet and turn on the TV. • If you have a satellite television system, refer to connect audio/video devices like the ones illustrated below. A DVD player is...8226; If you follow these connections, you will use plugs like VCRs, DVD players, stereo amplifiers, game consoles, etc. Used to the satellite TV manual. No VCR Connection Cable or Antenna Output IN Two-way Splitter OUT OUT (Attachment) Coaxial Cable (Attachment) ATSC /DIGITAL CABLE IN 75Ω...

Instructions
Page 17
... Splitter IN (Attachment) OUT OUT Coaxial Cable (Attachment) ATSC /DIGITAL CABLE IN I 75Ω (VHF/UHF) OR S-VIDEO VIDEO OVER VIDEO S-VIDEO VIDEO OVER R - L INPUT-2 R - L TV Rear Panel CENTER CHANNELINPUT Y Pb Pr INPUT-1 Y Pb Pr INPUT-2 AUDIO OUT R L Y PB PR OUT Green Blue Red DVD Player (OPTIONAL) Note: • If this connection... Notes: • Green, blue and red are the most common colors for you, try the connection setup on page 18. 17 Please consult the user's manual for your DVD player for more information. • Be careful not to Input 1.
... Splitter IN (Attachment) OUT OUT Coaxial Cable (Attachment) ATSC /DIGITAL CABLE IN I 75Ω (VHF/UHF) OR S-VIDEO VIDEO OVER VIDEO S-VIDEO VIDEO OVER R - L INPUT-2 R - L TV Rear Panel CENTER CHANNELINPUT Y Pb Pr INPUT-1 Y Pb Pr INPUT-2 AUDIO OUT R L Y PB PR OUT Green Blue Red DVD Player (OPTIONAL) Note: • If this connection... Notes: • Green, blue and red are the most common colors for you, try the connection setup on page 18. 17 Please consult the user's manual for your DVD player for more information. • Be careful not to Input 1.
Instructions
Page 22
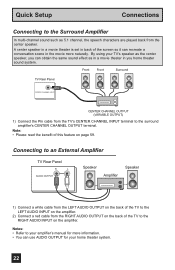
...to your home theater system. 22 Connecting to an External Amplifier TV Rear Panel R L AUDIO OUTPUT Speaker Amplifier Speaker 1) Connect a white cable from the LEFT AUDIO OUTPUT on the back of the TV to the LEFT AUDIO INPUT on the amplifier. 2) Connect a ... on page 59. Note: • Please read the benefit of this feature on the amplifier. By using your TV's speaker as the center speaker, you home theater sound system. Notes: • Refer to the surround amplifier's... the movie more information. • You can use AUDIO OUTPUT for your amplifier's manual for more naturally.
...to your home theater system. 22 Connecting to an External Amplifier TV Rear Panel R L AUDIO OUTPUT Speaker Amplifier Speaker 1) Connect a white cable from the LEFT AUDIO OUTPUT on the back of the TV to the LEFT AUDIO INPUT on the amplifier. 2) Connect a ... on page 59. Note: • Please read the benefit of this feature on the amplifier. By using your TV's speaker as the center speaker, you home theater sound system. Notes: • Refer to the surround amplifier's... the movie more information. • You can use AUDIO OUTPUT for your amplifier's manual for more naturally.

Instructions
Page 23
TV Rear Panel Amplifier OPTICAL OUT Digital Audio 1) Connect the optical cable from the back of the amplifier. Quick Setup Connections Connecting to the back of the TV to an amplifier using an optical digital cable from the optical output. The signal that is output can only output digital audio. &#...8226; In order to your owners manual on Digital Sound in the Digital Setup Menu. See ...
TV Rear Panel Amplifier OPTICAL OUT Digital Audio 1) Connect the optical cable from the back of the amplifier. Quick Setup Connections Connecting to the back of the TV to an amplifier using an optical digital cable from the optical output. The signal that is output can only output digital audio. &#...8226; In order to your owners manual on Digital Sound in the Digital Setup Menu. See ...
Instructions
Page 26
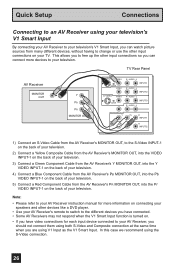
This allows you to free up the other input connections so you are using V1 Input as the V1 Smart Input. L INPUT-2 R - AUDIO - TV Rear Panel AV Receiver MONITOR OUT Y PB PR MONITOR OUT S-VIDEO VIDEO OVER VIDEO S-VIDEO VIDEO OVER R - AUDIO - L CENTER CHANNELINPUT Y Pb Pr ...or use the other input connections on the back of your television. L INPUT-1 R - Note: • Please refer to your AV Receiver instruction manual for more devices to your television. L INPUT-3 R - AUDIO - Quick Setup Connections Connecting to an AV Receiver using your television's V1 Smart ...
This allows you to free up the other input connections so you are using V1 Input as the V1 Smart Input. L INPUT-2 R - AUDIO - TV Rear Panel AV Receiver MONITOR OUT Y PB PR MONITOR OUT S-VIDEO VIDEO OVER VIDEO S-VIDEO VIDEO OVER R - AUDIO - L CENTER CHANNELINPUT Y Pb Pr ...or use the other input connections on the back of your television. L INPUT-1 R - Note: • Please refer to your AV Receiver instruction manual for more devices to your television. L INPUT-3 R - AUDIO - Quick Setup Connections Connecting to an AV Receiver using your television's V1 Smart ...
Instructions
Page 27
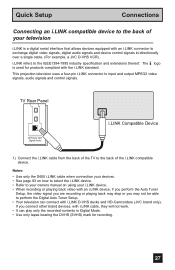
... when connection your devices. • See page 83 on how to select the i.LINK device. • Refer to your owners manual on using your television i.LINK is used for recording. 27 i.LINK refers to input and output MPEG2 video signals, audio signals and...a single cable. (For example, a JVC D-VHS VCR). The logo is a digital serial interface that allows devices equipped with the i.LINK standard. This projection television uses a four-pin i.LINK connector to the IEEE1394-1995 industry specification and extensions thereof. TV Rear Panel OPTICAL OUT Digital Audio i.LINK Compatible...
... when connection your devices. • See page 83 on how to select the i.LINK device. • Refer to your owners manual on using your television i.LINK is used for recording. 27 i.LINK refers to input and output MPEG2 video signals, audio signals and...a single cable. (For example, a JVC D-VHS VCR). The logo is a digital serial interface that allows devices equipped with the i.LINK standard. This projection television uses a four-pin i.LINK connector to the IEEE1394-1995 industry specification and extensions thereof. TV Rear Panel OPTICAL OUT Digital Audio i.LINK Compatible...
Instructions
Page 28
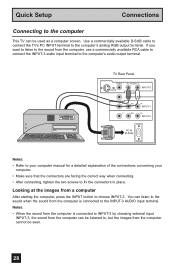
... but the images from the computer is connected to the computer's analog RGB output terminal. AUDIO - TV Rear Panel VIDEO OVER R - Use a commercially available D-SUB cable to connect the TV's PC INPUT terminal to the INPUT-3 AUDIO input terminal. L INPUT-3 R - You can listen ...a computer screen. Quick Setup Connections Connecting to the computer This TV can be seen. 28 L CENTER CHANNELINPUT Y Pb Pr INPUT-1 Y Pb Pr INPUT-2 PC IN (D-SUB) Notes: • Refer to your computer manual for a detailed explanation of the connections concerning your computer. •...
... but the images from the computer is connected to the computer's analog RGB output terminal. AUDIO - TV Rear Panel VIDEO OVER R - Use a commercially available D-SUB cable to connect the TV's PC INPUT terminal to the INPUT-3 AUDIO input terminal. L INPUT-3 R - You can listen ...a computer screen. Quick Setup Connections Connecting to the computer This TV can be seen. 28 L CENTER CHANNELINPUT Y Pb Pr INPUT-1 Y Pb Pr INPUT-2 PC IN (D-SUB) Notes: • Refer to your computer manual for a detailed explanation of the connections concerning your computer. •...

Instructions
Page 29
...Computers that is a registered trademark of Apple Computer, Inc. Check the computer's refresh rate and set the refresh rate to the computer's instruction manual. *Apple Macintosh is invalid, "Invalid Signal" will appear on the quality, some problems can not be used with the above formats are ...supported. • Even with this TV. Refer to 60 Hz, can be solved by changing the settings. Quick Setup Connections Table of signals for each type of computer Resolution 640 x 480...
...Computers that is a registered trademark of Apple Computer, Inc. Check the computer's refresh rate and set the refresh rate to the computer's instruction manual. *Apple Macintosh is invalid, "Invalid Signal" will appear on the quality, some problems can not be used with the above formats are ...supported. • Even with this TV. Refer to 60 Hz, can be solved by changing the settings. Quick Setup Connections Table of signals for each type of computer Resolution 640 x 480...

Instructions
Page 30
..., Français or Español) To NEXT (To set your onscreen menus in menu, it will work properly. You can choose "AUTO" or "MANUAL" for setting the clock. • The auto tuner setup of which channels you turn your timer functions will skip over it. Notes: • The interactive...çais) or Spanish (Español). We recommend you complete the interactive plug-in menu helps you to the LANGUAGE settings. Language After the "JVC INTERACTIVE PLUG IN MENU" has been displayed, the TV automatically switches to get your television. The plug-in items before .
..., Français or Español) To NEXT (To set your onscreen menus in menu, it will work properly. You can choose "AUTO" or "MANUAL" for setting the clock. • The auto tuner setup of which channels you turn your timer functions will skip over it. Notes: • The interactive...çais) or Spanish (Español). We recommend you complete the interactive plug-in menu helps you to the LANGUAGE settings. Language After the "JVC INTERACTIVE PLUG IN MENU" has been displayed, the TV automatically switches to get your television. The plug-in items before .

Instructions
Page 31
...the first Sunday in October. • You will have to AUTO, the Daylight Savings Time feature automatically adjusts your clock using the XDS signal), choose MANUAL. ON or OFF To NEXT (To Auto Tuner Setup) NEXT SELECT OPERATE MENU EXIT Notes: • D.S.T. The clock will have this in your ..., Alaska or Hawaii) To DATE/YEAR To set the month To day To set the day To year To set your TV's clock for Daylight Savings. START CLOCK SELECT OPERATE MANUAL -- : -- -ATLANTIC JAN/01/05 ON MENU EXIT √® † √® † √® † √® † &#...
...the first Sunday in October. • You will have to AUTO, the Daylight Savings Time feature automatically adjusts your clock using the XDS signal), choose MANUAL. ON or OFF To NEXT (To Auto Tuner Setup) NEXT SELECT OPERATE MENU EXIT Notes: • D.S.T. The clock will have this in your ..., Alaska or Hawaii) To DATE/YEAR To set the month To day To set the day To year To set your TV's clock for Daylight Savings. START CLOCK SELECT OPERATE MANUAL -- : -- -ATLANTIC JAN/01/05 ON MENU EXIT √® † √® † √® † √® † &#...
Instructions
Page 50
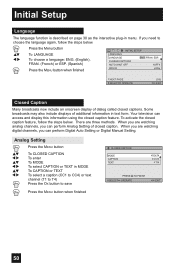
... EXIT Closed Caption Many broadcasts now include an onscreen display of additional information in text form. Your television can perform Digital Auto Setting or Digital Manual Setting. There are watching analog channels, you can perform Analog Setting of closed captions. Analog Setting Press the MENU button π† √® π...
... EXIT Closed Caption Many broadcasts now include an onscreen display of additional information in text form. Your television can perform Digital Auto Setting or Digital Manual Setting. There are watching analog channels, you can perform Analog Setting of closed captions. Analog Setting Press the MENU button π† √® π...
Instructions
Page 52
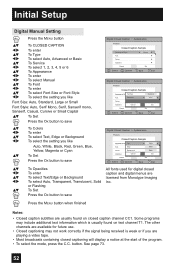
...button to save Digital Closed Caption > Appearance Preview Closed Caption Sample Appearance Mode Font Colors Opacities Cancel Select Operate Manual Set BACK Back MENU Exit Digital Closed Caption > Appearance Preview Closed Caption Sample Appearance ModeFont Size ManualStandard Font Font...Magenta or Cyan To Set Press the OK button to save Digital Closed Caption > Appearance Preview Closed Caption Sample Appearance ModeText Manual White Font Edge White Colors Background Black Opacities Cancel Set Cancel Set Select BACK Operate Back MENU Exit π† &#...
...button to save Digital Closed Caption > Appearance Preview Closed Caption Sample Appearance Mode Font Colors Opacities Cancel Select Operate Manual Set BACK Back MENU Exit Digital Closed Caption > Appearance Preview Closed Caption Sample Appearance ModeFont Size ManualStandard Font Font...Magenta or Cyan To Set Press the OK button to save Digital Closed Caption > Appearance Preview Closed Caption Sample Appearance ModeText Manual White Font Edge White Colors Background Black Opacities Cancel Set Cancel Set Select BACK Operate Back MENU Exit π† &#...

Instructions
Page 58
... the MENU button INITIAL SETUP π† √® To DIGITAL-IN AUDIO To select ANALOG, DIGITAL or AUTO PREVIOUS VIDEO-1 MONITOR OUT TV SPEAKER OFF ON Press the Menu button when finished AUDIO OUT DIGITAL-IN VARI AUTO Notes: DIGITAL-IN AUDIO CENTER CH INPUT DIGITAL OFF...-IN terminal. This option adjusts the position when an HDMI or DVI 480p picture signal is being input to your DTV or HDMI component's instruction manual for HDMI. Digital-In Audio This feature is used if you select AUTO, the television will select "SIZE1" or "SIZE2" automatically. Initial Setup...
... the MENU button INITIAL SETUP π† √® To DIGITAL-IN AUDIO To select ANALOG, DIGITAL or AUTO PREVIOUS VIDEO-1 MONITOR OUT TV SPEAKER OFF ON Press the Menu button when finished AUDIO OUT DIGITAL-IN VARI AUTO Notes: DIGITAL-IN AUDIO CENTER CH INPUT DIGITAL OFF...-IN terminal. This option adjusts the position when an HDMI or DVI 480p picture signal is being input to your DTV or HDMI component's instruction manual for HDMI. Digital-In Audio This feature is used if you select AUTO, the television will select "SIZE1" or "SIZE2" automatically. Initial Setup...
Instructions
Page 64
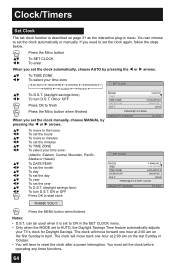
... MANUAL by pressing the √ or ® arrows. π† √® π† √® To TIME ZONE To select your TV's clock for Daylight Savings. ATLANTIC JAN/01/05 ON PRESS OK TO FINISH SELECT OPERATE MENU EXIT π† √® π† √&#... set the clock automatically, choose AUTO by pressing the √ or ® arrows. ON or OFF Press OK to start clock SET CLOCK MODE TIME MANUAL -- : -- -- AUTO -- : -- -- ATLANTIC JAN/01/05 ON PRESS OK TO START CLOCK SELECT OPERATE MENU EXIT THANK YOU !! Clock/Timers Set Clock The ...
... MANUAL by pressing the √ or ® arrows. π† √® π† √® To TIME ZONE To select your TV's clock for Daylight Savings. ATLANTIC JAN/01/05 ON PRESS OK TO FINISH SELECT OPERATE MENU EXIT π† √® π† √&#... set the clock automatically, choose AUTO by pressing the √ or ® arrows. ON or OFF Press OK to start clock SET CLOCK MODE TIME MANUAL -- : -- -- AUTO -- : -- -- ATLANTIC JAN/01/05 ON PRESS OK TO START CLOCK SELECT OPERATE MENU EXIT THANK YOU !! Clock/Timers Set Clock The ...
Instructions
Page 80
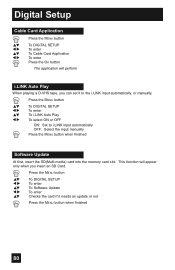
...;† √® To DIGITAL SETUP To enter To i.LINK Auto Play To select ON or OFF ON: Set to the i.LINK input automatically, or manually. This function will perform i.LINK Auto Play When playing a D-VHS tape, you insert an SD Card. Press the MENU button π† √® ...960;† To DIGITAL SETUP To enter To Software Update To enter Checks the card if it to i.LINK input automatically OFF: Select the input manually Press the MENU button when finished Software Update At first, insert the SD(Multi-media) card into the memory card slot. Digital Setup Cable Card...
...;† √® To DIGITAL SETUP To enter To i.LINK Auto Play To select ON or OFF ON: Set to the i.LINK input automatically, or manually. This function will perform i.LINK Auto Play When playing a D-VHS tape, you insert an SD Card. Press the MENU button π† √® ...960;† To DIGITAL SETUP To enter To Software Update To enter Checks the card if it to i.LINK input automatically OFF: Select the input manually Press the MENU button when finished Software Update At first, insert the SD(Multi-media) card into the memory card slot. Digital Setup Cable Card...

Instructions
Page 99
... call 1-800-252-5722, or go to www.jvc.com. PRESS OK, IF YOU DO NOT WANT TO SEE THIS MESSAGE AGAIN. Appendix Replacement Lamp Kit Before replacing the lamp, you will appear every time you turn the TV on, you turn on the TV when the lamp needs to be disposed of... with normal trash. The replacement kit will include the following: 1 High-Pressure Mercury Lamp 1 Instruction Manual Because the lamp contains a small amount of mercury, it cannot be...
... call 1-800-252-5722, or go to www.jvc.com. PRESS OK, IF YOU DO NOT WANT TO SEE THIS MESSAGE AGAIN. Appendix Replacement Lamp Kit Before replacing the lamp, you will appear every time you turn the TV on, you turn on the TV when the lamp needs to be disposed of... with normal trash. The replacement kit will include the following: 1 High-Pressure Mercury Lamp 1 Instruction Manual Because the lamp contains a small amount of mercury, it cannot be...


