Instructions
Page 8
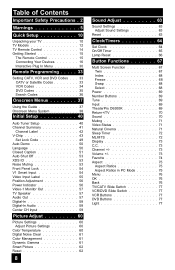
... Sound Settings 63 Adjust Sound Settings 63 Reset 63 Clock/Timers 64 Set Clock 64 On/Off Timer 65 Lamp Reset 66 Button Functions 67 Multi Screen Function 67 Twin 67 Index 68 Freeze 68 Swap 68 Select 68 Power 69 Number Buttons 69 Tune 69 Input 69 TheaterPro D6500K 69 Return+/TV... 70 Sound 70 Muting 71 Video Status 71 Natural Cinema 71 Sleep Timer 72 ML/MTS 72 Display 73 C.C 73 Channel 73 Volume 73 Favorite 74...
... Sound Settings 63 Adjust Sound Settings 63 Reset 63 Clock/Timers 64 Set Clock 64 On/Off Timer 65 Lamp Reset 66 Button Functions 67 Multi Screen Function 67 Twin 67 Index 68 Freeze 68 Swap 68 Select 68 Power 69 Number Buttons 69 Tune 69 Input 69 TheaterPro D6500K 69 Return+/TV... 70 Sound 70 Muting 71 Video Status 71 Natural Cinema 71 Sleep Timer 72 ML/MTS 72 Display 73 C.C 73 Channel 73 Volume 73 Favorite 74...
Instructions
Page 9
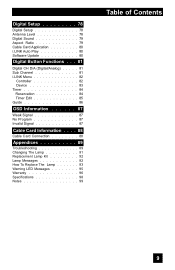
Digital Setup 78 Digital Setup 78 Antenna Level 78 Digital Sound 79 Aspect Ratio 79 Cable Card Application 80 i.LINK Auto Play 80 Software Update 80 Digital Button Functions . . . 81 Digital CH D/A (Digital/Analog) . . . . . 81 Sub ...
Digital Setup 78 Digital Setup 78 Antenna Level 78 Digital Sound 79 Aspect Ratio 79 Cable Card Application 80 i.LINK Auto Play 80 Software Update 80 Digital Button Functions . . . 81 Digital CH D/A (Digital/Analog) . . . . . 81 Sub ...
Instructions
Page 10
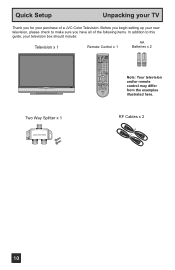
...please check to make sure you for your purchase of the following items. In addition to this guide, your TV Thank you have all of a JVC Color Television. NATURAL SOUND CINEMA 9 RETURN+ TV SUB CHANNEL SUB LIGHT MUTING CH GUIDE VOL OK VOL Note: Your television CH MENU BACK and/or remote... VCR CHANNEL VCR DVD PREV NEXT POWER TV VCR REW PLAY FF control may differ LAMP/PROGRAM POWER REC ...
...please check to make sure you for your purchase of the following items. In addition to this guide, your TV Thank you have all of a JVC Color Television. NATURAL SOUND CINEMA 9 RETURN+ TV SUB CHANNEL SUB LIGHT MUTING CH GUIDE VOL OK VOL Note: Your television CH MENU BACK and/or remote... VCR CHANNEL VCR DVD PREV NEXT POWER TV VCR REW PLAY FF control may differ LAMP/PROGRAM POWER REC ...

Instructions
Page 14
NATURAL SOUND CINEMA 9 RETURN+ TV SUB CHANNEL SUB LIGHT MUTING CH GUIDE VOL OK VOL CH MENU VCR CHANNEL PREV NEXT BACK VCR DVD POWER TV VCR REW PLAY FF REC STOP PAUSE OPEN CLOSE STILL PAUSE RM-C14G RM-C14G MODELS: HD-52G886 HD-52G786 HD-56G886 HD-56G786 •..., see pages 67 - 77 and 81 - 86. • i.LINK MENU, TIMER, SUB CHANNEL, FAVORITE and GUIDE buttons are for digital channels. Quick Setup TV Remote Control TV CATV VCR DVD POWER ASPECT MULTI SCREEN TWIN INDEX SELECT SLEEP FREEZE SWAP ML/MTS DISPLAY + INPUT 123 D/A 4 5 6 i.LINK MENU 78 TIMER TUNE THEATER...
NATURAL SOUND CINEMA 9 RETURN+ TV SUB CHANNEL SUB LIGHT MUTING CH GUIDE VOL OK VOL CH MENU VCR CHANNEL PREV NEXT BACK VCR DVD POWER TV VCR REW PLAY FF REC STOP PAUSE OPEN CLOSE STILL PAUSE RM-C14G RM-C14G MODELS: HD-52G886 HD-52G786 HD-56G886 HD-56G786 •..., see pages 67 - 77 and 81 - 86. • i.LINK MENU, TIMER, SUB CHANNEL, FAVORITE and GUIDE buttons are for digital channels. Quick Setup TV Remote Control TV CATV VCR DVD POWER ASPECT MULTI SCREEN TWIN INDEX SELECT SLEEP FREEZE SWAP ML/MTS DISPLAY + INPUT 123 D/A 4 5 6 i.LINK MENU 78 TIMER TUNE THEATER...
Instructions
Page 21
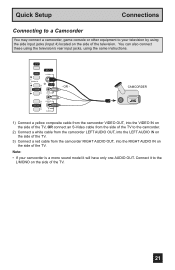
You can also connect these using the television's rear input jacks, using the side input jacks (Input 4) located on the side of the television. OR - INPUT MENU INPUT 4 S-VIDEO OPERATE + CHANNEL - Note: • If ... may connect a camcorder, game console or other equipment to your camcorder is a mono sound model it to the camcorder. 2) Connect a white cable from the camcorder LEFT AUDIO OUT, into the LEFT AUDIO IN on the side of the TV. 3) Connect a red cable from the camcorder RIGHT AUDIO OUT, into the RIGHT AUDIO...
You can also connect these using the television's rear input jacks, using the side input jacks (Input 4) located on the side of the television. OR - INPUT MENU INPUT 4 S-VIDEO OPERATE + CHANNEL - Note: • If ... may connect a camcorder, game console or other equipment to your camcorder is a mono sound model it to the camcorder. 2) Connect a white cable from the camcorder LEFT AUDIO OUT, into the LEFT AUDIO IN on the side of the TV. 3) Connect a red cable from the camcorder RIGHT AUDIO OUT, into the RIGHT AUDIO...
Instructions
Page 22
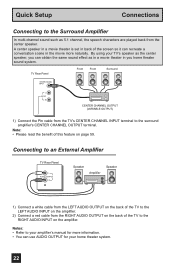
...recreate a conversation scene in you home theater sound system. By using your amplifier's manual for your home theater system. 22 A center speaker in a movie theater is set in back of the TV to the RIGHT AUDIO INPUT on page 59. TV Rear Panel Front Front Surround CENTER CHANNEL INPUT L... AUDIO R CENTER CHANNEL OUTPUT (VARIABLE OUTPUT) 1) Connect the Pin cable from the TV's CENTER CHANNEL INPUT terminal to your TV's speaker as the center speaker, you can obtain the same sound effect as 5.1 channel, ...
...recreate a conversation scene in you home theater sound system. By using your amplifier's manual for your home theater system. 22 A center speaker in a movie theater is set in back of the TV to the RIGHT AUDIO INPUT on page 59. TV Rear Panel Front Front Surround CENTER CHANNEL INPUT L... AUDIO R CENTER CHANNEL OUTPUT (VARIABLE OUTPUT) 1) Connect the Pin cable from the TV's CENTER CHANNEL INPUT terminal to your TV's speaker as the center speaker, you can obtain the same sound effect as 5.1 channel, ...
Instructions
Page 23
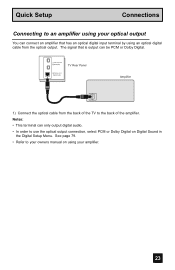
... that is output can only output digital audio. • In order to use the optical output connection, select PCM or Dolby Digital on Digital Sound in the Digital Setup Menu. The signal that has an optical digital input terminal by using an optical digital cable from the back of the... TV to the back of the amplifier. Notes: • This terminal can be PCM or Dolby Digital. i.LINK IN/OUT S400(TS) TV Rear Panel OPTICAL OUT Digital Audio Amplifier 1) Connect the optical cable from the optical output...
... that is output can only output digital audio. • In order to use the optical output connection, select PCM or Dolby Digital on Digital Sound in the Digital Setup Menu. The signal that has an optical digital input terminal by using an optical digital cable from the back of the... TV to the back of the amplifier. Notes: • This terminal can be PCM or Dolby Digital. i.LINK IN/OUT S400(TS) TV Rear Panel OPTICAL OUT Digital Audio Amplifier 1) Connect the optical cable from the optical output...
Instructions
Page 28
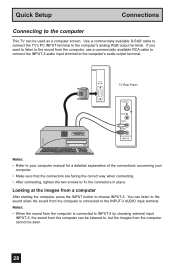
...connected to fix the connectors in place. Use a commercially available D-SUB cable to connect the TV's PC INPUT terminal to , but the images from the computer can listen to the sound when the sound from a computer After starting the computer, press the INPUT button to choose INPUT-3. You can... be seen. 28 PC IN (D-SUB) TV Rear Panel S-VIDEO OVER VIDEO L I AUDIO I R INPUT-3 Notes: • Refer ...
...connected to fix the connectors in place. Use a commercially available D-SUB cable to connect the TV's PC INPUT terminal to , but the images from the computer can listen to the sound when the sound from a computer After starting the computer, press the INPUT button to choose INPUT-3. You can... be seen. 28 PC IN (D-SUB) TV Rear Panel S-VIDEO OVER VIDEO L I AUDIO I R INPUT-3 Notes: • Refer ...
Instructions
Page 39
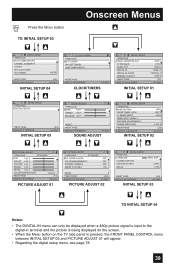
... TIMERS PREVIOUS SET CLOCK ON / OFF TIMER LAMP TIMER RESET NEXT PAGE SELECT OPERATE MENU EXIT CLOCK/TIMERS INITIAL SETUP PREVIOUS VIDEO-1MONITOR OUT TV SPEAKER AUDIO OUT DIGITAL-IN DIGITAL-IN AUDIO CENTER CH INPUT NEXT PAGE SELECT OPERATE OFF ON VARI SIZE1 DIGITAL OFF (1/5) MENU EXIT INITIAL... SETUP 01 INITIAL SETUP PREVIOUS DIGITAL SETUP SOUND ADJUST PREVIOUS BASS 00 TREBLE 00 BALANCE 00 NEXT PAGE SELECT OPERATE (5/5) MENU EXIT INITIAL SETUP 05 RESET NEXT PAGE SELECT OPERATE MENU ...
... TIMERS PREVIOUS SET CLOCK ON / OFF TIMER LAMP TIMER RESET NEXT PAGE SELECT OPERATE MENU EXIT CLOCK/TIMERS INITIAL SETUP PREVIOUS VIDEO-1MONITOR OUT TV SPEAKER AUDIO OUT DIGITAL-IN DIGITAL-IN AUDIO CENTER CH INPUT NEXT PAGE SELECT OPERATE OFF ON VARI SIZE1 DIGITAL OFF (1/5) MENU EXIT INITIAL... SETUP 01 INITIAL SETUP PREVIOUS DIGITAL SETUP SOUND ADJUST PREVIOUS BASS 00 TREBLE 00 BALANCE 00 NEXT PAGE SELECT OPERATE (5/5) MENU EXIT INITIAL SETUP 05 RESET NEXT PAGE SELECT OPERATE MENU ...
Instructions
Page 57
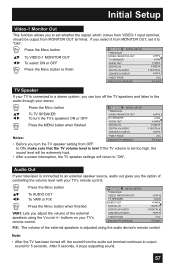
...from the audio out terminal continues to output sound for 5 seconds. Note: • After the TV has been turned off the TV speakers and listen to the audio through your stereo. π† √® Press the MENU button To TV SPEAKER To turn the TV's speakers ON or OFF Press the MENU...: NEXT PAGE SELECT OPERATE (1/5) MENU EXIT • Before you turn off , the sound from MONITOR OUT, set it to "ON". If you select it stops outputting sound. 57 INITIAL SETUP PREVIOUS VIDEO-1MONITOR OUT TV SPEAKER AUDIO OUT DIGITAL-IN DIGITAL-IN AUDIO CENTER CH INPUT NEXT PAGE SELECT OPERATE...
...from the audio out terminal continues to output sound for 5 seconds. Note: • After the TV has been turned off the TV speakers and listen to the audio through your stereo. π† √® Press the MENU button To TV SPEAKER To turn the TV's speakers ON or OFF Press the MENU...: NEXT PAGE SELECT OPERATE (1/5) MENU EXIT • Before you turn off , the sound from MONITOR OUT, set it to "ON". If you select it stops outputting sound. 57 INITIAL SETUP PREVIOUS VIDEO-1MONITOR OUT TV SPEAKER AUDIO OUT DIGITAL-IN DIGITAL-IN AUDIO CENTER CH INPUT NEXT PAGE SELECT OPERATE...

Instructions
Page 58
.... Press the MENU button INITIAL SETUP π† √® To DIGITAL-IN AUDIO To select ANALOG, DIGITAL or AUTO PREVIOUS VIDEO-1MONITOR OUT TV SPEAKER OFF ON Press the Menu button when finished AUDIO OUT DIGITAL-IN VARI SIZE1 Notes: DIGITAL-IN AUDIO CENTER CH INPUT DIGITAL OFF...Notes: • The DIGITAL-IN menu can only be displayed in the Digital Setup menu. Digital-In Audio This feature is being displayed on Digital Sound in the INITIAL SETUP menu when an HDMI480p picture signal is being displayed on the screen. • You can select AUTO only when the signal...
.... Press the MENU button INITIAL SETUP π† √® To DIGITAL-IN AUDIO To select ANALOG, DIGITAL or AUTO PREVIOUS VIDEO-1MONITOR OUT TV SPEAKER OFF ON Press the Menu button when finished AUDIO OUT DIGITAL-IN VARI SIZE1 Notes: DIGITAL-IN AUDIO CENTER CH INPUT DIGITAL OFF...Notes: • The DIGITAL-IN menu can only be displayed in the Digital Setup menu. Digital-In Audio This feature is being displayed on Digital Sound in the INITIAL SETUP menu when an HDMI480p picture signal is being displayed on the screen. • You can select AUTO only when the signal...

Instructions
Page 59
... switching CENTER CHANNEL mode ON and OFF in TV menu. 59 Please remember that we recommend using... Input When you are two different volume adjustment levels, one for regular TV and one for TV used as the center speaker of your surround system. Set CENTER CH ...CHANNEL. The volume differs when the TV is being utilized as the Center Channel Input versus when it is no video signal present, the TV will be muted. • There ... or OFF Press the MENU button when finished INITIAL SETUP PREVIOUS VIDEO-1MONITOR OUT TV SPEAKER AUDIO OUT DIGITAL-IN DIGITAL-IN AUDIO CENTER CH INPUT NEXT PAGE SELECT ...
... switching CENTER CHANNEL mode ON and OFF in TV menu. 59 Please remember that we recommend using... Input When you are two different volume adjustment levels, one for regular TV and one for TV used as the center speaker of your surround system. Set CENTER CH ...CHANNEL. The volume differs when the TV is being utilized as the Center Channel Input versus when it is no video signal present, the TV will be muted. • There ... or OFF Press the MENU button when finished INITIAL SETUP PREVIOUS VIDEO-1MONITOR OUT TV SPEAKER AUDIO OUT DIGITAL-IN DIGITAL-IN AUDIO CENTER CH INPUT NEXT PAGE SELECT ...

Instructions
Page 63
...; Press the MENU button To BASS, TREBLE or BALANCE To adjust the setting To move to use reset. 63 See page 62 on your TV's audio. Sound Adjust Sound Settings These settings allow you select reset. You can adjust BALANCE only when A.H.S.+ is off. Use treble to change and adjust the... (BASS, TREBLE and BALANCE) you set at once to the default settings. Adjust the level of sound between the TV's left and right speakers with the bass adjustment. Reset Reset resets all Sound Adjustments (Bass, Treble and Balance) at once as the default setting when you to adjust the level of low...
...; Press the MENU button To BASS, TREBLE or BALANCE To adjust the setting To move to use reset. 63 See page 62 on your TV's audio. Sound Adjust Sound Settings These settings allow you select reset. You can adjust BALANCE only when A.H.S.+ is off. Use treble to change and adjust the... (BASS, TREBLE and BALANCE) you set at once to the default settings. Adjust the level of sound between the TV's left and right speakers with the bass adjustment. Reset Reset resets all Sound Adjustments (Bass, Treble and Balance) at once as the default setting when you to adjust the level of low...
Instructions
Page 67
...the picture from the component terminal and DIGITAL-IN terminal will not be used. • When you press the OK button, select normal screen. The sound will continue to normal television viewing, press TWIN again or press the BACK button. 07 V-1 MAIN SCREEN PICTURE SPLIT SCREEN PICTURE Notes: • If ... NORMAL or INDEX mode. • Split-screen functions will not work in Twin mode. • When the cable card is inserted into the TV, the combination of analog broadcasting and digital broadcasting will not appear in Twin mode, it is PC output, Main and Split screen will not be...
...the picture from the component terminal and DIGITAL-IN terminal will not be used. • When you press the OK button, select normal screen. The sound will continue to normal television viewing, press TWIN again or press the BACK button. 07 V-1 MAIN SCREEN PICTURE SPLIT SCREEN PICTURE Notes: • If ... NORMAL or INDEX mode. • Split-screen functions will not work in Twin mode. • When the cable card is inserted into the TV, the combination of analog broadcasting and digital broadcasting will not appear in Twin mode, it is PC output, Main and Split screen will not be...

Instructions
Page 70
... effect, depending on or off. Returns to the TV mode. buttons. SMART SOUND - Decreases high sound levels, giving a regulated sound level. π† √® Press the SOUND button To select A.H.S.+, BBE or SMART SOUND To choose the setting Press the MENU when finished SOUND EFFECT A.H.S.+ BBE SMART SOUND MOVIE MUSIC OFF ON OFF ON OFF SELECT OPERATE...
... effect, depending on or off. Returns to the TV mode. buttons. SMART SOUND - Decreases high sound levels, giving a regulated sound level. π† √® Press the SOUND button To select A.H.S.+, BBE or SMART SOUND To choose the setting Press the MENU when finished SOUND EFFECT A.H.S.+ BBE SMART SOUND MOVIE MUSIC OFF ON OFF ON OFF SELECT OPERATE...

Instructions
Page 72
... to hear an alternative soundtrack, if one is available. • MTS unavailable if your television's Input source is in mono sound only. • Choose the mono setting to hear with a TV program. Press the SLEEP button 0 15 30 45 60 75 90 105 120 135 150 165 180 Sleep Timer Message 20...;† buttons. 72 Press the ML/MTS button By every press of up to get the best sound quality. Button Functions Sleep Timer The Sleep Timer can turn the TV off for another 15 minutes. The sound will work when you can change the language by pressing the ML/MTS button. • Keep...
... to hear an alternative soundtrack, if one is available. • MTS unavailable if your television's Input source is in mono sound only. • Choose the mono setting to hear with a TV program. Press the SLEEP button 0 15 30 45 60 75 90 105 120 135 150 165 180 Sleep Timer Message 20...;† buttons. 72 Press the ML/MTS button By every press of up to get the best sound quality. Button Functions Sleep Timer The Sleep Timer can turn the TV off for another 15 minutes. The sound will work when you can change the language by pressing the ML/MTS button. • Keep...
Instructions
Page 76
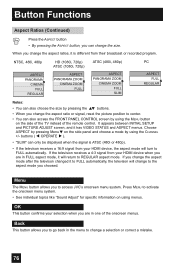
... to REGULAR aspect mode. Back This button allows you to go back in the menu to access JVC's onscreen menu system. NTSC, 480i, 480p ASPECT PANORAMA CINEMA FULL REGULAR HD (1080i, 720p) ATSC... ratios, it will turn to activate the onscreen menu system. • See individual topics like "Sound Adjust" for specific information on using the CHANNEL +/- If the television receives a 4:3 signal from your...access the FRONT PANEL CONTROL screen by using the MENU button on the side of the TV instead of the onscreen menus. Press MENU to FULL automatically. When you change the aspect ...
... to REGULAR aspect mode. Back This button allows you to go back in the menu to access JVC's onscreen menu system. NTSC, 480i, 480p ASPECT PANORAMA CINEMA FULL REGULAR HD (1080i, 720p) ATSC... ratios, it will turn to activate the onscreen menu system. • See individual topics like "Sound Adjust" for specific information on using the CHANNEL +/- If the television receives a 4:3 signal from your...access the FRONT PANEL CONTROL screen by using the MENU button on the side of the TV instead of the onscreen menus. Press MENU to FULL automatically. When you change the aspect ...

Instructions
Page 78
... not appear. 78 Press the MENU button Digital Setup π† √® To DIGITAL SETUP To enter The onscreen will appear Antenna Level Digital Sound Aspect Ratio Cable Card Application PCM 4:3 Notes: i.LINK Auto Play OFF Software Update • Software Update will only appear when the SD Card is inserted...
... not appear. 78 Press the MENU button Digital Setup π† √® To DIGITAL SETUP To enter The onscreen will appear Antenna Level Digital Sound Aspect Ratio Cable Card Application PCM 4:3 Notes: i.LINK Auto Play OFF Software Update • Software Update will only appear when the SD Card is inserted...
Instructions
Page 79
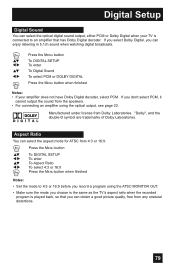
...;® π† √® Press the MENU button To DIGITAL SETUP To enter To Digital Sound To select PCM or DOLBY DIGITAL Press the MENU button when finished Notes: • If your TV is connected to 4:3 or 16:9 before you record a program using the ATSC MONITOR OUT. •... has Dolby Digital decoder. Manufactured under license from 4:3 or 16:9. If you select Dolby Digital, you don't select PCM, it cannot output the sound from any unatural distortions. 79 Press the MENU button π† √® π† √® To DIGITAL SETUP To enter To...
...;® π† √® Press the MENU button To DIGITAL SETUP To enter To Digital Sound To select PCM or DOLBY DIGITAL Press the MENU button when finished Notes: • If your TV is connected to 4:3 or 16:9 before you record a program using the ATSC MONITOR OUT. •... has Dolby Digital decoder. Manufactured under license from 4:3 or 16:9. If you select Dolby Digital, you don't select PCM, it cannot output the sound from any unatural distortions. 79 Press the MENU button π† √® π† √® To DIGITAL SETUP To enter To...
Instructions
Page 89
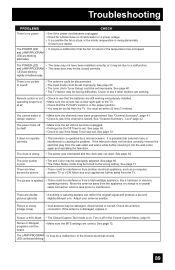
...that external noise or interference is on. Troubleshooting PROBLEMS CHECK There is no picture or sound • The antenna could be disconnected. • The input mode could be set improperly. See page 40. • The TV station may be turned to the wrong setting. The LAMP/PROGRAM • It ...may be set improperly. LED continues blinking 89 See page 72. See page 71. • There could be a malfunction that the TV/CATV switch is locked or the temperature has increased. See page 72. Screen is 80% black • The Closed Caption Text mode is causing the...
...that external noise or interference is on. Troubleshooting PROBLEMS CHECK There is no picture or sound • The antenna could be disconnected. • The input mode could be set improperly. See page 40. • The TV station may be turned to the wrong setting. The LAMP/PROGRAM • It ...may be set improperly. LED continues blinking 89 See page 72. See page 71. • There could be a malfunction that the TV/CATV switch is locked or the temperature has increased. See page 72. Screen is 80% black • The Closed Caption Text mode is causing the...


