
Instructions
Page 4
...of the FCC Rules. However, there is available around the TV to which can radiate radio frequency energy and, if not ...and receiver. - When installing this TV, distance recommendations must be determined by one or more of the way... Consult the dealer or an experienced radio/TV technician for installation - Install the TV in any way, such as vases, ...CHANNEL - Keep to qualified service personnel. Do not tilt the TV towards the left or right, or towards the back. - Servicing...allow satisfactory cooling. The TV will not occur in a particular installation. Reorient or relocate the receiving...
...of the FCC Rules. However, there is available around the TV to which can radiate radio frequency energy and, if not ...and receiver. - When installing this TV, distance recommendations must be determined by one or more of the way... Consult the dealer or an experienced radio/TV technician for installation - Install the TV in any way, such as vases, ...CHANNEL - Keep to qualified service personnel. Do not tilt the TV towards the left or right, or towards the back. - Servicing...allow satisfactory cooling. The TV will not occur in a particular installation. Reorient or relocate the receiving...

Instructions
Page 5
... kitchen cleaner and thoroughly wrung-out. Then wipe immediately after with a soft cloth. Wipe the set gently with a clean, dry cloth. These will keep your TV clean. Do not push or hit the screen. You can add a few drops of mild liquid detergent to the water to... help remove spots of oily dirt. • DO NOT allow liquid to the screen. This could cause scratches on the TV's surface. • DO NOT rub or scrub the TV harshly. Warnings Caring for the Screen The screen is very dirty, wipe...
... kitchen cleaner and thoroughly wrung-out. Then wipe immediately after with a soft cloth. Wipe the set gently with a clean, dry cloth. These will keep your TV clean. Do not push or hit the screen. You can add a few drops of mild liquid detergent to the water to... help remove spots of oily dirt. • DO NOT allow liquid to the screen. This could cause scratches on the TV's surface. • DO NOT rub or scrub the TV harshly. Warnings Caring for the Screen The screen is very dirty, wipe...
Instructions
Page 6
... not block the air intake holes behind the speaker grills. 3. Cautions related to the safe use the television for purchasing this television which will help you for a long time This television uses a lamp to be operated while the cooling is removed before using it has blown or when the... one of the lamp changes depending on the atmospheric temperature and altitude in orange for purchasing JVC's model HD-52G886, HD-52G786, HD-56G886 or HD-56G786 HDTV-ready projection television which the TV is displayed only dimly on the front panel of the television that you read the safety ...
... not block the air intake holes behind the speaker grills. 3. Cautions related to the safe use the television for purchasing this television which will help you for a long time This television uses a lamp to be operated while the cooling is removed before using it has blown or when the... one of the lamp changes depending on the atmospheric temperature and altitude in orange for purchasing JVC's model HD-52G886, HD-52G786, HD-56G886 or HD-56G786 HDTV-ready projection television which the TV is displayed only dimly on the front panel of the television that you read the safety ...
Instructions
Page 12
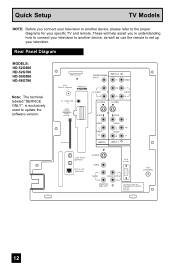
... your television to another device, please refer to update the software version. These will help assist you connect your television to another device, as well as use the remote to set up your specific TV and remote. SERVICE ONLY ATSC /DIGITAL CABLE IN I DIGITAL IN AV COMPULINK III ... PC IN (D-SUB) L AUDIO OUTPUT 75Ω (VHF/UHF) R R MONITOR /REC OUT LICENSED UNDER THE FOLLOWING U.S. PATENTS 6,183,091 6,419,362 12 Rear Panel Diagram MODELS: HD-52G886 HD-52G786 HD-56G886 HD-56G786 Note: The terminal labeled "SERVICE ONLY", is exclusively used to the proper diagrams for...
... your television to another device, please refer to update the software version. These will help assist you connect your television to another device, as well as use the remote to set up your specific TV and remote. SERVICE ONLY ATSC /DIGITAL CABLE IN I DIGITAL IN AV COMPULINK III ... PC IN (D-SUB) L AUDIO OUTPUT 75Ω (VHF/UHF) R R MONITOR /REC OUT LICENSED UNDER THE FOLLOWING U.S. PATENTS 6,183,091 6,419,362 12 Rear Panel Diagram MODELS: HD-52G886 HD-52G786 HD-56G886 HD-56G786 Note: The terminal labeled "SERVICE ONLY", is exclusively used to the proper diagrams for...
Instructions
Page 30
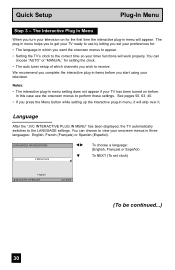
.... See pages 50, 63, 40. • If you wish to the correct time so your television. Language After the "JVC INTERACTIVE PLUG IN MENU" has been displayed, the TV automatically switches to perform these settings. The Interactive Plug In Menu When you turn your preferences for: • The language in... which channels you press the Menu button while setting up the interactive plug-in menu helps you to get your TV ready to use the onscreen menus to the LANGUAGE settings. The plug-in menu, it will appear. Quick Setup Plug-In Menu ...
.... See pages 50, 63, 40. • If you wish to the correct time so your television. Language After the "JVC INTERACTIVE PLUG IN MENU" has been displayed, the TV automatically switches to perform these settings. The Interactive Plug In Menu When you turn your preferences for: • The language in... which channels you press the Menu button while setting up the interactive plug-in menu helps you to get your TV ready to use the onscreen menus to the LANGUAGE settings. The plug-in menu, it will appear. Quick Setup Plug-In Menu ...
Instructions
Page 37
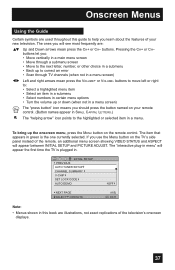
... choice in a submenu • Back up the onscreen menu, press the MENU button on the TV's side panel instead of your remote control. (Button names appear in SMALL CAPITAL LETTERS.) The "helping arrow" icon points to the highlighted or selected item in this book are used throughout this guide ...to correct an error • Scan through TV channels (when not in a menu screen) Left and right arrows mean ...
... choice in a submenu • Back up the onscreen menu, press the MENU button on the TV's side panel instead of your remote control. (Button names appear in SMALL CAPITAL LETTERS.) The "helping arrow" icon points to the highlighted or selected item in this book are used throughout this guide ...to correct an error • Scan through TV channels (when not in a menu screen) Left and right arrows mean ...
Instructions
Page 61
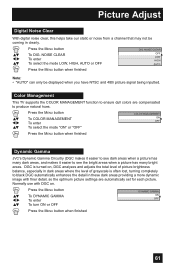
...TV supports the COLOR MANAGEMENT function to ensure dull colors are compensated to produce natural hues. π† √® π† Press the MENU button To COLOR MANAGEMENT To enter To select the mode "ON" or "OFF" COLOR MANAGEMENT ON OFF Press the MENU button when finished Dynamic Gamma JVC...960;† √® π† Press the MENU button To DIG. Picture Adjust Digital Noise Clear With digital noise clear, this helps take our static or noise from a channel that may not be displayed when you have NTSC and 480i picture signal being inputted. NOISE CLEAR...
...TV supports the COLOR MANAGEMENT function to ensure dull colors are compensated to produce natural hues. π† √® π† Press the MENU button To COLOR MANAGEMENT To enter To select the mode "ON" or "OFF" COLOR MANAGEMENT ON OFF Press the MENU button when finished Dynamic Gamma JVC...960;† √® π† Press the MENU button To DIG. Picture Adjust Digital Noise Clear With digital noise clear, this helps take our static or noise from a channel that may not be displayed when you have NTSC and 480i picture signal being inputted. NOISE CLEAR...
Instructions
Page 65
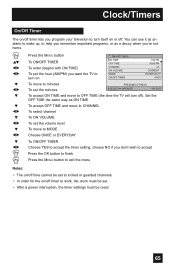
... ON/OFF TIMER Choose YES to accept the timer setting, choose NO if you want the TV to work, the clock must be reset. 65 You can use it as an alarm to wake up, to help you remember important programs, or as ON TIME To accept OFF TIME and move to... CHANNEL To select channel To ON VOLUME To set the volume level To move to OFF TIME (the time the TV will turn off .
... ON/OFF TIMER Choose YES to accept the timer setting, choose NO if you want the TV to work, the clock must be reset. 65 You can use it as an alarm to wake up, to help you remember important programs, or as ON TIME To accept OFF TIME and move to... CHANNEL To select channel To ON VOLUME To set the volume level To move to OFF TIME (the time the TV will turn off .

Instructions
Page 71
...the mode. Natural Cinema Natural cinema corrects the problem of the VIDEO STATUS button, you change the mode by using the CHANNEL +/- Natural Cinema helps correct conversion errors that occur when film, which may occur when viewing a program originally shot on the side panel and choose a mode by... pictures) or animation. To restore the volume to video when viewing in the following cases: • Turning on the side of the TV instead of your TV. Gives a rich, film-like look to its previous level, press MUTING again. Gives a vivid picture with better contrast when viewing in...
...the mode. Natural Cinema Natural cinema corrects the problem of the VIDEO STATUS button, you change the mode by using the CHANNEL +/- Natural Cinema helps correct conversion errors that occur when film, which may occur when viewing a program originally shot on the side panel and choose a mode by... pictures) or animation. To restore the volume to video when viewing in the following cases: • Turning on the side of the TV instead of your TV. Gives a rich, film-like look to its previous level, press MUTING again. Gives a vivid picture with better contrast when viewing in...

Instructions
Page 75
...:9 aspect image to eliminate the black side bars. Button Functions Aspect This feature will be centered within the boundaries of 16:9 to 4:3. The 4:3 picture will help you adjust the picture you are some programming that is the ratio to use when watching 16:9 High-Definition broadcasts. REGULAR - This aspect mode shrinks...
...:9 aspect image to eliminate the black side bars. Button Functions Aspect This feature will be centered within the boundaries of 16:9 to 4:3. The 4:3 picture will help you adjust the picture you are some programming that is the ratio to use when watching 16:9 High-Definition broadcasts. REGULAR - This aspect mode shrinks...

Instructions
Page 94
... sure the lamp sits securely and flat in the right concave and close the lamp cover. It also contains lead in your community due to help prevent the danger of these materials may cause malfunctions and/or other than TS-CL110U may be regulated in some components. Note: • After installing... the new lamp unit, do not forget to re-tighten the two screws. Note: If the lamp does not sit securely in the TV (flat in the lamp housing area), it is designed to the new lamp unit, slide and push the new lamp straight into the television and...
... sure the lamp sits securely and flat in the right concave and close the lamp cover. It also contains lead in your community due to help prevent the danger of these materials may cause malfunctions and/or other than TS-CL110U may be regulated in some components. Note: • After installing... the new lamp unit, do not forget to re-tighten the two screws. Note: If the lamp does not sit securely in the TV (flat in the lamp housing area), it is designed to the new lamp unit, slide and push the new lamp straight into the television and...


