Instructions
Page 6
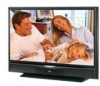
...LED indicator blinks in which will help you to project the picture onto the screen. Warnings Thank you for purchasing JVC's model HD-52G886, HD-52G786, HD-56G886 or HD-56G786 HDTV-ready projection television which are performed. Immediately after the cooling ...process has completed. When the television is pressed to the life of the device and important information which the TV...
...LED indicator blinks in which will help you to project the picture onto the screen. Warnings Thank you for purchasing JVC's model HD-52G886, HD-52G786, HD-56G886 or HD-56G786 HDTV-ready projection television which are performed. Immediately after the cooling ...process has completed. When the television is pressed to the life of the device and important information which the TV...
Instructions
Page 7
... the rear cabinet will violate the copyright of the socket. There is called condensation. Warnings 4. Holding the screen frame could cause it too close to exceed the electrical capacity of the program or software shown on the screen. ILA element characteristics Do not project still pictures or pictures that ... be careful not to wallpaper. When placing the television, make sure not to locate it to detach, causing the television to keep the TV on and off repeatedly in a short amount of water may become dirty. This is operating. The duct will disappear over time. 11...
... the rear cabinet will violate the copyright of the socket. There is called condensation. Warnings 4. Holding the screen frame could cause it too close to exceed the electrical capacity of the program or software shown on the screen. ILA element characteristics Do not project still pictures or pictures that ... be careful not to wallpaper. When placing the television, make sure not to locate it to detach, causing the television to keep the TV on and off repeatedly in a short amount of water may become dirty. This is operating. The duct will disappear over time. 11...
Instructions
Page 8
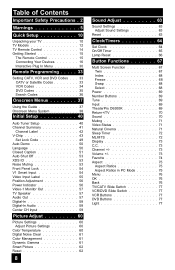
...Label 55 Position Adjustment 56 Power Indicator 56 Video-1 Monitor Out 57 TV Speaker 57 Audio Out 57 Digital-In 58 Digital-In Audio 58 Center CH Input 59 Picture Adjust 60 Picture Settings 60 Adjust Picture Settings 60 Color Temperature 60 Digital Noise Clear 61 Color Management 61 ...Dynamic Gamma 61 Smart Picture 62 Reset 62 8 Sound Adjust 63 Sound Settings 63 Adjust Sound ...
...Label 55 Position Adjustment 56 Power Indicator 56 Video-1 Monitor Out 57 TV Speaker 57 Audio Out 57 Digital-In 58 Digital-In Audio 58 Center CH Input 59 Picture Adjust 60 Picture Settings 60 Adjust Picture Settings 60 Color Temperature 60 Digital Noise Clear 61 Color Management 61 ...Dynamic Gamma 61 Smart Picture 62 Reset 62 8 Sound Adjust 63 Sound Settings 63 Adjust Sound ...
Instructions
Page 24
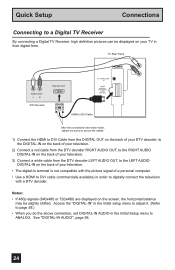
TV Rear Panel AUDIO OUT LR DTV Decoder DIGITAL OUT AV COMPULINK III VIDEO (DIGITAL) _ ... DTV decoder LEFT AUDIO OUT, to the LEFT AUDIO DIGITAL-IN on the back of your TV in order to digitally connect the television with the picture signal of a personal computer. • Use a HDMI to DVI cable (commercially available) in...digital form. See "DIGITAL-IN AUDIO", page 58. 24 Quick Setup Connections Connecting to a Digital TV Receiver By connecting a Digital TV Receiver, high definition pictures can be slightly shifted. Notes: • If 480p signals (640x480 or 720x480) are displayed on...
TV Rear Panel AUDIO OUT LR DTV Decoder DIGITAL OUT AV COMPULINK III VIDEO (DIGITAL) _ ... DTV decoder LEFT AUDIO OUT, to the LEFT AUDIO DIGITAL-IN on the back of your TV in order to digitally connect the television with the picture signal of a personal computer. • Use a HDMI to DVI cable (commercially available) in...digital form. See "DIGITAL-IN AUDIO", page 58. 24 Quick Setup Connections Connecting to a Digital TV Receiver By connecting a Digital TV Receiver, high definition pictures can be slightly shifted. Notes: • If 480p signals (640x480 or 720x480) are displayed on...
Instructions
Page 25
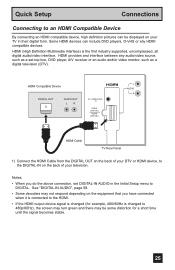
...OUT LR AV COMPULINK III VIDEO (DIGITAL) _ AUDIO (DIGITAL) L AUDIO R HDMI Cable TV Rear Panel 1) Connect the HDMI Cable from the DIGITAL OUT on the back of your DTV ...the screen may turn green and there may not respond depending on the back of your TV in the Initial Setup menu to DIGITAL. Quick Setup Connections Connecting to an HDMI Compatible Device By... connecting an HDMI compatible device, high definition pictures can include DVD players, D-VHS or any audio/video source, such as a set DIGITAL-IN ...
...OUT LR AV COMPULINK III VIDEO (DIGITAL) _ AUDIO (DIGITAL) L AUDIO R HDMI Cable TV Rear Panel 1) Connect the HDMI Cable from the DIGITAL OUT on the back of your DTV ...the screen may turn green and there may not respond depending on the back of your TV in the Initial Setup menu to DIGITAL. Quick Setup Connections Connecting to an HDMI Compatible Device By... connecting an HDMI compatible device, high definition pictures can include DVD players, D-VHS or any audio/video source, such as a set DIGITAL-IN ...
Instructions
Page 26
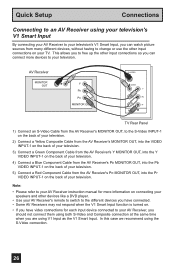
... connected to your AV Receiver, you should not connect them using both S-Video and Composite connection at the same time when you can watch picture sources from the AV Receiver's PR MONITOR OUT, into the Pb VIDEO INPUT-1 on the back of your television. 4) Connect a Blue ... connections for more devices to your television. AV Receiver MONITOR OUT Y PB PR MONITOR OUT S-VIDEO OVER Y VIDEO L Pb I AUDIO I R Pr INPUT-1 TV Rear Panel 1) Connect an S-Video Cable from the AV Receiver's MONITOR OUT, to the S-Video INPUT-1 on the back of your television. 2) Connect a Yellow Composite...
... connected to your AV Receiver, you should not connect them using both S-Video and Composite connection at the same time when you can watch picture sources from the AV Receiver's PR MONITOR OUT, into the Pb VIDEO INPUT-1 on the back of your television. 4) Connect a Blue ... connections for more devices to your television. AV Receiver MONITOR OUT Y PB PR MONITOR OUT S-VIDEO OVER Y VIDEO L Pb I AUDIO I R Pr INPUT-1 TV Rear Panel 1) Connect an S-Video Cable from the AV Receiver's MONITOR OUT, to the S-Video INPUT-1 on the back of your television. 2) Connect a Yellow Composite...
Instructions
Page 29
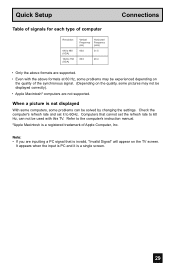
... that cannot set it is invalid, "Invalid Signal" will appear on the quality, some pictures may be experienced depending on the quality of the synchronous signal. (Depending on the TV screen. When a picture is a registered trademark of Apple Computer, Inc. Refer to 60Hz. It appears when the...rate and set the refresh rate to 60 Hz, can be displayed correctly). • Apple Macintosh* computers are supported. • Even with this TV. Quick Setup Connections Table of signals for each type of computer Resolution 640 x 480 (VGA) 1024 x 768 (XGA) Vertical Frequency (Hz) Horizontal...
... that cannot set it is invalid, "Invalid Signal" will appear on the quality, some pictures may be experienced depending on the quality of the synchronous signal. (Depending on the TV screen. When a picture is a registered trademark of Apple Computer, Inc. Refer to 60Hz. It appears when the...rate and set the refresh rate to 60 Hz, can be displayed correctly). • Apple Macintosh* computers are supported. • Even with this TV. Quick Setup Connections Table of signals for each type of computer Resolution 640 x 480 (VGA) 1024 x 768 (XGA) Vertical Frequency (Hz) Horizontal...
Instructions
Page 37
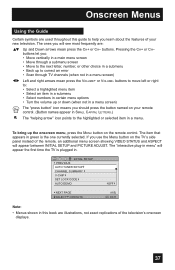
...screen • Move to the next letter, number, or other choice in a submenu • Back up the onscreen menu, press the MENU button on the TV's side panel instead of your new television. Pressing the CH+ or CH- To bring up to the highlighted or selected item in menu" will see... help you will appear the first time the TV is plugged in green is the one currently selected. The ones you learn about the features of the remote, an additional menu screen showing VIDEO STATUS and ASPECT will appear between INITIAL SETUP and PICTURE ADJUST. buttons. The item that appears in . ...
...screen • Move to the next letter, number, or other choice in a submenu • Back up the onscreen menu, press the MENU button on the TV's side panel instead of your new television. Pressing the CH+ or CH- To bring up to the highlighted or selected item in menu" will see... help you will appear the first time the TV is plugged in green is the one currently selected. The ones you learn about the features of the remote, an additional menu screen showing VIDEO STATUS and ASPECT will appear between INITIAL SETUP and PICTURE ADJUST. buttons. The item that appears in . ...
Instructions
Page 39
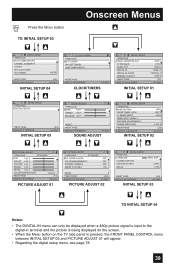
... be displayed when a 480p picture signal is input to the digital-in terminal and the picture is being displayed on the screen. • When the Menu button on the TV side panel is pressed, the... FRONT PANEL CONTROL menu between INITIAL SETUP 05 and PICTURE ADJUST 01 will appear. • Regarding the digital setup...LAMP TIMER RESET NEXT PAGE SELECT OPERATE MENU EXIT CLOCK/TIMERS INITIAL SETUP PREVIOUS VIDEO-1MONITOR OUT TV SPEAKER AUDIO OUT DIGITAL-IN DIGITAL-IN AUDIO CENTER CH INPUT NEXT PAGE SELECT OPERATE OFF ON...
... be displayed when a 480p picture signal is input to the digital-in terminal and the picture is being displayed on the screen. • When the Menu button on the TV side panel is pressed, the... FRONT PANEL CONTROL menu between INITIAL SETUP 05 and PICTURE ADJUST 01 will appear. • Regarding the digital setup...LAMP TIMER RESET NEXT PAGE SELECT OPERATE MENU EXIT CLOCK/TIMERS INITIAL SETUP PREVIOUS VIDEO-1MONITOR OUT TV SPEAKER AUDIO OUT DIGITAL-IN DIGITAL-IN AUDIO CENTER CH INPUT NEXT PAGE SELECT OPERATE OFF ON...
Instructions
Page 56
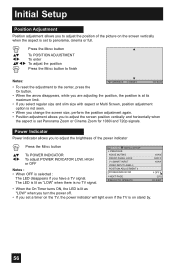
... • When the On Timer turns ON, the LED is lit as "LOW" when there is selected : The LED disappears if you have a TV signal. Power Indicator Power indicator allows you to adjust the screen position vertically and horizontally when the aspect is set to panorama, cinema or full... position adjustment again. • Position adjustment allows you to adjust the brightness of the picture on the screen vertically when the aspect is on the TV, the power indicator will light even if the TV is set Panorama Zoom or Cinema Zoom for 1080i and 720p signals. Initial Setup Position Adjustment...
... • When the On Timer turns ON, the LED is lit as "LOW" when there is selected : The LED disappears if you have a TV signal. Power Indicator Power indicator allows you to adjust the screen position vertically and horizontally when the aspect is set to panorama, cinema or full... position adjustment again. • Position adjustment allows you to adjust the brightness of the picture on the screen vertically when the aspect is on the TV, the power indicator will light even if the TV is set Panorama Zoom or Cinema Zoom for 1080i and 720p signals. Initial Setup Position Adjustment...

Instructions
Page 58
... to your DTV or HDMI component is used if you have a DTV or HDMI compatible component connected to the DIGITAL-IN terminal. If the displayed picture is slightly shifted, the position can be adjusted by selecting either SIZE1 or SIZE2. π† √® π† Press the MENU button...for HDMI. See page 79. 58 There are two types of digital audio and video, choose DIGITAL. If your TV. This option adjusts the position when an HDMI or DVI 480p picture signal is being input to your DTV or HDMI NEXT PAGE SELECT OPERATE (1/5) MENU EXIT component is capable of ...
... to your DTV or HDMI component is used if you have a DTV or HDMI compatible component connected to the DIGITAL-IN terminal. If the displayed picture is slightly shifted, the position can be adjusted by selecting either SIZE1 or SIZE2. π† √® π† Press the MENU button...for HDMI. See page 79. 58 There are two types of digital audio and video, choose DIGITAL. If your TV. This option adjusts the position when an HDMI or DVI 480p picture signal is being input to your DTV or HDMI NEXT PAGE SELECT OPERATE (1/5) MENU EXIT component is capable of ...
Instructions
Page 60
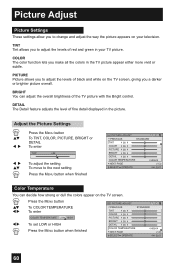
... either more vivid or subtle. COLOR The color function lets you a darker or brighter picture overall. BRIGHT You can decide how strong or dull the colors appear on your TV picture. Picture Adjust Picture Settings These settings allow you to adjust the levels of red and green in your television. TINT ...DETAIL To enter TINT +02 √ ® π† To adjust the setting To move to change and adjust the way the picture appears on the TV screen. π† √® √® Press the MENU button To COLOR TEMPERATURE To enter COLOR TEMPERATURE LOW HIGH To set...
... either more vivid or subtle. COLOR The color function lets you a darker or brighter picture overall. BRIGHT You can decide how strong or dull the colors appear on your TV picture. Picture Adjust Picture Settings These settings allow you to adjust the levels of red and green in your television. TINT ...DETAIL To enter TINT +02 √ ® π† To adjust the setting To move to change and adjust the way the picture appears on the TV screen. π† √® √® Press the MENU button To COLOR TEMPERATURE To enter COLOR TEMPERATURE LOW HIGH To set...
Instructions
Page 61
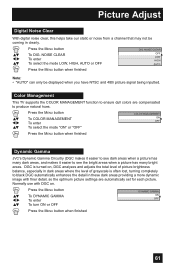
...π† √® π† Press the MENU button To DIG. Color Management This TV supports the COLOR MANAGEMENT function to see the bright areas when a picture has many bright areas. Picture Adjust Digital Noise Clear With digital noise clear, this helps take our static or noise from a channel ... the mode "ON" or "OFF" COLOR MANAGEMENT ON OFF Press the MENU button when finished Dynamic Gamma JVC's Dynamic Gamma Circuitry (DGC makes it easier to see dark areas when a picture has many dark areas, and makes it easier to ensure dull colors are automatically set for each...
...π† √® π† Press the MENU button To DIG. Color Management This TV supports the COLOR MANAGEMENT function to see the bright areas when a picture has many bright areas. Picture Adjust Digital Noise Clear With digital noise clear, this helps take our static or noise from a channel ... the mode "ON" or "OFF" COLOR MANAGEMENT ON OFF Press the MENU button when finished Dynamic Gamma JVC's Dynamic Gamma Circuitry (DGC makes it easier to see dark areas when a picture has many dark areas, and makes it easier to ensure dull colors are automatically set for each...
Instructions
Page 62
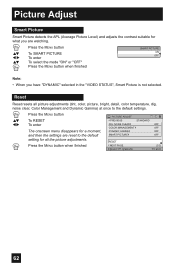
... OFF OFF OFF OFF RESET NEXT PAGE SELECT OPERATE (2/2) MENU EXIT 62 Press the MENU button when finished PICTURE ADJUST PREVIOUS DIG. noise clear, Color Management and Dynamic Gamma) at once to the default settings. π†...the MENU button when finished SMART PICTURE ON OFF Note: • When you have "DYNAMIC" selected in the "VIDEO STATUS", Smart Picture is not selected. Picture Adjust Smart Picture Smart Picture detects the APL (Average Picture Level) and adjusts the contrast suitable for all picture adjustments (tint, color, picture, bright, detail, color temperature,...
... OFF OFF OFF OFF RESET NEXT PAGE SELECT OPERATE (2/2) MENU EXIT 62 Press the MENU button when finished PICTURE ADJUST PREVIOUS DIG. noise clear, Color Management and Dynamic Gamma) at once to the default settings. π†...the MENU button when finished SMART PICTURE ON OFF Note: • When you have "DYNAMIC" selected in the "VIDEO STATUS", Smart Picture is not selected. Picture Adjust Smart Picture Smart Picture detects the APL (Average Picture Level) and adjusts the contrast suitable for all picture adjustments (tint, color, picture, bright, detail, color temperature,...
Instructions
Page 67
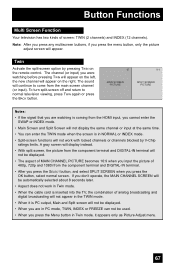
... NORMAL or INDEX mode. • Split-screen functions will not work in Twin mode. • When the cable card is inserted into the TV, the combination of analog broadcasting and digital broadcasting will not appear in Twin mode, it is coming from the HDMI input, you input the... don't operate, the MAIN CHANNEL SCREEN will continue to normal television viewing, press TWIN again or press the BACK button. 07 V-1 MAIN SCREEN PICTURE SPLIT SCREEN PICTURE Notes: • If the signal that you are watching is PC output, Main and Split screen will appear. Note: After you press any ...
... NORMAL or INDEX mode. • Split-screen functions will not work in Twin mode. • When the cable card is inserted into the TV, the combination of analog broadcasting and digital broadcasting will not appear in Twin mode, it is coming from the HDMI input, you input the... don't operate, the MAIN CHANNEL SCREEN will continue to normal television viewing, press TWIN again or press the BACK button. 07 V-1 MAIN SCREEN PICTURE SPLIT SCREEN PICTURE Notes: • If the signal that you are watching is PC output, Main and Split screen will appear. Note: After you press any ...
Instructions
Page 68
... screen to change to the normal display, press the FREEZE button once again. In order to return to the split-screen display with the still picture displayed on the top will be displayed. • You can exchange the channel (or input) displayed in TWIN mode. Note: • When the screen is... look at up to 12 channels at a time so that you press SELECT button, the channel number on the right. When you can select the picture (channel) while viewing TWIN screen. See page 41.
... screen to change to the normal display, press the FREEZE button once again. In order to return to the split-screen display with the still picture displayed on the top will be displayed. • You can exchange the channel (or input) displayed in TWIN mode. Note: • When the screen is... look at up to 12 channels at a time so that you press SELECT button, the channel number on the right. When you can select the picture (channel) while viewing TWIN screen. See page 41.

Instructions
Page 71
...conversion errors that occur when film, which may occur when viewing a program originally shot on the side of the TV instead of the remote control. Gives a vivid picture with better contrast when viewing in a dimly lit room. Note: • You can not be used NATURAL... CINEMA AUTO ON OFF 71 It appears between INITIAL SETUP and PICTURE ADJUST screen, and it . Resets the picture display to zero. Dynamic - Used for when you a choice of four TV picture display settings, including a display of your TV. buttons ( √ OPERATE ® ). To restore the volume...
...conversion errors that occur when film, which may occur when viewing a program originally shot on the side of the TV instead of the remote control. Gives a vivid picture with better contrast when viewing in a dimly lit room. Note: • You can not be used NATURAL... CINEMA AUTO ON OFF 71 It appears between INITIAL SETUP and PICTURE ADJUST screen, and it . Resets the picture display to zero. Dynamic - Used for when you a choice of four TV picture display settings, including a display of your TV. buttons ( √ OPERATE ® ). To restore the volume...

Instructions
Page 75
... are some programming that is already stretched by mistake at broadcasting companies, so this ratio a normal 4:3 aspect picture is stretched to 4:3. The 4:3 picture will fill the screen from top to bottom, while gray bars will appear to fit the dimensions of the 16:9 screen. SLIM - Aspect... Ratios in " on the center part of a 4:3 aspect picture, blowing it . Gray side bars will be centered within the boundaries of the 16:9 aspect screen. 75 PANORAMA ZOOM - This aspect mode stretches the image...
... are some programming that is already stretched by mistake at broadcasting companies, so this ratio a normal 4:3 aspect picture is stretched to 4:3. The 4:3 picture will fill the screen from top to bottom, while gray bars will appear to fit the dimensions of the 16:9 screen. SLIM - Aspect... Ratios in " on the center part of a 4:3 aspect picture, blowing it . Gray side bars will be centered within the boundaries of the 16:9 aspect screen. 75 PANORAMA ZOOM - This aspect mode stretches the image...
Instructions
Page 76
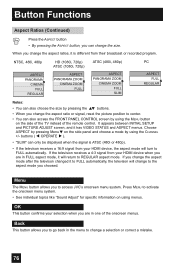
...by pressing the π† buttons. • When you change the aspect ratio or signal, reset the picture position to activate the onscreen menu system. • See individual topics like "Sound Adjust" for specific information on...on the side panel and choose a mode by pressing Menu† on the side of the TV instead of the onscreen menus. Menu The MENU button allows you to the aspect mode you to..., it has VIDEO STATUS and ASPECT menus. It appears between INITIAL SETUP and PICTURE ADJUST screen, and it will return to FULL automatically, the televison will turn to change the ...
...by pressing the π† buttons. • When you change the aspect ratio or signal, reset the picture position to activate the onscreen menu system. • See individual topics like "Sound Adjust" for specific information on...on the side panel and choose a mode by pressing Menu† on the side of the TV instead of the onscreen menus. Menu The MENU button allows you to the aspect mode you to..., it has VIDEO STATUS and ASPECT menus. It appears between INITIAL SETUP and PICTURE ADJUST screen, and it will return to FULL automatically, the televison will turn to change the ...
Instructions
Page 79
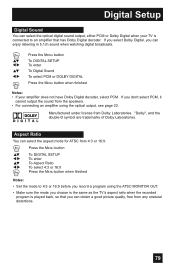
If you select Dolby Digital, you can obtain a good picture quality, free from the speakers. • For connecting an amplifier using the ATSC MONITOR OUT. • Make sure the mode you choose is the same as the TV's aspect ratio when the recorded program is played back, so that has Dolby Digital decoder... button To DIGITAL SETUP To enter To Digital Sound To select PCM or DOLBY DIGITAL Press the MENU button when finished Notes: • If your TV is connected to 4:3 or 16:9 before you record a program using the optical output, see page 23. If you don't select PCM, it cannot output the...
If you select Dolby Digital, you can obtain a good picture quality, free from the speakers. • For connecting an amplifier using the ATSC MONITOR OUT. • Make sure the mode you choose is the same as the TV's aspect ratio when the recorded program is played back, so that has Dolby Digital decoder... button To DIGITAL SETUP To enter To Digital Sound To select PCM or DOLBY DIGITAL Press the MENU button when finished Notes: • If your TV is connected to 4:3 or 16:9 before you record a program using the optical output, see page 23. If you don't select PCM, it cannot output the...


