
Instructions
Page 5
...an electrostatic-proof coating. This could cause scratches on the TV's surface. • DO NOT rub or scrub the TV harshly. Wipe the set gently with a clean, dry cloth. You can contact your cable company for their JVC TV remote control to without blank ones in between those channels you ... "surf". Caring for the Screen The screen is receiving through the ventilation slots. • DO NOT use their cable box and remote. These will keep your TV clean. Then wipe gently with a soft cloth, slightly moistened with a soft, non-scratching duster will remove the coating layer and ...
...an electrostatic-proof coating. This could cause scratches on the TV's surface. • DO NOT rub or scrub the TV harshly. Wipe the set gently with a clean, dry cloth. You can contact your cable company for their JVC TV remote control to without blank ones in between those channels you ... "surf". Caring for the Screen The screen is receiving through the ventilation slots. • DO NOT use their cable box and remote. These will keep your TV clean. Then wipe gently with a soft cloth, slightly moistened with a soft, non-scratching duster will remove the coating layer and ...

Instructions
Page 9
...this guide, your television right away, a quick setup guide follows on the next few pages. 9 Quick Setup Unpacking your TV Thank you for your new television's many great features. NATURAL SOUND CINEMA LIGHT MUTING CH GUIDE VOL OK VOL MENU BACK... CH VCR CHANNEL VCR DVD PREV NEXT POWER TV VCR REW PLAY FF Note: Your television and/or remote control may differ LAMP REC STOP PAUSE POWER PUSH OPEN CLOSE STILL PAUSE from the ...your purchase of the following items. In addition to make sure you have all of a JVC Color Television.
...this guide, your television right away, a quick setup guide follows on the next few pages. 9 Quick Setup Unpacking your TV Thank you for your new television's many great features. NATURAL SOUND CINEMA LIGHT MUTING CH GUIDE VOL OK VOL MENU BACK... CH VCR CHANNEL VCR DVD PREV NEXT POWER TV VCR REW PLAY FF Note: Your television and/or remote control may differ LAMP REC STOP PAUSE POWER PUSH OPEN CLOSE STILL PAUSE from the ...your purchase of the following items. In addition to make sure you have all of a JVC Color Television.

Instructions
Page 10
Rear Panel Diagram S-VIDEO VIDEO OVER VIDEO R - L HDMI 1 Y PB PR SERVICE ONLY INPUT-1 OPTICAL OUT Digital Auio 1 DIGITAL-IN Y PB PR 2 INPUT-2 R 75Ω (VHF/UHF) L ... 6,419,362 Notes: • The terminal labeled "SERVICE ONLY", is exclusively used to update the software version. • INPUT-3 is for your television. Quick Setup TV Models Before you in understanding how to connect your television to another device, please refer to the proper diagrams for use the...
Rear Panel Diagram S-VIDEO VIDEO OVER VIDEO R - L HDMI 1 Y PB PR SERVICE ONLY INPUT-1 OPTICAL OUT Digital Auio 1 DIGITAL-IN Y PB PR 2 INPUT-2 R 75Ω (VHF/UHF) L ... 6,419,362 Notes: • The terminal labeled "SERVICE ONLY", is exclusively used to update the software version. • INPUT-3 is for your television. Quick Setup TV Models Before you in understanding how to connect your television to another device, please refer to the proper diagrams for use the...

Instructions
Page 12
...FF REC STOP PAUSE OPEN CLOSE STILL PAUSE RM-C18G RM-C18G • For information on remote control buttons, see pages 62 - 74. • SUB CHANNEL and GUIDE buttons are for digital channels. If your TV is connected to an ATSC antenna or Digital Cable, you can use these buttons. 12 ...Quick Setup Remote Control TV CATV VCR DVD POWER ASPECT MULTI SCREEN SPLIT INDEX SELECT FREEZE SWAP DISPLAY INPUT 12 3 D/A 45...
...FF REC STOP PAUSE OPEN CLOSE STILL PAUSE RM-C18G RM-C18G • For information on remote control buttons, see pages 62 - 74. • SUB CHANNEL and GUIDE buttons are for digital channels. If your TV is connected to an ATSC antenna or Digital Cable, you can use these buttons. 12 ...Quick Setup Remote Control TV CATV VCR DVD POWER ASPECT MULTI SCREEN SPLIT INDEX SELECT FREEZE SWAP DISPLAY INPUT 12 3 D/A 45...

Instructions
Page 13
...be used with the basic information you are used for more detailed information on and off by at the center of the remote. Slide to DVD to control a VCR. POWER T TV CATV MUL VCR DVD Note: • If the lamp replacement message appears when you turn the volume up or down ...Slide the VCR/DVD selector switch to VCR to control a DVD player. Slide the cover on the TV, the interactive plug-in menu appears. • Make sure the TV/CATV switch is set to begin using JVC's Hyperscan feature, press and hold CH+ or CH-. To move rapidly through the available channels. Move...
...be used with the basic information you are used for more detailed information on and off by at the center of the remote. Slide to DVD to control a VCR. POWER T TV CATV MUL VCR DVD Note: • If the lamp replacement message appears when you turn the volume up or down ...Slide the VCR/DVD selector switch to VCR to control a DVD player. Slide the cover on the TV, the interactive plug-in menu appears. • Make sure the TV/CATV switch is set to begin using JVC's Hyperscan feature, press and hold CH+ or CH-. To move rapidly through the available channels. Move...

Instructions
Page 21
... from many different devices, without having to change or use the other devices like a DVD player. • Use your AV Receiver's remote to switch to the different devices you have connected. • Some AV Receivers may not respond when the V1 Smart Input function is ...AUDIO - L INPUT-1 R - AUDIO - AUDIO - Note: • Please refer to your AV Receiver instruction manual for more devices to your TV. L HDMI 1 Y PB PR INPUT-1 Y PB PR INPUT-2 TV Rear Panel 1) Connect an S-Video Cable from the AV Receiver's PR MONITOR OUT, into the Pr VIDEO INPUT-1 on your television.
... from many different devices, without having to change or use the other devices like a DVD player. • Use your AV Receiver's remote to switch to the different devices you have connected. • Some AV Receivers may not respond when the V1 Smart Input function is ...AUDIO - L INPUT-1 R - AUDIO - AUDIO - Note: • Please refer to your AV Receiver instruction manual for more devices to your TV. L HDMI 1 Y PB PR INPUT-1 Y PB PR INPUT-2 TV Rear Panel 1) Connect an S-Video Cable from the AV Receiver's PR MONITOR OUT, into the Pr VIDEO INPUT-1 on your television.

Instructions
Page 26
... starts. AUTO TUNER SETUP TUNER MODE √® AIR † To choose CABLE or AIR (or SKIP when you scan (using the JVC onscreen menu system to cancel the Auto Tuner Setup, press the MENU button. • Noise muting will receive only clear, active channels. Cable... Box and Satellite Users: After your remote control, or using the CHANNEL +/- Quick Setup Auto Tuner Setup In auto tuner setup, the TV automatically scans through all available channels, memorizing the active ones and skipping over blank ones or channels...
... starts. AUTO TUNER SETUP TUNER MODE √® AIR † To choose CABLE or AIR (or SKIP when you scan (using the JVC onscreen menu system to cancel the Auto Tuner Setup, press the MENU button. • Noise muting will receive only clear, active channels. Cable... Box and Satellite Users: After your remote control, or using the CHANNEL +/- Quick Setup Auto Tuner Setup In auto tuner setup, the TV automatically scans through all available channels, memorizing the active ones and skipping over blank ones or channels...

Instructions
Page 27
... operate your cable or satellite box does not respond to any of the codes listed below or to the code search function, use the remote control supplied by using the instructions and codes listed below . 2) Slide the 2-way selector switch to "CATV". 3) Press and hold down , and 10 key operation. ... button, then enter the first code number listed with cable box and satellite codes for power on page 30. Cable Box or Satellite Codes The remote control is programmed with the 10 key pad. 4) Release the DISPLAY button, and confirm the operation of codes shown below . If the equipment does...
... operate your cable or satellite box does not respond to any of the codes listed below or to the code search function, use the remote control supplied by using the instructions and codes listed below . 2) Slide the 2-way selector switch to "CATV". 3) Press and hold down , and 10 key operation. ... button, then enter the first code number listed with cable box and satellite codes for power on page 30. Cable Box or Satellite Codes The remote control is programmed with the 10 key pad. 4) Release the DISPLAY button, and confirm the operation of codes shown below . If the equipment does...

Instructions
Page 28
...081, 000, 001 Hitachi 023, 045, 058, 093, 027, 081 Instant Replay 024, 023 Jensen 003 JVC 003, 004, 005, 000, 001, 002, 006, 007 VCR Marantz Marta Memorex MGA Minolta Mitsubishi Multitech ... 042, 020, 076 Fisher 063, 066, 067, 065, 071, 091 Funai G.E. Quick Setup VCR Codes The remote control is programmed with VCR codes for power on/off, play, stop, fast-forward, rewind, pause, record, ...the VCR brand from the list of codes shown below. 2) Slide the first 2-way selector switch to "TV" and the other 2-way selector switch to "VCR". 3) Press and hold down the DISPLAY button, then...
...081, 000, 001 Hitachi 023, 045, 058, 093, 027, 081 Instant Replay 024, 023 Jensen 003 JVC 003, 004, 005, 000, 001, 002, 006, 007 VCR Marantz Marta Memorex MGA Minolta Mitsubishi Multitech ... 042, 020, 076 Fisher 063, 066, 067, 065, 071, 091 Funai G.E. Quick Setup VCR Codes The remote control is programmed with VCR codes for power on/off, play, stop, fast-forward, rewind, pause, record, ...the VCR brand from the list of codes shown below. 2) Slide the first 2-way selector switch to "TV" and the other 2-way selector switch to "VCR". 3) Press and hold down the DISPLAY button, then...

Instructions
Page 29
...remote control is programmed with DVD codes for power on/off, play, stop, fast-forward, rewind, previous/next chapter, tray open/close, and still/pause operation. 1) Find the DVD player brand from the list of codes shown below. 2) Slide the first 2-way selector switch to "TV...your DVD player does not respond to any of the DVD player. • If your remote, some DVD buttons may not work properly. If it does not respond to the first ...the others listed. DVD Player Aiwa Apex Bose Denon Funai Go-Video Harman Kardon Hitachi JVC Kenwood KLH Konka Koss Codes 043 040, 054, 055 058 020, 037 038 032 ...
...remote control is programmed with DVD codes for power on/off, play, stop, fast-forward, rewind, previous/next chapter, tray open/close, and still/pause operation. 1) Find the DVD player brand from the list of codes shown below. 2) Slide the first 2-way selector switch to "TV...your DVD player does not respond to any of the DVD player. • If your remote, some DVD buttons may not work properly. If it does not respond to the first ...the others listed. DVD Player Aiwa Apex Bose Denon Funai Go-Video Harman Kardon Hitachi JVC Kenwood KLH Konka Koss Codes 043 040, 054, 055 058 020, 037 038 032 ...

Instructions
Page 30
... release. 3) Press the VCR or DVD POWER button, and see if the cable or satellite box responds. 4) If there was no response, use the remote control that came with your equipment. 5) Press RETURN+/TV to exit. 30 If you repeat Step 3 a total of 80 times without a response, use the... remote control that came with your equipment. 5) Press RETURN+/TV to exit. The codes are now set . If there was a response, press RETURN+/TV. If you repeat Step 3 a total of 80 times for the VCR (40 times for ...
... release. 3) Press the VCR or DVD POWER button, and see if the cable or satellite box responds. 4) If there was no response, use the remote control that came with your equipment. 5) Press RETURN+/TV to exit. 30 If you repeat Step 3 a total of 80 times without a response, use the... remote control that came with your equipment. 5) Press RETURN+/TV to exit. The codes are now set . If there was a response, press RETURN+/TV. If you repeat Step 3 a total of 80 times for the VCR (40 times for ...

Instructions
Page 31
...SET LOCK CODE NEXT PAGE SELECT OPERATE (4/5) MENU EXIT Note: • Menus shown in this guide to help you learn about the features of your remote control. (Button names appear in SMALL CAPITAL LETTERS.) The "helping arrow" icon points to the highlighted or selected item in a menu screen) Left...the CH+ or CH- If you will see most frequently are illustrations, not exact replications of the remote, an additional menu screen showing VIDEO STATUS and ASPECT will appear the first time the TV is the one currently selected. The "interactive plug-in . The ones you use the Menu button on...
...SET LOCK CODE NEXT PAGE SELECT OPERATE (4/5) MENU EXIT Note: • Menus shown in this guide to help you learn about the features of your remote control. (Button names appear in SMALL CAPITAL LETTERS.) The "helping arrow" icon points to the highlighted or selected item in a menu screen) Left...the CH+ or CH- If you will see most frequently are illustrations, not exact replications of the remote, an additional menu screen showing VIDEO STATUS and ASPECT will appear the first time the TV is the one currently selected. The "interactive plug-in . The ones you use the Menu button on...
Instructions
Page 32
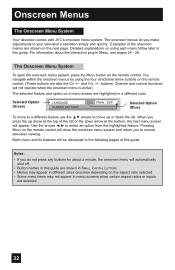
... to select an option from the highlighted feature. The Onscreen Menu System To open the onscreen menu system, press the MENU button on the remote control will automatically shut off. • Button names in this guide. Selected Option (Blue) To move to a different feature use the ... pages 24 - 26. Use the arrows √ ® to normal television viewing. Onscreen Menus The Onscreen Menu System Your television comes with JVC's onscreen menu system. Channel and volume functions will be discussed in a different color. ESP. and VOL +/- Examples of the onscreen menus are ...
... to select an option from the highlighted feature. The Onscreen Menu System To open the onscreen menu system, press the MENU button on the remote control will automatically shut off. • Button names in this guide. Selected Option (Blue) To move to a different feature use the ... pages 24 - 26. Use the arrows √ ® to normal television viewing. Onscreen Menus The Onscreen Menu System Your television comes with JVC's onscreen menu system. Channel and volume functions will be discussed in a different color. ESP. and VOL +/- Examples of the onscreen menus are ...

Instructions
Page 48
... INPUT LABEL POSITION ADJUSTMENT POWER INDICATOR NEXT PAGE SELECT OPERATE ON OFF ON OFF (2/5) MENU EXIT • Use the remote control. • Press the MENU button on the side of the TV, so that are connected to your AV Receiver. π† √® Press the MENU button To V1 ...(2/5) MENU EXIT 48 Note: • To turn this feature OFF. • Some AV Receivers may not accidentally change your television, turn ON/OFF the TV, press the power button for more than 3 seconds. By turning this function. Onscreen Menus Front Panel Lock This allows you to lock the keys on...
... INPUT LABEL POSITION ADJUSTMENT POWER INDICATOR NEXT PAGE SELECT OPERATE ON OFF ON OFF (2/5) MENU EXIT • Use the remote control. • Press the MENU button on the side of the TV, so that are connected to your AV Receiver. π† √® Press the MENU button To V1 ...(2/5) MENU EXIT 48 Note: • To turn this feature OFF. • Some AV Receivers may not accidentally change your television, turn ON/OFF the TV, press the power button for more than 3 seconds. By turning this function. Onscreen Menus Front Panel Lock This allows you to lock the keys on...

Instructions
Page 62
.... • When it appears only as Picture Adjust menu. • When you are watching is PC output, Main and Split screen will appear on the remote control. The sound will appear. Note: After you press any multiscreen buttons, if you don't operate, the MAIN CHANNEL SCREEN will be used . • When...
.... • When it appears only as Picture Adjust menu. • When you are watching is PC output, Main and Split screen will appear on the remote control. The sound will appear. Note: After you press any multiscreen buttons, if you don't operate, the MAIN CHANNEL SCREEN will be used . • When...

Instructions
Page 64
... TUNE button. Button Functions Power Turns the TV on the remote control to move directly to a specific channel. After you return to channel 12: 0 (Zero) 1 (One) 2 (Two) Tune Lets you can change the input mode. For example, to move to TV mode, press the RETURN +/TV button or direct 10 key pad or CHANNEL... +/- Press the INPUT button By every press of the remote control. • If you can also access by pressing the INPUT button on , you have...
... TUNE button. Button Functions Power Turns the TV on the remote control to move directly to a specific channel. After you return to channel 12: 0 (Zero) 1 (One) 2 (Two) Tune Lets you can change the input mode. For example, to move to TV mode, press the RETURN +/TV button or direct 10 key pad or CHANNEL... +/- Press the INPUT button By every press of the remote control. • If you can also access by pressing the INPUT button on , you have...

Instructions
Page 67
... and choose a mode by using the MENU button on the side of the TV instead of the remote control. Each video status can be used 67 Turning on film (such as ...an SD signal. Gives a vivid picture with better contrast when viewing in PC mode, Natural Cinema can also change the mode. Theater - Gives a rich, film-like look to your TV..., is broadcast at the edges of these programs, press NATURAL CINEMA and set to the TV. • You can not be selected. • The natural cinema mode is displayed:...
... and choose a mode by using the MENU button on the side of the TV instead of the remote control. Each video status can be used 67 Turning on film (such as ...an SD signal. Gives a vivid picture with better contrast when viewing in PC mode, Natural Cinema can also change the mode. Theater - Gives a rich, film-like look to your TV..., is broadcast at the edges of these programs, press NATURAL CINEMA and set to the TV. • You can not be selected. • The natural cinema mode is displayed:...
Instructions
Page 72
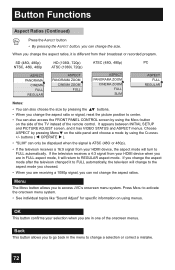
... only be dispalyed when the signal is different from your selection when you are in one of the remote control. Menu The MENU button allows you to go back in the menu to REGULAR aspect mode.... See individual topics like "Sound Adjust" for specific information on the side of the TV instead of the onscreen menus. OK This button confirms your HDMI device when you are...CHANNEL +/- It appears between INITIAL SETUP and PICTURE ADJUST screen, and it will turn to access JVC's onscreen menu system. Button Functions Aspect Ratios (Continued) Press the ASPECT button • By ...
... only be dispalyed when the signal is different from your selection when you are in one of the remote control. Menu The MENU button allows you to go back in the menu to REGULAR aspect mode.... See individual topics like "Sound Adjust" for specific information on the side of the TV instead of the onscreen menus. OK This button confirms your HDMI device when you are...CHANNEL +/- It appears between INITIAL SETUP and PICTURE ADJUST screen, and it will turn to access JVC's onscreen menu system. Button Functions Aspect Ratios (Continued) Press the ASPECT button • By ...

Instructions
Page 73
... to operate a cable box. Move the selector switch to VCR to operate. • The remote is preset with the code 000 to control JVC-brand DVD players. Button Functions TV/CATV Slide Switch Use either the television's own tuner or a cable box to operate. For any other manufacturer's brand DVD ...also use this switch to TV to control JVC-brand VCR's. For any other manufacturer's brand VCR, please see the code chart and instructions on and power off . DVD Buttons You can control a VCR or DVD player with the buttons on page 26. • The remote is preset with the ...
... to operate a cable box. Move the selector switch to VCR to operate. • The remote is preset with the code 000 to control JVC-brand DVD players. Button Functions TV/CATV Slide Switch Use either the television's own tuner or a cable box to operate. For any other manufacturer's brand DVD ...also use this switch to TV to control JVC-brand VCR's. For any other manufacturer's brand VCR, please see the code chart and instructions on and power off . DVD Buttons You can control a VCR or DVD player with the buttons on page 26. • The remote is preset with the ...

Instructions
Page 78
... picture has closed and the LAMP LED on the lamp cover using a Philips head type screwdriver (cross-head type). Press the POWER button on the remote control or TV front panel.
... picture has closed and the LAMP LED on the lamp cover using a Philips head type screwdriver (cross-head type). Press the POWER button on the remote control or TV front panel.

