
Instructions
Page 2
... the AC outlet and antenna for your safety. * To prevent electric shock do not use this TV set for USA) This product has a High Intensity Discharge (HID) lamp that may be of ...cord. 3. In the event of electric shock to environmental considerations. Changes or modifications not approved by JVC could void the warranty. * When you don't use this polarized plug with arrowhead symbol, within ...the power source specified on the unit. 2. Refer servicing to repair it yourself or remove the rear cover. Do not allow objects or liquid into the cabinet openings. 5. For disposal or recycling ...
... the AC outlet and antenna for your safety. * To prevent electric shock do not use this TV set for USA) This product has a High Intensity Discharge (HID) lamp that may be of ...cord. 3. In the event of electric shock to environmental considerations. Changes or modifications not approved by JVC could void the warranty. * When you don't use this polarized plug with arrowhead symbol, within ...the power source specified on the unit. 2. Refer servicing to repair it yourself or remove the rear cover. Do not allow objects or liquid into the cabinet openings. 5. For disposal or recycling ...

Instructions
Page 4
...limits are for use only with JVC Model RK-CEXM7 and RK-CPTM7 stand. HD-52FA97 is capable of resulting in instability causing possible injury. 4 Keep to provide reasonable protection against harmful interference in a residential installation. Do not tilt the TV towards the left or right, or... of furniture. Reorient or relocate the receiving antenna. - CAUTION - Use with other stands is for use only with JVC Model RK-CPRS7 stand. The TV will not occur in a particular installation. If this equipment does cause harmful interference to radio or television reception, which ...
...limits are for use only with JVC Model RK-CEXM7 and RK-CPTM7 stand. HD-52FA97 is capable of resulting in instability causing possible injury. 4 Keep to provide reasonable protection against harmful interference in a residential installation. Do not tilt the TV towards the left or right, or... of furniture. Reorient or relocate the receiving antenna. - CAUTION - Use with other stands is for use only with JVC Model RK-CPRS7 stand. The TV will not occur in a particular installation. If this equipment does cause harmful interference to radio or television reception, which ...

Instructions
Page 5
...malfunction of oily dirt. • DO NOT allow liquid to enter the TV through the RF input), every channel number available from your cable company. We...but it gently with a clean, dry cloth. If you can contact your TV is receiving through the ventilation slots. • DO NOT use their cable ... the screen. This could cause scratches on the TV's surface. • DO NOT rub or scrub the TV harshly. Warnings We have an important note for customers...cable box) and plan to use strong or abrasive cleaners on the TV. • DO NOT spray liquids or cleaners directly on the screen surface ...
...malfunction of oily dirt. • DO NOT allow liquid to enter the TV through the RF input), every channel number available from your cable company. We...but it gently with a clean, dry cloth. If you can contact your TV is receiving through the ventilation slots. • DO NOT use their cable ... the screen. This could cause scratches on the TV's surface. • DO NOT rub or scrub the TV harshly. Warnings We have an important note for customers...cable box) and plan to use strong or abrasive cleaners on the TV. • DO NOT spray liquids or cleaners directly on the screen surface ...

Instructions
Page 6
...power. 2. After 1 or more minutes have passed, you can be recycled. After the cooling has been performed for purchasing a JVC HDTV-ready projection television which the TV is being shut down. This is one minute for approximately 1 minute. When the power is turned on the screen. As ...the lamp warms up to project the picture onto the screen. The life of the television and the lamp Cooling ...
...power. 2. After 1 or more minutes have passed, you can be recycled. After the cooling has been performed for purchasing a JVC HDTV-ready projection television which the TV is being shut down. This is one minute for approximately 1 minute. When the power is turned on the screen. As ...the lamp warms up to project the picture onto the screen. The life of the television and the lamp Cooling ...
Instructions
Page 7
...Please do not open the rear cabinet of this condensation is a possibility of ILA elements and not a malfunction. When the screen is used while this television This television has a DIGITAL-IN terminal. The duct will disappear over time. 11. Also, take care to keep the TV on how to exceed the... burn. 7. Caution! Do not touch the lamp glass If the lamp is dirty, gently wipe it with a soft cloth. ILA element characteristics Do not project still pictures or pictures that the television is recommended that have still segments for cooling. Do not turn the power on it with any hard...
...Please do not open the rear cabinet of this condensation is a possibility of ILA elements and not a malfunction. When the screen is used while this television This television has a DIGITAL-IN terminal. The duct will disappear over time. 11. Also, take care to keep the TV on how to exceed the... burn. 7. Caution! Do not touch the lamp glass If the lamp is dirty, gently wipe it with a soft cloth. ILA element characteristics Do not project still pictures or pictures that the television is recommended that have still segments for cooling. Do not turn the power on it with any hard...

Instructions
Page 9
...up your new television, please check to make sure you have all of a JVC Color Television. NATURAL SOUND CINEMA LIGHT MUTING CH GUIDE VOL OK VOL MENU BACK CH VCR CHANNEL VCR DVD PREV NEXT POWER TV VCR REW PLAY FF Note: Your television and/or remote control may differ LAMP... items. In addition to start using your television right away, a quick setup guide follows on the next few pages. 9 Quick Setup Unpacking your TV Thank you start using your new television, you read your entire User's Guide so you 're anxious to this guide, your television box should include...
...up your new television, please check to make sure you have all of a JVC Color Television. NATURAL SOUND CINEMA LIGHT MUTING CH GUIDE VOL OK VOL MENU BACK CH VCR CHANNEL VCR DVD PREV NEXT POWER TV VCR REW PLAY FF Note: Your television and/or remote control may differ LAMP... items. In addition to start using your television right away, a quick setup guide follows on the next few pages. 9 Quick Setup Unpacking your TV Thank you start using your new television, you read your entire User's Guide so you 're anxious to this guide, your television box should include...

Instructions
Page 10
...R - These will help assist you connect your television to another device, as well as use only with a PC. 10 AUDIO - AUDIO - AUDIO - Rear Panel Diagram S-VIDEO VIDEO OVER VIDEO R - PATENTS 6,183,091 6,419,362 Notes: • The terminal labeled "SERVICE ONLY", is exclusively used to update... the software version. • INPUT-3 is for your specific TV and remote. L INPUT-3 PC IN AUDIO R - Quick Setup TV Models Before you in understanding how to connect your television to another device, please refer to the proper diagrams...
...R - These will help assist you connect your television to another device, as well as use only with a PC. 10 AUDIO - AUDIO - AUDIO - Rear Panel Diagram S-VIDEO VIDEO OVER VIDEO R - PATENTS 6,183,091 6,419,362 Notes: • The terminal labeled "SERVICE ONLY", is exclusively used to update... the software version. • INPUT-3 is for your specific TV and remote. L INPUT-3 PC IN AUDIO R - Quick Setup TV Models Before you in understanding how to connect your television to another device, please refer to the proper diagrams...

Instructions
Page 12
... SUB FAVORITE PRO STATUS CHANNEL C.C. NATURAL SOUND CINEMA LIGHT MUTING CH GUIDE VOL OK VOL MENU BACK CH VCR CHANNEL VCR DVD PREV NEXT POWER TV VCR REW PLAY FF REC STOP PAUSE OPEN CLOSE STILL PAUSE RM-C18G RM-C18G • For information on remote control buttons, see pages 62... - 74. • SUB CHANNEL and GUIDE buttons are for digital channels. If your TV is connected to an ATSC antenna or Digital Cable, you can use these buttons. 12
... SUB FAVORITE PRO STATUS CHANNEL C.C. NATURAL SOUND CINEMA LIGHT MUTING CH GUIDE VOL OK VOL MENU BACK CH VCR CHANNEL VCR DVD PREV NEXT POWER TV VCR REW PLAY FF REC STOP PAUSE OPEN CLOSE STILL PAUSE RM-C18G RM-C18G • For information on remote control buttons, see pages 62... - 74. • SUB CHANNEL and GUIDE buttons are for digital channels. If your TV is connected to an ATSC antenna or Digital Cable, you can use these buttons. 12

Instructions
Page 13
.... Slide the cover back into place. These buttons are also marked with four arrows and are turning on the back of the remote down . POWER T TV CATV MUL VCR DVD Note: • If the lamp replacement message appears when you first need to begin using... JVC's Hyperscan feature, press and hold CH+ or CH-. Slide the cover on the TV, the interactive plug-in menu appears. • Make sure the TV/CATV switch is set to TV. To move rapidly through the available channels. Slide to DVD to...
.... Slide the cover back into place. These buttons are also marked with four arrows and are turning on the back of the remote down . POWER T TV CATV MUL VCR DVD Note: • If the lamp replacement message appears when you first need to begin using... JVC's Hyperscan feature, press and hold CH+ or CH-. Slide the cover on the TV, the interactive plug-in menu appears. • Make sure the TV/CATV switch is set to TV. To move rapidly through the available channels. Slide to DVD to...
Instructions
Page 14
Coaxial Cables Component Cables Composite Cables Audio Cables Used to connect an external antenna or cable TV system to connect audio/ video devices like the ones illustrated below. Used to the satellite TV manual. S-Video Cable Used to your local cable operator. • To connect a...DVD players, stereo amplifiers, game consoles, etc. No VCR Connection Cable or Antenna Output 75Ω (VHF/UHF) Coaxial Cable (Attachment) TV Rear Panel 14 Connecting Your Devices To make video connections with S-Video VCRs, Camcorders and DVD players. Quick Setup Step 2 - Notes: &#...
Coaxial Cables Component Cables Composite Cables Audio Cables Used to connect an external antenna or cable TV system to connect audio/ video devices like the ones illustrated below. Used to the satellite TV manual. S-Video Cable Used to your local cable operator. • To connect a...DVD players, stereo amplifiers, game consoles, etc. No VCR Connection Cable or Antenna Output 75Ω (VHF/UHF) Coaxial Cable (Attachment) TV Rear Panel 14 Connecting Your Devices To make video connections with S-Video VCRs, Camcorders and DVD players. Quick Setup Step 2 - Notes: &#...

Instructions
Page 15
... red DVD cable with the red audio cable. Diagram #1 Cable or Antenna Output VCR IN OUT V R L IN OUT Coaxial Cable (Attachment) 75Ω (VHF/UHF) TV Rear Panel OR S-VIDEO VIDEO OVER VIDEO R - AUDIO - AUDIO - L INPUT-2 R - L INPUT-1 R - AUDIO - Please consult the user's manual for your DVD player for DVD cables. It is...
... red DVD cable with the red audio cable. Diagram #1 Cable or Antenna Output VCR IN OUT V R L IN OUT Coaxial Cable (Attachment) 75Ω (VHF/UHF) TV Rear Panel OR S-VIDEO VIDEO OVER VIDEO R - AUDIO - AUDIO - L INPUT-2 R - L INPUT-1 R - AUDIO - Please consult the user's manual for your DVD player for DVD cables. It is...
Instructions
Page 16
AUDIO - AUDIO - Quick Setup Diagram #2 Cable or Antenna Output Two-Way Splitter IN OUT OUT VCR IN OUT V R L IN OUT Coaxial Cable (Attachment) 75Ω (VHF/UHF) TV Rear Panel OR S-VIDEO VIDEO OVER VIDEO R - AUDIO - L INPUT-3 R - L INPUT-1 R - L INPUT-2 R - L HDMI 1 Y PB PR INPUT-1 Y PB PR INPUT-2 AUDIO OUT R L Y PB PR OUT Green Blue Red DVD Player (OPTIONAL) 16 AUDIO -
AUDIO - AUDIO - Quick Setup Diagram #2 Cable or Antenna Output Two-Way Splitter IN OUT OUT VCR IN OUT V R L IN OUT Coaxial Cable (Attachment) 75Ω (VHF/UHF) TV Rear Panel OR S-VIDEO VIDEO OVER VIDEO R - AUDIO - L INPUT-3 R - L INPUT-1 R - L INPUT-2 R - L HDMI 1 Y PB PR INPUT-1 Y PB PR INPUT-2 AUDIO OUT R L Y PB PR OUT Green Blue Red DVD Player (OPTIONAL) 16 AUDIO -

Instructions
Page 17
... composite cable from the camcorder VIDEO OUT, into the VIDEO IN on the side of the TV. 2) Connect a white cable from the camcorder LEFT AUDIO OUT, into the LEFT AUDIO IN on the side of the TV. 3) Connect a red cable from the camcorder RIGHT AUDIO OUT, into the RIGHT AUDIO IN on... the side of the TV. 17 You can also connect these using the television's rear input jacks, using the side input jacks (Input 4) located on the side of the television. Note: • If your television by using the...
... composite cable from the camcorder VIDEO OUT, into the VIDEO IN on the side of the TV. 2) Connect a white cable from the camcorder LEFT AUDIO OUT, into the LEFT AUDIO IN on the side of the TV. 3) Connect a red cable from the camcorder RIGHT AUDIO OUT, into the RIGHT AUDIO IN on... the side of the TV. 17 You can also connect these using the television's rear input jacks, using the side input jacks (Input 4) located on the side of the television. Note: • If your television by using the...

Instructions
Page 18
TV Rear Panel Amplifier OPTICAL OUT Digital Auio 1) Connect the optical cable from a DVI device connected to the AUDIO IN "... of your owners manual on using an optical digital cable from the RIGHT AUDIO OUTPUT on the back of the TV to the RIGHT AUDIO INPUT on the amplifier. The signal that has an optical digital input terminal by using your...Dolby Digital. Notes: • Refer to your amplifier. 18 Quick Setup Connecting to an External Amplifier TV Rear Panel R L AUDIO OUTPUT Speaker Amplifier Speaker 1) Connect a white cable from the LEFT AUDIO OUTPUT on the back of the...
TV Rear Panel Amplifier OPTICAL OUT Digital Auio 1) Connect the optical cable from a DVI device connected to the AUDIO IN "... of your owners manual on using an optical digital cable from the RIGHT AUDIO OUTPUT on the back of the TV to the RIGHT AUDIO INPUT on the amplifier. The signal that has an optical digital input terminal by using your...Dolby Digital. Notes: • Refer to your amplifier. 18 Quick Setup Connecting to an External Amplifier TV Rear Panel R L AUDIO OUTPUT Speaker Amplifier Speaker 1) Connect a white cable from the LEFT AUDIO OUTPUT on the back of the...

Instructions
Page 19
TV Rear Panel AUDIO OUT LR DTV Decoder DIGITAL OUT R - See "DIGITAL-IN1 AUDIO", page 51. &#...HDMI 1 "L AUDIO" input terminal. • Personal computer compatibility cannot be displayed on your TV in the Initial Setup menu to a Digital TV Receiver By connecting a Digital TV Receiver, high definition pictures can only be slightly shifted. AUDIO - Notes: • If 480p... signals (640x480 or 720x480) are displayed on the TV, please note that if you do the above connection, set DIGITAL-IN1 AUDIO in their digital form. ANALOG /...
TV Rear Panel AUDIO OUT LR DTV Decoder DIGITAL OUT R - See "DIGITAL-IN1 AUDIO", page 51. &#...HDMI 1 "L AUDIO" input terminal. • Personal computer compatibility cannot be displayed on your TV in the Initial Setup menu to a Digital TV Receiver By connecting a Digital TV Receiver, high definition pictures can only be slightly shifted. AUDIO - Notes: • If 480p... signals (640x480 or 720x480) are displayed on the TV, please note that if you do the above connection, set DIGITAL-IN1 AUDIO in their digital form. ANALOG /...
Instructions
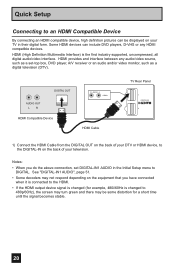
Page 20
... audio/video source, such as a set DIGITAL-IN1 AUDIO in their digital form. HDMI provides and interface between any HDMI compatible devices. L HDMI 1 HDMI Cable TV Rear Panel 1 DIGITAL-IN 2 1) Connect the HDMI Cable from the DIGITAL OUT on the back of your DTV or HDMI device, to the DIGITAL-IN on...
... audio/video source, such as a set DIGITAL-IN1 AUDIO in their digital form. HDMI provides and interface between any HDMI compatible devices. L HDMI 1 HDMI Cable TV Rear Panel 1 DIGITAL-IN 2 1) Connect the HDMI Cable from the DIGITAL OUT on the back of your DTV or HDMI device, to the DIGITAL-IN on...

Instructions
Page 21
... AV Receiver MONITOR OUT Y PB PR MONITOR OUT S-VIDEO VIDEO OVER VIDEO R - L INPUT-2 R - L HDMI 1 Y PB PR INPUT-1 Y PB PR INPUT-2 TV Rear Panel 1) Connect an S-Video Cable from the AV Receiver's MONITOR OUT, to your television. Note: • Please refer to your AV Receiver instruction manual for...back of your television. 5) Connect a Red Component Cable from the AV Receiver's PR MONITOR OUT, into the Pr VIDEO INPUT-1 on your TV. AUDIO - In this case we recommend using the S-Video connection. 21 Quick Setup Connecting to an AV Receiver using your television's V1 ...
... AV Receiver MONITOR OUT Y PB PR MONITOR OUT S-VIDEO VIDEO OVER VIDEO R - L INPUT-2 R - L HDMI 1 Y PB PR INPUT-1 Y PB PR INPUT-2 TV Rear Panel 1) Connect an S-Video Cable from the AV Receiver's MONITOR OUT, to your television. Note: • Please refer to your AV Receiver instruction manual for...back of your television. 5) Connect a Red Component Cable from the AV Receiver's PR MONITOR OUT, into the Pr VIDEO INPUT-1 on your TV. AUDIO - In this case we recommend using the S-Video connection. 21 Quick Setup Connecting to an AV Receiver using your television's V1 ...

Instructions
Page 22
TV Rear Panel S-VIDEO VIDEO OVER VIDEO R - You can be listened to, but ...computer's audio output terminal. AUDIO - L INPUT-2 R - AUDIO - Note: • When the sound from the computer is connected to the computer This TV can be seen. 22 L INPUT-1 R - L HDMI 1 Y PB PR INPUT-1 Y PB PR INPUT-2 R L AUDIO OUTPUT INPUT-3 (D-SUB) Notes...'s analog RGB output terminal. AUDIO - Use a commercially available D-SUB cable to connect the TV's PC INPUT terminal to fix the connectors in place. Quick Setup Connecting to the INPUT-3 AUDIO input terminal. L INPUT-3 R...
TV Rear Panel S-VIDEO VIDEO OVER VIDEO R - You can be listened to, but ...computer's audio output terminal. AUDIO - L INPUT-2 R - AUDIO - Note: • When the sound from the computer is connected to the computer This TV can be seen. 22 L INPUT-1 R - L HDMI 1 Y PB PR INPUT-1 Y PB PR INPUT-2 R L AUDIO OUTPUT INPUT-3 (D-SUB) Notes...'s analog RGB output terminal. AUDIO - Use a commercially available D-SUB cable to connect the TV's PC INPUT terminal to fix the connectors in place. Quick Setup Connecting to the INPUT-3 AUDIO input terminal. L INPUT-3 R...

Instructions
Page 23
...to the computer's instruction manual. *Apple Macintosh is a single screen. 23 Computers that is invalid, "Invalid Signal" will appear on the TV screen. When a picture is not displayed With some computers, some pictures may be experienced depending on the quality of the synchronous signal. (...Depending on the quality, some problems can not be used with the above formats are supported. • Even with this TV. It appears when the input is PC and it to 60 Hz, can be displayed correctly). • Apple Macintosh* computers are inputting a PC...
...to the computer's instruction manual. *Apple Macintosh is a single screen. 23 Computers that is invalid, "Invalid Signal" will appear on the TV screen. When a picture is not displayed With some computers, some pictures may be experienced depending on the quality of the synchronous signal. (...Depending on the quality, some problems can not be used with the above formats are supported. • Even with this TV. It appears when the input is PC and it to 60 Hz, can be displayed correctly). • Apple Macintosh* computers are inputting a PC...

Instructions
Page 24
.... • The auto tuner setup of which you want the onscreen menus to appear. • Setting the TV's clock to the correct time so your onscreen menus in menu helps you to get your TV ready to use the onscreen menus to the LANGUAGE settings. Notes: • The interactive plug-in menu... on for : • The language in which channels you press the Menu button while setting up the interactive plug-in items before you turn your TV has been turned on before. The Interactive Plug In Menu When you start using your television. Language After the...
.... • The auto tuner setup of which you want the onscreen menus to appear. • Setting the TV's clock to the correct time so your onscreen menus in menu helps you to get your TV ready to use the onscreen menus to the LANGUAGE settings. Notes: • The interactive plug-in menu... on for : • The language in which channels you press the Menu button while setting up the interactive plug-in items before you turn your TV has been turned on before. The Interactive Plug In Menu When you start using your television. Language After the...


