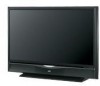
User Guide
Page 8
... Smart Input 49 Video Input Label 50 Position Adjustment 51 Power Indicator 51 Digital-In 52 Digital-In1 Audio 52 Digital Setup 53 Picture Adjust 55 Picture Settings 55 Color Temperature 55 Color Management 56 ... 63 OK 63 Back 63 Power 64 Number Buttons 64 Tune 64 Input 64 TheaterPro 64 Return+/TV 65 Sound 65 Video Status 66 Natural Cinema 66 Sleep Timer 67 ML/MTS 67 Muting 67 ...Display 68 C.C 68 Channel 68 Volume 68 Favorite 69 Aspect 70 Aspect Ratios 70 TV/CATV Slide Switch 72 VCR/DVD Slide Switch 72 VCR Buttons 72 DVD Buttons 72 Light 72 D/A ...
... Smart Input 49 Video Input Label 50 Position Adjustment 51 Power Indicator 51 Digital-In 52 Digital-In1 Audio 52 Digital Setup 53 Picture Adjust 55 Picture Settings 55 Color Temperature 55 Color Management 56 ... 63 OK 63 Back 63 Power 64 Number Buttons 64 Tune 64 Input 64 TheaterPro 64 Return+/TV 65 Sound 65 Video Status 66 Natural Cinema 66 Sleep Timer 67 ML/MTS 67 Muting 67 ...Display 68 C.C 68 Channel 68 Volume 68 Favorite 69 Aspect 70 Aspect Ratios 70 TV/CATV Slide Switch 72 VCR/DVD Slide Switch 72 VCR Buttons 72 DVD Buttons 72 Light 72 D/A ...

User Guide
Page 19
...adjust it. (Refer to page 52.) • When you use a DVI to HDMI adapter this setting only effects the HDMI 1 jack and that if you do the above connection, set DIGITAL-IN1 AUDIO in order to a Digital TV Receiver By connecting a Digital TV Receiver, high definition pictures can ...only be used with the HDMI 1 input. • When setting the "DIGITAL AUDIO - See "DIGITAL-IN1 AUDIO", page 52. • The Analog Audio input can be slightly shifted. ...
...adjust it. (Refer to page 52.) • When you use a DVI to HDMI adapter this setting only effects the HDMI 1 jack and that if you do the above connection, set DIGITAL-IN1 AUDIO in order to a Digital TV Receiver By connecting a Digital TV Receiver, high definition pictures can ...only be used with the HDMI 1 input. • When setting the "DIGITAL AUDIO - See "DIGITAL-IN1 AUDIO", page 52. • The Analog Audio input can be slightly shifted. ...

User Guide
Page 20
See "DIGITAL-IN1 AUDIO", page 52. • Some decoders may not respond depending on the equipment that you have an HDMI device connected to the HDMI 1 connection on your TV in the Initial Setup menu to DIGITAL. HDMI Compatible Device Digital Out TV Rear Panel R - L HDMI 1 1 DIGITAL-IN 2 HDMI Cable 1) Connect the HDMI Cable from... analog sound from the DIGITAL OUT on the back of your DTV or HDMI device to the HDMI1 DIGITAL-IN on the back of your TV, your TV detects it is connected to the HDMI. • If the HDMI output device signal is changed to 480p/60Hz), the screen may turn ...
See "DIGITAL-IN1 AUDIO", page 52. • Some decoders may not respond depending on the equipment that you have an HDMI device connected to the HDMI 1 connection on your TV in the Initial Setup menu to DIGITAL. HDMI Compatible Device Digital Out TV Rear Panel R - L HDMI 1 1 DIGITAL-IN 2 HDMI Cable 1) Connect the HDMI Cable from... analog sound from the DIGITAL OUT on the back of your DTV or HDMI device to the HDMI1 DIGITAL-IN on the back of your TV, your TV detects it is connected to the HDMI. • If the HDMI output device signal is changed to 480p/60Hz), the screen may turn ...
User Guide
Page 52
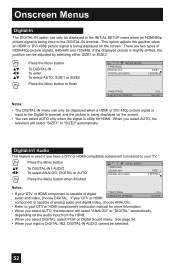
...two types of analog audio and digital video, choose ANALOG. • Refer to the Digital-In terminal and the picture is being input to your TV. π† √® Press the MENU button To DIGITAL-IN1 AUDIO To select ANALOG, DIGITAL or AUTO Press the Menu button when &#...PREVIOUS DIGITAL-IN DIGITAL-IN1 AUDIO SIZE1 DIGITAL NEXT PAGE SELECT OPERATE (1/5) MENU EXIT Notes: • The DIGITAL-IN menu can only be selected. 52 Digital-in1 Audio This feature is used if you have a DTV or HDMI compatible component connected to the DIGITAL-IN terminal. Onscreen Menus Digital-In...
...two types of analog audio and digital video, choose ANALOG. • Refer to the Digital-In terminal and the picture is being input to your TV. π† √® Press the MENU button To DIGITAL-IN1 AUDIO To select ANALOG, DIGITAL or AUTO Press the Menu button when &#...PREVIOUS DIGITAL-IN DIGITAL-IN1 AUDIO SIZE1 DIGITAL NEXT PAGE SELECT OPERATE (1/5) MENU EXIT Notes: • The DIGITAL-IN menu can only be selected. 52 Digital-in1 Audio This feature is used if you have a DTV or HDMI compatible component connected to the DIGITAL-IN terminal. Onscreen Menus Digital-In...
User Guide
Page 82
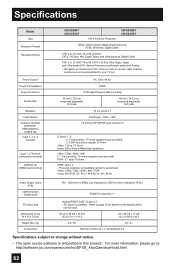
Refer to page 23 for your TV set. For more information, please go to: http://software.jvc.com/opensource/lnx/DP/05_AtscQam/download.html 82 AC 120V, 60 Hz 205W 110W High-Pressure Mercury Lamp 52 inch / 132 cm measured diagonally, 16:9 ratio 56 inch / 142.2 cm measured ... (VHF/UHF, ATSC/DIGITAL CABLE IN) Input 1, 2, 3, 4 Terminal Input 1, 2 Terminal (component terminal) DIGITAL-IN (HDMI input terminal) HD-52G887 HD-52G787 HD-ILA Device Projection HD-56G887 HD-56G787 NTSC, BTSC System (Multi-Channel Sound) ATSC Terrestrial, Digital Cable VHF 2 to 13, UHF 14 to 69 at ATSC, CATV 135 Sub...
Refer to page 23 for your TV set. For more information, please go to: http://software.jvc.com/opensource/lnx/DP/05_AtscQam/download.html 82 AC 120V, 60 Hz 205W 110W High-Pressure Mercury Lamp 52 inch / 132 cm measured diagonally, 16:9 ratio 56 inch / 142.2 cm measured ... (VHF/UHF, ATSC/DIGITAL CABLE IN) Input 1, 2, 3, 4 Terminal Input 1, 2 Terminal (component terminal) DIGITAL-IN (HDMI input terminal) HD-52G887 HD-52G787 HD-ILA Device Projection HD-56G887 HD-56G787 NTSC, BTSC System (Multi-Channel Sound) ATSC Terrestrial, Digital Cable VHF 2 to 13, UHF 14 to 69 at ATSC, CATV 135 Sub...


