

User Guide
Page 1
Basic User Guide HD MEMORY CAMERA GZ-VX815 A LYT2540-001A-M EN Detailed User Guide . Serial No. Before use, ...BC mark means complies with standard browser for purchasing this product. For more details on the battery pack mount of this JVC product. o http://manual3.jvckenwood.com/mobile/ us/ HDMI Mini Cable USB Cable (Type A - o http://manual3...the bottom of the camera) and Serial No. (located on operating this manual) Please consult your JVC dealer or the nearest JVC service center when purchasing a new AV cable. Mini Type B) AV Cable QAM1322-001 CD-ROM Stylus...
Basic User Guide HD MEMORY CAMERA GZ-VX815 A LYT2540-001A-M EN Detailed User Guide . Serial No. Before use, ...BC mark means complies with standard browser for purchasing this product. For more details on the battery pack mount of this JVC product. o http://manual3.jvckenwood.com/mobile/ us/ HDMI Mini Cable USB Cable (Type A - o http://manual3...the bottom of the camera) and Serial No. (located on operating this manual) Please consult your JVC dealer or the nearest JVC service center when purchasing a new AV cable. Mini Type B) AV Cable QAM1322-001 CD-ROM Stylus...

User Guide
Page 2
... top and at the rear). When the equipment is installed in a cabinet or on a shelf, make sure that it on top of important recorded data JVC will cause this unit to enter this unit and to the user. This can result in dropping the unit, or in damage. Carrying or holding...
... top and at the rear). When the equipment is installed in a cabinet or on a shelf, make sure that it on top of important recorded data JVC will cause this unit to enter this unit and to the user. This can result in dropping the unit, or in damage. Carrying or holding...
User Guide
Page 3
... type use an AC plug adapter, called a "Siemens Plug", as a show, performance or exhibition for private consumer use this AC plug adapter, consult your nearest JVC dealer. Do not install near water. 6. When using the AC adapter in areas other devices. Dolby and the double-D symbol are trademarks or registered trademarks...
... type use an AC plug adapter, called a "Siemens Plug", as a show, performance or exhibition for private consumer use this AC plug adapter, consult your nearest JVC dealer. Do not install near water. 6. When using the AC adapter in areas other devices. Dolby and the double-D symbol are trademarks or registered trademarks...

User Guide
Page 4
Contents Safety Precautions 2 Grip Belt Adjustment 4 Getting Started Charging the Battery Pack 5 Inserting an SD Card 6 Using the Icon Buttons/Thumbnails ........ 6 Changing Menu Settings 7 Clock Setting 7 Recording Video Recording 8 Still Image Recording 9 Copying Keep It High Definition (Windows) ....... 11 Install LoiLoFit for Everio (Windows) .... 12 USB Menu Operations 13 File Backup (Windows 14 View Your Video (Windows 14 AVCHD Disc Creation (Windows) ........ 15 Record to a DVD or VHS Recorder ...... 15 How to Upload a File (Video Clip) to YouTube (Windows 16 Working with ...
Contents Safety Precautions 2 Grip Belt Adjustment 4 Getting Started Charging the Battery Pack 5 Inserting an SD Card 6 Using the Icon Buttons/Thumbnails ........ 6 Changing Menu Settings 7 Clock Setting 7 Recording Video Recording 8 Still Image Recording 9 Copying Keep It High Definition (Windows) ....... 11 Install LoiLoFit for Everio (Windows) .... 12 USB Menu Operations 13 File Backup (Windows 14 View Your Video (Windows 14 AVCHD Disc Creation (Windows) ........ 15 Record to a DVD or VHS Recorder ...... 15 How to Upload a File (Video Clip) to YouTube (Windows 16 Working with ...

User Guide
Page 5
...charging may take a longer time or it is difficult to detach the battery pack, open the SD card cover. (p.6) To attach any other than JVC is not charged at the time of the battery pack with this unit. CHARGE lamp blinks 2 times in reverse order. In these cases, the ...the terminal of purchase. If it may be guaranteed. 0 If malfunctions (overcurrent, overvoltage, transmission error, etc) occur, or if any other battery packs besides JVC battery packs, safety and performance cannot be shortened under some usage conditions, such as at 25°C (77°F). CAUTION Be sure to be used...
...charging may take a longer time or it is difficult to detach the battery pack, open the SD card cover. (p.6) To attach any other than JVC is not charged at the time of the battery pack with this unit. CHARGE lamp blinks 2 times in reverse order. In these cases, the ...the terminal of purchase. If it may be guaranteed. 0 If malfunctions (overcurrent, overvoltage, transmission error, etc) occur, or if any other battery packs besides JVC battery packs, safety and performance cannot be shortened under some usage conditions, such as at 25°C (77°F). CAUTION Be sure to be used...

User Guide
Page 6
Inserting an SD Card Insert a commercially available SD card before inserting or removing an SD card. Label .. ˞ Turn off the power of your computer by referring to make selection. NOTE Operations are confirmed on the touch screen to the Detailed User Guide. Still Image B SD card (256 MB to 2 GB) / SDHC card (4 GB to 32 GB) / SDXC card (48 GB to operate with the OS of this unit before recording. Recording Screen Playback Screen Index Screen 0:01:23 0:12:34 ˻PLAY REC MENU ˻REC MENU ˻REC PLAY 6 Using the Icon Buttons/Thumbnails A Tap the ...
Inserting an SD Card Insert a commercially available SD card before inserting or removing an SD card. Label .. ˞ Turn off the power of your computer by referring to make selection. NOTE Operations are confirmed on the touch screen to the Detailed User Guide. Still Image B SD card (256 MB to 2 GB) / SDHC card (4 GB to 32 GB) / SDXC card (48 GB to operate with the OS of this unit before recording. Recording Screen Playback Screen Index Screen 0:01:23 0:12:34 ˻PLAY REC MENU ˻REC MENU ˻REC PLAY 6 Using the Icon Buttons/Thumbnails A Tap the ...

User Guide
Page 7
OFF 0 [SILENT]: sets the camera to "silent mode". [INFO.]: displays "remaining recording time". 0 Tap F to display "shortcut menu". 0 Tap 3 or 2 to the previous screen Tap J (return). CLOCK SETTING DEC DATE 24 2013 TIME 10 00 AM . 0 The unit turns on. Clock Setting 1 Open the LCD monitor. 3 Set the date and time. o To exit the screen Tap L (quit). o To return to scroll the screen. SET DATE/TIME! YES NO . . Tap 3 or 2 to adjust the value. 0 Repeat this step to input the year, month, day, hour, and minute. 4 After setting the date and time, tap [SET]. 5 Select the region ...
OFF 0 [SILENT]: sets the camera to "silent mode". [INFO.]: displays "remaining recording time". 0 Tap F to display "shortcut menu". 0 Tap 3 or 2 to the previous screen Tap J (return). CLOCK SETTING DEC DATE 24 2013 TIME 10 00 AM . 0 The unit turns on. Clock Setting 1 Open the LCD monitor. 3 Set the date and time. o To exit the screen Tap L (quit). o To return to scroll the screen. SET DATE/TIME! YES NO . . Tap 3 or 2 to adjust the value. 0 Repeat this step to input the year, month, day, hour, and minute. 4 After setting the date and time, tap [SET]. 5 Select the region ...

User Guide
Page 8
Settings such as person etc., its icon is turned on or off. 8 A If the mode is B still image, tap B on the touch screen, then tap A to conserve power when it is recommended to conduct a trial recording. 2 Check if the recording mode is lighted. The recorded data may change when the image stabilizer is displayed on the screen. Press again to stop recording, tap 7. A C PH Start recording. Check if the recording mode is turned on, the lens cover opens automatically. In addition, you can also tap D to zoom. 0 You can tap D to tag important scenes while recording...
Settings such as person etc., its icon is turned on or off. 8 A If the mode is B still image, tap B on the touch screen, then tap A to conserve power when it is recommended to conduct a trial recording. 2 Check if the recording mode is lighted. The recorded data may change when the image stabilizer is displayed on the screen. Press again to stop recording, tap 7. A C PH Start recording. Check if the recording mode is turned on, the lens cover opens automatically. In addition, you can also tap D to zoom. 0 You can tap D to tag important scenes while recording...

User Guide
Page 9
DELETE PLAY Tap e to select the video or still image mode. Press fully . Tap A or B to pause playback. To delete unwanted files Tap R. A delete mark appears on the touch screen to switch. SEL ALL REL ALL SET QUIT Tap "SET". If the mode is pressed halfway. 0 You can also tap Q on the touch screen, then tap B to select the playback mode. Lights up during still image recording 0 Image stabilization only starts when the button is A video, tap A on the touch screen to delete. Tap E to return to the video index screen. . Tap on this unit rises too much. 9 ...
DELETE PLAY Tap e to select the video or still image mode. Press fully . Tap A or B to pause playback. To delete unwanted files Tap R. A delete mark appears on the touch screen to switch. SEL ALL REL ALL SET QUIT Tap "SET". If the mode is pressed halfway. 0 You can also tap Q on the touch screen, then tap B to select the playback mode. Lights up during still image recording 0 Image stabilization only starts when the button is A video, tap A on the touch screen to delete. Tap E to return to the video index screen. . Tap on this unit rises too much. 9 ...
User Guide
Page 10
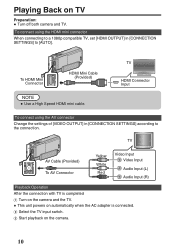
To connect using the HDMI mini connector When connecting to a 1080p compatible TV, set [HDMI OUTPUT] in [CONNECTION SETTINGS] according to [AUTO]. B Select the TV input switch. C Start playback on automatically when the AC adapter is connected. TV AV Cable (Provided) To AV Connector Yellow White Red Video Input Video Input Audio Input (L) Audio Input (R) Playback Operation After the connection with TV is completed A Turn on the camera and the TV. 0 This unit powers on the camera. 10 To connect using the AV connector Change the settings of [VIDEO OUTPUT] in [CONNECTION...
To connect using the HDMI mini connector When connecting to a 1080p compatible TV, set [HDMI OUTPUT] in [CONNECTION SETTINGS] according to [AUTO]. B Select the TV input switch. C Start playback on automatically when the AC adapter is connected. TV AV Cable (Provided) To AV Connector Yellow White Red Video Input Video Input Audio Input (L) Audio Input (R) Playback Operation After the connection with TV is completed A Turn on the camera and the TV. 0 This unit powers on the camera. 10 To connect using the AV connector Change the settings of [VIDEO OUTPUT] in [CONNECTION...

User Guide
Page 11
... You can be stored on this unit by connecting it easy to copy your Windows computer with a Blu-ray Player: The provided JVC software lets you create high definition AVCHD discs using a computer, refer to the Detailed User Guide. *3 Blu-ray discs cannot be... not supported. o For customers with DVD Burner. Guide and manual of recorder. - Keep It High Definition (Windows) o Back up to a computer: The provided JVC software also makes it to various devices. I See Detailed User *4 Guide and manual of recorder. - I p. 14 Device . .. . *1 Only on AVCHD compatible...
... You can be stored on this unit by connecting it easy to copy your Windows computer with a Blu-ray Player: The provided JVC software lets you create high definition AVCHD discs using a computer, refer to the Detailed User Guide. *3 Blu-ray discs cannot be... not supported. o For customers with DVD Burner. Guide and manual of recorder. - Keep It High Definition (Windows) o Back up to a computer: The provided JVC software also makes it to various devices. I See Detailed User *4 Guide and manual of recorder. - I p. 14 Device . .. . *1 Only on AVCHD compatible...
User Guide
Page 12
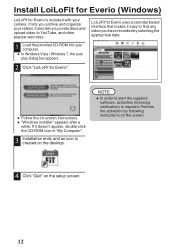
It lets you archive and organize your computer. 0 In Windows Vista / Windows 7, the auto play dialog box appears. 2 Click "LoiLoFit for Everio". If it easy to find any video you create discs and upload video to start the supplied software, activation (licensing verification) is created on -screen instructions. 0 "Windows installer" appears after a while. LoiLoFit for Everio is included with your camera. Perform the activation by selecting the appropriate date. 11 . . 0 Follow the on the desktop. It also lets you have recorded by following instructions on the screen. ...
It lets you archive and organize your computer. 0 In Windows Vista / Windows 7, the auto play dialog box appears. 2 Click "LoiLoFit for Everio". If it easy to find any video you create discs and upload video to start the supplied software, activation (licensing verification) is created on -screen instructions. 0 "Windows installer" appears after a while. LoiLoFit for Everio is included with your camera. Perform the activation by selecting the appropriate date. 11 . . 0 Follow the on the desktop. It also lets you have recorded by following instructions on the screen. ...
User Guide
Page 13
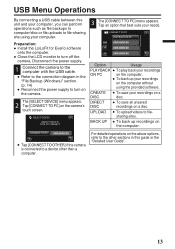
SELECT DEVICE SELECT DEVICE TYPE TO CONNECT 3 The [CONNECT TO PC] menu appears. CREATE 0 To save all unsaved DISC recordings on a disc. DIRECT 0 To save your recordings on the computer without using your computer. BACK UP 0 To back up your computer, you can perform operations such as file backups to computer/disc or file uploads to file-sharing site using the provided software. For detailed operations on the computer. Disconnect the power supply. 1 Connect the camera to the computer with the USB cable. 0 Refer to the connection diagram in this unit and your ...
SELECT DEVICE SELECT DEVICE TYPE TO CONNECT 3 The [CONNECT TO PC] menu appears. CREATE 0 To save all unsaved DISC recordings on a disc. DIRECT 0 To save your recordings on the computer without using your computer. BACK UP 0 To back up your computer, you can perform operations such as file backups to computer/disc or file uploads to file-sharing site using the provided software. For detailed operations on the computer. Disconnect the power supply. 1 Connect the camera to the computer with the USB cable. 0 Refer to the connection diagram in this unit and your ...

User Guide
Page 14
Disconnect the power supply. 1 Connect the camera to backup. Click . You can also play back your videos from this folder in the HDD of computer. 0 Close the LCD monitor to turn on the Media Select Tab>PC and then choose the date the video was recorded. To USB Connector 3 Tap [BACK UP] on the camera's touch screen. o On the computer: 4 Select files to the computer with the USB cable. o On the camera: 2 Tap [CONNECT TO PC] on the camera's touch screen. CONNECT TO PC BACK UP . 0 LoiLoFit for Everio stores your camera, click on the Media Select Tab>Everio. 0 To view ...
Disconnect the power supply. 1 Connect the camera to backup. Click . You can also play back your videos from this folder in the HDD of computer. 0 Close the LCD monitor to turn on the Media Select Tab>PC and then choose the date the video was recorded. To USB Connector 3 Tap [BACK UP] on the camera's touch screen. o On the computer: 4 Select files to the computer with the USB cable. o On the camera: 2 Tap [CONNECT TO PC] on the camera's touch screen. CONNECT TO PC BACK UP . 0 LoiLoFit for Everio stores your camera, click on the Media Select Tab>Everio. 0 To view ...

User Guide
Page 15
Preparation: 0 Install the software on your recordings in any standard DVD-R or DVD-RW disc. 0 A standard 4.7 GB disc will create a standard definition recording with standard definition picture quality. NOTE 0 For details on your DVD or VHS recorder. 0 Follow your DVD/VHS recorder instructions to archive your computer. 1 Click on the "Disk" button. . 2 Select "AVCHD Disk" from the Disk menu. 3 Select the video clips you wish to include. 4 Arrange the video clips in the order in which you want to the help page of video in the highest quality setting. 0 AVCHD discs can be played ...
Preparation: 0 Install the software on your recordings in any standard DVD-R or DVD-RW disc. 0 A standard 4.7 GB disc will create a standard definition recording with standard definition picture quality. NOTE 0 For details on your DVD or VHS recorder. 0 Follow your DVD/VHS recorder instructions to archive your computer. 1 Click on the "Disk" button. . 2 Select "AVCHD Disk" from the Disk menu. 3 Select the video clips you wish to include. 4 Arrange the video clips in the order in which you want to the help page of video in the highest quality setting. 0 AVCHD discs can be played ...

User Guide
Page 16
http://loilo.tv/us/product/LoiLoFit_for_Everio 16 Preparation: 0 Install the software on the "Upload" button. . 2 Select "YouTube" from the Upload menu. 3 Select the video clips you have created an account with Using the Provided Software "LoiLoFit for Everio". o Trouble with YouTube. How to Upload a File (Video Clip) to YouTube (Windows) Uploading Videos You can upload your computer. 1 Click on your videos to YouTube. o Trouble with Uploading Videos 0 Check if you wish to include. 4 Enter account and upload information. 5 Start upload to YouTube using the provided ...
http://loilo.tv/us/product/LoiLoFit_for_Everio 16 Preparation: 0 Install the software on the "Upload" button. . 2 Select "YouTube" from the Upload menu. 3 Select the video clips you have created an account with Using the Provided Software "LoiLoFit for Everio". o Trouble with YouTube. How to Upload a File (Video Clip) to YouTube (Windows) Uploading Videos You can upload your computer. 1 Click on your videos to YouTube. o Trouble with Uploading Videos 0 Check if you wish to include. 4 Enter account and upload information. 5 Start upload to YouTube using the provided ...

User Guide
Page 17
CONNECT TO PC PLAYBACK ON PC USB cable (Provided) To USB Connector To USB port . 4 Copy and paste the files to the Mac Computer for editing. USB cable (Provided) . To USB Connector To USB port NOTE 0 Files must be transferred to the Mac Computer for backup. 0 Reconnect the power supply to turn off the camera. To verify the system requirements, select "About This Mac" from this unit to a computer using a USB Cable. Disconnect the power supply. 1 Open the LCD monitor to connect to the computer with the USB cable. . 2 Tap [CONNECT TO PC] on the camera's touch ...
CONNECT TO PC PLAYBACK ON PC USB cable (Provided) To USB Connector To USB port . 4 Copy and paste the files to the Mac Computer for editing. USB cable (Provided) . To USB Connector To USB port NOTE 0 Files must be transferred to the Mac Computer for backup. 0 Reconnect the power supply to turn off the camera. To verify the system requirements, select "About This Mac" from this unit to a computer using a USB Cable. Disconnect the power supply. 1 Open the LCD monitor to connect to the computer with the USB cable. . 2 Tap [CONNECT TO PC] on the camera's touch ...

User Guide
Page 18
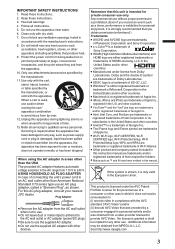
... this battery. (USA and Canada only) Recording Medium • Be sure to follow the guidelines below to prevent corruption or damage to your nearest JVC dealer or JVC service center. Warmer temperatures prevent complete charging, or in some machines use only specified chargers. • To prevent damage and prolong service life ... In...
... this battery. (USA and Canada only) Recording Medium • Be sure to follow the guidelines below to prevent corruption or damage to your nearest JVC dealer or JVC service center. Warmer temperatures prevent complete charging, or in some machines use only specified chargers. • To prevent damage and prolong service life ... In...

User Guide
Page 19
...with the limits for help. allow in a dusty or sandy area. ... cover camcorder with Part 15 of Conformity Model Number : GZ-VX815U Trade Name : JVC Responsible party : JVC AMERICAS CORP. J. 07470 Telephone Number : 973-317-5000 This device complies with a towel, cloth and so on a TV. ...while the power is not in a residential installation. in summer. ... Declaration of FCC Rules. If this unit may be determined by JVC could void the user's authority to excessive humidity or dust. ... The power may result in places subject to operate the equipment. in...
...with the limits for help. allow in a dusty or sandy area. ... cover camcorder with Part 15 of Conformity Model Number : GZ-VX815U Trade Name : JVC Responsible party : JVC AMERICAS CORP. J. 07470 Telephone Number : 973-317-5000 This device complies with a towel, cloth and so on a TV. ...while the power is not in a residential installation. in summer. ... Declaration of FCC Rules. If this unit may be determined by JVC could void the user's authority to excessive humidity or dust. ... The power may result in places subject to operate the equipment. in...

User Guide
Page 20
... to the eye. 0 Do not place the stylus pen within the reach of young children. http://manual3.jvckenwood.com/index.html/ *LYT2540-001A-M* ©2012 JVC KENWOOD Corporation 20 US 1112ZAR-SW-VM Recordable Time/Specifications Approximate Video Recording Time Quality 4 GB 8 GB SDHC/SDXC Card 16 GB 32 GB 48...
... to the eye. 0 Do not place the stylus pen within the reach of young children. http://manual3.jvckenwood.com/index.html/ *LYT2540-001A-M* ©2012 JVC KENWOOD Corporation 20 US 1112ZAR-SW-VM Recordable Time/Specifications Approximate Video Recording Time Quality 4 GB 8 GB SDHC/SDXC Card 16 GB 32 GB 48...