Software Guide
Page 2
... to the conditions of such defective media. EXCEPT FOR THE EXPRESS WARRANTIES STATED HEREIN AND TO THE EXTENT PERMITTED BY APPLICABLE LAW, JVC AND ITS LICENSORS DISCLAIM ANY OTHER WARRANTIES, EITHER EXPRESS OR IMPLIED, INCLUDING BUT NOT LIMITED TO IMPLIED WARRANTIES OF MERCHANTABILITY AND FITNESS ...THE PROGRAM (1) You may not reverse engineer, decompile, disassemble, revise or modify the Program, except to the extent that expressly permitted by JVC and its licensor, and remain vested in connection with the Program shall be replacement of this Agreement. (3) You have no right to grant ...
... to the conditions of such defective media. EXCEPT FOR THE EXPRESS WARRANTIES STATED HEREIN AND TO THE EXTENT PERMITTED BY APPLICABLE LAW, JVC AND ITS LICENSORS DISCLAIM ANY OTHER WARRANTIES, EITHER EXPRESS OR IMPLIED, INCLUDING BUT NOT LIMITED TO IMPLIED WARRANTIES OF MERCHANTABILITY AND FITNESS ...THE PROGRAM (1) You may not reverse engineer, decompile, disassemble, revise or modify the Program, except to the extent that expressly permitted by JVC and its licensor, and remain vested in connection with the Program shall be replacement of this Agreement. (3) You have no right to grant ...
Software Guide
Page 3
...in this software. CAUTION: Operate this equipment according to the operating procedures described in conflict with the same use rights JVC grants all disputes which may claim against You for any notice to operate the equipment. GOVERNMENT USER If You are an agency ...of the United States of America (the "Government"), You acknowledge JVC's representation that You will be in Federal Acquisition Regulation (FAR) part 2.101 (g) consisting unpublished "Commercial Computer Software" as those of the ...
...in this software. CAUTION: Operate this equipment according to the operating procedures described in conflict with the same use rights JVC grants all disputes which may claim against You for any notice to operate the equipment. GOVERNMENT USER If You are an agency ...of the United States of America (the "Government"), You acknowledge JVC's representation that You will be in Federal Acquisition Regulation (FAR) part 2.101 (g) consisting unpublished "Commercial Computer Software" as those of the ...
Software Guide
Page 4
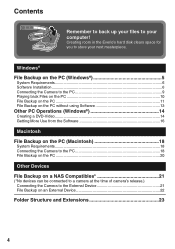
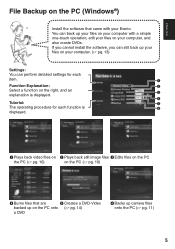
Creating room in the Everio's hard disk clears space for you to store your computer! Windows® File Backup on the PC (Windows 5 System Requirements...6 Software Installation...6 Connecting the Camera ...
Creating room in the Everio's hard disk clears space for you to store your computer! Windows® File Backup on the PC (Windows 5 System Requirements...6 Software Installation...6 Connecting the Camera ...
Software Guide
Page 5
A Function Explanation: B Select a function on your Everio. C D Tutorial: E The operating procedure for each function is displayed. A Plays back video files on B Plays back still image files C Edits files on ...
A Function Explanation: B Select a function on your Everio. C D Tutorial: E The operating procedure for each function is displayed. A Plays back video files on B Plays back still image files C Edits files on ...
Software Guide
Page 6
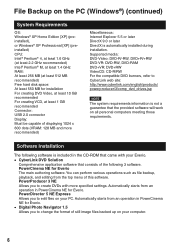
... on your PC. Automatically starts from an operation in PowerCinema NE for Everio. PowerCinema NE for Everio The main authoring software. PowerDirector 5 NE Express Allows you to create DVDs with your Everio. Automatically starts from an operation in PowerCinema NE for Everio. Digital Photo Navigator 1.5 Allows you to CyberLink web site: http://www.cyberlink...
... on your PC. Automatically starts from an operation in PowerCinema NE for Everio. PowerCinema NE for Everio The main authoring software. PowerDirector 5 NE Express Allows you to create DVDs with your Everio. Automatically starts from an operation in PowerCinema NE for Everio. Digital Photo Navigator 1.5 Allows you to CyberLink web site: http://www.cyberlink...

Software Guide
Page 7
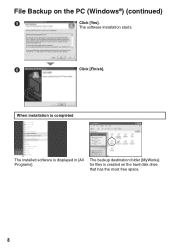
B Click [Easy Installation]. C Click [Yes]. ENGLISH Preparation: Quit any other application icons on next page 7 D Select the desired language and click [OK]. Continued on the status bar.) A Load the provided CD-ROM into the PC. Follow the instructions on the screen to install or the installation destination folder etc., select [Custom Installation]. After a moment, the [SETUP] screen appears. If the [SETUP] screen does not appear, double-click the CD-ROM icon in the [My Computer]. If you are using. (Check that there are no other software you want to specify ...
B Click [Easy Installation]. C Click [Yes]. ENGLISH Preparation: Quit any other application icons on next page 7 D Select the desired language and click [OK]. Continued on the status bar.) A Load the provided CD-ROM into the PC. Follow the instructions on the screen to install or the installation destination folder etc., select [Custom Installation]. After a moment, the [SETUP] screen appears. If the [SETUP] screen does not appear, double-click the CD-ROM icon in the [My Computer]. If you are using. (Check that there are no other software you want to specify ...
Software Guide
Page 8
F Click [Finish]. The backup destination folder [MyWorks] for files is displayed in [All Programs]. When installation is completed The installed software is created on the PC (Windows®) (continued) E Click [Yes]. The software installation starts. File Backup on the hard disk drive that has the most free space. 8
F Click [Finish]. The backup destination folder [MyWorks] for files is displayed in [All Programs]. When installation is completed The installed software is created on the PC (Windows®) (continued) E Click [Yes]. The software installation starts. File Backup on the hard disk drive that has the most free space. 8
Software Guide
Page 9
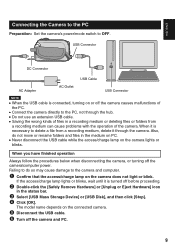
ENGLISH Connecting the Camera to the PC Preparation: Set the camera's power/mode switch to the PC, not through the camera. Connect the camera directly to OFF. Do not use an extension USB cable. B Double-click the [Safely Remove Hardware] or [Unplug or Eject Hardware] icon in the medium on the connected camera. E Disconnect the USB cable. F Turn off the camera/computer power. C Select [USB Mass Storage Device] or [USB Disk], and then click [Stop]. USB Connector DC Connector USB Cable AC Adapter AC Outlet USB Connector NOTE When the USB cable is connected, turning on ...
ENGLISH Connecting the Camera to the PC Preparation: Set the camera's power/mode switch to the PC, not through the camera. Connect the camera directly to OFF. Do not use an extension USB cable. B Double-click the [Safely Remove Hardware] or [Unplug or Eject Hardware] icon in the medium on the connected camera. E Disconnect the USB cable. F Turn off the camera/computer power. C Select [USB Mass Storage Device] or [USB Disk], and then click [Stop]. USB Connector DC Connector USB Cable AC Adapter AC Outlet USB Connector NOTE When the USB cable is connected, turning on ...
Software Guide
Page 10
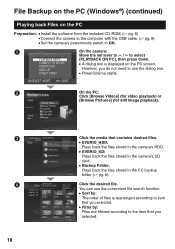
EVERIO_SD: Plays back the files stored in the PC backup folder (੬ pg. 8). Sort by : Files are filtered according to the item that you selected. Filter by : The order of files is displayed on the PC Preparation: Install the software from the included CD-ROM. (੬ pg. 6) Connect the camera to the computer with the USB cable. (੬ pg. 9) Set the camera's power/mode switch to select PLAYBACK ON PC [PLAYBACK ON PC], then press down. A On the camera: Move the set lever to e / f to ON. Backup Folder: Plays back the files stored in the camera's ...
EVERIO_SD: Plays back the files stored in the PC backup folder (੬ pg. 8). Sort by : Files are filtered according to the item that you selected. Filter by : The order of files is displayed on the PC Preparation: Install the software from the included CD-ROM. (੬ pg. 6) Connect the camera to the computer with the USB cable. (੬ pg. 9) Set the camera's power/mode switch to select PLAYBACK ON PC [PLAYBACK ON PC], then press down. A On the camera: Move the set lever to e / f to ON. Backup Folder: Plays back the files stored in the camera's ...
Software Guide
Page 11
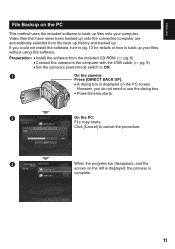
ENGLISH File Backup on the PC This method uses the included software to ON. A dialog box is displayed on the left is displayed, the process is complete. 11 C When the progress bar disappears, and the screen on the PC screen. Preparation: Install the software from the back up history and backed up. PowerCinema starts. If you do not need to back up files onto your files without using this software. However, you could not install the software, turn to pg. 13 for details of how to use the dialog box. A On the camera: Press [DIRECT BACK UP]. B On the ...
ENGLISH File Backup on the PC This method uses the included software to ON. A dialog box is displayed on the left is displayed, the process is complete. 11 C When the progress bar disappears, and the screen on the PC screen. Preparation: Install the software from the back up history and backed up. PowerCinema starts. If you do not need to back up files onto your files without using this software. However, you could not install the software, turn to pg. 13 for details of how to use the dialog box. A On the camera: Press [DIRECT BACK UP]. B On the ...
Software Guide
Page 12
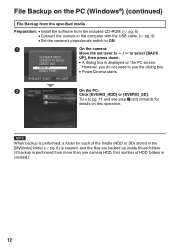
SELECT SET QUIT B On the PC: Click [EVERIO_HDD] or [EVERIO_SD]. NOTE When backup is performed, a folder for details on this operation. However, you do not need to select [BACK PLAYBACK ON PC CONNECT TO DEVICE CREATE DVD BACK UP UP], then press down. A On the camera: Move the set lever to e / f to use the dialog box. DIRECT PRINT PowerCinema starts. Turn to pg. 11 and see step B and onwards for each of HDD folders is displayed on the PC screen. A dialog box is created.) 12 File Backup on the PC (Windows®) (continued) File Backup from the specifi...
SELECT SET QUIT B On the PC: Click [EVERIO_HDD] or [EVERIO_SD]. NOTE When backup is performed, a folder for details on this operation. However, you do not need to select [BACK PLAYBACK ON PC CONNECT TO DEVICE CREATE DVD BACK UP UP], then press down. A On the camera: Move the set lever to e / f to use the dialog box. DIRECT PRINT PowerCinema starts. Turn to pg. 11 and see step B and onwards for each of HDD folders is displayed on the PC screen. A dialog box is created.) 12 File Backup on the PC (Windows®) (continued) File Backup from the specifi...
Software Guide
Page 13
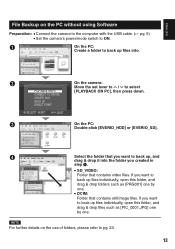
If you want to back up files into the folder you want to back up files individually, open this folder, and drag & drop folders such as [PIC_0001.JPG] one by one . D Select the folder that you want to back up files individually, open this folder, and drag & drop files such as [PRG001] one by one . DCIM: Folder that contains video files. A On the PC: Create a folder to back up , and drag & drop it into . NOTE For further details on the PC without using Software Preparation: Connect the camera to the computer with the USB cable. (&#...
If you want to back up files into the folder you want to back up files individually, open this folder, and drag & drop folders such as [PIC_0001.JPG] one by one . D Select the folder that you want to back up files individually, open this folder, and drag & drop files such as [PRG001] one by one . DCIM: Folder that contains video files. A On the PC: Create a folder to back up , and drag & drop it into . NOTE For further details on the PC without using Software Preparation: Connect the camera to the computer with the USB cable. (&#...
Software Guide
Page 14
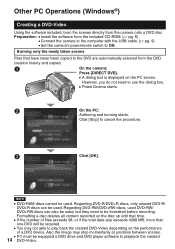
NOTE DVD-RAM discs cannot be formatted before recording. Formatting a disc deletes all content recorded on the PC screen. You may stop momentarily at junctions between scenes. However, you do not need to be used . Regarding DVD-R/DVD+R discs, only unused DVD-R/ DVD+R discs can also be equipped a DVD drive and DVD player software to play back the created DVD-Video depending on the performance of files exceeds 98, or if the total data size exceeds 4300 MB, more than one DVD will be used . PC must be used, but they need to use the dialog box. A On the camera: ...
NOTE DVD-RAM discs cannot be formatted before recording. Formatting a disc deletes all content recorded on the PC screen. You may stop momentarily at junctions between scenes. However, you do not need to be used . Regarding DVD-R/DVD+R discs, only unused DVD-R/ DVD+R discs can also be equipped a DVD drive and DVD player software to play back the created DVD-Video depending on the performance of files exceeds 98, or if the total data size exceeds 4300 MB, more than one DVD will be used . PC must be used, but they need to use the dialog box. A On the camera: ...
Software Guide
Page 15
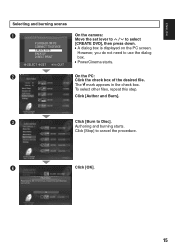
However, you do not need to cancel the procedure. Click [Stop] to use the dialog DIRECT PRINT box. D Click [OK]. 15 CONNECT TO DEVICE CREATE DVD BACK UP A dialog box is displayed on the PC screen. C Click [Burn to select PLAYBACK ON PC [CREATE DVD], then press down. B On the PC: Click the check box of the desired file. To select other files, repeat this step. Authoring and burning starts. SELECT SET QUIT PowerCinema starts. Click [Author and Burn]. The mark appears in the check box. ENGLISH Selecting and burning scenes A On the ...
However, you do not need to cancel the procedure. Click [Stop] to use the dialog DIRECT PRINT box. D Click [OK]. 15 CONNECT TO DEVICE CREATE DVD BACK UP A dialog box is displayed on the PC screen. C Click [Burn to select PLAYBACK ON PC [CREATE DVD], then press down. B On the PC: Click the check box of the desired file. To select other files, repeat this step. Authoring and burning starts. SELECT SET QUIT PowerCinema starts. Click [Author and Burn]. The mark appears in the check box. ENGLISH Selecting and burning scenes A On the ...
Software Guide
Page 16
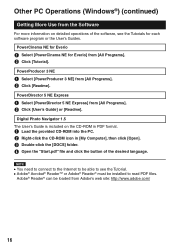
...the CD-ROM in [My Computer], then click [Open]. NOTE You need to connect to the Internet to be installed to see the Tutorials for Everio] from [All Programs]. D Open the "Start.pdf" file and click the button of the software, see the Tutorial. PowerCinema NE for... Everio A Select [PowerCinema NE for each software program or the User's Guides. B Click [Tutorial]. Adobe® Acrobat® ReaderTM or Adobe® Reader® must be...
...the CD-ROM in [My Computer], then click [Open]. NOTE You need to connect to the Internet to be installed to see the Tutorials for Everio] from [All Programs]. D Open the "Start.pdf" file and click the button of the software, see the Tutorial. PowerCinema NE for... Everio A Select [PowerCinema NE for each software program or the User's Guides. B Click [Tutorial]. Adobe® Acrobat® ReaderTM or Adobe® Reader® must be...
Software Guide
Page 17
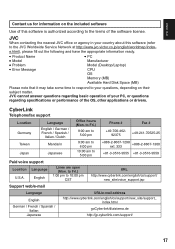
...included software Use of fice or agency in your PC, or questions regarding specifications or performance of the software license. JVC cannot answer questions regarding basic operation of your country about this software is authorized according to 10:00 pm CST URL http://www.cyberlink....co.jp/english/worldmap/indexe.html), please fill out the following and have the appropriate information ready. English Lines are open (Mon. JVC When contacting the nearest JVC of this software (refer to 5:00 pm Phone # Fax # +49-700-46292375 +49-241-70525-25 +886-2-8667-1298 ext. ...
...included software Use of fice or agency in your PC, or questions regarding specifications or performance of the software license. JVC cannot answer questions regarding basic operation of your country about this software is authorized according to 10:00 pm CST URL http://www.cyberlink....co.jp/english/worldmap/indexe.html), please fill out the following and have the appropriate information ready. English Lines are open (Mon. JVC When contacting the nearest JVC of this software (refer to 5:00 pm Phone # Fax # +49-700-46292375 +49-241-70525-25 +886-2-8667-1298 ext. ...
Software Guide
Page 18
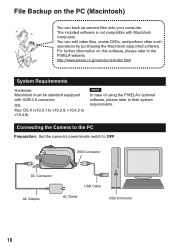
... operations by purchasing the Macintosh supported software. Macintosh File Backup on this software, please refer to the PIXELA website. http://www.pixela.co.jp/oem/jvc/e/index.html System Requirements Hardware: Macintosh must be standard equipped with Macintosh computers. USB Connector DC Connector AC Adapter USB Cable AC Outlet USB Connector...
... operations by purchasing the Macintosh supported software. Macintosh File Backup on this software, please refer to the PIXELA website. http://www.pixela.co.jp/oem/jvc/e/index.html System Requirements Hardware: Macintosh must be standard equipped with Macintosh computers. USB Connector DC Connector AC Adapter USB Cable AC Outlet USB Connector...
Software Guide
Page 19
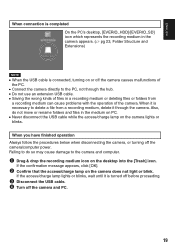
When it is necessary to the camera and computer. Never disconnect the USB cable while the access/charge lamp on the camera does not light or blink. B Confirm that the access/charge lamp on the camera lights or blinks. When you have finished operation Always follow the procedures below when disconnecting the camera, or turning off the camera and PC. 19 Failing to do not move or rename folders and files in the medium on PC. ENGLISH When connection is completed On the PC's desktop, [EVERIO_HDD]/[EVERIO_SD] icon which represents the recording medium in the ...
When it is necessary to the camera and computer. Never disconnect the USB cable while the access/charge lamp on the camera does not light or blink. B Confirm that the access/charge lamp on the camera lights or blinks. When you have finished operation Always follow the procedures below when disconnecting the camera, or turning off the camera and PC. 19 Failing to do not move or rename folders and files in the medium on PC. ENGLISH When connection is completed On the PC's desktop, [EVERIO_HDD]/[EVERIO_SD] icon which represents the recording medium in the ...
Software Guide
Page 20
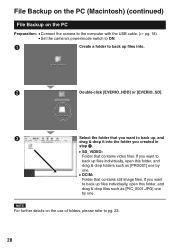
B Double-click [EVERIO_HDD] or [EVERIO_SD]. SD_VIDEO: Folder that contains still image files. DCIM: Folder that contains video files. NOTE For further details on the PC Preparation: Connect the camera to the computer with the USB cable. (੬ pg. 18) Set the camera's power/mode switch to ON. If you want to back up files individually, open this folder, and drag & drop files such as [PRG001] one by one . File Backup on the PC (Macintosh) (continued) File Backup on the use of folders, please refer to pg. 23. 20 If you created in step A. C ...
B Double-click [EVERIO_HDD] or [EVERIO_SD]. SD_VIDEO: Folder that contains still image files. DCIM: Folder that contains video files. NOTE For further details on the PC Preparation: Connect the camera to the computer with the USB cable. (੬ pg. 18) Set the camera's power/mode switch to ON. If you want to back up files individually, open this folder, and drag & drop files such as [PRG001] one by one . File Backup on the PC (Macintosh) (continued) File Backup on the use of folders, please refer to pg. 23. 20 If you created in step A. C ...
Software Guide
Page 21
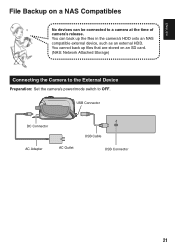
You can back up files that are stored on a NAS Compatibles No devices can be connected to OFF. You cannot back up the files in the camera's HDD onto an NAS compatible external device, such as an external HDD. USB Connector DC Connector AC Adapter AC Outlet USB Cable USB Connector 21 ENGLISH Other Devices File Backup on an SD card. (NAS: Network Attached Storage) Connecting the Camera to the External Device Preparation: Set the camera's power/mode switch to a camera at the time of camera's release.
You can back up files that are stored on a NAS Compatibles No devices can be connected to OFF. You cannot back up the files in the camera's HDD onto an NAS compatible external device, such as an external HDD. USB Connector DC Connector AC Adapter AC Outlet USB Cable USB Connector 21 ENGLISH Other Devices File Backup on an SD card. (NAS: Network Attached Storage) Connecting the Camera to the External Device Preparation: Set the camera's power/mode switch to a camera at the time of camera's release.
