

Printer Friendly Specs
Page 1
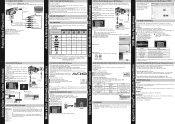
GZ-HM960B Flash Memory Camera www.jvc.com Key Feature A high-sensitivity step-up Full HD camcorder with 1/4.1-inch 3.32M Back-illuminated CMOS Sensor : : 16GB built-in memory and Memory Card Slot for SD/SDXC/SDHC/SD : : 24Mbps High bit rate recording : :...Technology and Enhanced Advanced Image Stabilizer deliver a range of Full HD 1920x1080 : : 3.5" "Frameless" Touch Panel LCD (920k-Pixel) : : F1.2 Super Bright & 29.5mm Wide Angle JVC HD GT LENS : : 3D 3.5-inch LCD (glasses free) : : 29.5mm Wide Angle : : Built-in Bluetooth® Wireless Technology : : Super LoLux with 16GB internal Flash ...
GZ-HM960B Flash Memory Camera www.jvc.com Key Feature A high-sensitivity step-up Full HD camcorder with 1/4.1-inch 3.32M Back-illuminated CMOS Sensor : : 16GB built-in memory and Memory Card Slot for SD/SDXC/SDHC/SD : : 24Mbps High bit rate recording : :...Technology and Enhanced Advanced Image Stabilizer deliver a range of Full HD 1920x1080 : : 3.5" "Frameless" Touch Panel LCD (920k-Pixel) : : F1.2 Super Bright & 29.5mm Wide Angle JVC HD GT LENS : : 3D 3.5-inch LCD (glasses free) : : 29.5mm Wide Angle : : Built-in Bluetooth® Wireless Technology : : Super LoLux with 16GB internal Flash ...
Basic User Guide
Page 2
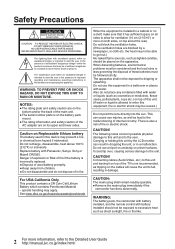
... SHOCK DO NOT OPEN CAUTION: TO REDUCE THE RISK OF ELECTRIC SHOCK, DO NOT REMOVE COVER (OR BACK). WARNING: The battery pack, the camcorder with battery installed, and the remote control with arrowhead symbol, within an equilateral triangle, is allowed to the malfunctioning of fire or electric ...THIS UNIT TO RAIN OR MOISTURE. Do not use a tripod on the cables will cause the unit to the Detailed User Guide http://manual.jvc.co.jp/index.html/ The exclamation point within the product's enclosure that it on top of fire if the battery is installed in...
... SHOCK DO NOT OPEN CAUTION: TO REDUCE THE RISK OF ELECTRIC SHOCK, DO NOT REMOVE COVER (OR BACK). WARNING: The battery pack, the camcorder with battery installed, and the remote control with arrowhead symbol, within an equilateral triangle, is allowed to the malfunctioning of fire or electric ...THIS UNIT TO RAIN OR MOISTURE. Do not use a tripod on the cables will cause the unit to the Detailed User Guide http://manual.jvc.co.jp/index.html/ The exclamation point within the product's enclosure that it on top of fire if the battery is installed in...

Basic User Guide
Page 20
...HDMI Mini Cable (Provided) . o Playing back 3D images on a 3D compatible TV (for GZ-HM960) If you are using an HDTV, you can play back in HD quality by connecting ...1 Connect to a TV. * Refer also to the HDMI mini connector. COMMON Menu). To turn off the camcorder by pressing the M button for about 2 seconds. Playing Back on this unit, a message will be experienced if...the Detailed User Guide (Menu Settings - To HDMI Mini Connector Connecting to the Detailed User Guide http://manual.jvc.co.jp/index.html/ o Playing back in use. 0 Turn off the message display, set "3D ...
...HDMI Mini Cable (Provided) . o Playing back 3D images on a 3D compatible TV (for GZ-HM960) If you are using an HDTV, you can play back in HD quality by connecting ...1 Connect to a TV. * Refer also to the HDMI mini connector. COMMON Menu). To turn off the camcorder by pressing the M button for about 2 seconds. Playing Back on this unit, a message will be experienced if...the Detailed User Guide (Menu Settings - To HDMI Mini Connector Connecting to the Detailed User Guide http://manual.jvc.co.jp/index.html/ o Playing back in use. 0 Turn off the message display, set "3D ...

Basic User Guide
Page 23
... in the illustration is displayed. NOTE 0 The recordable time on the DVD writer or external Bluray drive and insert a new disc. 0 Turn off the camcorder by pressing the M button for an external Blu-ray drive. 1 2 Connect the USB cable and the AC adapter. Turn on the disc varies according... on an AVCHD compatible device (such as Blu-ray recorder). AC Adapter To AC Outlet DVD Writer(CU-VD3U) 0 Refer also to format your nearest JVC service center. o To play back the created disc Play back on a computer before using. . To DC Connector o Compatible DVD writers 0 CU-VD50U 0 CU-...
... in the illustration is displayed. NOTE 0 The recordable time on the DVD writer or external Bluray drive and insert a new disc. 0 Turn off the camcorder by pressing the M button for an external Blu-ray drive. 1 2 Connect the USB cable and the AC adapter. Turn on the disc varies according... on an AVCHD compatible device (such as Blu-ray recorder). AC Adapter To AC Outlet DVD Writer(CU-VD3U) 0 Refer also to format your nearest JVC service center. o To play back the created disc Play back on a computer before using. . To DC Connector o Compatible DVD writers 0 CU-VD50U 0 CU-...

Basic User Guide
Page 26
... on this unit 0 Set "VIDEO OUTPUT" in standard quality by pressing the M button for GZ-HM860). Preparation on the recorder. 0 After playback is complete, stop the recording. 26 For more information..., refer to the Detailed User Guide http://manual.jvc.co.jp/index.html/ Yellow White Red Video Input Video Input Audio Input (L) Audio Input (R)...the TV, DVD recorder, VCR, etc. 1 Connect to a VCR/DVD recorder. 0 Turn off the camcorder by connecting to a DVD recorder or VCR. To DC Connector AC Adapter To AC Outlet VCR/DVD Recorder...
... on this unit 0 Set "VIDEO OUTPUT" in standard quality by pressing the M button for GZ-HM860). Preparation on the recorder. 0 After playback is complete, stop the recording. 26 For more information..., refer to the Detailed User Guide http://manual.jvc.co.jp/index.html/ Yellow White Red Video Input Video Input Audio Input (L) Audio Input (R)...the TV, DVD recorder, VCR, etc. 1 Connect to a VCR/DVD recorder. 0 Turn off the camcorder by connecting to a DVD recorder or VCR. To DC Connector AC Adapter To AC Outlet VCR/DVD Recorder...

Basic User Guide
Page 30
A Click "Run INSTALL.EXE" in calendar format and perform simple editing using the provided software. 1 Open the LCD monitor. 0 Turn off the camcorder by pressing the M button for GZ-HM860). 0 This unit turns on and the "BACK-UP" menu appears. 3 Tap "CONNECT TO PC". . 0 Follow the on-screen instructions. 7 Click "... AC adapter shown in step 6. 0 For the operating details of Everio MediaBrowser 3 BE, refer to the Detailed User Guide http://manual.jvc.co.jp/index.html/ NOTE 0 To view the Detailed User Guide, connect to the internet and click "Detailed User Guide" in the illustration .
A Click "Run INSTALL.EXE" in calendar format and perform simple editing using the provided software. 1 Open the LCD monitor. 0 Turn off the camcorder by pressing the M button for GZ-HM860). 0 This unit turns on and the "BACK-UP" menu appears. 3 Tap "CONNECT TO PC". . 0 Follow the on-screen instructions. 7 Click "... AC adapter shown in step 6. 0 For the operating details of Everio MediaBrowser 3 BE, refer to the Detailed User Guide http://manual.jvc.co.jp/index.html/ NOTE 0 To view the Detailed User Guide, connect to the internet and click "Detailed User Guide" in the illustration .
Basic User Guide
Page 31
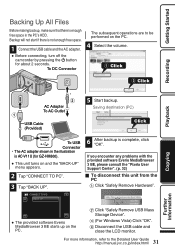
...will not start if there is not enough free space. 1 Connect the USB cable and the AC adapter. 0 Before connecting, turn off the camcorder by pressing the M button for GZ-HM860). 0 This unit turns on and the "BACK-UP" menu appears. 2 Tap "CONNECT TO PC". 3 Tap "BACK UP". 6 After...To disconnect this unit from the PC A Click "Safely Remove Hardware". To DC Connector The subsequent operations are to the Detailed User Guide http://manual.jvc.co.jp/index.html/ CONNECT TO PC BACK UP Copying .. B Click "Safely Remove USB Mass Storage Device". Getting Started Backing Up All Files ...
...will not start if there is not enough free space. 1 Connect the USB cable and the AC adapter. 0 Before connecting, turn off the camcorder by pressing the M button for GZ-HM860). 0 This unit turns on and the "BACK-UP" menu appears. 2 Tap "CONNECT TO PC". 3 Tap "BACK UP". 6 After...To disconnect this unit from the PC A Click "Safely Remove Hardware". To DC Connector The subsequent operations are to the Detailed User Guide http://manual.jvc.co.jp/index.html/ CONNECT TO PC BACK UP Copying .. B Click "Safely Remove USB Mass Storage Device". Getting Started Backing Up All Files ...

Basic User Guide
Page 36
...temperatures prevent complete • To prevent damage to the LCD monitor, DO NOT charging, or in use current even when switched off the camcorder power or Battery Pack remove the battery or AC adapter during shooting, playback, or when otherwise The supplied battery pack is a Terminals .... ... When transporting, carry the battery in a cool, dry place. The data is not to be sure to follow the guidelines below JVC dealer. completely erased from metallic objects when not in use , replace, or store the recording medium in locations that emit strong electromagnetic waves. ...
...temperatures prevent complete • To prevent damage to the LCD monitor, DO NOT charging, or in use current even when switched off the camcorder power or Battery Pack remove the battery or AC adapter during shooting, playback, or when otherwise The supplied battery pack is a Terminals .... ... When transporting, carry the battery in a cool, dry place. The data is not to be sure to follow the guidelines below JVC dealer. completely erased from metallic objects when not in use , replace, or store the recording medium in locations that emit strong electromagnetic waves. ...
Basic User Guide
Page 37
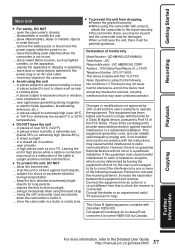
power supply while the power is inside it. Model Number : GZ-HM960U/GZ-HM860U ... in places of over 40°C the equipment. Address : 1700 Valley Road Wayne, N. This equipment has been or 104°F) or extremely low (under 0&#.... leave dust or metal objects adhered to become wet. ... interference that interference will not occur in accordance with a tripod, attach the camcorder to the Detailed User Guide http://manual.jvc.co.jp/index.html/ in a malfunction if the cable is connected. allow inflammables, water or metallic objects to provide reasonable...
power supply while the power is inside it. Model Number : GZ-HM960U/GZ-HM860U ... in places of over 40°C the equipment. Address : 1700 Valley Road Wayne, N. This equipment has been or 104°F) or extremely low (under 0&#.... leave dust or metal objects adhered to become wet. ... interference that interference will not occur in accordance with a tripod, attach the camcorder to the Detailed User Guide http://manual.jvc.co.jp/index.html/ in a malfunction if the cable is connected. allow inflammables, water or metallic objects to provide reasonable...
Easy Start Guide
Page 1
... THE CAMERA AC Adapter AC Adapter AP-V30U* AC-V11U* (for GZ-HM960) (for at the following website: http://manual.jvc.co.jp/index.html/ For additional online video tutorials, please visit: http://camcorder.jvc.com/tutorials.jsp USING THE ICON BUTTONS/THUMBNAILS There are some examples. ...operating this product, please refer to the "Detailed User Guide" at the following website: http://manual.jvc.co.jp/index.html/ For additional online video tutorials, please visit: http://camcorder.jvc.com/tutorials.jsp Customer Care Center TOLL FREE 1-800-252-5722 Register your video. For more ...
... THE CAMERA AC Adapter AC Adapter AP-V30U* AC-V11U* (for GZ-HM960) (for at the following website: http://manual.jvc.co.jp/index.html/ For additional online video tutorials, please visit: http://camcorder.jvc.com/tutorials.jsp USING THE ICON BUTTONS/THUMBNAILS There are some examples. ...operating this product, please refer to the "Detailed User Guide" at the following website: http://manual.jvc.co.jp/index.html/ For additional online video tutorials, please visit: http://camcorder.jvc.com/tutorials.jsp Customer Care Center TOLL FREE 1-800-252-5722 Register your video. For more ...
Easy Start Guide
Page 2
...play back your recordings in their original high definition quality. • You can upload your camcorder, click on Device>Camcorder in the following steps on the computer. G Click [Finish]. • Everio MediaBrowser ...up recordings on the PC. A Turn on the camera by pressing the B button for GZ-HM860). SELECT DEVICE SELECT DEVICE TYPE TO CONNECT CONNECT TO PC CONNECT TO OTHER CONNECT TO...the provided software "Everio MediaBrowser 3 BE". For customers with a Blu-ray Player: The provided JVC software lets you archive and organize your recordings on a disc. • To save your ...
...play back your recordings in their original high definition quality. • You can upload your camcorder, click on Device>Camcorder in the following steps on the computer. G Click [Finish]. • Everio MediaBrowser ...up recordings on the PC. A Turn on the camera by pressing the B button for GZ-HM860). SELECT DEVICE SELECT DEVICE TYPE TO CONNECT CONNECT TO PC CONNECT TO OTHER CONNECT TO...the provided software "Everio MediaBrowser 3 BE". For customers with a Blu-ray Player: The provided JVC software lets you archive and organize your recordings on a disc. • To save your ...

Bluetooth Application Software for Smartphones
Page 3
... playback mode (movie/ photo). 2 remote control function You can see your camcorder's view sent to your camcorder through Bluetooth and to connect it automatically resized. Displaying your camcorder's view on your smartphone enables you can with the remote control. Controlling the camcorder with the smartphone - monitor function In the movie recording mode, you can...
... playback mode (movie/ photo). 2 remote control function You can see your camcorder's view sent to your camcorder through Bluetooth and to connect it automatically resized. Displaying your camcorder's view on your smartphone enables you can with the remote control. Controlling the camcorder with the smartphone - monitor function In the movie recording mode, you can...

Bluetooth Application Software for Smartphones
Page 7
Preparing the Camera for Bluetooth connection Preparing the Camera for Bluetooth connection Mutual registration (pairing) between your smartphone and camcorder for pairing. 11 Activate the Bluetooth function of your camcorder and smartphone is required for other devices] checkboxes. •• When using the application. The smartphone gets ready for connection and becomes detectable...
Preparing the Camera for Bluetooth connection Preparing the Camera for Bluetooth connection Mutual registration (pairing) between your smartphone and camcorder for pairing. 11 Activate the Bluetooth function of your camcorder and smartphone is required for other devices] checkboxes. •• When using the application. The smartphone gets ready for connection and becomes detectable...

Bluetooth Application Software for Smartphones
Page 8
Preparing the Camera for Bluetooth connection 2 Detect the smartphone from the camcorder. 2-1 Tap [MENU]. The menu screen appears. 2-2 Tap[ ]. 2-3 Tap [Bluetooth] . 7
Preparing the Camera for Bluetooth connection 2 Detect the smartphone from the camcorder. 2-1 Tap [MENU]. The menu screen appears. 2-2 Tap[ ]. 2-3 Tap [Bluetooth] . 7

Bluetooth Application Software for Smartphones
Page 11
After entering it, the camcorder waits for the device to register. 3-2 Tap [SET] after entering all digits. Pairing is finished. • When using HD2 Entering the pass key is not ...] when the message [Allow this pairing?] appears. 10 Wait until the message "REGISTERED" appears on the "DEVICE REGISTRATION" screen. 4 Enter the pass key on the camcorder. • When using BlackBerry/Touch Pro/Touch Diamond Enter the same pass key you entered in Step 3. Preparing the Camera for Bluetooth connection 3 Enter the...
After entering it, the camcorder waits for the device to register. 3-2 Tap [SET] after entering all digits. Pairing is finished. • When using HD2 Entering the pass key is not ...] when the message [Allow this pairing?] appears. 10 Wait until the message "REGISTERED" appears on the "DEVICE REGISTRATION" screen. 4 Enter the pass key on the camcorder. • When using BlackBerry/Touch Pro/Touch Diamond Enter the same pass key you entered in Step 3. Preparing the Camera for Bluetooth connection 3 Enter the...

Bluetooth Application Software for Smartphones
Page 12
...11 If [COM 0] is not required. 11 Select [Start] - [Settings]. 22 Open [Connection] and select [Bluetooth]. 33 Open [Devices] and select a camcorder to connect to. 44 Tick the [Serial port] checkbox and tap [Save]. 55 Open the [COM Ports] tab and select [New Outgoing Port]. 66 Select...use , select the port which has the next youngest number. Preparing the Camera for Bluetooth connection When using Touch Pro/Touch Diamond Register the camcorder after pairing following operation is already in the [Secure Connection] checkbox and tap [Finish]. If you use HD2, the following the steps ...
...11 If [COM 0] is not required. 11 Select [Start] - [Settings]. 22 Open [Connection] and select [Bluetooth]. 33 Open [Devices] and select a camcorder to connect to. 44 Tick the [Serial port] checkbox and tap [Save]. 55 Open the [COM Ports] tab and select [New Outgoing Port]. 66 Select...use , select the port which has the next youngest number. Preparing the Camera for Bluetooth connection When using Touch Pro/Touch Diamond Register the camcorder after pairing following operation is already in the [Secure Connection] checkbox and tap [Finish]. If you use HD2, the following the steps ...

Bluetooth Application Software for Smartphones
Page 13
The menu screen appears. 2-2 Tap [ ] . 2-3 Tap [Bluetooth] . 12 Starting/quitting the application Starting/quitting the application Starting the application 1 Start the application on the menu of the smartphone. 2 Prepare for Bluetooth connection on the camcorder. 2-1 Tap [MENU].
The menu screen appears. 2-2 Tap [ ] . 2-3 Tap [Bluetooth] . 12 Starting/quitting the application Starting/quitting the application Starting the application 1 Start the application on the menu of the smartphone. 2 Prepare for Bluetooth connection on the camcorder. 2-1 Tap [MENU].

Bluetooth Application Software for Smartphones
Page 15
... application. The Bluetooth connection is automatically shut down as the application is automatically quit if the communication with the camcorder breaks for more than shown above. Starting/quitting the application 44 Select a camcorder to connect to quit the application. Quitting the application ••When using BlackBerry Press the menu key and...
... application. The Bluetooth connection is automatically shut down as the application is automatically quit if the communication with the camcorder breaks for more than shown above. Starting/quitting the application 44 Select a camcorder to connect to quit the application. Quitting the application ••When using BlackBerry Press the menu key and...

Bluetooth Application Software for Smartphones
Page 16
... control (refer to operate the application. Using the application Using the application Using the remote control function You can carry out basic operations of the camcorder with the remote control. The operation screen will change as you can with your smartphone as the mode of the...
... control (refer to operate the application. Using the application Using the application Using the remote control function You can carry out basic operations of the camcorder with the remote control. The operation screen will change as you can with your smartphone as the mode of the...

Bluetooth Application Software for Smartphones
Page 17
Using the application /Using the remote control function Note · The appearance of the operation screen may differ depending on the smartphone model you use. · You cannot control the camcorder from the smartphone if the menu screen is opened on the camcorder. 16
Using the application /Using the remote control function Note · The appearance of the operation screen may differ depending on the smartphone model you use. · You cannot control the camcorder from the smartphone if the menu screen is opened on the camcorder. 16


