
Basic User Guide
Page 2
...hazard if mistreated. CAUTION! Replace battery with water. When discarding batteries, environmental problems must be able to the Detailed User Guide http://manual.jvc.co.jp/index.html/ Carrying or holding this equipment in a cabinet or on a shelf, make sure that it on top of ...causing serious damage to dripping or splashing. CAUTION: The mains plug shall remain readily operable. • Remove the mains plug immediately if the camcorder functions abnormally. WARNING: TO PREVENT FIRE OR SHOCK HAZARD, DO NOT EXPOSE THIS UNIT TO RAIN OR MOISTURE. Do not recharge, disassemble,...
...hazard if mistreated. CAUTION! Replace battery with water. When discarding batteries, environmental problems must be able to the Detailed User Guide http://manual.jvc.co.jp/index.html/ Carrying or holding this equipment in a cabinet or on a shelf, make sure that it on top of ...causing serious damage to dripping or splashing. CAUTION: The mains plug shall remain readily operable. • Remove the mains plug immediately if the camcorder functions abnormally. WARNING: TO PREVENT FIRE OR SHOCK HAZARD, DO NOT EXPOSE THIS UNIT TO RAIN OR MOISTURE. Do not recharge, disassemble,...
Basic User Guide
Page 17
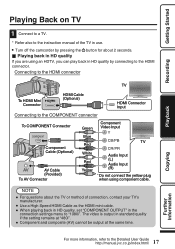
... in HD quality by pressing the M button for about the TV or method of the TV in use. 0 Turn off the camcorder by connecting to the Detailed User Guide http://manual.jvc.co.jp/index.html/ Connecting to the instruction manual of connection, contact your TV's manufacturer. 0 Use a High Speed HDMI Cable...
... in HD quality by pressing the M button for about the TV or method of the TV in use. 0 Turn off the camcorder by connecting to the Detailed User Guide http://manual.jvc.co.jp/index.html/ Connecting to the instruction manual of connection, contact your TV's manufacturer. 0 Use a High Speed HDMI Cable...

Basic User Guide
Page 20
... tape. Preparation on automatically when the AC adapter is complete, stop the recording. 20 For more information, refer to the Detailed User Guide http://manual.jvc.co.jp/index.html/ To AV Connector AV Cable (Provided) Yellow White Red Video Input Video Input Audio Input (L) Audio Input (R) AC Adapter To AC... V to 240 V) To DC Connector VCR/DVD Recorder . 0 This unit powers on TV and VCR/DVD recorder 0 Switch to a VCR/DVD recorder. 0 Turn off the camcorder by pressing the M button for about 2 seconds.
... tape. Preparation on automatically when the AC adapter is complete, stop the recording. 20 For more information, refer to the Detailed User Guide http://manual.jvc.co.jp/index.html/ To AV Connector AV Cable (Provided) Yellow White Red Video Input Video Input Audio Input (L) Audio Input (R) AC Adapter To AC... V to 240 V) To DC Connector VCR/DVD Recorder . 0 This unit powers on TV and VCR/DVD recorder 0 Switch to a VCR/DVD recorder. 0 Turn off the camcorder by pressing the M button for about 2 seconds.
Basic User Guide
Page 22
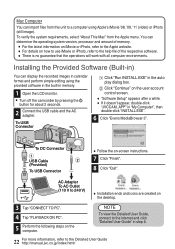
...select "About This Mac" from this unit to a computer using the provided software in the built-in memory. 1 Open the LCD monitor. 0 Turn off the camcorder by pressing the M button for about 2 seconds. 2 Connect the USB cable and the AC adapter. To USB Connector A Click "Run INSTALL.EXE" in step ...6. 22 For more information, refer to the Detailed User Guide http://manual.jvc.co.jp/index.html/ To DC Connector USB Cable (Provided) To USB Connector . 0 Follow the on the user account control screen. 0 "Software Setup...
...select "About This Mac" from this unit to a computer using the provided software in the built-in memory. 1 Open the LCD monitor. 0 Turn off the camcorder by pressing the M button for about 2 seconds. 2 Connect the USB cable and the AC adapter. To USB Connector A Click "Run INSTALL.EXE" in step ...6. 22 For more information, refer to the Detailed User Guide http://manual.jvc.co.jp/index.html/ To DC Connector USB Cable (Provided) To USB Connector . 0 Follow the on the user account control screen. 0 "Software Setup...
Basic User Guide
Page 23
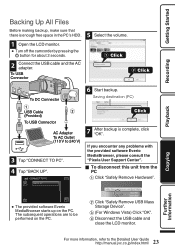
...) Click "OK". CONNECT TO PC BACK UP Click . 7 After backup is enough free space in the PC's HDD. 1 Open the LCD monitor. 0 Turn off the camcorder by pressing the M button for about 2 seconds. 2 Connect the USB cable and the AC adapter. If you encounter any problems with the provided software Everio... USB Mass Storage Device". D Disconnect the USB cable and close the LCD monitor. 23 For more information, refer to the Detailed User Guide http://manual.jvc.co.jp/index.html/ To USB Connector To DC Connector 5 Select the volume. 1 Click 2 Click . 6 Start backup.
...) Click "OK". CONNECT TO PC BACK UP Click . 7 After backup is enough free space in the PC's HDD. 1 Open the LCD monitor. 0 Turn off the camcorder by pressing the M button for about 2 seconds. 2 Connect the USB cable and the AC adapter. If you encounter any problems with the provided software Everio... USB Mass Storage Device". D Disconnect the USB cable and close the LCD monitor. 23 For more information, refer to the Detailed User Guide http://manual.jvc.co.jp/index.html/ To USB Connector To DC Connector 5 Select the volume. 1 Click 2 Click . 6 Start backup.

Basic User Guide
Page 28
...ADAPTER In case of 10°C to 35°C (50°F to 95°F). For this may cause the battery to follow the guidelines below JVC dealer. do not drop or subject to strong impact. . 28 For more information, refer to the AC wall outlet or AC adapter (power/DC ... unit when not in a cool, dry place. Cooler temperatures LCD Monitor require longer charging time, or in use current even when switched off the camcorder power or remove the battery or AC adapter during Terminals The supplied battery pack is a lithium-ion battery. Please call 1-800-8-BATTERY for information on...
...ADAPTER In case of 10°C to 35°C (50°F to 95°F). For this may cause the battery to follow the guidelines below JVC dealer. do not drop or subject to strong impact. . 28 For more information, refer to the AC wall outlet or AC adapter (power/DC ... unit when not in a cool, dry place. Cooler temperatures LCD Monitor require longer charging time, or in use current even when switched off the camcorder power or remove the battery or AC adapter during Terminals The supplied battery pack is a lithium-ion battery. Please call 1-800-8-BATTERY for information on...
Basic User Guide
Page 29
... sandy area. a Class B digital device, pursuant to the tripod securely. This device complies with a tripod, attach the camcorder to Part 15 of Conformity Model Number : GZ-HM690U/GZ-HM670U/ GZ-HM650U/GZ-HM450U/GZ-HM440U Trade Name : JVC Responsible party : JVC AMERICAS CORP. ... in places where humidity is caught and the unit falls onto the floor. •...
... sandy area. a Class B digital device, pursuant to the tripod securely. This device complies with a tripod, attach the camcorder to Part 15 of Conformity Model Number : GZ-HM690U/GZ-HM670U/ GZ-HM650U/GZ-HM450U/GZ-HM440U Trade Name : JVC Responsible party : JVC AMERICAS CORP. ... in places where humidity is caught and the unit falls onto the floor. •...


