Instruction Manual
Page 3
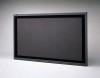
...JVC Monitor. Keep this manual whenever questions or problems about operation arise. Refer to this manual where the user can see it easily. * Installation and removal require special expertise. The differences between these two models are its color and class of EMC: GM-P421U is silver and is categorized in class B, while GM-P420UG...manual refers to the GM-P421U and GM-P420UG. INSTRUCTIONS Model GM-P421U GM-P420UG Thank you for details. Contents Page Safety Precautions 2 Parts Identification 4 • Remote Control 4 • Monitor: Front View 5 • Monitor: Rear Views 6 ...
...JVC Monitor. Keep this manual whenever questions or problems about operation arise. Refer to this manual where the user can see it easily. * Installation and removal require special expertise. The differences between these two models are its color and class of EMC: GM-P421U is silver and is categorized in class B, while GM-P420UG...manual refers to the GM-P421U and GM-P420UG. INSTRUCTIONS Model GM-P421U GM-P420UG Thank you for details. Contents Page Safety Precautions 2 Parts Identification 4 • Remote Control 4 • Monitor: Front View 5 • Monitor: Rear Views 6 ...

Instruction Manual
Page 4
Safety Precautions FCC NOTICE s GM-P420UG CAUTION: Changes or modifications not approved by JVC could void the user's authority to...VIDEO AUDIO MONO/L Y/G Pb/B Pr/R HD/Cs VD R COMPONENT/RGB B SPEAKER OUT R (9 AUDIO IN RGB A RS-232C REMOTE MAKE WIRED OUT L R AUDIO OPTION SPEAKER OUT L (9 AC IN POWER - The product should use a cloth and wipe it...operating instructions should be retained for a Class A digital device, pursuant to correct the interference by JVC could void the user's authority to provide reasonable protection against harmful interference when the equipment is ...
Safety Precautions FCC NOTICE s GM-P420UG CAUTION: Changes or modifications not approved by JVC could void the user's authority to...VIDEO AUDIO MONO/L Y/G Pb/B Pr/R HD/Cs VD R COMPONENT/RGB B SPEAKER OUT R (9 AUDIO IN RGB A RS-232C REMOTE MAKE WIRED OUT L R AUDIO OPTION SPEAKER OUT L (9 AC IN POWER - The product should use a cloth and wipe it...operating instructions should be retained for a Class A digital device, pursuant to correct the interference by JVC could void the user's authority to provide reasonable protection against harmful interference when the equipment is ...

Instruction Manual
Page 6
...used to switch between aspect ratios. To select the COMPONENT or RGB B input, you press the button, the aspect ratio changes as a wired remote control. 2 DISPLAY button (page 14) Use this button to turn on the menu (see page 25). buttons (page 14) Use these ... RGB A and RGB B input). RGB A 3 RGB B 4 9 MUTING VOLUME 5 MENU/EXIT RM-C576 REMOTE CONTROL UNIT p 1 Remote control cable jack (page 11) Connect the remote control cable (not supplied) when using this remote control as follows: REGULAR FULL PANORAMIC ZOOM 8 POWER button (page 14) Use this button to display or...
...used to switch between aspect ratios. To select the COMPONENT or RGB B input, you press the button, the aspect ratio changes as a wired remote control. 2 DISPLAY button (page 14) Use this button to turn on the menu (see page 25). buttons (page 14) Use these ... RGB A and RGB B input). RGB A 3 RGB B 4 9 MUTING VOLUME 5 MENU/EXIT RM-C576 REMOTE CONTROL UNIT p 1 Remote control cable jack (page 11) Connect the remote control cable (not supplied) when using this remote control as follows: REGULAR FULL PANORAMIC ZOOM 8 POWER button (page 14) Use this button to display or...

Instruction Manual
Page 7
...and to make adjustments. • When no menu is turned on and off the Monitor. 5 Monitor: Front View 1 2 MENU INPUT POWER MENU INPUT POWER Bottom View 3 45 6 1 Remote sensor/power lamp Point the front end of the wireless remote control toward here. correctly on the menu (see page 23). 6 POWER button ...(page 14) Use this button to turn on , the power lamp glows green. When the Monitor is displayed, you can use the 2 / 3 buttons to adjust the volume ...
...and to make adjustments. • When no menu is turned on and off the Monitor. 5 Monitor: Front View 1 2 MENU INPUT POWER MENU INPUT POWER Bottom View 3 45 6 1 Remote sensor/power lamp Point the front end of the wireless remote control toward here. correctly on the menu (see page 23). 6 POWER button ...(page 14) Use this button to turn on , the power lamp glows green. When the Monitor is displayed, you can use the 2 / 3 buttons to adjust the volume ...

Instruction Manual
Page 8
.... • AUDIO IN (stereo mini jack) Connect to the audio output terminal of a personal computer. 2 REMOTE terminals (pages 11 and 13) • RS-232C (D-sub, 9 pin) Connect to turn on the Monitor. 7 SPEAKER OUT L/R terminals (page 11) Connect external speakers. 6 Note: • When the above three... this terminal, consult an authorized JVC dealer. • MAKE terminal (mini DIN 4pin) Connect an external control unit. (See page 13.) • WIRED terminal (stereo mini jack) Connect a wired remote control unit to this switch to ON will put the Monitor into standby mode, allowing you ...
.... • AUDIO IN (stereo mini jack) Connect to the audio output terminal of a personal computer. 2 REMOTE terminals (pages 11 and 13) • RS-232C (D-sub, 9 pin) Connect to turn on the Monitor. 7 SPEAKER OUT L/R terminals (page 11) Connect external speakers. 6 Note: • When the above three... this terminal, consult an authorized JVC dealer. • MAKE terminal (mini DIN 4pin) Connect an external control unit. (See page 13.) • WIRED terminal (stereo mini jack) Connect a wired remote control unit to this switch to ON will put the Monitor into standby mode, allowing you ...

Instruction Manual
Page 10
If any item is missing, please contact the dealer where you purchased the Monitor. • Remote control (RM-C576) x 1 • Power cord x 1 • Batteries (AA/R6P) x 2 Installing the Batteries Put the batteries in place correctly. Make sure the release lever on... on the cover is six months to avoid a short circuit. • Use only the specified batteries. • When you may be shorter. When the remote control operation becomes erratic, replace with the Monitor. If the leaked liquid contacts your skin, wipe off the liquid with new ones immediately. Precautions for using the...
If any item is missing, please contact the dealer where you purchased the Monitor. • Remote control (RM-C576) x 1 • Power cord x 1 • Batteries (AA/R6P) x 2 Installing the Batteries Put the batteries in place correctly. Make sure the release lever on... on the cover is six months to avoid a short circuit. • Use only the specified batteries. • When you may be shorter. When the remote control operation becomes erratic, replace with the Monitor. If the leaked liquid contacts your skin, wipe off the liquid with new ones immediately. Precautions for using the...

Instruction Manual
Page 11
... for each other adversely. (For example, if a disturbed image or noise due to electromagnetic interference occurs, or if the infrared remote control malfunctions, change the installation place.) 9 Do not tilt the Monitor rightward, leftward, or backward. • Route the power cord and connection cables along wall or floor corners to avoid walking...
... for each other adversely. (For example, if a disturbed image or noise due to electromagnetic interference occurs, or if the infrared remote control malfunctions, change the installation place.) 9 Do not tilt the Monitor rightward, leftward, or backward. • Route the power cord and connection cables along wall or floor corners to avoid walking...

Instruction Manual
Page 13
...audio input To RS-232C To audio output To monitor output Cable with stereo mini jacks (not supplied) For connection, see page 13 For connection, see page 13 Power cord (supplied) To a wall outlet AUDIO IN RGB A RS-232C REMOTE MAKE WIRED OUT L R AUDIO External speaker ... OUT R OPTION AC IN SPEAKER OUT L POWER Left speaker To speaker input terminals (9 (9 To speaker input terminals 11 MENU/EXIT RM-C576 REMOTE CONTROL UNIT MUTING RGB B VOLUME VIDEO A VIDEO B COMPO. Connection Diagrams Typical connections Personal computer Personal computer (used as the playback source) (...
...audio input To RS-232C To audio output To monitor output Cable with stereo mini jacks (not supplied) For connection, see page 13 For connection, see page 13 Power cord (supplied) To a wall outlet AUDIO IN RGB A RS-232C REMOTE MAKE WIRED OUT L R AUDIO External speaker ... OUT R OPTION AC IN SPEAKER OUT L POWER Left speaker To speaker input terminals (9 (9 To speaker input terminals 11 MENU/EXIT RM-C576 REMOTE CONTROL UNIT MUTING RGB B VOLUME VIDEO A VIDEO B COMPO. Connection Diagrams Typical connections Personal computer Personal computer (used as the playback source) (...
Instruction Manual
Page 15
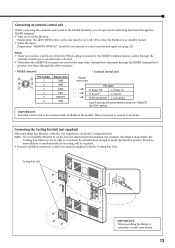
...setting. Cooling Fan Unit OPTION POWER AC IN OPTION OUT L R AUDIO MAKE WIRED SPEAKER OUT L (9 RS-232C REMOTE AUDIO IN RGB A IMPORTANT: When installing the Monitor vertically, consult your dealer. therefore, reinstallation or another method for example, installing it diagonally), the Cooling Fan Unit may ... to cool down the internal heat enough to make the Monitor operate; Preparation: "REMOTE SWITCH" should be set correctly to ON (so that the Monitor is in the market. IMPORTANT: External control unit is no remote control on the rear must be set to select your desired...
...setting. Cooling Fan Unit OPTION POWER AC IN OPTION OUT L R AUDIO MAKE WIRED SPEAKER OUT L (9 RS-232C REMOTE AUDIO IN RGB A IMPORTANT: When installing the Monitor vertically, consult your dealer. therefore, reinstallation or another method for example, installing it diagonally), the Cooling Fan Unit may ... to cool down the internal heat enough to make the Monitor operate; Preparation: "REMOTE SWITCH" should be set correctly to ON (so that the Monitor is in the market. IMPORTANT: External control unit is no remote control on the rear must be set to select your desired...

Instruction Manual
Page 16
...on the main power. "MUTING ON" is displayed, you can also use the POWER on the Monitor. RGB A RGB B MUTING VOLUME 4 MUTING MENU/EXIT RM-C576 REMOTE CONTROL UNIT Daily Operations 1 Turn on the Monitor. Each time you need to turn on the power. When selecting "VIDEO A" input VIDEO A ...mode changes in sequence. The types of the front panel glows orange. 2 Turn on the Monitor. 3 Select an input. Set POWER on the remote control to ON. Press POWER on the back of the Monitor to turn off the volume immediately Press MUTING. Select the desired input by pressing VIDEO A, ...
...on the main power. "MUTING ON" is displayed, you can also use the POWER on the Monitor. RGB A RGB B MUTING VOLUME 4 MUTING MENU/EXIT RM-C576 REMOTE CONTROL UNIT Daily Operations 1 Turn on the Monitor. Each time you need to turn on the power. When selecting "VIDEO A" input VIDEO A ...mode changes in sequence. The types of the front panel glows orange. 2 Turn on the Monitor. 3 Select an input. Set POWER on the remote control to ON. Press POWER on the back of the Monitor to turn off the volume immediately Press MUTING. Select the desired input by pressing VIDEO A, ...

Instruction Manual
Page 17
...Notes: • When one of the original picture will reduce the burn-in gradually. RGB A RGB B MUTING VOLUME MENU/EXIT RM-C576 REMOTE CONTROL UNIT With this point when you are selecting a screen mode. • If you want. To enjoy the original picture as it is ...the picture by using the screen mode switching (aspect ratio change) function, this occurs, watching programs using the screen mode switching function • This Monitor features a screen mode switching (aspect ratio change) function. FULL: REGULAR size display is , select "REGULAR" while viewing such programs. • ...
...Notes: • When one of the original picture will reduce the burn-in gradually. RGB A RGB B MUTING VOLUME MENU/EXIT RM-C576 REMOTE CONTROL UNIT With this point when you are selecting a screen mode. • If you want. To enjoy the original picture as it is ...the picture by using the screen mode switching (aspect ratio change) function, this occurs, watching programs using the screen mode switching function • This Monitor features a screen mode switching (aspect ratio change) function. FULL: REGULAR size display is , select "REGULAR" while viewing such programs. • ...

Instruction Manual
Page 18
...VIDEO A PICTURE ADJ. reset See "To reset the adjustments" on the MENU INPUT POWER Monitor) to display the Main Menu. MENU INPUT POWER Cursor (3) MAIN MENU PICTURE ADJ. RGB A RGB B MUTING VOLUME MENU/EXIT RM-C576 REMOTE CONTROL UNIT ENTER: SELECT: EXIT: MENU 2 Press 5/∞ to move the cursor (3) ...viewing the adjustment bar" on the next page. SIZE/POSITION ADJ. Video Adjustments For video adjustments, use the buttons either on the remote control or on Monitor for menu operations. • Refer also to "Menu Classifications" on pages 31 and 33. 2 / 3 MENU/EXIT Adjusting ...
...VIDEO A PICTURE ADJ. reset See "To reset the adjustments" on the MENU INPUT POWER Monitor) to display the Main Menu. MENU INPUT POWER Cursor (3) MAIN MENU PICTURE ADJ. RGB A RGB B MUTING VOLUME MENU/EXIT RM-C576 REMOTE CONTROL UNIT ENTER: SELECT: EXIT: MENU 2 Press 5/∞ to move the cursor (3) ...viewing the adjustment bar" on the next page. SIZE/POSITION ADJ. Video Adjustments For video adjustments, use the buttons either on the remote control or on Monitor for menu operations. • Refer also to "Menu Classifications" on pages 31 and 33. 2 / 3 MENU/EXIT Adjusting ...

Instruction Manual
Page 20
... may be decreased. 18 Note: • Adjustment values for H SIZE appears on the Monitor) three times to display the Sub Menu. RGB A RGB B MUTING VOLUME MENU/EXIT RM-C576 REMOTE CONTROL UNIT 2 / 3 5 / 5 To make an adjustment while viewing the adjustment bar After step 3 on page 17,...adjust the selected item. To cancel the reset, press MENU/EXIT (or MENU on the Monitor) twice to near the maximum value, the attainable value of the Monitor. 6 Press MENU/EXIT (or MENU on the Monitor). MENU/EXIT MENU INPUT POWER 5 5 / MENU DISPLAY ASPECT POWER VIDEO A VIDEO B...
... may be decreased. 18 Note: • Adjustment values for H SIZE appears on the Monitor) three times to display the Sub Menu. RGB A RGB B MUTING VOLUME MENU/EXIT RM-C576 REMOTE CONTROL UNIT 2 / 3 5 / 5 To make an adjustment while viewing the adjustment bar After step 3 on page 17,...adjust the selected item. To cancel the reset, press MENU/EXIT (or MENU on the Monitor) twice to near the maximum value, the attainable value of the Monitor. 6 Press MENU/EXIT (or MENU on the Monitor). MENU/EXIT MENU INPUT POWER 5 5 / MENU DISPLAY ASPECT POWER VIDEO A VIDEO B...

Instruction Manual
Page 21
... to all inputs. 1 Press MENU/EXIT (or MENU on the Monitor) to make an adjustment. reset : HIGH* : STILL : PANORAMIC : AUTO : COMPO. LOW: To make the screen become bluish. Cursor (3) SET-UP MENU STATUS DISPLAY CONTROL LOCK REMOTE SWITCH HD SIGNAL MODE WHITE BALANCE 1/2 : OFF : OFF : ..."WHITE BALANCE." • The Setup Menu consists of the color temperature. 1 On the remote control: Press MENU/EXIT while holding 2 to display the Setup Menu. Notes: • Adjustable range will vary among the Monitors. • "MAX" may appear soon after you press the button, the color temperature ...
... to all inputs. 1 Press MENU/EXIT (or MENU on the Monitor) to make an adjustment. reset : HIGH* : STILL : PANORAMIC : AUTO : COMPO. LOW: To make the screen become bluish. Cursor (3) SET-UP MENU STATUS DISPLAY CONTROL LOCK REMOTE SWITCH HD SIGNAL MODE WHITE BALANCE 1/2 : OFF : OFF : ..."WHITE BALANCE." • The Setup Menu consists of the color temperature. 1 On the remote control: Press MENU/EXIT while holding 2 to display the Setup Menu. Notes: • Adjustable range will vary among the Monitors. • "MAX" may appear soon after you press the button, the color temperature ...

Instruction Manual
Page 22
...input (either RGB A or RGB B) is selected. 20 RGB A RGB B MUTING VOLUME To make an adjustment while viewing the adjustment bars After step 3 on the Monitor) three times to exit from the menu operations. "NO" then MENU key. 3 Press 3 again to adjust. On the other items. 6 Press MENU/EXIT (...POWER VIDEO A VIDEO B COMPO. Each time you want to reset the adjustments. reset Are you sure? The Sub Menu for R GAIN appears on the Monitor). 5 5 MENU/EXIT MENU/EXIT RM-C576 REMOTE CONTROL UNIT 2 / 3 5 / *1 "PICTURE MODE" and "SIGNAL MODE" do not appear at the same time.
...input (either RGB A or RGB B) is selected. 20 RGB A RGB B MUTING VOLUME To make an adjustment while viewing the adjustment bars After step 3 on the Monitor) three times to exit from the menu operations. "NO" then MENU key. 3 Press 3 again to adjust. On the other items. 6 Press MENU/EXIT (...POWER VIDEO A VIDEO B COMPO. Each time you want to reset the adjustments. reset Are you sure? The Sub Menu for R GAIN appears on the Monitor). 5 5 MENU/EXIT MENU/EXIT RM-C576 REMOTE CONTROL UNIT 2 / 3 5 / *1 "PICTURE MODE" and "SIGNAL MODE" do not appear at the same time.

Instruction Manual
Page 24
...: AUTO 480i 576i 1080i (1035i)* 720p 480p * Changes according to the "HD SIGNAL MODE" setting (see page 27). 6 Press MENU/EXIT (or MENU on the Monitor) to display the Function Selection Menu. 5 5 DISPLAY ASPECT POWER VIDEO A VIDEO B COMPO. FUNCTION SELECT COLOR TEMP. Cursor (3) MAIN MENU PICTURE ADJ. reset : COMPO.... M • When COMPONENT input is selected. SIZE/POSITION ADJ. Normally, select "AUTO." RGB A RGB B MUTING VOLUME MENU/EXIT MENU/EXIT RM-C576 REMOTE CONTROL UNIT 2 / 3 5 / *1 "PICTURE MODE" and "SIGNAL MODE" do not appear at the same time.
...: AUTO 480i 576i 1080i (1035i)* 720p 480p * Changes according to the "HD SIGNAL MODE" setting (see page 27). 6 Press MENU/EXIT (or MENU on the Monitor) to display the Function Selection Menu. 5 5 DISPLAY ASPECT POWER VIDEO A VIDEO B COMPO. FUNCTION SELECT COLOR TEMP. Cursor (3) MAIN MENU PICTURE ADJ. reset : COMPO.... M • When COMPONENT input is selected. SIZE/POSITION ADJ. Normally, select "AUTO." RGB A RGB B MUTING VOLUME MENU/EXIT MENU/EXIT RM-C576 REMOTE CONTROL UNIT 2 / 3 5 / *1 "PICTURE MODE" and "SIGNAL MODE" do not appear at the same time.

Instruction Manual
Page 26
...3 5 / MENU Showing On-screen Display The input mode and signal type will be done by pressing DISPLAY on the remote control. (See page 14.) 1 Press MENU (or MENU/EXIT on the Monitor. SIZE/POSITION ADJ. FUNCTION SELECT STATUS DISPLAY ENTER: SELECT: EXIT: MENU 5 5 VOLUME - You can also show these...be shown after the frequency. Other Convenient Functions To set the other convenient functions, use the buttons either on the remote control or on Monitor for menu operations. • Refer also to "Menu Classifications" on page 25. 24 Cursor (3) MAIN MENU PICTURE ADJ.
...3 5 / MENU Showing On-screen Display The input mode and signal type will be done by pressing DISPLAY on the remote control. (See page 14.) 1 Press MENU (or MENU/EXIT on the Monitor. SIZE/POSITION ADJ. FUNCTION SELECT STATUS DISPLAY ENTER: SELECT: EXIT: MENU 5 5 VOLUME - You can also show these...be shown after the frequency. Other Convenient Functions To set the other convenient functions, use the buttons either on the remote control or on Monitor for menu operations. • Refer also to "Menu Classifications" on page 25. 24 Cursor (3) MAIN MENU PICTURE ADJ.

Instruction Manual
Page 27
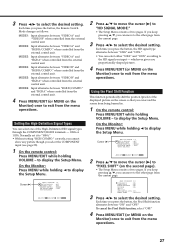
...while holding VOLUME - Cursor (3) SET-UP MENU STATUS DISPLAY CONTROL LOCK REMOTE SWITCH HD SIGNAL MODE WHITE BALANCE 1/2 : OFF : OFF : MODE1 : 1080i ADJUST: SELECT: EXIT: MENU (To be shown (GM-P420UG). 4 Press MENU/EXIT (or MENU on the Monitor) once to the hours of two pages. SET-UP MENU 2/2 ...PIXEL SHIFT : ON POWER SAVE : ON COLOR-REVERSE : ON REFRESH : ON reset all reset HOUR METER x100h : 001 MODEL NAME : GM-P421U ADJUST: SELECT: EXIT:...
...while holding VOLUME - Cursor (3) SET-UP MENU STATUS DISPLAY CONTROL LOCK REMOTE SWITCH HD SIGNAL MODE WHITE BALANCE 1/2 : OFF : OFF : MODE1 : 1080i ADJUST: SELECT: EXIT: MENU (To be shown (GM-P420UG). 4 Press MENU/EXIT (or MENU on the Monitor) once to the hours of two pages. SET-UP MENU 2/2 ...PIXEL SHIFT : ON POWER SAVE : ON COLOR-REVERSE : ON REFRESH : ON reset all reset HOUR METER x100h : 001 MODEL NAME : GM-P421U ADJUST: SELECT: EXIT:...

Instruction Manual
Page 28
...When connecting the external control unit to the REMOTE MAKE terminal, you can move to the other page from the current page. 26 To cancel the Control Lock function, select "OFF." 4 Press MENU/EXIT (or MENU on the Monitor) once to use , the following operations are... possible: - to "CONTROL LOCK." • The Setup Menu consists of two pages. Other Convenient Functions (Continued) 2 / 3 VOLUME - RGB A RGB B MUTING VOLUME MENU/EXIT RM-C576 REMOTE CONTROL UNIT 2 / 3 5 / 2 Press 5/&#...
...When connecting the external control unit to the REMOTE MAKE terminal, you can move to the other page from the current page. 26 To cancel the Control Lock function, select "OFF." 4 Press MENU/EXIT (or MENU on the Monitor) once to use , the following operations are... possible: - to "CONTROL LOCK." • The Setup Menu consists of two pages. Other Convenient Functions (Continued) 2 / 3 VOLUME - RGB A RGB B MUTING VOLUME MENU/EXIT RM-C576 REMOTE CONTROL UNIT 2 / 3 5 / 2 Press 5/&#...
Instruction Manual
Page 29
.../EXIT (or MENU on the screen so that you can select one of the displayed picture on the Monitor) once to display the Setup Menu. Cursor (3) SET-UP MENU STATUS DISPLAY CONTROL LOCK REMOTE SWITCH HD SIGNAL MODE WHITE BALANCE 1/2 : OFF : OFF : MODE1 : 1080i ADJUST: SELECT: EXIT: MENU...SET-UP MENU 2/2 PIXEL SHIFT : ON POWER SAVE : ON COLOR-REVERSE : ON REFRESH : ON reset all reset HOUR METER x100h : 001 MODEL NAME : GM-P421U 3 Press 2/3 to "1080i." • Without setting "RGB/COMPO." MODE4: Input alternates between "VIDEO A" and "RGB B/COMPO." Normally set it to select...
.../EXIT (or MENU on the screen so that you can select one of the displayed picture on the Monitor) once to display the Setup Menu. Cursor (3) SET-UP MENU STATUS DISPLAY CONTROL LOCK REMOTE SWITCH HD SIGNAL MODE WHITE BALANCE 1/2 : OFF : OFF : MODE1 : 1080i ADJUST: SELECT: EXIT: MENU...SET-UP MENU 2/2 PIXEL SHIFT : ON POWER SAVE : ON COLOR-REVERSE : ON REFRESH : ON reset all reset HOUR METER x100h : 001 MODEL NAME : GM-P421U 3 Press 2/3 to "1080i." • Without setting "RGB/COMPO." MODE4: Input alternates between "VIDEO A" and "RGB B/COMPO." Normally set it to select...