Instruction Manual
Page 3
... B, while GM-P420UG is gray and is categorized in class A. INSTRUCTIONS Model GM-P421U GM-P420UG Thank you know how to read this manual where the user can see it easily. * Installation and removal require special expertise. Contents Page Safety Precautions 2 Parts Identification 4 • Remote Control 4 • Monitor: Front View 5 • Monitor: Rear Views...Main Menu 31 • Setup Menu 33 Troubleshooting 34 • Self-diagnostic Indication 35 Specifications 36 1 Refer to the GM-P421U and GM-P420UG. This instruction manual refers to this JVC Monitor.
... B, while GM-P420UG is gray and is categorized in class A. INSTRUCTIONS Model GM-P421U GM-P420UG Thank you know how to read this manual where the user can see it easily. * Installation and removal require special expertise. Contents Page Safety Precautions 2 Parts Identification 4 • Remote Control 4 • Monitor: Front View 5 • Monitor: Rear Views...Main Menu 31 • Setup Menu 33 Troubleshooting 34 • Self-diagnostic Indication 35 Specifications 36 1 Refer to the GM-P421U and GM-P420UG. This instruction manual refers to this JVC Monitor.

Instruction Manual
Page 6
... VIDEO A VIDEO B COMPO. RGB A 3 RGB B 4 9 MUTING VOLUME 5 MENU/EXIT RM-C576 REMOTE CONTROL UNIT p 1 Remote control cable jack (page 11) Connect the remote control cable (not supplied) when using this remote control as follows: REGULAR FULL PANORAMIC ZOOM 8 POWER button (page 14) Use this button to switch between inputs.... Each time you press the button, the aspect ratio changes as a wired remote control. 2 DISPLAY button (page 14) Use this button to turn off the power. 9 VOLUME + / - To select the COMPONENT or ...
... VIDEO A VIDEO B COMPO. RGB A 3 RGB B 4 9 MUTING VOLUME 5 MENU/EXIT RM-C576 REMOTE CONTROL UNIT p 1 Remote control cable jack (page 11) Connect the remote control cable (not supplied) when using this remote control as follows: REGULAR FULL PANORAMIC ZOOM 8 POWER button (page 14) Use this button to switch between inputs.... Each time you press the button, the aspect ratio changes as a wired remote control. 2 DISPLAY button (page 14) Use this button to turn off the power. 9 VOLUME + / - To select the COMPONENT or ...

Instruction Manual
Page 7
... and to make adjustments. • When no menu is turned on and off the Monitor. 5 correctly on the menu (see page 23). 6 POWER button (page 14) Use this button to display or erase menus. When the Monitor is displayed, you can use the 2 / 3 buttons to adjust the volume level.... 4 MENU button Use this button to set "RGB/COMPO." Monitor: Front View 1 2 MENU INPUT POWER MENU INPUT POWER Bottom View 3 45 6 1 Remote sensor/power lamp Point the front end of the wireless remote control toward here. To select the COMPONENT or RGB B input, you one screen back...
... and to make adjustments. • When no menu is turned on and off the Monitor. 5 correctly on the menu (see page 23). 6 POWER button (page 14) Use this button to display or erase menus. When the Monitor is displayed, you can use the 2 / 3 buttons to adjust the volume level.... 4 MENU button Use this button to set "RGB/COMPO." Monitor: Front View 1 2 MENU INPUT POWER MENU INPUT POWER Bottom View 3 45 6 1 Remote sensor/power lamp Point the front end of the wireless remote control toward here. To select the COMPONENT or RGB B input, you one screen back...

Instruction Manual
Page 8
... cord to this terminal. 6 POWER switch (page 14) Setting this switch to ON will put the Monitor into standby mode, allowing you to the RS-232C terminal of a personal computer. 2 REMOTE terminals (pages 11 and 13) • RS-232C (D-sub, 9 pin) Connect to turn on..., consult an authorized JVC dealer. • MAKE terminal (mini DIN 4pin) Connect an external control unit. (See page 13.) • WIRED terminal (stereo mini jack) Connect a wired remote control unit to this terminal. For the control method using the POWER button either on the remote control or on the Monitor. 7 SPEAKER OUT ...
... cord to this terminal. 6 POWER switch (page 14) Setting this switch to ON will put the Monitor into standby mode, allowing you to the RS-232C terminal of a personal computer. 2 REMOTE terminals (pages 11 and 13) • RS-232C (D-sub, 9 pin) Connect to turn on..., consult an authorized JVC dealer. • MAKE terminal (mini DIN 4pin) Connect an external control unit. (See page 13.) • WIRED terminal (stereo mini jack) Connect a wired remote control unit to this terminal. For the control method using the POWER button either on the remote control or on the Monitor. 7 SPEAKER OUT ...

Instruction Manual
Page 10
Make sure the release lever on the cover is missing, please contact the dealer where you purchased the Monitor. • Remote control (RM-C576) x 1 • Power cord x 1 • Batteries (AA/R6P) x 2 Installing the Batteries Put the batteries in place correctly. Otherwise, the ...liquid may leak out, or malfunction may be caused by the leaked liquid. When the remote control operation becomes erratic, replace with the Monitor. If any item is locked in the remote control as follows. If the affected skin is left as is, you may get a rough skin. •...
Make sure the release lever on the cover is missing, please contact the dealer where you purchased the Monitor. • Remote control (RM-C576) x 1 • Power cord x 1 • Batteries (AA/R6P) x 2 Installing the Batteries Put the batteries in place correctly. Otherwise, the ...liquid may leak out, or malfunction may be caused by the leaked liquid. When the remote control operation becomes erratic, replace with the Monitor. If any item is locked in the remote control as follows. If the affected skin is left as is, you may get a rough skin. •...

Instruction Manual
Page 11
...option to use the Refresh function (see page 28). • The Monitor is free from overturning: To protect against abnormal events such as earthquakes and to use the remote control as a wired remote control or move the Monitor where it is manufactured using very high-precision technology, allowing for more ...lead to personal injury. should be within the range of 0˚C to 40˚C. • When installing the Monitor in a place, such as near the ceiling, the remote control may not work correctly because of pixels may vary in such a way that only a slight number of possible effects...
...option to use the Refresh function (see page 28). • The Monitor is free from overturning: To protect against abnormal events such as earthquakes and to use the remote control as a wired remote control or move the Monitor where it is manufactured using very high-precision technology, allowing for more ...lead to personal injury. should be within the range of 0˚C to 40˚C. • When installing the Monitor in a place, such as near the ceiling, the remote control may not work correctly because of pixels may vary in such a way that only a slight number of possible effects...

Instruction Manual
Page 13
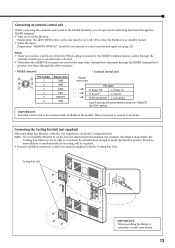
MENU/EXIT RM-C576 REMOTE CONTROL UNIT MUTING RGB B VOLUME VIDEO A VIDEO B COMPO. RGB A DISPLAY ASPECT POWER To audio input To RS-232C To audio output To monitor output Cable with stereo mini jacks (not supplied) For connection, ...REMOTE MAKE WIRED OUT L R AUDIO External speaker connection Right speaker SPEAKER OUT R OPTION AC IN SPEAKER OUT L POWER Left speaker To speaker input terminals (9 (9 To speaker input terminals 11 Connection Diagrams Typical connections Personal computer Personal computer (used as the playback source) (used to control the Monitor) Remote control...
MENU/EXIT RM-C576 REMOTE CONTROL UNIT MUTING RGB B VOLUME VIDEO A VIDEO B COMPO. RGB A DISPLAY ASPECT POWER To audio input To RS-232C To audio output To monitor output Cable with stereo mini jacks (not supplied) For connection, ...REMOTE MAKE WIRED OUT L R AUDIO External speaker connection Right speaker SPEAKER OUT R OPTION AC IN SPEAKER OUT L POWER Left speaker To speaker input terminals (9 (9 To speaker input terminals 11 Connection Diagrams Typical connections Personal computer Personal computer (used as the playback source) (used to control the Monitor) Remote control...
Instruction Manual
Page 15
... OPTION OUT L R AUDIO MAKE WIRED SPEAKER OUT L (9 RS-232C REMOTE AUDIO IN RGB A IMPORTANT: When installing the Monitor vertically, consult your desired input (see page 26). Notes: • There is no remote control on the rear must be determined by the "REMOTE SWITCH" setting. IMPORTANT: External control unit is in standby mode). • Select the input...
... OPTION OUT L R AUDIO MAKE WIRED SPEAKER OUT L (9 RS-232C REMOTE AUDIO IN RGB A IMPORTANT: When installing the Monitor vertically, consult your desired input (see page 26). Notes: • There is no remote control on the rear must be determined by the "REMOTE SWITCH" setting. IMPORTANT: External control unit is in standby mode). • Select the input...

Instruction Manual
Page 16
...input by pressing VIDEO A, VIDEO B, COMPO./RGB B and RGB A. • You can adjust the volume by pressing INPUT on the back of the Monitor to set the "RGB/COMPO." VOLUME - : 10 + Note: • While no menu is displayed, and the sound goes out. "MUTING ON...previous volume level. setting correctly. 4 Adjust the volume. RGB A RGB B MUTING VOLUME 4 MUTING MENU/EXIT RM-C576 REMOTE CONTROL UNIT Daily Operations 1 Turn on . Press POWER on the remote control to turn off the volume immediately Press MUTING. VIDEO A VIDEO B RGB A COMPONENT or RGB B Ex. To turn on...
...input by pressing VIDEO A, VIDEO B, COMPO./RGB B and RGB A. • You can adjust the volume by pressing INPUT on the back of the Monitor to set the "RGB/COMPO." VOLUME - : 10 + Note: • While no menu is displayed, and the sound goes out. "MUTING ON...previous volume level. setting correctly. 4 Adjust the volume. RGB A RGB B MUTING VOLUME 4 MUTING MENU/EXIT RM-C576 REMOTE CONTROL UNIT Daily Operations 1 Turn on . Press POWER on the remote control to turn off the volume immediately Press MUTING. VIDEO A VIDEO B RGB A COMPONENT or RGB B Ex. To turn on...

Instruction Manual
Page 17
...mode while viewing conventional video programs of the aspect ratio 4:3, some portions (edges) of time, the Monitor screen may look abnormally. RGB A RGB B MUTING VOLUME MENU/EXIT RM-C576 REMOTE CONTROL UNIT With this point when you are selecting a screen mode. • If you press the button..., the screen size changes as it is enlarged vertically and horizontally at conventional 4:3 aspect ratio. Be aware of this Monitor, you want. Changing the...
...mode while viewing conventional video programs of the aspect ratio 4:3, some portions (edges) of time, the Monitor screen may look abnormally. RGB A RGB B MUTING VOLUME MENU/EXIT RM-C576 REMOTE CONTROL UNIT With this point when you are selecting a screen mode. • If you press the button..., the screen size changes as it is enlarged vertically and horizontally at conventional 4:3 aspect ratio. Be aware of this Monitor, you want. Changing the...

Instruction Manual
Page 18
...each input mode. 1 Press MENU/EXIT (or MENU on the MENU INPUT POWER Monitor) to display the Main Menu. MENU INPUT POWER Cursor (3) MAIN MENU PICTURE ADJ. RGB A RGB B MUTING VOLUME MENU/EXIT RM-C576 REMOTE CONTROL UNIT ENTER: SELECT: EXIT: MENU 2 Press 5/∞ to move the cursor ...to adjust. reset See "To reset the adjustments" on the next page. Video Adjustments For video adjustments, use the buttons either on the remote control or on Monitor for menu operations. • Refer also to "Menu Classifications" on pages 31 and 33. 2 / 3 MENU/EXIT Adjusting the Picture Quality...
...each input mode. 1 Press MENU/EXIT (or MENU on the MENU INPUT POWER Monitor) to display the Main Menu. MENU INPUT POWER Cursor (3) MAIN MENU PICTURE ADJ. RGB A RGB B MUTING VOLUME MENU/EXIT RM-C576 REMOTE CONTROL UNIT ENTER: SELECT: EXIT: MENU 2 Press 5/∞ to move the cursor ...to adjust. reset See "To reset the adjustments" on the next page. Video Adjustments For video adjustments, use the buttons either on the remote control or on Monitor for menu operations. • Refer also to "Menu Classifications" on pages 31 and 33. 2 / 3 MENU/EXIT Adjusting the Picture Quality...

Instruction Manual
Page 20
..."YES" then key. Note: • Adjustment values for H SIZE appears on the Monitor). RGB A RGB B MUTING VOLUME MENU/EXIT RM-C576 REMOTE CONTROL UNIT 2 / 3 5 / 5 To make an adjustment while viewing the adjustment bar After step 3 on the Monitor) three times to select the Sub Menu you sure? H SIZE + :+01 + ...Press 2/3 to reset the adjustments. The confirmation screen appears. This is adjusted up to near the maximum value, the attainable value of the Monitor. 6 Press MENU/EXIT (or MENU on page 17, proceed as follows: 1 Press 5/∞ to move the cursor (3) to exit ...
..."YES" then key. Note: • Adjustment values for H SIZE appears on the Monitor). RGB A RGB B MUTING VOLUME MENU/EXIT RM-C576 REMOTE CONTROL UNIT 2 / 3 5 / 5 To make an adjustment while viewing the adjustment bar After step 3 on the Monitor) three times to select the Sub Menu you sure? H SIZE + :+01 + ...Press 2/3 to reset the adjustments. The confirmation screen appears. This is adjusted up to near the maximum value, the attainable value of the Monitor. 6 Press MENU/EXIT (or MENU on page 17, proceed as follows: 1 Press 5/∞ to move the cursor (3) to exit ...

Instruction Manual
Page 21
... of the color temperature. 1 On the remote control: Press MENU/EXIT while holding 2 to display the Setup Menu. Cursor (3) MAIN MENU PICTURE ADJ. FUNCTION SELECT STATUS DISPLAY ENTER: SELECT: EXIT: MENU 2 Press 5/∞ to move to the other items. 7 Press MENU/EXIT (or MENU on the Monitor) twice to exit from the current...
... of the color temperature. 1 On the remote control: Press MENU/EXIT while holding 2 to display the Setup Menu. Cursor (3) MAIN MENU PICTURE ADJ. FUNCTION SELECT STATUS DISPLAY ENTER: SELECT: EXIT: MENU 2 Press 5/∞ to move to the other items. 7 Press MENU/EXIT (or MENU on the Monitor) twice to exit from the current...

Instruction Manual
Page 22
... + 3 Press 5/∞ to select the Sub Menu you want to reset the adjustments. The Sub Menu for R GAIN appears on the Monitor). 5 5 MENU/EXIT MENU/EXIT RM-C576 REMOTE CONTROL UNIT 2 / 3 5 / *1 "PICTURE MODE" and "SIGNAL MODE" do not appear at the same time. To cancel the reset,...DISPLAY ASPECT POWER VIDEO A VIDEO B COMPO. RGB A RGB B MUTING VOLUME To make an adjustment while viewing the adjustment bars After step 3 on the Monitor) three times to adjust the other hand, "SIGNAL MODE" appears when VIDEO A, VIDEO B, or COMPONENT input is selected, and one of the following ...
... + 3 Press 5/∞ to select the Sub Menu you want to reset the adjustments. The Sub Menu for R GAIN appears on the Monitor). 5 5 MENU/EXIT MENU/EXIT RM-C576 REMOTE CONTROL UNIT 2 / 3 5 / *1 "PICTURE MODE" and "SIGNAL MODE" do not appear at the same time. To cancel the reset,...DISPLAY ASPECT POWER VIDEO A VIDEO B COMPO. RGB A RGB B MUTING VOLUME To make an adjustment while viewing the adjustment bars After step 3 on the Monitor) three times to adjust the other hand, "SIGNAL MODE" appears when VIDEO A, VIDEO B, or COMPONENT input is selected, and one of the following ...

Instruction Manual
Page 24
... AUTO 480i 576i 1080i (1035i)* 720p 480p * Changes according to the "HD SIGNAL MODE" setting (see page 27). 6 Press MENU/EXIT (or MENU on the Monitor) to display the Function Selection Menu. 5 5 DISPLAY ASPECT POWER VIDEO A VIDEO B COMPO. FUNCTION SELECT STATUS DISPLAY ENTER: SELECT: EXIT: MENU 2 / 3 5... one of the following signals comes in-RGB15K-50, RGB15K-60, and VGA480-60. RGB A RGB B MUTING VOLUME MENU/EXIT MENU/EXIT RM-C576 REMOTE CONTROL UNIT 2 / 3 5 / *1 "PICTURE MODE" and "SIGNAL MODE" do not appear at the same time. A common setting will apply to both...
... AUTO 480i 576i 1080i (1035i)* 720p 480p * Changes according to the "HD SIGNAL MODE" setting (see page 27). 6 Press MENU/EXIT (or MENU on the Monitor) to display the Function Selection Menu. 5 5 DISPLAY ASPECT POWER VIDEO A VIDEO B COMPO. FUNCTION SELECT STATUS DISPLAY ENTER: SELECT: EXIT: MENU 2 / 3 5... one of the following signals comes in-RGB15K-50, RGB15K-60, and VGA480-60. RGB A RGB B MUTING VOLUME MENU/EXIT MENU/EXIT RM-C576 REMOTE CONTROL UNIT 2 / 3 5 / *1 "PICTURE MODE" and "SIGNAL MODE" do not appear at the same time. A common setting will apply to both...

Instruction Manual
Page 26
... RGB A RGB B MUTING VOLUME MENU/EXIT MENU/EXIT RM-C576 REMOTE CONTROL UNIT 2 Press 5/∞ to move the cursor (3) to "STATUS DISPLAY." 3 Press 3 to make these information by using the buttons on the Monitor. Other Convenient Functions To set the other convenient functions, use the ...buttons either on the remote control or on Monitor for menu operations. • Refer also to "Menu Classifications" on pages 31 and 33...
... RGB A RGB B MUTING VOLUME MENU/EXIT MENU/EXIT RM-C576 REMOTE CONTROL UNIT 2 Press 5/∞ to move the cursor (3) to "STATUS DISPLAY." 3 Press 3 to make these information by using the buttons on the Monitor. Other Convenient Functions To set the other convenient functions, use the ...buttons either on the remote control or on Monitor for menu operations. • Refer also to "Menu Classifications" on pages 31 and 33...

Instruction Manual
Page 27
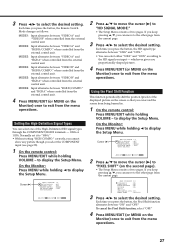
.../EXIT while holding 2 to display the Setup Menu. to display the Setup Menu. On the Monitor: Press MENU while holding VOLUME - Notes: • The value for any service. 1 On the remote control: Press MENU/EXIT while holding 2 to display the Setup Menu. To calculate the actual hours ...use . • The period when the monitor is divided by 100. If you have a different model, its correct model name will not be shown (GM-P420UG). 4 Press MENU/EXIT (or MENU on the next page) 25 Cursor (3) SET-UP MENU STATUS DISPLAY CONTROL LOCK REMOTE SWITCH HD SIGNAL MODE WHITE BALANCE 1/2 :...
.../EXIT while holding 2 to display the Setup Menu. to display the Setup Menu. On the Monitor: Press MENU while holding VOLUME - Notes: • The value for any service. 1 On the remote control: Press MENU/EXIT while holding 2 to display the Setup Menu. To calculate the actual hours ...use . • The period when the monitor is divided by 100. If you have a different model, its correct model name will not be shown (GM-P420UG). 4 Press MENU/EXIT (or MENU on the next page) 25 Cursor (3) SET-UP MENU STATUS DISPLAY CONTROL LOCK REMOTE SWITCH HD SIGNAL MODE WHITE BALANCE 1/2 :...

Instruction Manual
Page 28
... between "ON" and "OFF." To cancel the Control Lock function, select "OFF." 4 Press MENU/EXIT (or MENU on the Monitor) once to "CONTROL LOCK." • The Setup Menu consists of two pages. Cursor (3) SET-UP MENU STATUS DISPLAY CONTROL LOCK REMOTE SWITCH HD SIGNAL MODE WHITE BALANCE 1/2 : OFF ...can move to the other page from the connected external control unit. 1 On the remote control: Press MENU/EXIT while holding 2 to the other page from the menu operations. Operation to display the Setup Menu. On the Monitor: Press MENU while holding VOLUME - If you keep pressing...
... between "ON" and "OFF." To cancel the Control Lock function, select "OFF." 4 Press MENU/EXIT (or MENU on the Monitor) once to "CONTROL LOCK." • The Setup Menu consists of two pages. Cursor (3) SET-UP MENU STATUS DISPLAY CONTROL LOCK REMOTE SWITCH HD SIGNAL MODE WHITE BALANCE 1/2 : OFF ...can move to the other page from the connected external control unit. 1 On the remote control: Press MENU/EXIT while holding 2 to the other page from the menu operations. Operation to display the Setup Menu. On the Monitor: Press MENU while holding VOLUME - If you keep pressing...
Instruction Manual
Page 29
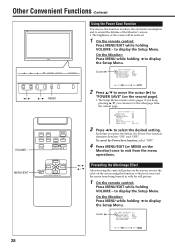
...remote control: Press MENU/EXIT while holding VOLUME - to display the Setup Menu. when controlled from the external control unit. To cancel the Pixel Shift function, select "OFF." 4 Press MENU/EXIT (or MENU on the second page). • The Setup Menu consists of the displayed picture on the Monitor... (3) to "PIXEL SHIFT" (on the Monitor) once to exit from the external control unit. SET-UP MENU 2/2 PIXEL SHIFT : ON POWER SAVE : ON COLOR-REVERSE : ON REFRESH : ON reset all reset HOUR METER x100h : 001 MODEL NAME : GM-P421U 3 Press 2/3 to "HD SIGNAL MODE...
...remote control: Press MENU/EXIT while holding VOLUME - to display the Setup Menu. when controlled from the external control unit. To cancel the Pixel Shift function, select "OFF." 4 Press MENU/EXIT (or MENU on the second page). • The Setup Menu consists of the displayed picture on the Monitor... (3) to "PIXEL SHIFT" (on the Monitor) once to exit from the external control unit. SET-UP MENU 2/2 PIXEL SHIFT : ON POWER SAVE : ON COLOR-REVERSE : ON REFRESH : ON reset all reset HOUR METER x100h : 001 MODEL NAME : GM-P421U 3 Press 2/3 to "HD SIGNAL MODE...
Instruction Manual
Page 30
...: ON reset all reset HOUR METER x100h : 001 MODEL NAME : GM-P421U 3 Press 2/3 to display the Setup Menu. On the Monitor: Press MENU while holding 2 to exit from the menu operations. 5 5 MENU/EXIT MENU/EXIT RM-C576 REMOTE CONTROL UNIT 2 / 3 5 / Preventing the Afterimage Effect After showing the... EXIT: MENU 2 Press 5/∞ to move to display the Setup Menu. On the Monitor: Press MENU while holding 2 to the other page from being burned in with the still picture. 1 On the remote control: Press MENU/EXIT while holding VOLUME - DISPLAY ASPECT POWER VIDEO A VIDEO B COMPO. ...
...: ON reset all reset HOUR METER x100h : 001 MODEL NAME : GM-P421U 3 Press 2/3 to display the Setup Menu. On the Monitor: Press MENU while holding 2 to exit from the menu operations. 5 5 MENU/EXIT MENU/EXIT RM-C576 REMOTE CONTROL UNIT 2 / 3 5 / Preventing the Afterimage Effect After showing the... EXIT: MENU 2 Press 5/∞ to move to display the Setup Menu. On the Monitor: Press MENU while holding 2 to the other page from being burned in with the still picture. 1 On the remote control: Press MENU/EXIT while holding VOLUME - DISPLAY ASPECT POWER VIDEO A VIDEO B COMPO. ...