
Instruction Manual
Page 7
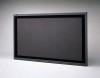
... level. 4 MENU button Use this button to turn on , the power lamp glows green. correctly on the menu (see page 23). 6 POWER button (page 14) Use this button to switch between inputs. When the Monitor is displayed, pressing this button will move you have to display or erase menus. To... to the preceding menu. 5 INPUT button (page 14) Use this button to set "RGB/COMPO." While a sub-menu is turned on and off the Monitor. 5 Monitor: Front View 1 2 MENU INPUT POWER MENU INPUT POWER Bottom View 3 45 6 1 Remote sensor/power lamp Point the front end of the wireless remote ...
... level. 4 MENU button Use this button to turn on , the power lamp glows green. correctly on the menu (see page 23). 6 POWER button (page 14) Use this button to switch between inputs. When the Monitor is displayed, pressing this button will move you have to display or erase menus. To... to the preceding menu. 5 INPUT button (page 14) Use this button to set "RGB/COMPO." While a sub-menu is turned on and off the Monitor. 5 Monitor: Front View 1 2 MENU INPUT POWER MENU INPUT POWER Bottom View 3 45 6 1 Remote sensor/power lamp Point the front end of the wireless remote ...

Instruction Manual
Page 16
...MUTING. Press POWER on the back of input and signal are indicated on . Each time you can also select the input by pressing 2 / 3 on the Monitor. 3 Select an input. VOLUME - : 10 + Note: • While no menu is displayed, and the sound goes out. The POWER lamp changes to...RGB/COMPO." You can also use the POWER on the Monitor. Select the desired input by pressing VIDEO A, VIDEO B, COMPO./RGB B and RGB A. • You can adjust the volume by pressing INPUT on the front panel (lower right) to glow green. • You can also make the screen indication appear...
...MUTING. Press POWER on the back of input and signal are indicated on . Each time you can also select the input by pressing 2 / 3 on the Monitor. 3 Select an input. VOLUME - : 10 + Note: • While no menu is displayed, and the sound goes out. The POWER lamp changes to...RGB/COMPO." You can also use the POWER on the Monitor. Select the desired input by pressing VIDEO A, VIDEO B, COMPO./RGB B and RGB A. • You can adjust the volume by pressing INPUT on the front panel (lower right) to glow green. • You can also make the screen indication appear...
Instruction Manual
Page 40
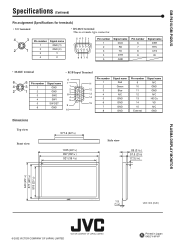
GM-P421U/GM-P420UG Specifications (Continued) Pin assignment (Specifications for terminals) • Y/C terminal • RS-232C ...4 SW1 5 5 SW DET 9 6 GND 10 Pin number Signal name Pin number Signal name 11 1 2 12 3 13 4 14 5 Red Green Blue N/C GND 9 N/C 10 GND 11 GND 12 N/C 13 HD/Cs 15 6 GND 14 VD 7 GND 15 N/C 8 GND External GND Dimensions...1035 (403/4) 997 (393/8 ) 921 (36 3/8) Side view 89 (3 5/8 ) 57.5 (2 3/8) 17.3 ( 3/4) PLASMA DISPLAY MONITOR 640 (251/4) 577 (22 3/4) 518 (201/2) MENU INPUT POWER 1.5 (1/16) Unit: mm (inch) © 2002 ...
GM-P421U/GM-P420UG Specifications (Continued) Pin assignment (Specifications for terminals) • Y/C terminal • RS-232C ...4 SW1 5 5 SW DET 9 6 GND 10 Pin number Signal name Pin number Signal name 11 1 2 12 3 13 4 14 5 Red Green Blue N/C GND 9 N/C 10 GND 11 GND 12 N/C 13 HD/Cs 15 6 GND 14 VD 7 GND 15 N/C 8 GND External GND Dimensions...1035 (403/4) 997 (393/8 ) 921 (36 3/8) Side view 89 (3 5/8 ) 57.5 (2 3/8) 17.3 ( 3/4) PLASMA DISPLAY MONITOR 640 (251/4) 577 (22 3/4) 518 (201/2) MENU INPUT POWER 1.5 (1/16) Unit: mm (inch) © 2002 ...