JVC FS-H35 Support and Manuals
Get Help and Manuals for this JVC item
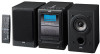
Popular JVC FS-H35 Manual Pages
Instruction Manual - Page 1
which are located either on the rear, bottom or side of CA-FSH35 and SP-UXH35 FS-H30- GVT0101-001B
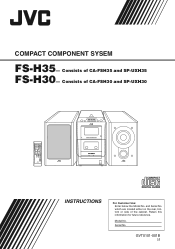
[J] Consists of the cabinet.
Model No.
Serial No. Retain this information for future reference. Consists of CA-FSH30 and SP-UXH30
COMPACT COMPONENT SYSTEM
INSTRUCTIONS
For Customer Use: Enter below the Model No. COMPACT COMPONENT SYSEM
FS-H35- and Serial No.
Instruction Manual - Page 2
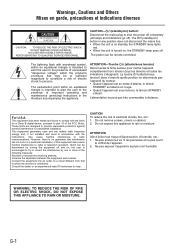
...;teint. This equipment has been tested and found to comply with the instructions, may be remote controlled. These limits are designed to part 15 of the following measures: Reorient or relocate the receiving antenna. However, there is turned on standby, the STANDBY lamp lights
red. • When the unit is no guarantee that may cause...
Instruction Manual - Page 4
... there are no user serviceable parts inside the unit in the following symbols are explained in the section "Common Operations" on the remote control. Before operating this unit, read this manual for future reference.
Gives you information and hints you information about turning on the lens inside .
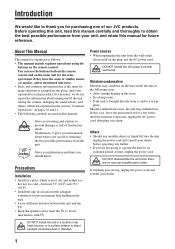
About This Manual
This manual is organized as follows...
Instruction Manual - Page 8
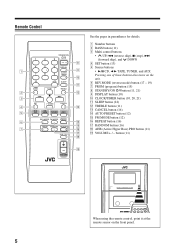
...) button (17 - 19) 7 PRGM (program) button (15) 8 STANDBY/ON button (11, 21) 9 DISPLAY button (10) p CLOCK/TIMER ... (11) o VOLUME + / - Remote Control
STANDBY/ON
1
2
3
8
4
5
6
DISPLAY
1
9
7
8
9
CLOCK /TIMER
p
10
10
SLEEP
q
BASS
2
UP
TREBLE
w
3
SET
DOWN
CANCEL
4
e
5
CD
TAPE TUNER AUX...DOWN
4 SET button (13) 5 Source buttons
• 3/8 CD, 2 3 TAPE, TUNER, and...
Instruction Manual - Page 12

...turned
"OFF" (or set to "ACC"). Otherwise, a
short-circuit may occur if the adapter plug
makes contact with the + and -
When the remote control can no longer operate the unit, replace both batteries at the same time.
1
12V 4A DC IN
Car adapter (JVC model...markings on the batteries with any metal part inside
3
the car.
• DO NOT use the remote control for an extended period...
Instruction Manual - Page 13
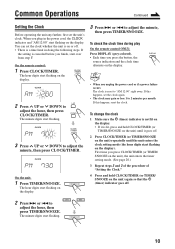
.../TIMER (or TIMER/ SNOOZE on the unit), the unit enters the timer setting mode. (See page 20.)
3 Repeat steps 2 and 3 of the procedure of "Setting the Clock."
4 Press and hold CLOCK/TIMER (or TIMER/ SNOOZE on the unit) until it goes off . • There is lit, press and hold CLOCK/TIMER (or TIMER...
Instruction Manual - Page 14
... cancel the effect, press AHB PRO again so that the BASS indicator lights up on headphones. After setting the clock, the clock time will be adjusted between on the unit goes off (standby) with the volume set to turn the unit off .
• When you finish, start playing any source next time. VOLUME
For private...
Instruction Manual - Page 15
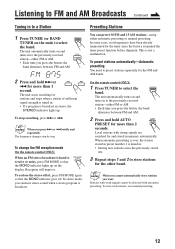
...presetting You need to receive or noisy, press FM MODE so that the MONO indicator goes off.
To store such stations, use manual presetting.
12 To stop searching, press ¢ or 4.
To change the FM ...AM.
2 Press and hold ¢ or
4 for the FM and AM bands.
The unit automatically turns on and tunes in to the previously received
station-either FM or AM. • Each time you press...
Instruction Manual - Page 16
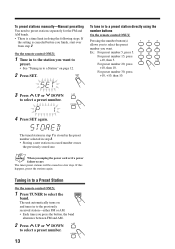
...to select a preset number. The unit automatically turns on
and tunes in to the previously
received ... TUNER to select a preset number.
To preset stations manually-Manual presetting You need to preset stations separately for the FM...Storing a new station on a used number erases
the previously stored one.
If
the setting is canceled before you want .
4
5
6
Ex.: For preset number 5, press...
Instruction Manual - Page 18
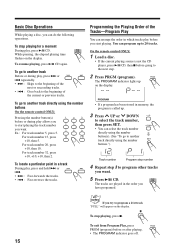
...number
directly using the number
button(s). (See "To go to another track directly using the number
SET
buttons.")
Track number
Program step number
4 Repeat step 3 to program other tracks
you want .... are played in a track During play before or after playing.
• The PROGRAM indicator goes off.
15 To exit from Program Play, press
PRGM
PRGM (program) before you start playing...
Instruction Manual - Page 23
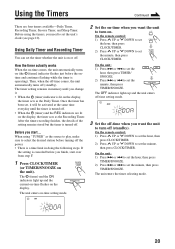
... canceled before the ontime and continues flashing while the timer is a time limit in memory until the timer is turned off (standby). On the unit: 1) Press ¢ or 4 to set the
hour, then press TIMER/ SNOOZE. 2) Press ¢ or 4 to set the minute, then press TIMER/SNOOZE.
On the unit: 1) Press ¢ or 4 to...
Instruction Manual - Page 24
... need .
• See "Setting the Clock" on page 10.
7 Press STANDBY/ON
STANDBY/ON
(or on the unit) to turn
off the unit (standby) if you
have set the timer with the previous setting), follow steps 1 to 7 ... change the timer (with the
unit turned on.
• When the timer turns on the display goes off.
On the unit: Press ¢ or 4 to set the volume level, then press CLOCK/TIMER...
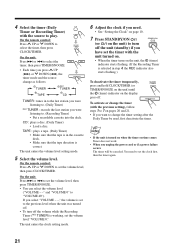
Instruction Manual - Page 25
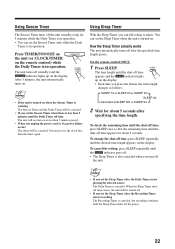
... Sleep Timer actually works The unit automatically turns off (standby) and the
SNOOZE indicator lights up on the display. On the remote control ONLY:
1 Press SLEEP. To cancel the setting, press SLEEP repeatedly until the SLEEP indicator goes off. • The Sleep Timer is also canceled when you turn on even when 5 minutes passed.
•...
Instruction Manual - Page 28
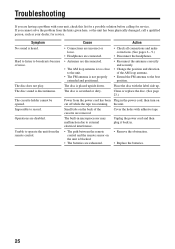
...8226; Remove the obstruction. • Replace the batteries.
25 Clean or replace the disc. (See page 23.)
...Disconnect the headphones.
• Antennas are having a problem with your dealer, for service. Small tabs on the back of the AM loop...The built-in the power cord, then turn on the unit is scratched or dirty....Troubleshooting
If you cannot solve the problem from the remote control.
Instruction Manual - Page 30
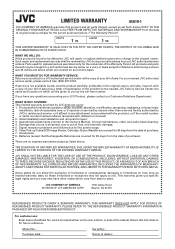
... THIS WARRANTY.
This warranty gives you specific legal rights and you .
Model No. : Purchase data :
Serial No. : Name of your JVC Product, please contact our Customer Relations ...problem to the nearest JVC Factory Service Center, the name and location of which are no express warranties except as listed above which will repair or replace defective parts at JVC authorized service ...
JVC FS-H35 Reviews
We have not received any reviews for JVC yet.