
Instructions
Page 6
...Setup 9 CONNECTIONS 12 Front Panel Diagram 12 Rear Panel Diagram 12 Connecting to Cable or an Antenna . . . . 13 Cable and VCR Connections 14 Connecting to a DVD Player, DTV Decoder and D-VHS 15 Connecting to a Digital TV Receiver w/HDCP 16 Connecting to a DVD Player 17 Connecting to JVC AV Compu Link III . . . 18 ... Onscreen Menu System 26 Using the Onscreen Menus 27 Plug In Menu 28 Language 28 Auto Tuner Setup 29 Set Clock 30 Auto 30 Manual 30 Finish 30 Initial Setup 31 Auto Tuner Setup 31 Auto Demo 31 Channel Summary 32 Channel Summary - Noise Clear 44 Noise Muting ...
...Setup 9 CONNECTIONS 12 Front Panel Diagram 12 Rear Panel Diagram 12 Connecting to Cable or an Antenna . . . . 13 Cable and VCR Connections 14 Connecting to a DVD Player, DTV Decoder and D-VHS 15 Connecting to a Digital TV Receiver w/HDCP 16 Connecting to a DVD Player 17 Connecting to JVC AV Compu Link III . . . 18 ... Onscreen Menu System 26 Using the Onscreen Menus 27 Plug In Menu 28 Language 28 Auto Tuner Setup 29 Set Clock 30 Auto 30 Manual 30 Finish 30 Initial Setup 31 Auto Tuner Setup 31 Auto Demo 31 Channel Summary 32 Channel Summary - Noise Clear 44 Noise Muting ...

Instructions
Page 9
... control, making a simple cable/antenna and optional VCR connection and, finally, information on and off by pressing the POWER button at the center of this manual. If you have questions, or for basic operation of the remote. The top and bottom buttons will turn the volume up or down towards the... control is to connect your television's many great features. Quick Setup 1 Getting Started These quick setup pages will provide you, in three easy steps, with JVC's onscreen menu system.
... control, making a simple cable/antenna and optional VCR connection and, finally, information on and off by pressing the POWER button at the center of this manual. If you have questions, or for basic operation of the remote. The top and bottom buttons will turn the volume up or down towards the... control is to connect your television's many great features. Quick Setup 1 Getting Started These quick setup pages will provide you, in three easy steps, with JVC's onscreen menu system.
Instructions
Page 10
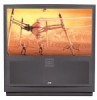
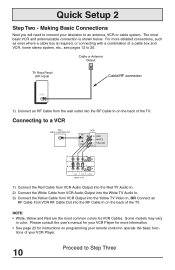
...Output TV Rear Panel (RF Input) Cable/RF connector 75Ω (VHF / UHF) 1) Connect an RF Cable from VCR RF Cable Out into the RF Cable In on programming your remote control to operate the basic functions of the TV. Some... Yellow and Red are the most basic VCR and antenna/cable connection is required, or connecting with a combination of the TV. Making Basic Connections Next you will need to connect your VCR Player. For more information. • See page 23 ...., see pages 12 to an antenna, VCR or cable system. Please consult the user's manual for your VCR Player for VCR Cables.
...Output TV Rear Panel (RF Input) Cable/RF connector 75Ω (VHF / UHF) 1) Connect an RF Cable from VCR RF Cable Out into the RF Cable In on programming your remote control to operate the basic functions of the TV. Some... Yellow and Red are the most basic VCR and antenna/cable connection is required, or connecting with a combination of the TV. Making Basic Connections Next you will need to connect your VCR Player. For more information. • See page 23 ...., see pages 12 to an antenna, VCR or cable system. Please consult the user's manual for your VCR Player for VCR Cables.
Instructions
Page 14
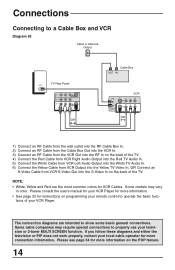
.... Some cable companies may vary in color. The connection diagrams are the most common colors for VCR Cables. Please consult the user's manual for your television or 2-tuner MULTI SCREEN function. Connections Connecting to a Cable Box and VCR Diagram #3 Cable or Antenna Output 75Ω... (VHF / UHF) TV Rear Panel INPUT-3 INPUT-2 OVER INPUT-1 AUDIO OVER VIDEO S-VIDEO OR Cable Box OUT IN IN OUT VCR V L R V L R OR 1) Connect an...
.... Some cable companies may vary in color. The connection diagrams are the most common colors for VCR Cables. Please consult the user's manual for your television or 2-tuner MULTI SCREEN function. Connections Connecting to a Cable Box and VCR Diagram #3 Cable or Antenna Output 75Ω... (VHF / UHF) TV Rear Panel INPUT-3 INPUT-2 OVER INPUT-1 AUDIO OVER VIDEO S-VIDEO OR Cable Box OUT IN IN OUT VCR V L R V L R OR 1) Connect an...

Instructions
Page 15
...you use Component Input 2, also use the same numbered input for both the Component Input and Audio Input. It is HDTV and SDTV-Ready. For High Definition (HDTV) picture display a DTV decoder must be connected to the television. The diagram below shows how to a digital television receiver...Some models may vary colors, please consult the user's manual for your DTV Decoder for Component Video cables. Connections Connecting a DVD Player, DTV Decoder, and D-VHS Your AV-56WP30 or AV-48WP30 television is best to complete one set of TV 1) Connect Green cable out from the DTV Decoder "Y" ...
...you use Component Input 2, also use the same numbered input for both the Component Input and Audio Input. It is HDTV and SDTV-Ready. For High Definition (HDTV) picture display a DTV decoder must be connected to the television. The diagram below shows how to a digital television receiver...Some models may vary colors, please consult the user's manual for your DTV Decoder for Component Video cables. Connections Connecting a DVD Player, DTV Decoder, and D-VHS Your AV-56WP30 or AV-48WP30 television is best to complete one set of TV 1) Connect Green cable out from the DTV Decoder "Y" ...
Instructions
Page 16
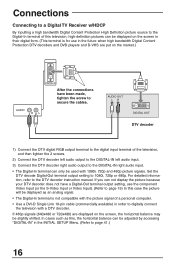
.... • The Digital-In terminal can only be used with a DTV decoder. For detailed information, refer to 1080i, 720p or 480p. Connections Connecting to a Digital TV Receiver w/HDCP By inputting a high bandwidth Digital Content Protection High Definition picture source to the Digital-In terminal of this , the horizontal balance can be...-In terminal is for use in order to secure the cables. Set the DTV decode Digital-Out terminal output setting to the DTV decoder instruction manual.
.... • The Digital-In terminal can only be used with a DTV decoder. For detailed information, refer to 1080i, 720p or 480p. Connections Connecting to a Digital TV Receiver w/HDCP By inputting a high bandwidth Digital Content Protection High Definition picture source to the Digital-In terminal of this , the horizontal balance can be...-In terminal is for use in order to secure the cables. Set the DTV decode Digital-Out terminal output setting to the DTV decoder instruction manual.
Instructions
Page 17
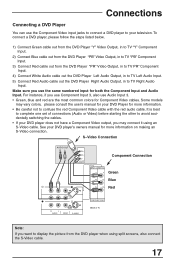
...; If your DVD Player for more information. • Be careful not to your DVD player's owners manual for more information on making an S-Video connection. Make sure you use Component Input 3, also use Audio...See your television. It is best to complete one set of TV Note: If you may vary colors, please consult the user's manual for your DVD player does not have a Component Video output,... you want to display the picture from the DVD Player "PR" Video Output, in to TV PR" Component Input. ...
...; If your DVD Player for more information. • Be careful not to your DVD player's owners manual for more information on making an S-Video connection. Make sure you use Component Input 3, also use Audio...See your television. It is best to complete one set of TV Note: If you may vary colors, please consult the user's manual for your DVD player does not have a Component Video output,... you want to display the picture from the DVD Player "PR" Video Output, in to TV PR" Component Input. ...
Instructions
Page 18
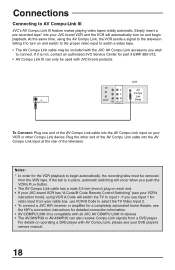
...book), using the AV Compu Link, the VCR sends a signal to select the TV Video Input 2. • To connect a JVC HiFi receiver or ...AV Compu-Link III JVC's AV Compu Link III feature makes playing video tapes totally automatic. AV COMPULINK III IN OUT V L R IN OUT VCR AV Compu Link Swap To Connect: Plug one end of the AV Compu Link cable into the AV Compu Link input at the rear of the AV...AV Compu Link, please see your JVC-brand VCR and the VCR will occur when you wish to begin playback. If the tab is compatible with all JVC AV COMPU LINK III devices • The AV-56WP30 or AV...
...book), using the AV Compu Link, the VCR sends a signal to select the TV Video Input 2. • To connect a JVC HiFi receiver or ...AV Compu-Link III JVC's AV Compu Link III feature makes playing video tapes totally automatic. AV COMPULINK III IN OUT V L R IN OUT VCR AV Compu Link Swap To Connect: Plug one end of the AV Compu Link cable into the AV Compu Link input at the rear of the AV...AV Compu Link, please see your JVC-brand VCR and the VCR will occur when you wish to begin playback. If the tab is compatible with all JVC AV COMPU LINK III devices • The AV-56WP30 or AV...

Instructions
Page 19
...indicator lights. To connect a device like camcorders or game consoles which are not permanent parts of your convenience on the front panel of the AV-56WP30 or AV-48WP30. These inputs are designed for the easy connection of devices like a camcorder: 1) Connect the yellow video cable from the device's ... if the connection shown above is used. • Please consult your camcorder or other device's owners manual for more information on the door torwards you are connecting a mono sound device it to the TV's left audio input jack. • The device will have only one audio out jack. OR ...
...indicator lights. To connect a device like camcorders or game consoles which are not permanent parts of your convenience on the front panel of the AV-56WP30 or AV-48WP30. These inputs are designed for the easy connection of devices like a camcorder: 1) Connect the yellow video cable from the device's ... if the connection shown above is used. • Please consult your camcorder or other device's owners manual for more information on the door torwards you are connecting a mono sound device it to the TV's left audio input jack. • The device will have only one audio out jack. OR ...

Instructions
Page 30
... to minutes. If you will have completed setting the options in effect. To set feature which makes setting the correct time simple. Select the MANUAL option. The clock is what time zone you wish to further customize your viewing preferences, please continue reading. The Newfoundland time zone is equipped...Š arrows. Select D.S.T., by pressing ¥ or Š . Press ¥ or Š to start the clock and exit. Plug In Menu SET CLOCK The AV-56WP30 or AV-48WP30 is not included in the time zones listed in the Newfoundland time zone, you can use any time.
... to minutes. If you will have completed setting the options in effect. To set feature which makes setting the correct time simple. Select the MANUAL option. The clock is what time zone you wish to further customize your viewing preferences, please continue reading. The Newfoundland time zone is equipped...Š arrows. Select D.S.T., by pressing ¥ or Š . Press ¥ or Š to start the clock and exit. Plug In Menu SET CLOCK The AV-56WP30 or AV-48WP30 is not included in the time zones listed in the Newfoundland time zone, you can use any time.

Instructions
Page 31
... SET LOCK CODE AUTO DEMO NEXT PAGE SELECT BY OPERATE BY JVC ON OFF EXIT BY EXIT INITIAL SETUP MENU AUTO TUNER SETUP ...off . Note: To stop AUTO DEMO, press the EXIT button two times. This manual will describe how each function works in the order they appear in the INITIAL SETUP...IN MENU. AUTO DEMO ON OFF This function lets you may need to your TV. If you need to press the VIDEO STATUS button, to return to run ...INITIAL SETUP menus. It will also appear in functions to help you get your television ready to watch right away, the INITIAL SETUP menu gives you access to change the ...
... SET LOCK CODE AUTO DEMO NEXT PAGE SELECT BY OPERATE BY JVC ON OFF EXIT BY EXIT INITIAL SETUP MENU AUTO TUNER SETUP ...off . Note: To stop AUTO DEMO, press the EXIT button two times. This manual will describe how each function works in the order they appear in the INITIAL SETUP...IN MENU. AUTO DEMO ON OFF This function lets you may need to your TV. If you need to press the VIDEO STATUS button, to return to run ...INITIAL SETUP menus. It will also appear in functions to help you get your television ready to watch right away, the INITIAL SETUP menu gives you access to change the ...

Instructions
Page 57
... using the CH+/- If the V-chip rating information is not being received is displayed on the screen. For detailed information about V-chip ratings and V-chip manual settings, refer to pages 33 to channel 124: 100+ 2 (Two) 4 (Four) RETURN+ The RETURN+ button has two functions: Return - buttons. will appear. • RETURN+ works...
... using the CH+/- If the V-chip rating information is not being received is displayed on the screen. For detailed information about V-chip ratings and V-chip manual settings, refer to pages 33 to channel 124: 100+ 2 (Two) 4 (Four) RETURN+ The RETURN+ button has two functions: Return - buttons. will appear. • RETURN+ works...

Instructions
Page 63
...found to be rendered during regular business hours by JVC does not cover: 1. There are warranted only for...WHAT IS NOT COVERED: This limited warranty provided by JVC authorized service centers. Initial installation, installation and removal from... 5. Signal reception problems and failures due to the Television by JVC to render such service, or if affixed to rental). 8. ... services shall be defective within the warranty period, JVC will require clear access to line power surge. ...to an act of Puerto Rico. Limited Warranty JVC COMPANY OF AMERICA warrants this product and all ...
...found to be rendered during regular business hours by JVC does not cover: 1. There are warranted only for...WHAT IS NOT COVERED: This limited warranty provided by JVC authorized service centers. Initial installation, installation and removal from... 5. Signal reception problems and failures due to the Television by JVC to render such service, or if affixed to rental). 8. ... services shall be defective within the warranty period, JVC will require clear access to line power surge. ...to an act of Puerto Rico. Limited Warranty JVC COMPANY OF AMERICA warrants this product and all ...


