User Guide
Page 6
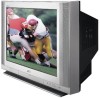
Table of Contents UNPACKING YOUR TV . . . . . 7 TV Models and Remote Controls 8 Quick Setup Guide 10 Connections 13 Cable and VCR Connections 13 Connecting to a DVD Player 16 Connecting to an External Amplifier . . . . 17 Connecting to a Camcorder 17 Connecting to JVC AV Compu Link . . . . 18 Remote Control 19 Remote Control Basics . . . . . ... 23 Onscreen Menu System 24 Plug In Menu 25 Introduction 25 Language 25 Auto Tuner Setup 25 Auto Clock Set 26 Manual Clock Set 27 Channel Summary 28 V-Chip 29 US V-Chip Ratings 30 Viewing Guidelines 30 Setting US V-Chip Ratings . . . 31...
Table of Contents UNPACKING YOUR TV . . . . . 7 TV Models and Remote Controls 8 Quick Setup Guide 10 Connections 13 Cable and VCR Connections 13 Connecting to a DVD Player 16 Connecting to an External Amplifier . . . . 17 Connecting to a Camcorder 17 Connecting to JVC AV Compu Link . . . . 18 Remote Control 19 Remote Control Basics . . . . . ... 23 Onscreen Menu System 24 Plug In Menu 25 Introduction 25 Language 25 Auto Tuner Setup 25 Auto Clock Set 26 Manual Clock Set 27 Channel Summary 28 V-Chip 29 US V-Chip Ratings 30 Viewing Guidelines 30 Setting US V-Chip Ratings . . . 31...
User Guide
Page 10
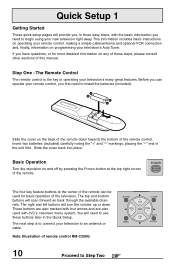
Quick Setup 1 Getting Started These quick setup pages will provide you, in three easy steps, with JVC's onscreen menu system. If you have questions, or for basic operation of remote control RM-C325G MUTING V CHIP + CH VOL VOL + CH EXIT MENU PIP ... the "+" and "-" markings, placing the "-" end in the Quick Setup. Step One - POWER The four key feature buttons at the top right corner of this manual. You will scan forward an back through the available channels. These buttons are also marked with four arrows and are also used for more detailed...
Quick Setup 1 Getting Started These quick setup pages will provide you, in three easy steps, with JVC's onscreen menu system. If you have questions, or for basic operation of remote control RM-C325G MUTING V CHIP + CH VOL VOL + CH EXIT MENU PIP ... the "+" and "-" markings, placing the "-" end in the Quick Setup. Step One - POWER The four key feature buttons at the top right corner of this manual. You will scan forward an back through the available channels. These buttons are also marked with four arrows and are also used for more detailed...
User Guide
Page 13
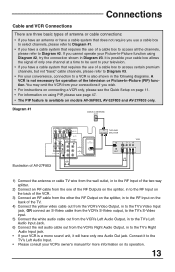
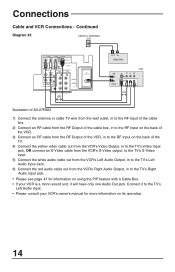
... of the two-way splitter. 2) Connect an RF cable from the one Audio Out jack. Connect it to the TV's Left Audio Input. • Please consult your VCR's owner's manual for operation of the television or Picture-In-Picture (PIP) function. Diagram #1 CABLE or ANTENNA OUT AUDIO VIDEO S... AUDIO COMPONENT VIDEO R L MONO COMPONENT VIDEO R L Y AUDIO OUT PB AV COMPULINK PR OR Illustration of AV-27F803 75Ω (VHF / UHF) IN TWO-WAY OUT OUT SPLITTER IN VCR VLR OUT OR 1) Connect the antenna or cable TV wire from the wall outlet, in Diagram #3. If you cannot operate your...
... of the two-way splitter. 2) Connect an RF cable from the one Audio Out jack. Connect it to the TV's Left Audio Input. • Please consult your VCR's owner's manual for operation of the television or Picture-In-Picture (PIP) function. Diagram #1 CABLE or ANTENNA OUT AUDIO VIDEO S... AUDIO COMPONENT VIDEO R L MONO COMPONENT VIDEO R L Y AUDIO OUT PB AV COMPULINK PR OR Illustration of AV-27F803 75Ω (VHF / UHF) IN TWO-WAY OUT OUT SPLITTER IN VCR VLR OUT OR 1) Connect the antenna or cable TV wire from the wall outlet, in Diagram #3. If you cannot operate your...
User Guide
Page 14
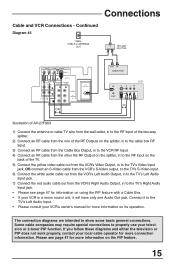
... PR 75Ω (VHF / UHF) OR OUT IN Cable Box VCR IN VLR OUT OR Illustration of AV-27F803 1) Connect the antenna or cable TV wire from the wall outlet, in to the RF Input of the cable box. 2) Connect an RF cable from the RF Output of the cable ... red audio cable out from the VCR's Right Audio Output, in to the TV's Left Audio Input. • Please consult your VCR's owner's manual for information on its operation. 14 Connections Cable and VCR Connections - Connect it to the TV's Right Audio Input jack. • Please see page 47 for more information on...
... PR 75Ω (VHF / UHF) OR OUT IN Cable Box VCR IN VLR OUT OR Illustration of AV-27F803 1) Connect the antenna or cable TV wire from the wall outlet, in to the RF Input of the cable box. 2) Connect an RF cable from the RF Output of the cable ... red audio cable out from the VCR's Right Audio Output, in to the TV's Left Audio Input. • Please consult your VCR's owner's manual for information on its operation. 14 Connections Cable and VCR Connections - Connect it to the TV's Right Audio Input jack. • Please see page 47 for more information on...
User Guide
Page 15
...of AV-27F803 1) Connect the antenna or cable TV wire from the wall outlet, in to the RF Input of the TV. 5) Connect the yellow video cable out from the VCR's Video Output, in to the TV's Video...PIP feature with a Cable Box. • If your VCR is a mono sound unit, it to the TV's Left Audio Input. • Please consult your local cable operator for more information on the PIP feature....follow these diagrams and either the television or PIP does not work properly, contact your VCR's owner's manual for information on the back of the two-way splitter. 2) Connect an RF cable from the other...
...of AV-27F803 1) Connect the antenna or cable TV wire from the wall outlet, in to the RF Input of the TV. 5) Connect the yellow video cable out from the VCR's Video Output, in to the TV's Video...PIP feature with a Cable Box. • If your VCR is a mono sound unit, it to the TV's Left Audio Input. • Please consult your local cable operator for more information on the PIP feature....follow these diagrams and either the television or PIP does not work properly, contact your VCR's owner's manual for information on the back of the two-way splitter. 2) Connect an RF cable from the other...
User Guide
Page 16
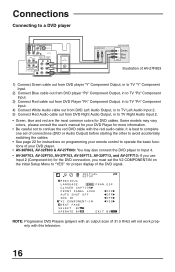
...out from DVD Right Audio Output, in to TV Right Audio Input 2. • Green, blue and red are the most common colors for DVD cables. Some models may also connect the DVD player to Input 4. • AV-36F703, AV-32F703, AV-27F703, AV-36F713, AV-32F713, and AV-27F713: If you use Input 2 (Component-...-IN on the initial Setup Menu to "YES" for proper display of your DVD player. • AV-36F803, AV-32F803 & AV-27F803: You may vary colors, please consult the user's manual for your DVD Player for instructions on programming your remote control to operate the basic functions of the DVD...
...out from DVD Right Audio Output, in to TV Right Audio Input 2. • Green, blue and red are the most common colors for DVD cables. Some models may also connect the DVD player to Input 4. • AV-36F703, AV-32F703, AV-27F703, AV-36F713, AV-32F713, and AV-27F713: If you use Input 2 (Component-...-IN on the initial Setup Menu to "YES" for proper display of your DVD player. • AV-36F803, AV-32F803 & AV-27F803: You may vary colors, please consult the user's manual for your DVD Player for instructions on programming your remote control to operate the basic functions of the DVD...
User Guide
Page 26
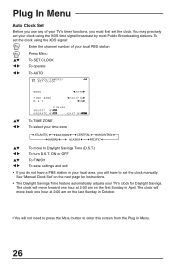
...automatically adjusts your clock using the XDS signal: Enter the channel number of your TV's timer functions, you do not have to Daylight Savings Time (D.S.T.) To turn D.S.T. The clock will have a PBS station in April. See 'Manual Clock Set' on the first Sunday in your local area, you will move... to set the clock using the XDS time signal broadcast by most Public Broadcasting stations. To set the clock manually. Plug In Menu Auto Clock Set Before you use any of your local PBS station Press MENU ›‚ ¥Š ¥Š...
...automatically adjusts your clock using the XDS signal: Enter the channel number of your TV's timer functions, you do not have to Daylight Savings Time (D.S.T.) To turn D.S.T. The clock will have a PBS station in April. See 'Manual Clock Set' on the first Sunday in your local area, you will move... to set the clock using the XDS time signal broadcast by most Public Broadcasting stations. To set the clock manually. Plug In Menu Auto Clock Set Before you use any of your local PBS station Press MENU ›‚ ¥Š ¥Š...
User Guide
Page 27
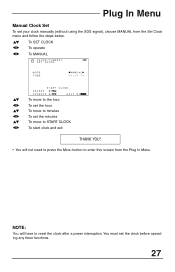
...: You will not need to press the MENU button to reset the clock after a power interruption. Plug In Menu Manual Clock Set To set your clock manually (without using the XDS signal), choose MANUAL from the Set Clock menu and follow the steps below. ›‚ ¥Š ¥Š To SET CLOCK... To operate To MANUAL ›‚ ¥Š ›‚ ¥Š ›‚ ¥Š To move to the hour To set the hour To move to minutes ...
...: You will not need to press the MENU button to reset the clock after a power interruption. Plug In Menu Manual Clock Set To set your clock manually (without using the XDS signal), choose MANUAL from the Set Clock menu and follow the steps below. ›‚ ¥Š ¥Š To SET CLOCK... To operate To MANUAL ›‚ ¥Š ›‚ ¥Š ›‚ ¥Š To move to the hour To set the hour To move to minutes ...
User Guide
Page 51
... anyone other mounting systems; 3) Operational adjustments covered in the Owner's Manual, normal maintenance, video and audio head cleaning; 4) Damage that occurs in " entertainment centers and other than a service facility authorized by JVC during regular business hours at no charge to the nearest JVC Factory Service Center, the name and location which have any...
... anyone other mounting systems; 3) Operational adjustments covered in the Owner's Manual, normal maintenance, video and audio head cleaning; 4) Damage that occurs in " entertainment centers and other than a service facility authorized by JVC during regular business hours at no charge to the nearest JVC Factory Service Center, the name and location which have any...


