

Owners Manual
Page 1
Owner's Operator And Maintenance Manual ® EXCELERATOR™ SERIES Excelerator™ Li'l Excelerator™ DEALER: THIS MANUAL MUST BE GIVEN TO THE USER OF THE HANDCYCLE. For more information regarding Invacare products, parts, and services, please visit: www.invacare.com REFER TO THE INFORMATION ON PAGE 7 OF THIS MANUAL. USER: BEFORE USING THIS HANDCYCLE, READ THIS MANUAL AND SAVE FOR FUTURE REFERENCE.
Owner's Operator And Maintenance Manual ® EXCELERATOR™ SERIES Excelerator™ Li'l Excelerator™ DEALER: THIS MANUAL MUST BE GIVEN TO THE USER OF THE HANDCYCLE. For more information regarding Invacare products, parts, and services, please visit: www.invacare.com REFER TO THE INFORMATION ON PAGE 7 OF THIS MANUAL. USER: BEFORE USING THIS HANDCYCLE, READ THIS MANUAL AND SAVE FOR FUTURE REFERENCE.

Owners Manual
Page 4
...Any registration information you or your provider, if servicing is needed on your investment. 2. TABLE OF CONTENTS TABLE OF CONTENTS SECTION 7 - Safeguard your input and needs. Invacare can contact you submit will enable Invacare to improve product designs based on your purchase.... 3. Excelerator™Series 4 Part No. 1056188 SERVICE PROCEDURES 30 Fork Assembly Installation ...30 Tension Spring Installation ...30 ...
...Any registration information you or your provider, if servicing is needed on your investment. 2. TABLE OF CONTENTS TABLE OF CONTENTS SECTION 7 - Safeguard your input and needs. Invacare can contact you submit will enable Invacare to improve product designs based on your purchase.... 3. Excelerator™Series 4 Part No. 1056188 SERVICE PROCEDURES 30 Fork Assembly Installation ...30 Tension Spring Installation ...30 ...
Owners Manual
Page 15
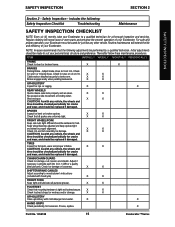
... for damage or looseness. Adjust if necessary. Check for damage. X X HAND GRIPS Check periodically for a thorough inspection and servicing. includes the following adjustments be checked periodically for rips or sagging. For safe and proper operation, your personal body structure and... Inspection - X X BRAKES Parking Brake - Lubricate each link (3-in-1 oil® or a quality bike lubricant). NOTE: Invacare recommends that mounting hardware is tight and footrest secure. Initial adjustments should be made to manufacturer's instructions (included with mild detergent ...
... for damage or looseness. Adjust if necessary. Check for damage. X X HAND GRIPS Check periodically for a thorough inspection and servicing. includes the following adjustments be checked periodically for rips or sagging. For safe and proper operation, your personal body structure and... Inspection - X X BRAKES Parking Brake - Lubricate each link (3-in-1 oil® or a quality bike lubricant). NOTE: Invacare recommends that mounting hardware is tight and footrest secure. Initial adjustments should be made to manufacturer's instructions (included with mild detergent ...
Owners Manual
Page 16
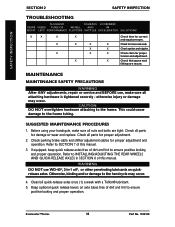
MAINTENANCE MAINTENANCE SAFETY PRECAUTIONS WARNING After ANY adjustments, repair or service and BEFORE use WD-40®, 3-in SECTION 6 of this manual. Before using your handcycle, make sure all parts for correct and equal pressure. Check ...
MAINTENANCE MAINTENANCE SAFETY PRECAUTIONS WARNING After ANY adjustments, repair or service and BEFORE use WD-40®, 3-in SECTION 6 of this manual. Before using your handcycle, make sure all parts for correct and equal pressure. Check ...
Owners Manual
Page 18
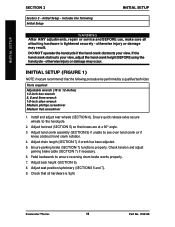
...and adjust parking brake cable (SECTION 7) if necessary. 6. Adjust seat position/upholstery (SECTIONS 5 and 7). 9. INITIAL SETUP (FIGURE 1) NOTE: Invacare recommends that all attaching hardware is tight. Ensure quick release axles secure wheels to 12-inches) 1/2-inch box wrench 6, 8 and 9mm wrench 1/8-...SECTION 7) if crank has been adjusted. 5. Check that the following : Initial Setup INITIAL SETUP WARNING After ANY adjustments, repair or service and BEFORE use, make sure all hardware is tightened securely - If the hand crank obstructs your view. Install and adjust rear ...
...and adjust parking brake cable (SECTION 7) if necessary. 6. Adjust seat position/upholstery (SECTIONS 5 and 7). 9. INITIAL SETUP (FIGURE 1) NOTE: Invacare recommends that all attaching hardware is tight. Ensure quick release axles secure wheels to 12-inches) 1/2-inch box wrench 6, 8 and 9mm wrench 1/8-...SECTION 7) if crank has been adjusted. 5. Check that the following : Initial Setup INITIAL SETUP WARNING After ANY adjustments, repair or service and BEFORE use, make sure all hardware is tightened securely - If the hand crank obstructs your view. Install and adjust rear ...
Owners Manual
Page 20
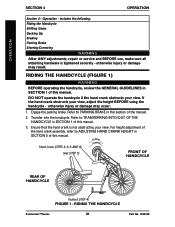
includes the following: Riding the Handcycle Shifting Gears Backing Up Braking Parking Brake Steering/Cornering WARNING After ANY adjustments, repair or service and BEFORE use, make sure all attaching hardware is not obstructing your view, adjust the height BEFORE using the handcycle - RIDING THE HANDCYCLE (FIGURE 1) WARNING ...
includes the following: Riding the Handcycle Shifting Gears Backing Up Braking Parking Brake Steering/Cornering WARNING After ANY adjustments, repair or service and BEFORE use, make sure all attaching hardware is not obstructing your view, adjust the height BEFORE using the handcycle - RIDING THE HANDCYCLE (FIGURE 1) WARNING ...
Owners Manual
Page 23
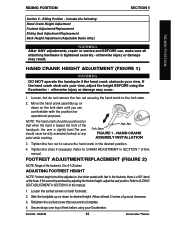
... the following: Hand Crank Height Adjustment Footrest Adjustment/Replacement Sliding Seat Adjustment/Replacement Back Height Adjustment (Adjustable Backs Only) WARNING After ANY adjustments, repair or service and BEFORE use, make sure all attaching hardware is 0 to secure the hand crank in the footrests, there is a 90° bend at any point...
... the following: Hand Crank Height Adjustment Footrest Adjustment/Replacement Sliding Seat Adjustment/Replacement Back Height Adjustment (Adjustable Backs Only) WARNING After ANY adjustments, repair or service and BEFORE use, make sure all attaching hardware is 0 to secure the hand crank in the footrests, there is a 90° bend at any point...

Owners Manual
Page 27
... Tire/Tube Replacement and Tuning/Replacement of Spokes Tire Pressure Determining/Adjusting Toe In/Toe Out Replacing Camber Inserts WARNING After ANY adjustments, repair or service and BEFORE use, make sure all attaching hardware is fully released BEFORE operating the handcycle. Keep locking pins clean. 5. WHEELS WHEELS WHEELS SECTION 6 Section 6 - Make...
... Tire/Tube Replacement and Tuning/Replacement of Spokes Tire Pressure Determining/Adjusting Toe In/Toe Out Replacing Camber Inserts WARNING After ANY adjustments, repair or service and BEFORE use, make sure all attaching hardware is fully released BEFORE operating the handcycle. Keep locking pins clean. 5. WHEELS WHEELS WHEELS SECTION 6 Section 6 - Make...
Owners Manual
Page 30
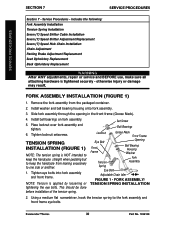
.... NOTE: Tension is tightened securely - Using a medium flat screwdriver, hook the tension spring to one side or another. 1. Service Procedures - includes the following: Fork Assembly Installation Tension Spring Installation Seven (7) Speed Shifter Cable Installation Seven (7) Speed Shifter Adjustment/Replacement...Installation Chain Adjustment Parking Brake Adjustment/Replacement Seat Upholstery Replacement Back Upholstery Replacement WARNING After ANY adjustments, repair or service and BEFORE use, make sure all attaching hardware is applied by loosening or tightening the eye bolts. Remove...
.... NOTE: Tension is tightened securely - Using a medium flat screwdriver, hook the tension spring to one side or another. 1. Service Procedures - includes the following: Fork Assembly Installation Tension Spring Installation Seven (7) Speed Shifter Cable Installation Seven (7) Speed Shifter Adjustment/Replacement...Installation Chain Adjustment Parking Brake Adjustment/Replacement Seat Upholstery Replacement Back Upholstery Replacement WARNING After ANY adjustments, repair or service and BEFORE use, make sure all attaching hardware is applied by loosening or tightening the eye bolts. Remove...

Owners Manual
Page 31
...Run the cable from the RIGHT-SIDE of the fork assembly to mounting position on the HAND CRANK Assembly Shaft. 1. SERVICE PROCEDURES SERVICE PROCEDURES SECTION 7 SEVEN (7) SPEED SHIFTER CABLE INSTALLATION (FIGURE 2) NOTE: This procedure applies to the hand crank assembly extension.... 3. Cable Hand Crank Assembly Extension Shifter FIGURE 2 - Attach the seven (7) speed shifter to the Excelerator ONLY. Contact Invacare, 1-...
...Run the cable from the RIGHT-SIDE of the fork assembly to mounting position on the HAND CRANK Assembly Shaft. 1. SERVICE PROCEDURES SERVICE PROCEDURES SECTION 7 SEVEN (7) SPEED SHIFTER CABLE INSTALLATION (FIGURE 2) NOTE: This procedure applies to the hand crank assembly extension.... 3. Cable Hand Crank Assembly Extension Shifter FIGURE 2 - Attach the seven (7) speed shifter to the Excelerator ONLY. Contact Invacare, 1-...

Owners Manual
Page 32
... Top Chain Bottom Chain Sprocket Assembly STEP 4 Wheel Sprocket FIGURE 3 - After chain is assembled, start in a clockwise motion to the hand crank sprocket assembly. 2. SERVICE PROCEDURES SECTION 7 SERVICE PROCEDURES SEVEN (7) SPEED HUB CHAIN INSTALLATION (FIGURE 3) WARNING Chain MUST be necessary to turn the hand crank in first gear and on the sprocket. 3.
... Top Chain Bottom Chain Sprocket Assembly STEP 4 Wheel Sprocket FIGURE 3 - After chain is assembled, start in a clockwise motion to the hand crank sprocket assembly. 2. SERVICE PROCEDURES SECTION 7 SERVICE PROCEDURES SEVEN (7) SPEED HUB CHAIN INSTALLATION (FIGURE 3) WARNING Chain MUST be necessary to turn the hand crank in first gear and on the sprocket. 3.
Owners Manual
Page 33
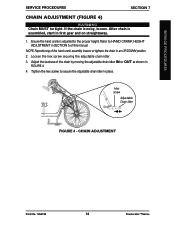
If the chain is adjusted to the proper height. Loosen the hex screw securing the adjustable chain idler. 3. SERVICE PROCEDURES SERVICE PROCEDURES SECTION 7 CHAIN ADJUSTMENT (FIGURE 4) WARNING Chain MUST be tight. Ensure the hand crank is noisy, loosen. Adjust the tautness of the chain by moving ...
If the chain is adjusted to the proper height. Loosen the hex screw securing the adjustable chain idler. 3. SERVICE PROCEDURES SERVICE PROCEDURES SECTION 7 CHAIN ADJUSTMENT (FIGURE 4) WARNING Chain MUST be tight. Ensure the hand crank is noisy, loosen. Adjust the tautness of the chain by moving ...

Owners Manual
Page 34
... Part No. 1056188 REPLACEMENT Parking Brake Pads. 1. WARNING Replacement of the parking brake MUST be performed by a qualified technician. Secure with existing hardware and adjust. SERVICE PROCEDURES SECTION 7 SERVICE PROCEDURES PARKING BRAKE ADJUSTMENT/REPLACEMENT (FIGURE 5) WARNING Before using your handcycle, inspect the parking brake for proper operation.
... Part No. 1056188 REPLACEMENT Parking Brake Pads. 1. WARNING Replacement of the parking brake MUST be performed by a qualified technician. Secure with existing hardware and adjust. SERVICE PROCEDURES SECTION 7 SERVICE PROCEDURES PARKING BRAKE ADJUSTMENT/REPLACEMENT (FIGURE 5) WARNING Before using your handcycle, inspect the parking brake for proper operation.

Owners Manual
Page 35
... back upholstery and seat cushion onto chair. Unlatch the four (4) fastening flaps that are in close proximity to one another are to the seat frame. 3. SERVICE PROCEDURES SERVICE PROCEDURES SECTION 7 SEAT UPHOLSTERY REPLACEMENT (FIGURE 6) WARNING Upholstery MUST be inspected BEFORE each use. Secure the four (4) fastening flaps together. 6. wet weather or puddles...
... back upholstery and seat cushion onto chair. Unlatch the four (4) fastening flaps that are in close proximity to one another are to the seat frame. 3. SERVICE PROCEDURES SERVICE PROCEDURES SECTION 7 SEAT UPHOLSTERY REPLACEMENT (FIGURE 6) WARNING Upholstery MUST be inspected BEFORE each use. Secure the four (4) fastening flaps together. 6. wet weather or puddles...

Owners Manual
Page 36
... from the wheelchair. 4. Back Upholstery Fastening Flap Fastening Flap Back Cane FIGURE 7 - Lift up on the bottom of existing back upholstery to moisture (ie.- SERVICE PROCEDURES SECTION 7 SERVICE PROCEDURES BACK UPHOLSTERY REPLACEMENT (FIGURE 7) WARNING Upholstery MUST be inspected BEFORE each use. BACK UPHOLSTERY REPLACEMENT Excelerator™Series 36 Part No. 1056188 wet...
... from the wheelchair. 4. Back Upholstery Fastening Flap Fastening Flap Back Cane FIGURE 7 - Lift up on the bottom of existing back upholstery to moisture (ie.- SERVICE PROCEDURES SECTION 7 SERVICE PROCEDURES BACK UPHOLSTERY REPLACEMENT (FIGURE 7) WARNING Upholstery MUST be inspected BEFORE each use. BACK UPHOLSTERY REPLACEMENT Excelerator™Series 36 Part No. 1056188 wet...
Owners Manual
Page 37
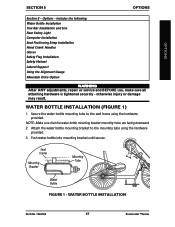
... Installation Hand Crank Handles Gloves Safety Flag Installation Safety Helmet Lateral Support Using the Alignment Gauge Mountain Drive Option WARNING After ANY adjustments, repair or service and BEFORE use, make sure all attaching hardware is tightened securely - otherwise injury or damage may result. Attach the water bottle mounting bracket to the...
... Installation Hand Crank Handles Gloves Safety Flag Installation Safety Helmet Lateral Support Using the Alignment Gauge Mountain Drive Option WARNING After ANY adjustments, repair or service and BEFORE use, make sure all attaching hardware is tightened securely - otherwise injury or damage may result. Attach the water bottle mounting bracket to the...
Owners Manual
Page 47
... the product is not warranted. THIS WARRANTY SHALL BE EXTENDED TO COMPLY WITH STATE/PROVINCIAL LAWS AND REQUIREMENTS. Invacare's sole obligation and your Invacare product. In the event you do not receive satisfactory warranty service, please write directly to such repair and/or replacement. Provide dealer's name, address, date of purchase, indicate nature...
... the product is not warranted. THIS WARRANTY SHALL BE EXTENDED TO COMPLY WITH STATE/PROVINCIAL LAWS AND REQUIREMENTS. Invacare's sole obligation and your Invacare product. In the event you do not receive satisfactory warranty service, please write directly to such repair and/or replacement. Provide dealer's name, address, date of purchase, indicate nature...