

Owners Manual
Page 1
REFER TO THE INFORMATION ON PAGE 7 OF THIS MANUAL. For more information regarding Invacare products, parts, and services, please visit: www.invacare.com Owner's Operator And Maintenance Manual ® EXCELERATOR™ SERIES Excelerator™ Li'l Excelerator™ DEALER: THIS MANUAL MUST BE GIVEN TO THE USER OF THE HANDCYCLE. USER: BEFORE USING THIS HANDCYCLE, READ THIS MANUAL AND SAVE FOR FUTURE REFERENCE.
REFER TO THE INFORMATION ON PAGE 7 OF THIS MANUAL. For more information regarding Invacare products, parts, and services, please visit: www.invacare.com Owner's Operator And Maintenance Manual ® EXCELERATOR™ SERIES Excelerator™ Li'l Excelerator™ DEALER: THIS MANUAL MUST BE GIVEN TO THE USER OF THE HANDCYCLE. USER: BEFORE USING THIS HANDCYCLE, READ THIS MANUAL AND SAVE FOR FUTURE REFERENCE.
Owners Manual
Page 2
WARNING WARNING WARNING DO NOT OPERATE THIS EQUIPMENT WITHOUT FIRST READING AND UNDERSTANDING THIS MANUAL. OTHERWISE INJURY OR DAMAGE MAY RESULT. IF YOU ARE UNABLE TO UNDERSTAND THE WARNINGS, CAUTIONS, AND INSTRUCTIONS, CONTACT YOUR INVACARE DEALER OR INVACARE CUSTOMER SUPPORT AT (800) 532-8677 BEFORE ATTEMPTING TO USE THIS EQUIPMENT - THE INITIAL SET UP OF THIS WHEELCHAIR MUST BE PERFORMED BY A QUALIFIED TECHNICIAN. SAVE THESE INSTRUCTIONS Excelerator™Series 2 Part No. 1056188
WARNING WARNING WARNING DO NOT OPERATE THIS EQUIPMENT WITHOUT FIRST READING AND UNDERSTANDING THIS MANUAL. OTHERWISE INJURY OR DAMAGE MAY RESULT. IF YOU ARE UNABLE TO UNDERSTAND THE WARNINGS, CAUTIONS, AND INSTRUCTIONS, CONTACT YOUR INVACARE DEALER OR INVACARE CUSTOMER SUPPORT AT (800) 532-8677 BEFORE ATTEMPTING TO USE THIS EQUIPMENT - THE INITIAL SET UP OF THIS WHEELCHAIR MUST BE PERFORMED BY A QUALIFIED TECHNICIAN. SAVE THESE INSTRUCTIONS Excelerator™Series 2 Part No. 1056188
Owners Manual
Page 3
... Shifting Gears...21 Backing Up ...22 Braking ...22 Parking Brake ...22 Steering/Cornering ...22 Hand Crank Height Adjustment ...23 Footrest Adjustment/Replacement ...23 SECTION 5 - GENERAL GUIDELINES...Replacing Camber Inserts ...29 Part No. 1056188 3 Excelerator™Series WHEELS 27 Installing/Adjusting the Rear Wheels and Quick-Release Axles 27 Tire/Tube Replacement and Tuning/Replacement of the handcycle 13 SECTION 2 - SAFETY INSPECTION 15 Safety Inspection Checklist ...15 Maintenance ...16 Troubleshooting ...16 SECTION 3 - RIDING POSITION 23 Sliding Seat Adjustment/Replacement...
... Shifting Gears...21 Backing Up ...22 Braking ...22 Parking Brake ...22 Steering/Cornering ...22 Hand Crank Height Adjustment ...23 Footrest Adjustment/Replacement ...23 SECTION 5 - GENERAL GUIDELINES...Replacing Camber Inserts ...29 Part No. 1056188 3 Excelerator™Series WHEELS 27 Installing/Adjusting the Rear Wheels and Quick-Release Axles 27 Tire/Tube Replacement and Tuning/Replacement of the handcycle 13 SECTION 2 - SAFETY INSPECTION 15 Safety Inspection Checklist ...15 Maintenance ...16 Troubleshooting ...16 SECTION 3 - RIDING POSITION 23 Sliding Seat Adjustment/Replacement...
Owners Manual
Page 4
... servicing is needed on your investment. 2. Ensure long term maintenance and servicing of registering: 1. Excelerator™Series 4 Part No. 1056188 SERVICE PROCEDURES 30 Fork Assembly Installation ...30 Tension Spring Installation ...30 Seven (7) Speed Shifter Cable Installation 31 Seven (7) Speed Shifter Adjustment/Replacement 31 Seven (7) Speed Hub Chain Installation 32 Chain Adjustment ...33 Parking Brake Adjustment/Replacement 34 Seat Upholstery Replacement ...35 Back Upholstery Replacement...
... servicing is needed on your investment. 2. Ensure long term maintenance and servicing of registering: 1. Excelerator™Series 4 Part No. 1056188 SERVICE PROCEDURES 30 Fork Assembly Installation ...30 Tension Spring Installation ...30 Seven (7) Speed Shifter Cable Installation 31 Seven (7) Speed Shifter Adjustment/Replacement 31 Seven (7) Speed Hub Chain Installation 32 Chain Adjustment ...33 Parking Brake Adjustment/Replacement 34 Seat Upholstery Replacement ...35 Back Upholstery Replacement...
Owners Manual
Page 5
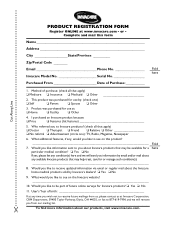
.../Postal Code ________ Email Phone No Fold here Invacare Model No Serial No Purchased From Date of birth If at any available Invacare products that...manage such condition(s 8. User's Year of Purchase:___________ Cut Along Line 1. PRODUCT REGISTRATION FORM Register ONLINE at Invacare Corporation, CRM Department, ...updated information via email or regular mail about the Invacare home medical products sold by Invacare's dealers? ❏ Yes ❏ No 9. Method of future online surveys for use by: (check one ): TV, Radio, Magazine, Newspaper 6. I purchased an Invacare...
.../Postal Code ________ Email Phone No Fold here Invacare Model No Serial No Purchased From Date of birth If at any available Invacare products that...manage such condition(s 8. User's Year of Purchase:___________ Cut Along Line 1. PRODUCT REGISTRATION FORM Register ONLINE at Invacare Corporation, CRM Department, ...updated information via email or regular mail about the Invacare home medical products sold by Invacare's dealers? ❏ Yes ❏ No 9. Method of future online surveys for use by: (check one ): TV, Radio, Magazine, Newspaper 6. I purchased an Invacare...
Owners Manual
Page 7
...Department of Transportation has not approved any tie-down systems for transportation of a user while in a handcycle, in a moving vehicle of any type. SEAT POSITIONING STRAPS - Part No. 1056188 7 Excelerator™Series WARNING HANDCYCLE USER As a manufacturer of handcycles, Invacare endeavors to... or property damage. HANDCYCLE TIE-DOWN RESTRAINTS AND SEAT POSITIONING STRAPS Invacare recommends that handcycle users NOT be used in this manual refers to an Invacare qualified technician or a Shimano® certified bicycle repair technician. SERIOUS INJURY CAN OCCUR IN THE EVENT ...
...Department of Transportation has not approved any tie-down systems for transportation of a user while in a handcycle, in a moving vehicle of any type. SEAT POSITIONING STRAPS - Part No. 1056188 7 Excelerator™Series WARNING HANDCYCLE USER As a manufacturer of handcycles, Invacare endeavors to... or property damage. HANDCYCLE TIE-DOWN RESTRAINTS AND SEAT POSITIONING STRAPS Invacare recommends that handcycle users NOT be used in this manual refers to an Invacare qualified technician or a Shimano® certified bicycle repair technician. SERIOUS INJURY CAN OCCUR IN THE EVENT ...

Owners Manual
Page 10
...user or damage to the handcycle. DO NOT attempt to lift the handcycle by Invacare. DO NOT stand on roads, streets or highways. DO NOT carry any transfers. DO NOT carry any items that may include the use parts...WARNING Before attempting to transfer IN or OUT of way. DO NOT use of a safety light and reflectors for dusk/night riding.) Give pedestrians the right of the...operating the handcycle properly. Use proper hand signals when turning. therapist), ALWAYS wear a seat positioning strap. Slow down an incline with reversing drum brake. Lifting by your health...
...user or damage to the handcycle. DO NOT attempt to lift the handcycle by Invacare. DO NOT stand on roads, streets or highways. DO NOT carry any transfers. DO NOT carry any items that may include the use parts...WARNING Before attempting to transfer IN or OUT of way. DO NOT use of a safety light and reflectors for dusk/night riding.) Give pedestrians the right of the...operating the handcycle properly. Use proper hand signals when turning. therapist), ALWAYS wear a seat positioning strap. Slow down an incline with reversing drum brake. Lifting by your health...
Owners Manual
Page 12
... the assistant. Invacare recommends using seat positioning straps for the end-user. These must at all . Keep your back straight and bend your safety. Proper positioning is important to the user and/or assistant. It is essential for the handcycle, have been used for lifting supports or to move the handcycle, as a "basic" guide. Techniques in this manual. A NOTE...
... the assistant. Invacare recommends using seat positioning straps for the end-user. These must at all . Keep your back straight and bend your safety. Proper positioning is important to the user and/or assistant. It is essential for the handcycle, have been used for lifting supports or to move the handcycle, as a "basic" guide. Techniques in this manual. A NOTE...

Owners Manual
Page 13
...as possible as possible in the seat. Refer to position the hand crank. 5. Apply wheel locks (if installed) if the object is a wheelchair. Although it may be difficult to wedge the transfer board between the wheelchair seat and the handcycle seat, use a transfer board if necessary....brake on level ground and as close as shown in SECTION 5 of this manual. 6. NOTE: During independent transfer, little or no seat platform will prevent damage to the upholstery. NOTE: If necessary, lift the front wheel off the ground and rotate the front tire to SLIDING SEAT ADJUSTMENT/REPLACEMENT...
...as possible as possible in the seat. Refer to position the hand crank. 5. Apply wheel locks (if installed) if the object is a wheelchair. Although it may be difficult to wedge the transfer board between the wheelchair seat and the handcycle seat, use a transfer board if necessary....brake on level ground and as close as shown in SECTION 5 of this manual. 6. NOTE: During independent transfer, little or no seat platform will prevent damage to the upholstery. NOTE: If necessary, lift the front wheel off the ground and rotate the front tire to SLIDING SEAT ADJUSTMENT/REPLACEMENT...
Owners Manual
Page 15
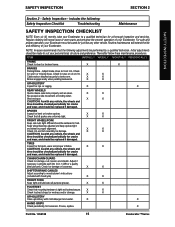
... cracks and wear, and should be replaced if damaged. includes the following adjustments be cared for just like any vehicle, the wheels and tires should be checked periodically for a thorough inspection and servicing. X X BRAKES Parking Brake - X X UPHOLSTERY Inspect for damage... Invacare recommends that mounting hardware is tight and footrest secure. X X Cable anchor attached securely to front rim. X X No excessive side movement or binding when lifted and spun. X X FOOTREST Check that the following : Safety Inspection Checklist Troubleshooting ...
... cracks and wear, and should be replaced if damaged. includes the following adjustments be cared for just like any vehicle, the wheels and tires should be checked periodically for a thorough inspection and servicing. X X BRAKES Parking Brake - X X UPHOLSTERY Inspect for damage... Invacare recommends that mounting hardware is tight and footrest secure. X X Cable anchor attached securely to front rim. X X No excessive side movement or binding when lifted and spun. X X FOOTREST Check that the following : Safety Inspection Checklist Troubleshooting ...
Owners Manual
Page 16
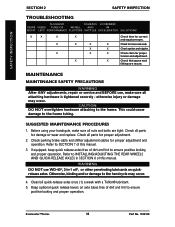
..., repair or service and BEFORE use WD-40®, 3-in SECTION 6 of this manual. Check all attaching hardware is tightened securely - If equipped, keep quick release axles free of dirt and lint to ensure positive locking and proper operation. Otherwise, binding and/or damage to SECTION 7 of this manual. 3. SAFETY INSPECTION SECTION 2 SAFETY INSPECTION TROUBLESHOOTING SLUGGISH...
..., repair or service and BEFORE use WD-40®, 3-in SECTION 6 of this manual. Check all attaching hardware is tightened securely - If equipped, keep quick release axles free of dirt and lint to ensure positive locking and proper operation. Otherwise, binding and/or damage to SECTION 7 of this manual. 3. SAFETY INSPECTION SECTION 2 SAFETY INSPECTION TROUBLESHOOTING SLUGGISH...
Owners Manual
Page 18
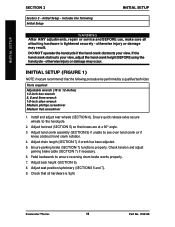
...° angle. 3. Adjust footrest (SECTION 5) so that the following : Initial Setup INITIAL SETUP WARNING After ANY adjustments, repair or service and BEFORE use, make sure all hardware is tightened securely - Check that all attaching hardware is tight. Excelerator™Series 18 Part No. 1056188 Install and adjust rear wheels (SECTION 6). Check tension and adjust parking brake cable (SECTION 7) if necessary...
...° angle. 3. Adjust footrest (SECTION 5) so that the following : Initial Setup INITIAL SETUP WARNING After ANY adjustments, repair or service and BEFORE use, make sure all hardware is tightened securely - Check that all attaching hardware is tight. Excelerator™Series 18 Part No. 1056188 Install and adjust rear wheels (SECTION 6). Check tension and adjust parking brake cable (SECTION 7) if necessary...
Owners Manual
Page 20
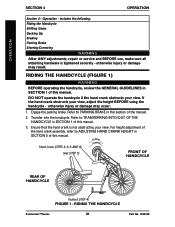
... OF HANDCYCLE Footrest (STEP 4) FIGURE 1 - Engage the parking brake. otherwise injury or damage may occur. 1. If the hand crank obstructs your view. RIDING THE HANDCYCLE Excelerator™Series 20 Part No. 1056188 includes the following: Riding the Handcycle Shifting Gears Backing Up Braking Parking Brake Steering/Cornering WARNING After ANY adjustments, repair or service and BEFORE use, make...
... OF HANDCYCLE Footrest (STEP 4) FIGURE 1 - Engage the parking brake. otherwise injury or damage may occur. 1. If the hand crank obstructs your view. RIDING THE HANDCYCLE Excelerator™Series 20 Part No. 1056188 includes the following: Riding the Handcycle Shifting Gears Backing Up Braking Parking Brake Steering/Cornering WARNING After ANY adjustments, repair or service and BEFORE use, make...
Owners Manual
Page 22
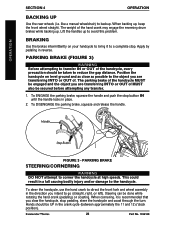
like a manual wheelchair) to corner the handcycle at high speeds. To ENGAGE the parking brake, squeeze the handle and push the stop button IN until ...and 12 o'clock position). Excelerator™Series 22 Part No. 1056188 Lift the handles up . When cornering, it to direct the front fork and wheel assembly in reverse. BRAKING Use the brakes intermittently on level ground and as close as ... right, or left). Apply by pedaling in the direction you intend to avoid this problem. PARKING BRAKE STEERING/CORNERING WARNING DO NOT attempt to backup. Hands should be taken to the object...
like a manual wheelchair) to corner the handcycle at high speeds. To ENGAGE the parking brake, squeeze the handle and push the stop button IN until ...and 12 o'clock position). Excelerator™Series 22 Part No. 1056188 Lift the handles up . When cornering, it to direct the front fork and wheel assembly in reverse. BRAKING Use the brakes intermittently on level ground and as close as ... right, or left). Apply by pedaling in the direction you intend to avoid this problem. PARKING BRAKE STEERING/CORNERING WARNING DO NOT attempt to backup. Hands should be taken to the object...
Owners Manual
Page 23
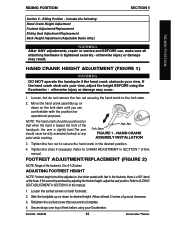
... in SECTION 5 of feet before using the Excelerator - Secure straps over top of this manual. Riding Position - RIDING POSITION SECTION 5 RIDING POSITION Section 5 - includes the following: Hand Crank Height Adjustment Footrest Adjustment/Replacement Sliding Seat Adjustment/Replacement Back Height Adjustment (Adjustable Backs Only) WARNING After ANY adjustments, repair or service and BEFORE use, make sure all attaching hardware is...
... in SECTION 5 of feet before using the Excelerator - Secure straps over top of this manual. Riding Position - RIDING POSITION SECTION 5 RIDING POSITION Section 5 - includes the following: Hand Crank Height Adjustment Footrest Adjustment/Replacement Sliding Seat Adjustment/Replacement Back Height Adjustment (Adjustable Backs Only) WARNING After ANY adjustments, repair or service and BEFORE use, make sure all attaching hardware is...

Owners Manual
Page 25
... footrests, there is supported on both sliding seat rail brackets. 2. Activate parking brake. 2. Grasp forward/rearward adjustment lever and push it to install sliding seat and seat rails onto the seat frame. NOTE: User need not be adjusted so that the seat engages into the seating position you desire by "jiggling" the seat, making sure that when seated with feet in seat to slide seat...
... footrests, there is supported on both sliding seat rail brackets. 2. Activate parking brake. 2. Grasp forward/rearward adjustment lever and push it to install sliding seat and seat rails onto the seat frame. NOTE: User need not be adjusted so that the seat engages into the seating position you desire by "jiggling" the seat, making sure that when seated with feet in seat to slide seat...
Owners Manual
Page 30
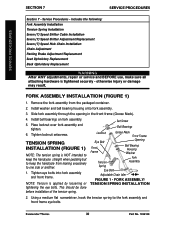
.... This should be done before installation of the tension spring. SECTION 7 SERVICE PROCEDURES SERVICE PROCEDURES Section 7 - includes the following: Fork Assembly Installation Tension Spring Installation Seven (7) Speed Shifter Cable Installation Seven (7) Speed Shifter Adjustment/Replacement Seven (7) Speed Hub Chain Installation Chain Adjustment Parking Brake Adjustment/Replacement Seat Upholstery Replacement Back Upholstery Replacement WARNING After ANY adjustments, repair or service and BEFORE use, make sure all attaching...
.... This should be done before installation of the tension spring. SECTION 7 SERVICE PROCEDURES SERVICE PROCEDURES Section 7 - includes the following: Fork Assembly Installation Tension Spring Installation Seven (7) Speed Shifter Cable Installation Seven (7) Speed Shifter Adjustment/Replacement Seven (7) Speed Hub Chain Installation Chain Adjustment Parking Brake Adjustment/Replacement Seat Upholstery Replacement Back Upholstery Replacement WARNING After ANY adjustments, repair or service and BEFORE use, make sure all attaching...

Owners Manual
Page 34
ADJUSTMENT Cable. 1. REPLACEMENT Parking Brake Pads. 1. WARNING Replacement of Wheel Adjuster Barrel Brake Pads FIGURE 5 - PARKING BRAKE ADJUSTMENT/REPLACEMENT Excelerator™Series 34 Part No. 1056188 Retighten hex nut. SERVICE PROCEDURES SECTION 7 SERVICE PROCEDURES PARKING BRAKE ADJUSTMENT/REPLACEMENT (FIGURE 5) WARNING Before using your handcycle, inspect the parking brake for proper operation. Remove the mounting nuts and replace brake pads. 2. Mounting Nuts Rim of the parking brake MUST be...
ADJUSTMENT Cable. 1. REPLACEMENT Parking Brake Pads. 1. WARNING Replacement of Wheel Adjuster Barrel Brake Pads FIGURE 5 - PARKING BRAKE ADJUSTMENT/REPLACEMENT Excelerator™Series 34 Part No. 1056188 Retighten hex nut. SERVICE PROCEDURES SECTION 7 SERVICE PROCEDURES PARKING BRAKE ADJUSTMENT/REPLACEMENT (FIGURE 5) WARNING Before using your handcycle, inspect the parking brake for proper operation. Remove the mounting nuts and replace brake pads. 2. Mounting Nuts Rim of the parking brake MUST be...

Owners Manual
Page 35
.... 4. Back Upholstery Large Strap Toward Rear of Seat Frame Towards Front of Chair Three (3) Seat Upholstery Fastening Straps Towards Rear of the seat frame. 5. Reinstall back upholstery and seat cushion onto chair. SEAT UPHOLSTERY REPLACEMENT Part No. 1056188 35 Excelerator™Series Remove seat cushion and back upholstery from chair. 2. SERVICE PROCEDURES SERVICE PROCEDURES SECTION 7 SEAT UPHOLSTERY REPLACEMENT (FIGURE 6) WARNING Upholstery MUST be inspected BEFORE...
.... 4. Back Upholstery Large Strap Toward Rear of Seat Frame Towards Front of Chair Three (3) Seat Upholstery Fastening Straps Towards Rear of the seat frame. 5. Reinstall back upholstery and seat cushion onto chair. SEAT UPHOLSTERY REPLACEMENT Part No. 1056188 35 Excelerator™Series Remove seat cushion and back upholstery from chair. 2. SERVICE PROCEDURES SERVICE PROCEDURES SECTION 7 SEAT UPHOLSTERY REPLACEMENT (FIGURE 6) WARNING Upholstery MUST be inspected BEFORE...
Owners Manual
Page 47
...1975. This warranty gives you specific legal rights and you purchased your exclusive remedy under this warranty shall be free from defects in replacement part installation or repair of our products. The Mountain Drive Option is serialized, indicate the serial number. Provide dealer's name, ...Part No. 1056188 47 Excelerator™Series distributed parts and components including compensators, forks, upholstery and miscellaneous bicycle components are not warranted. THE WARRANTY SHALL NOT APPLY TO PROBLEMS ARISING FROM NORMAL WEAR OR FAILURE TO ADHERE TO THE THESE INSTRUCTIONS...
...1975. This warranty gives you specific legal rights and you purchased your exclusive remedy under this warranty shall be free from defects in replacement part installation or repair of our products. The Mountain Drive Option is serialized, indicate the serial number. Provide dealer's name, ...Part No. 1056188 47 Excelerator™Series distributed parts and components including compensators, forks, upholstery and miscellaneous bicycle components are not warranted. THE WARRANTY SHALL NOT APPLY TO PROBLEMS ARISING FROM NORMAL WEAR OR FAILURE TO ADHERE TO THE THESE INSTRUCTIONS...


