
Owners Manual
Page 1
USER: BEFORE USING THIS HANDCYCLE, READ THIS MANUAL AND SAVE FOR FUTURE REFERENCE. For more information regarding Invacare products, parts, and services, please visit: www.invacare.com REFER TO THE INFORMATION ON PAGE 7 OF THIS MANUAL. Owner's Operator And Maintenance Manual ® EXCELERATOR™ SERIES Excelerator™ Li'l Excelerator™ DEALER: THIS MANUAL MUST BE GIVEN TO THE USER OF THE HANDCYCLE.
USER: BEFORE USING THIS HANDCYCLE, READ THIS MANUAL AND SAVE FOR FUTURE REFERENCE. For more information regarding Invacare products, parts, and services, please visit: www.invacare.com REFER TO THE INFORMATION ON PAGE 7 OF THIS MANUAL. Owner's Operator And Maintenance Manual ® EXCELERATOR™ SERIES Excelerator™ Li'l Excelerator™ DEALER: THIS MANUAL MUST BE GIVEN TO THE USER OF THE HANDCYCLE.
Owners Manual
Page 2
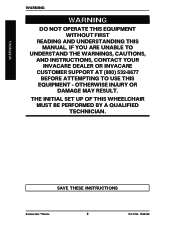
THE INITIAL SET UP OF THIS WHEELCHAIR MUST BE PERFORMED BY A QUALIFIED TECHNICIAN. SAVE THESE INSTRUCTIONS Excelerator™Series 2 Part No. 1056188 OTHERWISE INJURY OR DAMAGE MAY RESULT. IF YOU ARE UNABLE TO UNDERSTAND THE WARNINGS, CAUTIONS, AND INSTRUCTIONS, CONTACT YOUR INVACARE DEALER OR INVACARE CUSTOMER SUPPORT AT (800) 532-8677 BEFORE ATTEMPTING TO USE THIS EQUIPMENT - WARNING WARNING WARNING DO NOT OPERATE THIS EQUIPMENT WITHOUT FIRST READING AND UNDERSTANDING THIS MANUAL.
THE INITIAL SET UP OF THIS WHEELCHAIR MUST BE PERFORMED BY A QUALIFIED TECHNICIAN. SAVE THESE INSTRUCTIONS Excelerator™Series 2 Part No. 1056188 OTHERWISE INJURY OR DAMAGE MAY RESULT. IF YOU ARE UNABLE TO UNDERSTAND THE WARNINGS, CAUTIONS, AND INSTRUCTIONS, CONTACT YOUR INVACARE DEALER OR INVACARE CUSTOMER SUPPORT AT (800) 532-8677 BEFORE ATTEMPTING TO USE THIS EQUIPMENT - WARNING WARNING WARNING DO NOT OPERATE THIS EQUIPMENT WITHOUT FIRST READING AND UNDERSTANDING THIS MANUAL.
Owners Manual
Page 3
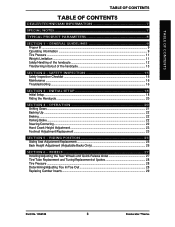
... handcycle ...12 Transferring into/out of Spokes 28 Tire Pressure ...28 Determining/Adjusting Toe In/Toe Out 28 Replacing Camber Inserts ...29 Part No. 1056188 3 Excelerator™Series INITIAL SETUP 18 Initial Setup ...18 Riding the Handcycle ...20 SECTION 4 - TABLE OF CONTENTS TABLE OF CONTENTS TABLE OF CONTENTS DEALER/TECHNICIAN INFORMATION...
... handcycle ...12 Transferring into/out of Spokes 28 Tire Pressure ...28 Determining/Adjusting Toe In/Toe Out 28 Replacing Camber Inserts ...29 Part No. 1056188 3 Excelerator™Series INITIAL SETUP 18 Initial Setup ...18 Riding the Handcycle ...20 SECTION 4 - TABLE OF CONTENTS TABLE OF CONTENTS TABLE OF CONTENTS DEALER/TECHNICIAN INFORMATION...
Owners Manual
Page 4
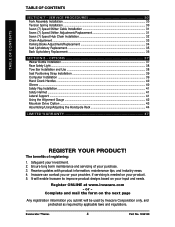
... only, and protected as required by applicable laws and regulations. Safeguard your input and needs. Register ONLINE at www.invacare.com - OPTIONS 37 Water Bottle Installation ...37 Rear Safety Light ...38 Tow Bar Installation and Use ...38 Seat Positioning Strap ... 4. Complete and mail the form on the next page Any registration information you or your provider, if servicing is needed on your investment. 2. Excelerator™Series 4 Part No. 1056188 The benefits of your product. 5. SERVICE PROCEDURES 30 Fork Assembly Installation ...30 Tension Spring Installation ...30 Seven (7)...
... only, and protected as required by applicable laws and regulations. Safeguard your input and needs. Register ONLINE at www.invacare.com - OPTIONS 37 Water Bottle Installation ...37 Rear Safety Light ...38 Tow Bar Installation and Use ...38 Seat Positioning Strap ... 4. Complete and mail the form on the next page Any registration information you or your provider, if servicing is needed on your investment. 2. Excelerator™Series 4 Part No. 1056188 The benefits of your product. 5. SERVICE PROCEDURES 30 Fork Assembly Installation ...30 Tension Spring Installation ...30 Seven (7)...
Owners Manual
Page 7
... of Transportation has not approved any tie-down systems for transportation of a user while in a handcycle, in this manual refers to an Invacare qualified technician or a Shimano® certified bicycle repair technician. AS REGARDS RESTRAINTS - IT IS THE OBLIGATION OF THE DME DEALER, THERAPISTS ... IF A SEATING POSITIONING STRAP IS REQUIRED TO ENSURE THE SAFE OPERATION OF THIS EQUIPMENT BY THE USER. Part No. 1056188 7 Excelerator™Series NOTICE THE INFORMATION CONTAINED IN THIS DOCUMENT IS SUBJECT TO CHANGE WITHOUT NOTICE. SPECIAL NOTES WARNING/CAUTION notices as used by...
... of Transportation has not approved any tie-down systems for transportation of a user while in a handcycle, in this manual refers to an Invacare qualified technician or a Shimano® certified bicycle repair technician. AS REGARDS RESTRAINTS - IT IS THE OBLIGATION OF THE DME DEALER, THERAPISTS ... IF A SEATING POSITIONING STRAP IS REQUIRED TO ENSURE THE SAFE OPERATION OF THIS EQUIPMENT BY THE USER. Part No. 1056188 7 Excelerator™Series NOTICE THE INFORMATION CONTAINED IN THIS DOCUMENT IS SUBJECT TO CHANGE WITHOUT NOTICE. SPECIAL NOTES WARNING/CAUTION notices as used by...

Owners Manual
Page 8
...Tension Nylon-Adjustable Tension 50 lbs. 40 lbs. 80 lbs. 70 lbs. TYPICAL PRODUCT PARAMETERS TYPICAL PRODUCT PARAMETERS TYPICAL PRODUCT PARAMETERS EXCELERATOR LI'L EXCELERATOR Seat Width: Seat Depth: Seat-to approximately 1-inch. Wheel Clearance: Rear Axle: Rear Wheel Camber: Wheels: Brakes: Hand Pedals...inches - 2.5-inches Quick-Release Quick-Release 9o - Precision Black Anodized w/ 1/2-inch Quick Release Stainless Axles FRONT - Excelerator™Series 8 Part No. 1056188 Shimano Nexus® 7 Speed Hub REAR - Shimano Nexus® 7 Speed Hub REAR - Standard 9o -
...Tension Nylon-Adjustable Tension 50 lbs. 40 lbs. 80 lbs. 70 lbs. TYPICAL PRODUCT PARAMETERS TYPICAL PRODUCT PARAMETERS TYPICAL PRODUCT PARAMETERS EXCELERATOR LI'L EXCELERATOR Seat Width: Seat Depth: Seat-to approximately 1-inch. Wheel Clearance: Rear Axle: Rear Wheel Camber: Wheels: Brakes: Hand Pedals...inches - 2.5-inches Quick-Release Quick-Release 9o - Precision Black Anodized w/ 1/2-inch Quick Release Stainless Axles FRONT - Excelerator™Series 8 Part No. 1056188 Shimano Nexus® 7 Speed Hub REAR - Shimano Nexus® 7 Speed Hub REAR - Standard 9o -

Owners Manual
Page 9
...; The rider MUST have a slightly bent elbow when the hand pedals are toward the front of your brakes by the end-user. Part No. 1056188 9 Excelerator™Series OPERATING INFORMATION WARNING Wear your particular safety limits, practice transferring activities in the presence of a qualified health care professional BEFORE attempting active use...
...; The rider MUST have a slightly bent elbow when the hand pedals are toward the front of your brakes by the end-user. Part No. 1056188 9 Excelerator™Series OPERATING INFORMATION WARNING Wear your particular safety limits, practice transferring activities in the presence of a qualified health care professional BEFORE attempting active use...

Owners Manual
Page 10
... right and back to left again before attempting any items that may result in injury to the user or damage to lift the handcycle by Invacare. Excelerator™Series 10 Part No. 1056188
... right and back to left again before attempting any items that may result in injury to the user or damage to lift the handcycle by Invacare. Excelerator™Series 10 Part No. 1056188
Owners Manual
Page 11
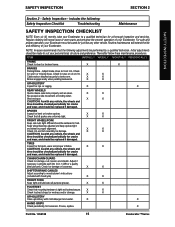
... can cause injury, as well as, damage to explode and cause bodily harm. The Invacare Li'l Excelerator has a weight limitation of 350 lbs. Part No. 1056188 11 Excelerator™Series DO NOT overinflate the tires. WEIGHT LIMITATION WARNING The Invacare Excelerator has a weight limitation of 150 lbs. GENERAL GUIDELINES GENERAL GUIDELINES SECTION 1 TIRE PRESSURE WARNING...
... can cause injury, as well as, damage to explode and cause bodily harm. The Invacare Li'l Excelerator has a weight limitation of 350 lbs. Part No. 1056188 11 Excelerator™Series DO NOT overinflate the tires. WEIGHT LIMITATION WARNING The Invacare Excelerator has a weight limitation of 150 lbs. GENERAL GUIDELINES GENERAL GUIDELINES SECTION 1 TIRE PRESSURE WARNING...
Owners Manual
Page 12
When you are discussed on the following pages have an experienced assistant help you before attempting it alone. Excelerator™Series 12 Part No. 1056188 This manual points out the most important consideration for all times maintain proper balance. Also, be ... is important to move the handcycle, as a "basic" guide. Use this manual are comfortable in this information only as they may encounter. Invacare recognizes and encourages each individual to try what works best for lifting supports or to practice and master these safe techniques until you must NEVER...
When you are discussed on the following pages have an experienced assistant help you before attempting it alone. Excelerator™Series 12 Part No. 1056188 This manual points out the most important consideration for all times maintain proper balance. Also, be ... is important to move the handcycle, as a "basic" guide. Use this manual are comfortable in this information only as they may encounter. Invacare recognizes and encourages each individual to try what works best for lifting supports or to practice and master these safe techniques until you must NEVER...

Owners Manual
Page 13
... (if installed) if the object is a wheelchair. Lift and place LEFT leg past front frame, across seat and over center tube. Part No. 1056188 13 Excelerator™Series This will be performed independently provided you have adequate mobility and upper body strength. 1. Although it may be beneath you are transferring INTO...
... (if installed) if the object is a wheelchair. Lift and place LEFT leg past front frame, across seat and over center tube. Part No. 1056188 13 Excelerator™Series This will be performed independently provided you have adequate mobility and upper body strength. 1. Although it may be beneath you are transferring INTO...

Owners Manual
Page 14
... A: Shift body weight to the edge of the handcycle) Footrest Seat Frame STEP E: Lift and shift weight into handcycle seat. TRANSFERRING INTO/OUT OF A WHEELCHAIR Excelerator™Series 14 Part No. 1056188 Follow a similar procedure to transfer to/from a wheelchair and do not correspond to /from an object other than a wheelchair...
... A: Shift body weight to the edge of the handcycle) Footrest Seat Frame STEP E: Lift and shift weight into handcycle seat. TRANSFERRING INTO/OUT OF A WHEELCHAIR Excelerator™Series 14 Part No. 1056188 Follow a similar procedure to transfer to/from a wheelchair and do not correspond to /from an object other than a wheelchair...
Owners Manual
Page 15
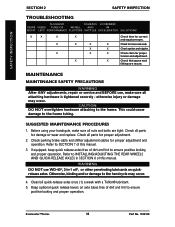
...wetness and/or damage. Lubricate each link (3-in proper alignment. Regular cleaning will extend the life and efficiency of your Excelerator must be cared for just like any vehicle, the wheels and tires should be checked periodically for cracks and wear, ... handcycle) X X FRONT FORK Keep tight and lubricate (all spokes are clean. X X CAUTION: As with any other vehicle. NOTE: Invacare recommends that mounting hardware is tight and footrest secure. Wheel should be replaced if damaged. ITEM INITIALLY WEEKLY MONTHLY PERIODICALLY FRAME Check for looseness....
...wetness and/or damage. Lubricate each link (3-in proper alignment. Regular cleaning will extend the life and efficiency of your Excelerator must be cared for just like any vehicle, the wheels and tires should be checked periodically for cracks and wear, ... handcycle) X X FRONT FORK Keep tight and lubricate (all spokes are clean. X X CAUTION: As with any other vehicle. NOTE: Invacare recommends that mounting hardware is tight and footrest secure. Wheel should be replaced if damaged. ITEM INITIALLY WEEKLY MONTHLY PERIODICALLY FRAME Check for looseness....
Owners Manual
Page 16
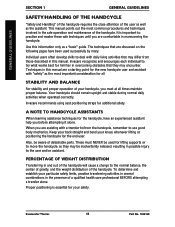
... this manual. SAFETY INSPECTION SECTION 2 SAFETY INSPECTION TROUBLESHOOTING SLUGGISH SQUEAKS LOOSENESS VEERS VEERS TURN OR WHEEL AND IN RIGHT LEFT PERFORMANCE FLUTTERS RATTLES EXCELERATOR SOLUTIONS X X X X X X X X X X X Check tires for proper adjustment and operation. X Check that goose neck ...secure. WARNING DO NOT use , make sure all parts for proper adjustment. 2. This could cause damage to the frame. Excelerator™Series 16 Part No. 1056188 X Check spokes and nipples. otherwise injury or damage may occur. 4. Check all attaching...
... this manual. SAFETY INSPECTION SECTION 2 SAFETY INSPECTION TROUBLESHOOTING SLUGGISH SQUEAKS LOOSENESS VEERS VEERS TURN OR WHEEL AND IN RIGHT LEFT PERFORMANCE FLUTTERS RATTLES EXCELERATOR SOLUTIONS X X X X X X X X X X X Check tires for proper adjustment and operation. X Check that goose neck ...secure. WARNING DO NOT use , make sure all parts for proper adjustment. 2. This could cause damage to the frame. Excelerator™Series 16 Part No. 1056188 X Check spokes and nipples. otherwise injury or damage may occur. 4. Check all attaching...

Owners Manual
Page 17
If tire needs replacement, see local bike shop. Refer to TENSION SPRING INSTALLATION in SECTION 7 of the tire. Part No. 1056188 17 Excelerator™Series The wheels and tires should be checked periodically for proper operation. If loose, have it aligned at your local bike shop. Refer to ...
If tire needs replacement, see local bike shop. Refer to TENSION SPRING INSTALLATION in SECTION 7 of the tire. Part No. 1056188 17 Excelerator™Series The wheels and tires should be checked periodically for proper operation. If loose, have it aligned at your local bike shop. Refer to ...
Owners Manual
Page 18
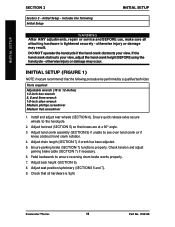
... if the hand crank obstructs your view, adjust the hand crank height BEFORE using the handcycle - INITIAL SETUP (FIGURE 1) NOTE: Invacare recommends that all attaching hardware is tight. Install and adjust rear wheels (SECTION 6). Adjust footrest (SECTION 5) so that knees are ...at a 90° angle. 3. Pedal backwards to the handcycle. 2. Adjust seat position/upholstery (SECTIONS 5 and 7). 9. Excelerator™Series 18 Part No. 1056188 includes the following procedure be performed by a qualified technician. Adjust chain length (SECTION 7) if crank has been...
... if the hand crank obstructs your view, adjust the hand crank height BEFORE using the handcycle - INITIAL SETUP (FIGURE 1) NOTE: Invacare recommends that all attaching hardware is tight. Install and adjust rear wheels (SECTION 6). Adjust footrest (SECTION 5) so that knees are ...at a 90° angle. 3. Pedal backwards to the handcycle. 2. Adjust seat position/upholstery (SECTIONS 5 and 7). 9. Excelerator™Series 18 Part No. 1056188 includes the following procedure be performed by a qualified technician. Adjust chain length (SECTION 7) if crank has been...

Owners Manual
Page 19
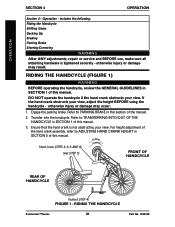
INITIAL SETUP Part No. 1056188 19 Excelerator™Series INITIAL SETUP INITIAL SETUP Hand Crank Assembly Back Seat Rear Wheel SECTION 3 Seven (7) Speed Shifter Brake Cable Chain Parking Brake Tension Spring Footrest FIGURE 1 -
INITIAL SETUP Part No. 1056188 19 Excelerator™Series INITIAL SETUP INITIAL SETUP Hand Crank Assembly Back Seat Rear Wheel SECTION 3 Seven (7) Speed Shifter Brake Cable Chain Parking Brake Tension Spring Footrest FIGURE 1 -
Owners Manual
Page 20
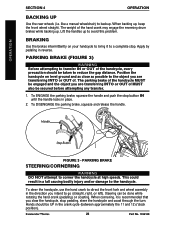
... occur. 1. If the hand crank obstructs your view. Refer to TRANSFERRING INTO/OUT OF THE HANDCYCLE in this section of this manual. RIDING THE HANDCYCLE Excelerator™Series 20 Part No. 1056188 includes the following: Riding the Handcycle Shifting Gears Backing Up Braking Parking Brake Steering/Cornering WARNING After ANY adjustments...
... occur. 1. If the hand crank obstructs your view. Refer to TRANSFERRING INTO/OUT OF THE HANDCYCLE in this section of this manual. RIDING THE HANDCYCLE Excelerator™Series 20 Part No. 1056188 includes the following: Riding the Handcycle Shifting Gears Backing Up Braking Parking Brake Steering/Cornering WARNING After ANY adjustments...

Owners Manual
Page 21
...but ease pressure on the hand crank assembly at least one (1) of the manual. UPSHIFT - Release the parking brake. B. SHIFTING GEARS 21 Excelerator™Series Ensure the footrest is obtained. Perform one (1) hand onto the hand crank. OPERATION OPERATION SECTION 4 4. If necessary, adjust the ...Push shifting lever down or stop. NOTE: Footrest height should be adjusted so that when seated with the other hand. When the Excelerator is adjusted properly. Rotate (pedal) the hand crank FORWARD (toward the rear) to propel the handcycle forward. 9. Ensure the ...
...but ease pressure on the hand crank assembly at least one (1) of the manual. UPSHIFT - Release the parking brake. B. SHIFTING GEARS 21 Excelerator™Series Ensure the footrest is obtained. Perform one (1) hand onto the hand crank. OPERATION OPERATION SECTION 4 4. If necessary, adjust the ...Push shifting lever down or stop. NOTE: Footrest height should be adjusted so that when seated with the other hand. When the Excelerator is adjusted properly. Rotate (pedal) the hand crank FORWARD (toward the rear) to propel the handcycle forward. 9. Ensure the ...
Owners Manual
Page 22
... UP in reverse. Position the handcycle on your handcycle to bring it is recommended that you intend to avoid this problem. Handle Stop Button FIGURE 3 - Excelerator™Series 22 Part No. 1056188 OPERATION SECTION 4 OPERATION BACKING UP Use the rear wheels (i.e. The weight of the handcycle, every precaution should be secured...
... UP in reverse. Position the handcycle on your handcycle to bring it is recommended that you intend to avoid this problem. Handle Stop Button FIGURE 3 - Excelerator™Series 22 Part No. 1056188 OPERATION SECTION 4 OPERATION BACKING UP Use the rear wheels (i.e. The weight of the handcycle, every precaution should be secured...