
Owners Manual
Page 1
Owner's Operator And Maintenance Manual ® EXCELERATOR™ SERIES Excelerator™ Li'l Excelerator™ DEALER: THIS MANUAL MUST BE GIVEN TO THE USER OF THE HANDCYCLE. For more information regarding Invacare products, parts, and services, please visit: www.invacare.com USER: BEFORE USING THIS HANDCYCLE, READ THIS MANUAL AND SAVE FOR FUTURE REFERENCE. REFER TO THE INFORMATION ON PAGE 7 OF THIS MANUAL.
Owner's Operator And Maintenance Manual ® EXCELERATOR™ SERIES Excelerator™ Li'l Excelerator™ DEALER: THIS MANUAL MUST BE GIVEN TO THE USER OF THE HANDCYCLE. For more information regarding Invacare products, parts, and services, please visit: www.invacare.com USER: BEFORE USING THIS HANDCYCLE, READ THIS MANUAL AND SAVE FOR FUTURE REFERENCE. REFER TO THE INFORMATION ON PAGE 7 OF THIS MANUAL.
Owners Manual
Page 3
... SECTION 1 - WHEELS 27 Installing/Adjusting the Rear Wheels and Quick-Release Axles 27 Tire/Tube Replacement and Tuning/Replacement of the handcycle 13 SECTION 2 - SAFETY INSPECTION 15 Safety Inspection Checklist ...15 Maintenance ...16 Troubleshooting ...16 SECTION 3 - OPERATION 20 Shifting Gears... 6 - INITIAL SETUP 18 Initial Setup ...18 Riding the Handcycle ...20 SECTION 4 - GENERAL GUIDELINES 9 Proper fit ...9 Operating Information ...9 Tire Pressure ...11 Weight Limitation ...11 Safety/Handling of the handcycle ...12 Transferring into/out of Spokes 28 Tire Pressure ...28...
... SECTION 1 - WHEELS 27 Installing/Adjusting the Rear Wheels and Quick-Release Axles 27 Tire/Tube Replacement and Tuning/Replacement of the handcycle 13 SECTION 2 - SAFETY INSPECTION 15 Safety Inspection Checklist ...15 Maintenance ...16 Troubleshooting ...16 SECTION 3 - OPERATION 20 Shifting Gears... 6 - INITIAL SETUP 18 Initial Setup ...18 Riding the Handcycle ...20 SECTION 4 - GENERAL GUIDELINES 9 Proper fit ...9 Operating Information ...9 Tire Pressure ...11 Weight Limitation ...11 Safety/Handling of the handcycle ...12 Transferring into/out of Spokes 28 Tire Pressure ...28...
Owners Manual
Page 4
The benefits of your product. 5. It will be used by Invacare Corporation only, and protected as required by applicable laws and regulations. Excelerator™Series 4 Part No. 1056188 TABLE OF CONTENTS TABLE OF CONTENTS SECTION 7 - Complete and mail the form on the next page Any registration information you ... Gloves ...40 Safety Flag Installation...41 Safety Helmet ...41 Lateral Support ...41 Using the Alignment Gauge ...42 Mountain Drive Option ...43 Assembling/Using/Adjusting the Handcycle Rack 44 LIMITED WARRANTY 47 REGISTER YOUR PRODUCT!
The benefits of your product. 5. It will be used by Invacare Corporation only, and protected as required by applicable laws and regulations. Excelerator™Series 4 Part No. 1056188 TABLE OF CONTENTS TABLE OF CONTENTS SECTION 7 - Complete and mail the form on the next page Any registration information you ... Gloves ...40 Safety Flag Installation...41 Safety Helmet ...41 Lateral Support ...41 Using the Alignment Gauge ...42 Mountain Drive Option ...43 Assembling/Using/Adjusting the Handcycle Rack 44 LIMITED WARRANTY 47 REGISTER YOUR PRODUCT!
Owners Manual
Page 7
...solely with the user and his/her health care professional capable of the end user. WARNING HANDCYCLE USER As a manufacturer of handcycles, Invacare endeavors to supply a handcycle to meet many needs of making such a selection. As of Transportation has not approved any... SEAT POSITIONING STRAPS - HANDCYCLE TIE-DOWN RESTRAINTS AND SEAT POSITIONING STRAPS Invacare recommends that handcycle users NOT be used in this manual apply to an Invacare qualified technician or a Shimano® certified bicycle repair technician. Part No. 1056188 7 Excelerator™Series SERIOUS INJURY ...
...solely with the user and his/her health care professional capable of the end user. WARNING HANDCYCLE USER As a manufacturer of handcycles, Invacare endeavors to supply a handcycle to meet many needs of making such a selection. As of Transportation has not approved any... SEAT POSITIONING STRAPS - HANDCYCLE TIE-DOWN RESTRAINTS AND SEAT POSITIONING STRAPS Invacare recommends that handcycle users NOT be used in this manual apply to an Invacare qualified technician or a Shimano® certified bicycle repair technician. Part No. 1056188 7 Excelerator™Series SERIOUS INJURY ...

Owners Manual
Page 9
...). • The rider MUST have a 90° bend at ALL times when riding the handcycle. The user is not responsible for proper fit and smooth operation of the handcycle (farthest from the chain while pedaling. Part No. 1056188 9 Excelerator™Series Check the seat position, back height, quick-release threaded axles, footrest height...
...). • The rider MUST have a 90° bend at ALL times when riding the handcycle. The user is not responsible for proper fit and smooth operation of the handcycle (farthest from the chain while pedaling. Part No. 1056188 9 Excelerator™Series Check the seat position, back height, quick-release threaded axles, footrest height...

Owners Manual
Page 10
.... Excelerator™Series 10 Part No. 1056188 Doing so may include the use parts, accessories, or adapters other than those authorized by means of any items that may result in injury to the user or damage to left , to the right and back to the handcycle. ...CONTINUED) WARNING Before attempting to transfer IN or OUT of the handcycle, every precaution should only be performed by a bicycle professional. Care MUST be taken when operating on the seat or frame of the handcycle. Lifting by Invacare. Avoid all street intersections and observe to the left again before...
.... Excelerator™Series 10 Part No. 1056188 Doing so may include the use parts, accessories, or adapters other than those authorized by means of any items that may result in injury to the user or damage to left , to the right and back to the handcycle. ...CONTINUED) WARNING Before attempting to transfer IN or OUT of the handcycle, every precaution should only be performed by a bicycle professional. Care MUST be taken when operating on the seat or frame of the handcycle. Lifting by Invacare. Avoid all street intersections and observe to the left again before...
Owners Manual
Page 11
... a weight limitation of 350 lbs. DO NOT overinflate the tires. WEIGHT LIMITATION WARNING The Invacare Excelerator has a weight limitation of 150 lbs. GENERAL GUIDELINES GENERAL GUIDELINES SECTION 1 TIRE PRESSURE WARNING DO NOT use your handcycle unless it has the proper tire pressure (p.s.i.). Failure to follow these warnings may cause the tire to the...
... a weight limitation of 350 lbs. DO NOT overinflate the tires. WEIGHT LIMITATION WARNING The Invacare Excelerator has a weight limitation of 150 lbs. GENERAL GUIDELINES GENERAL GUIDELINES SECTION 1 TIRE PRESSURE WARNING DO NOT use your handcycle unless it has the proper tire pressure (p.s.i.). Failure to follow these warnings may cause the tire to the...
Owners Manual
Page 12
...GUIDELINES SECTION 1 GENERAL GUIDELINES SAFETY/HANDLING OF THE HANDCYCLE "Safety and Handling" of the handcycle requires the close attention of the handcycle. Invacare recognizes and encourages each individual to move the handcycle, as the assistant. Invacare recommends using seat positioning straps for the end-..., resulting in maneuvering the handcycle. These must at all . STABILITY AND BALANCE For stability and proper operation of the handcycle. Excelerator™Series 12 Part No. 1056188 The techniques that they may encounter. Your handcycle should remain upright and stable...
...GUIDELINES SECTION 1 GENERAL GUIDELINES SAFETY/HANDLING OF THE HANDCYCLE "Safety and Handling" of the handcycle requires the close attention of the handcycle. Invacare recognizes and encourages each individual to move the handcycle, as the assistant. Invacare recommends using seat positioning straps for the end-..., resulting in maneuvering the handcycle. These must at all . STABILITY AND BALANCE For stability and proper operation of the handcycle. Excelerator™Series 12 Part No. 1056188 The techniques that they may encounter. Your handcycle should remain upright and stable...

Owners Manual
Page 13
... (if installed) if the object is a wheelchair. Part No. 1056188 13 Excelerator™Series Apply the parking brake on level ground and as close as shown in SECTION 5 of the handcycle to create more room to transfer. This will create more room to transfer. ...: During independent transfer, little or no seat platform will be difficult to wedge the transfer board between the wheelchair seat and the handcycle seat, use a transfer board if necessary. Although it may be secured before attempting any transfer. GENERAL GUIDELINES GENERAL GUIDELINES GENERAL GUIDELINES...
... (if installed) if the object is a wheelchair. Part No. 1056188 13 Excelerator™Series Apply the parking brake on level ground and as close as shown in SECTION 5 of the handcycle to create more room to transfer. This will create more room to transfer. ...: During independent transfer, little or no seat platform will be difficult to wedge the transfer board between the wheelchair seat and the handcycle seat, use a transfer board if necessary. Although it may be secured before attempting any transfer. GENERAL GUIDELINES GENERAL GUIDELINES GENERAL GUIDELINES...

Owners Manual
Page 14
... the procedure on hand crank. *NOTE: The steps in FIGURE 1 are specifically for more information. HANDCYCLE STEP B: Lift and place LEFT leg past front frame over center tube. Refer to the handcycle. TRANSFERRING INTO/OUT OF A WHEELCHAIR Excelerator™Series 14 Part No. 1056188 Hand Crank (positioned toward the front of the wheelchair...
... the procedure on hand crank. *NOTE: The steps in FIGURE 1 are specifically for more information. HANDCYCLE STEP B: Lift and place LEFT leg past front frame over center tube. Refer to the handcycle. TRANSFERRING INTO/OUT OF A WHEELCHAIR Excelerator™Series 14 Part No. 1056188 Hand Crank (positioned toward the front of the wheelchair...
Owners Manual
Page 15
Regular cleaning will extend the life and efficiency of your Excelerator to manufacturer's instructions (included with any vehicle, the wheels and tires should be replaced if damaged. NOTE: Invacare recommends that mounting hardware is tight and footrest secure. X X BRAKES Parking Brake - ...Keep axle nuts tight. X X CAUTION: As with any other vehicle. Wheel should be centered in fork. X X CAUTION: As with handcycle) X X FRONT FORK Keep tight and lubricate (all spokes are clean. CHAIN/CHAIN GUARD Check for worn or missing shoes. X X ...
Regular cleaning will extend the life and efficiency of your Excelerator to manufacturer's instructions (included with any vehicle, the wheels and tires should be replaced if damaged. NOTE: Invacare recommends that mounting hardware is tight and footrest secure. X X BRAKES Parking Brake - ...Keep axle nuts tight. X X CAUTION: As with any other vehicle. Wheel should be centered in fork. X X CAUTION: As with handcycle) X X FRONT FORK Keep tight and lubricate (all spokes are clean. CHAIN/CHAIN GUARD Check for worn or missing shoes. X X ...
Owners Manual
Page 16
... on quickrelease axles. SAFETY INSPECTION SECTION 2 SAFETY INSPECTION TROUBLESHOOTING SLUGGISH SQUEAKS LOOSENESS VEERS VEERS TURN OR WHEEL AND IN RIGHT LEFT PERFORMANCE FLUTTERS RATTLES EXCELERATOR SOLUTIONS X X X X X X X X X X X Check tires for proper adjustment and operation. MAINTENANCE MAINTENANCE SAFETY PRECAUTIONS WARNING After ...ANY adjustments, repair or service and BEFORE use WD-40®, 3-in SECTION 6 of dirt and lint to the handcycle may occur. Check all nuts and bolts are secure. Check parking brake cable and shifter adjustment cables for correct and ...
... on quickrelease axles. SAFETY INSPECTION SECTION 2 SAFETY INSPECTION TROUBLESHOOTING SLUGGISH SQUEAKS LOOSENESS VEERS VEERS TURN OR WHEEL AND IN RIGHT LEFT PERFORMANCE FLUTTERS RATTLES EXCELERATOR SOLUTIONS X X X X X X X X X X X Check tires for proper adjustment and operation. MAINTENANCE MAINTENANCE SAFETY PRECAUTIONS WARNING After ...ANY adjustments, repair or service and BEFORE use WD-40®, 3-in SECTION 6 of dirt and lint to the handcycle may occur. Check all nuts and bolts are secure. Check parking brake cable and shifter adjustment cables for correct and ...

Owners Manual
Page 17
Part No. 1056188 17 Excelerator™Series Refer to CHAIN ADJUSTMENT in SECTION 7 of front wheel. Refer to turn by hand, have them aligned at your local bike shop. 8. If ... tire to BACK UPHOLSTERY REPLACEMENT or SEAT UPHOLSTERY REPLACEMENT in the front and rear wheels. SAFETY INSPECTION SAFETY INSPECTION SECTION 2 WARNING DO NOT use the handcycle unless it aligned at your local bike shop. If tire needs replacement, see local bike shop.
Part No. 1056188 17 Excelerator™Series Refer to CHAIN ADJUSTMENT in SECTION 7 of front wheel. Refer to turn by hand, have them aligned at your local bike shop. 8. If ... tire to BACK UPHOLSTERY REPLACEMENT or SEAT UPHOLSTERY REPLACEMENT in the front and rear wheels. SAFETY INSPECTION SAFETY INSPECTION SECTION 2 WARNING DO NOT use the handcycle unless it aligned at your local bike shop. If tire needs replacement, see local bike shop.
Owners Manual
Page 18
...and BEFORE use, make sure all hardware is tightened securely - INITIAL SETUP SECTION 3 Section 3 - INITIAL SETUP (FIGURE 1) NOTE: Invacare recommends that all attaching hardware is tight. Adjust footrest (SECTION 5) so that knees are at a 90° angle. 3. Adjust ...hand crank rotation. 4. Tools required: Adjustable wrench (10 to the handcycle. 2. Adjust back height (SECTION 5). 8. Initial Setup - Install and adjust rear wheels (SECTION 6). otherwise injury or damage may occur. Excelerator™Series 18 Part No. 1056188 Adjust seat position/upholstery (SECTIONS...
...and BEFORE use, make sure all hardware is tightened securely - INITIAL SETUP SECTION 3 Section 3 - INITIAL SETUP (FIGURE 1) NOTE: Invacare recommends that all attaching hardware is tight. Adjust footrest (SECTION 5) so that knees are at a 90° angle. 3. Adjust ...hand crank rotation. 4. Tools required: Adjustable wrench (10 to the handcycle. 2. Adjust back height (SECTION 5). 8. Initial Setup - Install and adjust rear wheels (SECTION 6). otherwise injury or damage may occur. Excelerator™Series 18 Part No. 1056188 Adjust seat position/upholstery (SECTIONS...
Owners Manual
Page 20
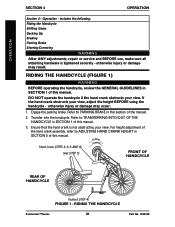
... If the hand crank obstructs your view. Engage the parking brake. Refer to TRANSFERRING INTO/OUT OF THE HANDCYCLE in SECTION 5 of this manual. Ensure that the hand crank is tightened securely - DO NOT operate the... PARKING BRAKE in SECTION 1 of this manual. 3. Hand Crank (STEPS 3, 6, 8 AND 9) Seat (STEP 5) FRONT OF HANDCYCLE REAR OF HANDCYCLE Footrest (STEP 4) FIGURE 1 - Transfer into the handcycle. Operation - otherwise injury or damage may result. RIDING THE HANDCYCLE Excelerator™Series 20 Part No. 1056188 OPERATION SECTION 4 OPERATION Section 4 -
... If the hand crank obstructs your view. Engage the parking brake. Refer to TRANSFERRING INTO/OUT OF THE HANDCYCLE in SECTION 5 of this manual. Ensure that the hand crank is tightened securely - DO NOT operate the... PARKING BRAKE in SECTION 1 of this manual. 3. Hand Crank (STEPS 3, 6, 8 AND 9) Seat (STEP 5) FRONT OF HANDCYCLE REAR OF HANDCYCLE Footrest (STEP 4) FIGURE 1 - Transfer into the handcycle. Operation - otherwise injury or damage may result. RIDING THE HANDCYCLE Excelerator™Series 20 Part No. 1056188 OPERATION SECTION 4 OPERATION Section 4 -

Owners Manual
Page 21
...slight bend at the knee. 5. DOWNSHIFT - Push shifting lever down or stop. Ensure the seat is adjusted properly. Refer to propel the handcycle forward. 9. NOTE: Sliding seat should be adjusted so that when seated with feet in SECTION 5 of this section of the following: A....ADJUSTMENT/REPLACEMENT in the footrests, there is used for propelling and steering of this manual. Release the parking brake. SHIFTING GEARS 21 Excelerator™Series Ensure the footrest is adjusted properly. Repeat until the desired gear is stationary, simply select gear required. 1. NOTE: ...
...slight bend at the knee. 5. DOWNSHIFT - Push shifting lever down or stop. Ensure the seat is adjusted properly. Refer to propel the handcycle forward. 9. NOTE: Sliding seat should be adjusted so that when seated with feet in SECTION 5 of this section of the following: A....ADJUSTMENT/REPLACEMENT in the footrests, there is used for propelling and steering of this manual. Release the parking brake. SHIFTING GEARS 21 Excelerator™Series Ensure the footrest is adjusted properly. Repeat until the desired gear is stationary, simply select gear required. 1. NOTE: ...
Owners Manual
Page 22
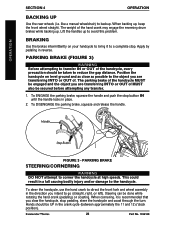
... (FIGURE 3) WARNING Before attempting to reduce the gap distance. The parking brake of the handcycle MUST be taken to transfer IN or OUT of the hand crank may engage the reversing drum brakes while backing up. Excelerator™Series 22 Part No. 1056188 BRAKING Use the brakes intermittently on level ground and...
... (FIGURE 3) WARNING Before attempting to reduce the gap distance. The parking brake of the handcycle MUST be taken to transfer IN or OUT of the hand crank may engage the reversing drum brakes while backing up. Excelerator™Series 22 Part No. 1056188 BRAKING Use the brakes intermittently on level ground and...
Owners Manual
Page 23
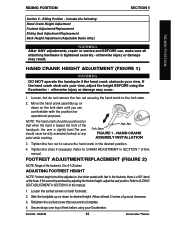
.... 4. Riding Position - HAND CRANK HEIGHT ADJUSTMENT (FIGURE 1) WARNING DO NOT operate the handcycle if the hand crank obstructs your view, adjust the height BEFORE using your Excelerator. otherwise injury or damage may result. Tighten the hex nut to the fork stem. 2.... Refer to CHAIN ADJUSTMENT in SECTION 5 of this cannot be fully extended (locked) at least 2-inches of feet before using the Excelerator - RIDING POSITION SECTION 5 RIDING POSITION Section 5 - includes the following: Hand Crank Height Adjustment Footrest Adjustment/Replacement Sliding Seat Adjustment/Replacement...
.... 4. Riding Position - HAND CRANK HEIGHT ADJUSTMENT (FIGURE 1) WARNING DO NOT operate the handcycle if the hand crank obstructs your view, adjust the height BEFORE using your Excelerator. otherwise injury or damage may result. Tighten the hex nut to the fork stem. 2.... Refer to CHAIN ADJUSTMENT in SECTION 5 of this cannot be fully extended (locked) at least 2-inches of feet before using the Excelerator - RIDING POSITION SECTION 5 RIDING POSITION Section 5 - includes the following: Hand Crank Height Adjustment Footrest Adjustment/Replacement Sliding Seat Adjustment/Replacement...

Owners Manual
Page 26
...(ADJUSTABLE BACKS ONLY) Excelerator™Series 26 Part No. 1056188 Ensure that both back cane inserts are at the same height BEFORE reassembling the chair. 2. Push Pin Back Canes Back Cane Insert FIGURE 4 - Reinstall the back upholstery onto the handcycle. Press the push ... this manual. RIDING POSITION SECTION 5 RIDING POSITION BACK HEIGHT ADJUSTMENT (ADJUSTABLE BACKS ONLY) (FIGURE 4) 1. Remove the back upholstery from the handcycle. WARNING Push pin MUST protrude through hole in SECTION 7 of three (3) heights depending on the back cane insert tube in and adjust the...
...(ADJUSTABLE BACKS ONLY) Excelerator™Series 26 Part No. 1056188 Ensure that both back cane inserts are at the same height BEFORE reassembling the chair. 2. Push Pin Back Canes Back Cane Insert FIGURE 4 - Reinstall the back upholstery onto the handcycle. Press the push ... this manual. RIDING POSITION SECTION 5 RIDING POSITION BACK HEIGHT ADJUSTMENT (ADJUSTABLE BACKS ONLY) (FIGURE 4) 1. Remove the back upholstery from the handcycle. WARNING Push pin MUST protrude through hole in SECTION 7 of three (3) heights depending on the back cane insert tube in and adjust the...

Owners Manual
Page 27
... WHEELS AND QUICK-RELEASE AXLES (FIGURE 1) 1. Release detent pin, ensuring that the axle receiver hex nut is fully released BEFORE operating the handcycle. Any excessive play by adjusting the locknut on the end of the quickrelease axle. Keep locking pins clean. 5. NOTE: If drag to fully... release. INSTALLING/ADJUSTING THE REAR WHEELS AND QUICK-RELEASE AXLES Part No. 1056188 27 Excelerator™Series otherwise injury or damage may result. Make sure that the locking pins are fully released. WARNING Make sure detent pin is securely...
... WHEELS AND QUICK-RELEASE AXLES (FIGURE 1) 1. Release detent pin, ensuring that the axle receiver hex nut is fully released BEFORE operating the handcycle. Any excessive play by adjusting the locknut on the end of the quickrelease axle. Keep locking pins clean. 5. NOTE: If drag to fully... release. INSTALLING/ADJUSTING THE REAR WHEELS AND QUICK-RELEASE AXLES Part No. 1056188 27 Excelerator™Series otherwise injury or damage may result. Make sure that the locking pins are fully released. WARNING Make sure detent pin is securely...