
Owners Manual
Page 2
... NOT OPERATE THIS EQUIPMENT WITHOUT FIRST READING AND UNDERSTANDING THIS MANUAL. THE INITIAL SET UP OF THIS WHEELCHAIR MUST BE PERFORMED BY A QUALIFIED TECHNICIAN. REPLACING THE LOCKING MECHANISM IN THE BACK CANE ADJUSTING THE ...WHEELCHAIR FRAME INSTALLING QUICK-RELEASE CASTERS HANDRIMS ADJUSTING REAR WHEEL CAMBER ADJUSTING WHEELBASE LENGTH ADJUSTING WHEELBASE LENGTH TOE-IN/TOE-OUT ALIGNMENT CORRECTING THE TOE-IN/TOE-OUT CONDITION SEAT-TO-FLOOR HEIGHT DETERMINATION CHANGING SEAT-TO-FLOOR HEIGHT INSTALLING ANTI-TIPPER MOUNTING BRACKETS SAVE THESE INSTRUCTIONS MVP™ & MVP jr.™ 2 Part...
... NOT OPERATE THIS EQUIPMENT WITHOUT FIRST READING AND UNDERSTANDING THIS MANUAL. THE INITIAL SET UP OF THIS WHEELCHAIR MUST BE PERFORMED BY A QUALIFIED TECHNICIAN. REPLACING THE LOCKING MECHANISM IN THE BACK CANE ADJUSTING THE ...WHEELCHAIR FRAME INSTALLING QUICK-RELEASE CASTERS HANDRIMS ADJUSTING REAR WHEEL CAMBER ADJUSTING WHEELBASE LENGTH ADJUSTING WHEELBASE LENGTH TOE-IN/TOE-OUT ALIGNMENT CORRECTING THE TOE-IN/TOE-OUT CONDITION SEAT-TO-FLOOR HEIGHT DETERMINATION CHANGING SEAT-TO-FLOOR HEIGHT INSTALLING ANTI-TIPPER MOUNTING BRACKETS SAVE THESE INSTRUCTIONS MVP™ & MVP jr.™ 2 Part...
Owners Manual
Page 10
... BEFORE attempting active use of a wheelchair may cause your knees. DO NOT attempt to the wheelchair. MVP™ & MVP jr.™ 10 Part No. 1106638 DO NOT sit or transfer into the wheelchair unless it is locked securely BEFORE using any removable (detachable) parts of the wheelchair. DO NOT attempt to reach objects... Before attempting to transfer in injury to the user or damage to and from the floor by Invacare. Turn both casters toward the direction you have to stop a moving wheelchair with a water, ice or oil film. Serious bodily injury may occur. DO NOT attempt to...
... BEFORE attempting active use of a wheelchair may cause your knees. DO NOT attempt to the wheelchair. MVP™ & MVP jr.™ 10 Part No. 1106638 DO NOT sit or transfer into the wheelchair unless it is locked securely BEFORE using any removable (detachable) parts of the wheelchair. DO NOT attempt to reach objects... Before attempting to transfer in injury to the user or damage to and from the floor by Invacare. Turn both casters toward the direction you have to stop a moving wheelchair with a water, ice or oil film. Serious bodily injury may occur. DO NOT attempt to...
Owners Manual
Page 11
...-propulsion. DO NOT overinflate the tires. WEIGHT TRAINING WARNING Invacare DOES NOT recommend the use the footplate as a weight training apparatus. Part No. 1106638 11 MVP™ & MVP jr.™ and a seating system weighing 10 lbs., the user weight is a backpack containing 10 lbs. ALWAYS wear your wheelchair unless it has the proper tire pressure (p.s.i.). and...
...-propulsion. DO NOT overinflate the tires. WEIGHT TRAINING WARNING Invacare DOES NOT recommend the use the footplate as a weight training apparatus. Part No. 1106638 11 MVP™ & MVP jr.™ and a seating system weighing 10 lbs., the user weight is a backpack containing 10 lbs. ALWAYS wear your wheelchair unless it has the proper tire pressure (p.s.i.). and...
Owners Manual
Page 12
... normal daily activities as long as a “basic” guide. MVP™ & MVP jr.™ 12 Part No. 1106638 The techniques that may differ from those described in a straight line. Your wheelchair has been designed to deal with or without the seat positioning strap), Invacare strongly recommends ordering the seat positioning strap as the assistant. This...
... normal daily activities as long as a “basic” guide. MVP™ & MVP jr.™ 12 Part No. 1106638 The techniques that may differ from those described in a straight line. Your wheelchair has been designed to deal with or without the seat positioning strap), Invacare strongly recommends ordering the seat positioning strap as the assistant. This...
Owners Manual
Page 14
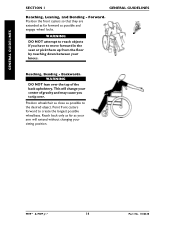
Position wheelchair as close as possible to create the longest possible wheelbase. Reach back only as far as possible and engage wheel locks. GENERAL GUIDELINES SECTION 1 GENERAL ... to reach objects if you to move forward in the seat or pick them up from the floor by reaching down between your knees. MVP™ & MVP jr.™ 14 Part No. 1106638 Forward. Point front casters forward to the desired object. Position the front casters so that they are extended as far forward...
Position wheelchair as close as possible to create the longest possible wheelbase. Reach back only as far as possible and engage wheel locks. GENERAL GUIDELINES SECTION 1 GENERAL ... to reach objects if you to move forward in the seat or pick them up from the floor by reaching down between your knees. MVP™ & MVP jr.™ 14 Part No. 1106638 Forward. Point front casters forward to the desired object. Position the front casters so that they are extended as far forward...
Owners Manual
Page 16
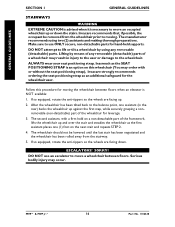
...over the stair and steadies the wheelchair as an additional safeguard for leverage. 3. The second assistant, with or without the seat positioning strap), Invacare strongly recommends ordering the seat ...parts of a wheelchair may result in the rear) backs the wheelchair up against the first step, while securely grasping a nonremovable (non-detachable) part of the framework, lifts the wheelchair up . 2. Make sure to use an escalator to the balance point, one (1) foot on this procedure for hand-held supports. ESCALATORS? MVP™ & MVP jr.™ 16 Part...
...over the stair and steadies the wheelchair as an additional safeguard for leverage. 3. The second assistant, with or without the seat positioning strap), Invacare strongly recommends ordering the seat ...parts of a wheelchair may result in the rear) backs the wheelchair up against the first step, while securely grasping a nonremovable (non-detachable) part of the framework, lifts the wheelchair up . 2. Make sure to use an escalator to the balance point, one (1) foot on this procedure for hand-held supports. ESCALATORS? MVP™ & MVP jr.™ 16 Part...
Owners Manual
Page 18
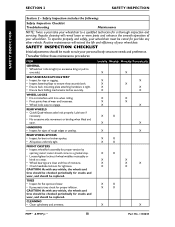
... X X X X X X X X X X X X X X X X X X X X X X X X X X X X X X X X X X X X X X X MVP™ & MVP jr.™ 18 Part No. 1106638 Regular cleaning will extend the life and efficiency of wear and looseness. • Wheel locks easy to suit your wheelchair must be cared for just like any vehicle, the wheels and tires should...broken spokes. • All spokes uniformly tight. Routine maintenance will reveal loose or worn parts and enhance the smooth operation of your wheelchair to a stop. • Wheel bearings are clean and free of rough edges or ...
... X X X X X X X X X X X X X X X X X X X X X X X X X X X X X X X X X X X X X X X MVP™ & MVP jr.™ 18 Part No. 1106638 Regular cleaning will extend the life and efficiency of wear and looseness. • Wheel locks easy to suit your wheelchair must be cared for just like any vehicle, the wheels and tires should...broken spokes. • All spokes uniformly tight. Routine maintenance will reveal loose or worn parts and enhance the smooth operation of your wheelchair to a stop. • Wheel bearings are clean and free of rough edges or ...
Owners Manual
Page 22
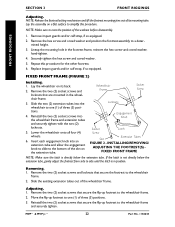
...the existing extension tubes out of its back. 2. Reinstall the two (2) socket screws that secure the flip-up footrest to the wheelchair frame. 2. NOTE: Make sure to simplify this procedure for the other footrest. 6. SECTION 3 FRONT RIGGINGS FRONT RIGGINGS Adjusting. ...wheelchair frame. Lineup the mounting hole in the wheelchair frame. 3. Repeat this procedure. INSTALLING/REMOVING/ ADJUSTING THE FOOTREST(S) - If the latch is in position. Move the flip-up footrest to side until the latch is not directly below the extension tube. MVP™ & MVP jr.™ 22 Part...
...the existing extension tubes out of its back. 2. Reinstall the two (2) socket screws that secure the flip-up footrest to the wheelchair frame. 2. NOTE: Make sure to simplify this procedure for the other footrest. 6. SECTION 3 FRONT RIGGINGS FRONT RIGGINGS Adjusting. ...wheelchair frame. Lineup the mounting hole in the wheelchair frame. 3. Repeat this procedure. INSTALLING/REMOVING/ ADJUSTING THE FOOTREST(S) - If the latch is in position. Move the flip-up footrest to side until the latch is not directly below the extension tube. MVP™ & MVP jr.™ 22 Part...
Owners Manual
Page 26
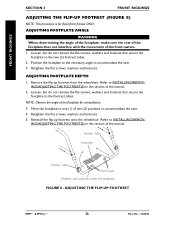
... (2) positions to the footrest tubes. Remove the flip-up footrest onto the wheelchair. Loosen, but do not remove the flat screws, washers and locknuts that secure the footplate to accommodate the user. 3. ADJUSTING THE FLIP-UP FOOTREST MVP™ & MVP jr.™ 26 Part No. 1106638 Move the footplate to one (1) of the manual. 2. FRONT...
... (2) positions to the footrest tubes. Remove the flip-up footrest onto the wheelchair. Loosen, but do not remove the flat screws, washers and locknuts that secure the footplate to accommodate the user. 3. ADJUSTING THE FLIP-UP FOOTREST MVP™ & MVP jr.™ 26 Part No. 1106638 Move the footplate to one (1) of the manual. 2. FRONT...
Owners Manual
Page 30
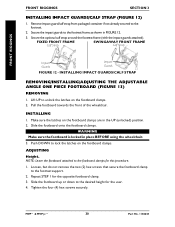
...impact guards attached). Pull the footboard towards the front of the wheelchair. Slide the footboard onto the footboard clamps. Slide the footboard up or down to the desired height for the opposite footboard clamp. 3. MVP™ & MVP jr.™ 30 Part No. 1106638 FIXED FRONT FRAME Calf Strap SWINGAWAY FRONT FRAME Calf...1. Secure the impact guards to the footboard clamps for this procedure. 1. WARNING Make sure the footboard is locked in place BEFORE using the wheelchair. 3. NOTE: Leave the footboard attached to the footrest frame as shown in the UP (unlocked) position. 2.
...impact guards attached). Pull the footboard towards the front of the wheelchair. Slide the footboard onto the footboard clamps. Slide the footboard up or down to the desired height for the opposite footboard clamp. 3. MVP™ & MVP jr.™ 30 Part No. 1106638 FIXED FRONT FRAME Calf Strap SWINGAWAY FRONT FRAME Calf...1. Secure the impact guards to the footboard clamps for this procedure. 1. WARNING Make sure the footboard is locked in place BEFORE using the wheelchair. 3. NOTE: Leave the footboard attached to the footrest frame as shown in the UP (unlocked) position. 2.
Owners Manual
Page 32
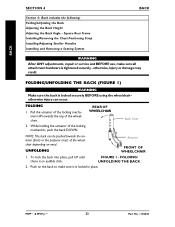
...Removing a Seating System WARNING After ANY adjustments, repair or service and BEFORE use, make sure it is locked securely BEFORE using the wheelchair otherwise injury can be pushed towards the top of the locking mechanism, push the back DOWN. FOLDING/ UNFOLDING THE BACK 2. Back... mechanism UP towards the anterior (front) or the posterior (rear) of the wheelchair depending on the back to make sure all attachment hardware is an audible click. NOTE: The back can occur. MVP™ & MVP jr.™ 32 Part No. 1106638 Push on need. FIGURE 1 - FOLDING 1. BACK SECTION 4 ...
...Removing a Seating System WARNING After ANY adjustments, repair or service and BEFORE use, make sure it is locked securely BEFORE using the wheelchair otherwise injury can be pushed towards the top of the locking mechanism, push the back DOWN. FOLDING/ UNFOLDING THE BACK 2. Back... mechanism UP towards the anterior (front) or the posterior (rear) of the wheelchair depending on the back to make sure all attachment hardware is an audible click. NOTE: The back can occur. MVP™ & MVP jr.™ 32 Part No. 1106638 Push on need. FIGURE 1 - FOLDING 1. BACK SECTION 4 ...
Owners Manual
Page 38
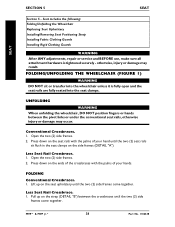
... the seat upholstery until the two (2) side frames come together. Less Seat Rail Crossbrace. 1. MVP™ & MVP jr.™ 38 Part No. 1106638 Conventional Crossbraces. 1. otherwise, injury or damage may occur. Open the two (2) side frames. 2. FOLDING/UNFOLDING THE WHEELCHAIR (FIGURE 1) WARNING DO NOT sit or transfer into the seat clamps. Seat includes the following...
... the seat upholstery until the two (2) side frames come together. Less Seat Rail Crossbrace. 1. MVP™ & MVP jr.™ 38 Part No. 1106638 Conventional Crossbraces. 1. otherwise, injury or damage may occur. Open the two (2) side frames. 2. FOLDING/UNFOLDING THE WHEELCHAIR (FIGURE 1) WARNING DO NOT sit or transfer into the seat clamps. Seat includes the following...
Owners Manual
Page 40
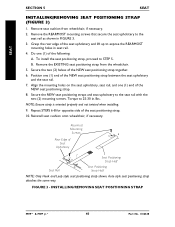
...seat cushion onto wheelchair, if necessary. Auto style seat positioning strap attaches the same way. Secure the NEW seat positioning straps and seat upholstery to expose the REARMOST mounting holes in FIGURE 3. 3. INSTALLING/REMOVING SEAT POSITIONING STRAP MVP™ & MVP jr.™ 40 Part No. 1106638 Secure...seat upholstery and lift up to the seat rail with the two (2) mounting screws. FIGURE 3 - Remove seat cushion from the wheelchair. 5. Position one (1) end of Seat Upholstery Seat Positioning Strap Half Seat Rail Seat Positioning Strap Half NOTE: Only Hook and Loop...
...seat cushion onto wheelchair, if necessary. Auto style seat positioning strap attaches the same way. Secure the NEW seat positioning straps and seat upholstery to expose the REARMOST mounting holes in FIGURE 3. 3. INSTALLING/REMOVING SEAT POSITIONING STRAP MVP™ & MVP jr.™ 40 Part No. 1106638 Secure...seat upholstery and lift up to the seat rail with the two (2) mounting screws. FIGURE 3 - Remove seat cushion from the wheelchair. 5. Position one (1) end of Seat Upholstery Seat Positioning Strap Half Seat Rail Seat Positioning Strap Half NOTE: Only Hook and Loop...
Owners Manual
Page 42
... tighten with the desired mounting hole in the arm socket depending on the wheelchair frame making sure the arm socket is tightened securely - MVP™ & MVP jr.™ 42 Part No. 1106638 Position the top coved washer between the arm socket and the wheelchair frame. 3. Loosely tighten. 5. SECTION 6 ARMS ARMS Section 6 - DO NOT attempt to the...
... tighten with the desired mounting hole in the arm socket depending on the wheelchair frame making sure the arm socket is tightened securely - MVP™ & MVP jr.™ 42 Part No. 1106638 Position the top coved washer between the arm socket and the wheelchair frame. 3. Loosely tighten. 5. SECTION 6 ARMS ARMS Section 6 - DO NOT attempt to the...
Owners Manual
Page 44
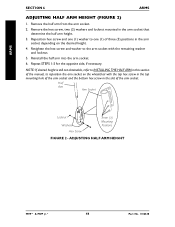
... the top hex screw in the top mounting hole of the arm socket and the bottom hex screw in the arm socket depending on the wheelchair with the remaining washer and locknut. 5. Repeat STEPS 1-5 for the opposite side, if necessary. Remove the hex screw, two (2) washers and locknut mounted in this... the arm socket that determine the half arm height. 3. Half Arm Arm Socket Locknut Washers Three (3) Mounting Positions Hex Screw FIGURE 2 - ADJUSTING HALF ARM HEIGHT MVP™ & MVP jr.™ 44 Part No. 1106638 ARMS SECTION 6 ARMS ADJUSTING HALF ARM HEIGHT (FIGURE 2) 1.
... the top hex screw in the top mounting hole of the arm socket and the bottom hex screw in the arm socket depending on the wheelchair with the remaining washer and locknut. 5. Repeat STEPS 1-5 for the opposite side, if necessary. Remove the hex screw, two (2) washers and locknut mounted in this... the arm socket that determine the half arm height. 3. Half Arm Arm Socket Locknut Washers Three (3) Mounting Positions Hex Screw FIGURE 2 - ADJUSTING HALF ARM HEIGHT MVP™ & MVP jr.™ 44 Part No. 1106638 ARMS SECTION 6 ARMS ADJUSTING HALF ARM HEIGHT (FIGURE 2) 1.
Owners Manual
Page 46
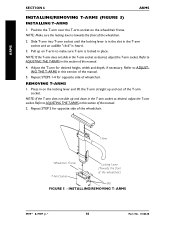
... ADJUSTING THE T-ARMS in this section of the T-arm socket. Refer to make sure T-arm is heard. 3. Press in this section of the wheelchair. ARMS MVP™ & MVP jr.™ 46 Part No. 1106638 Adjust the T-arm for opposite side of the manual. 4. Refer to ADJUSTING THE T-ARMS in on the... wheelchair frame. Repeat STEP 2 for opposite side of the manual. 5. Slide T-arm into T-arm socket until the locking lever is in the slot in ...
... ADJUSTING THE T-ARMS in this section of the T-arm socket. Refer to make sure T-arm is heard. 3. Press in this section of the wheelchair. ARMS MVP™ & MVP jr.™ 46 Part No. 1106638 Adjust the T-arm for opposite side of the manual. 4. Refer to ADJUSTING THE T-ARMS in on the... wheelchair frame. Repeat STEP 2 for opposite side of the manual. 5. Slide T-arm into T-arm socket until the locking lever is in the slot in ...

Owners Manual
Page 48
... tube to REMOVING/INSTALLING REAR WHEELS in the T-arm socket and an audible "click" is heard. 4. If necessary, install rear wheels. MVP™ & MVP jr.™ 48 Part No. 1106638 Desk Length Arms - to one (1) of this manual. T-Arm Post Phillips Screw FIGURE 8 - Press in the T-arm ... slot in SECTION 7 of the T-arm socket. 7. ADJUSTING T-ARM DEPTH ADJUSTING T-ARM SOCKETS (FIGURE 9) 1. Remove the rear wheels from the wheelchair, if necessary. Refer to the T-arm post with the T-arm. 5. Squeeze the T-arm socket the T-arm clamp together until the locking lever...
... tube to REMOVING/INSTALLING REAR WHEELS in the T-arm socket and an audible "click" is heard. 4. If necessary, install rear wheels. MVP™ & MVP jr.™ 48 Part No. 1106638 Desk Length Arms - to one (1) of this manual. T-Arm Post Phillips Screw FIGURE 8 - Press in the T-arm ... slot in SECTION 7 of the T-arm socket. 7. ADJUSTING T-ARM DEPTH ADJUSTING T-ARM SOCKETS (FIGURE 9) 1. Remove the rear wheels from the wheelchair, if necessary. Refer to the T-arm post with the T-arm. 5. Squeeze the T-arm socket the T-arm clamp together until the locking lever...
Owners Manual
Page 50
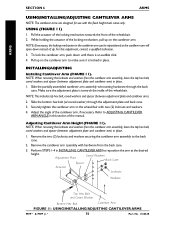
...coved washers and spacer (between adjustment plate and cantilever arm) in this adjustment, contact a qualified technician. 3. Refer to the wheelchair with hardware from the back cane. 3. Remove the two (2) locknuts and washers securing the cantilever arm assembly to reposition the... up on the cantilever arm. USING/INSTALLING/ADJUSTING CANTILEVER ARMS MVP™ & MVP jr.™ 50 Part No. 1106638 INSTALLING/ADJUSTING Installing Cantilever Arm (FIGURE 11). While holding the actuator of the wheelchair. ARMS SECTION 6 ARMS USING/INSTALLING/ADJUSTING CANTILEVER ARMS NOTE:...
...coved washers and spacer (between adjustment plate and cantilever arm) in this adjustment, contact a qualified technician. 3. Refer to the wheelchair with hardware from the back cane. 3. Remove the two (2) locknuts and washers securing the cantilever arm assembly to reposition the... up on the cantilever arm. USING/INSTALLING/ADJUSTING CANTILEVER ARMS MVP™ & MVP jr.™ 50 Part No. 1106638 INSTALLING/ADJUSTING Installing Cantilever Arm (FIGURE 11). While holding the actuator of the wheelchair. ARMS SECTION 6 ARMS USING/INSTALLING/ADJUSTING CANTILEVER ARMS NOTE:...

Owners Manual
Page 52
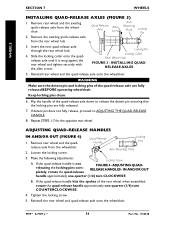
...) and pull the axle out through the opening in the center of the wheelchair to prevent accidental release. If the locking pins are fully released BEFORE operating the wheelchair. MVP™ & MVP jr.™ 52 Part No. 1106638 NOTE: During contact activities, Invacare recommends inserting quick-release axles with the head end to ADJUSTING THE QUICK-RELEASE...
...) and pull the axle out through the opening in the center of the wheelchair to prevent accidental release. If the locking pins are fully released BEFORE operating the wheelchair. MVP™ & MVP jr.™ 52 Part No. 1106638 NOTE: During contact activities, Invacare recommends inserting quick-release axles with the head end to ADJUSTING THE QUICK-RELEASE...
Owners Manual
Page 54
... axle down to ADJUSTING THE QUAD-RELEASE HANDLE. 8. Repeat STEPS 1-7 for the opposite rear wheel. MVP™ & MVP jr.™ 54 Part No. 1106638 Slide the locking collar onto the quadrelease axle until it is not releasing the locking pins... completely, rotate the quad-release Locking Screw FIGURE 4 - Loosen the locking screw. Locking Pin Locking Collar Rear Wheel Hub FIGURE 3 - Reinstall rear wheel and the quad-release axle onto the wheelchair...
... axle down to ADJUSTING THE QUAD-RELEASE HANDLE. 8. Repeat STEPS 1-7 for the opposite rear wheel. MVP™ & MVP jr.™ 54 Part No. 1106638 Slide the locking collar onto the quadrelease axle until it is not releasing the locking pins... completely, rotate the quad-release Locking Screw FIGURE 4 - Loosen the locking screw. Locking Pin Locking Collar Rear Wheel Hub FIGURE 3 - Reinstall rear wheel and the quad-release axle onto the wheelchair...


