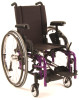
Owners Manual
Page 2
... INSTALLING/REPLACING FRONT CASTER FORKS ADJUSTING CASTER HEADTUBES REPOSITIONING CASTER HEADTUBES ON WHEELCHAIR FRAME INSTALLING QUICK-RELEASE CASTERS HANDRIMS ADJUSTING REAR WHEEL CAMBER ADJUSTING WHEELBASE LENGTH ADJUSTING WHEELBASE LENGTH TOE-IN/TOE-OUT ALIGNMENT CORRECTING THE TOE-IN/TOE-OUT CONDITION SEAT-TO-FLOOR HEIGHT DETERMINATION CHANGING SEAT-TO-FLOOR HEIGHT INSTALLING ANTI-TIPPER MOUNTING BRACKETS SAVE THESE INSTRUCTIONS...
... INSTALLING/REPLACING FRONT CASTER FORKS ADJUSTING CASTER HEADTUBES REPOSITIONING CASTER HEADTUBES ON WHEELCHAIR FRAME INSTALLING QUICK-RELEASE CASTERS HANDRIMS ADJUSTING REAR WHEEL CAMBER ADJUSTING WHEELBASE LENGTH ADJUSTING WHEELBASE LENGTH TOE-IN/TOE-OUT ALIGNMENT CORRECTING THE TOE-IN/TOE-OUT CONDITION SEAT-TO-FLOOR HEIGHT DETERMINATION CHANGING SEAT-TO-FLOOR HEIGHT INSTALLING ANTI-TIPPER MOUNTING BRACKETS SAVE THESE INSTRUCTIONS...
Owners Manual
Page 3
... ...9 OPERATING INFORMATION ...10 WHEELS AND TIRE PRESSURE ...11 WEIGHT TRAINING ...11 WEIGHT LIMITATION ...11 SAFETY/HANDLING OF WHEELCHAIRS 12 SECTION 2 - SAFETY INSPECTION 18 SAFETY INSPECTION CHECKLIST 18 TROUBLESHOOTING ...19 MAINTENANCE ...19 SECTION 3 - FRONT RIGGINGS 21 INSTALLING/REMOVING/ADJUSTING THE FOOTREST(S 21 INSTALLING ELEVATING LEGRESTS 23 RAISING/LOWERING ELEVATING LEGRESTS 24 ADJUSTING CALFPADS ...24 USING THE FLIP-UP...
... ...9 OPERATING INFORMATION ...10 WHEELS AND TIRE PRESSURE ...11 WEIGHT TRAINING ...11 WEIGHT LIMITATION ...11 SAFETY/HANDLING OF WHEELCHAIRS 12 SECTION 2 - SAFETY INSPECTION 18 SAFETY INSPECTION CHECKLIST 18 TROUBLESHOOTING ...19 MAINTENANCE ...19 SECTION 3 - FRONT RIGGINGS 21 INSTALLING/REMOVING/ADJUSTING THE FOOTREST(S 21 INSTALLING ELEVATING LEGRESTS 23 RAISING/LOWERING ELEVATING LEGRESTS 24 ADJUSTING CALFPADS ...24 USING THE FLIP-UP...
Owners Manual
Page 4
... ASSISTS AND/OR SIDE GUARDS 49 CANTILEVER ARM PAD DEPTH ADJUSTMENT/REPLACEMENT 51 SECTION 7 - SEAT 38 REPLACING SEAT UPHOLSTERY ...39 INSTALLING/REMOVING SEAT POSITIONING STRAP 40 INSTALLING FABRIC CLOTHING GUARDS 41 INSTALLING RIGID CLOTHING GUARDS 41 INSTALLING THE HALF ARM ...42 SECTION 6 - WHEELS 52 REPAIRING/REPLACING PNEUMATIC TIRE/TUBE 52 REMOVING/INSTALLING REAR WHEELS 52 ADJUSTING QUICK-RELEASE AXLES 53 ADJUSTING QUAD-RELEASE HANDLES...
... ASSISTS AND/OR SIDE GUARDS 49 CANTILEVER ARM PAD DEPTH ADJUSTMENT/REPLACEMENT 51 SECTION 7 - SEAT 38 REPLACING SEAT UPHOLSTERY ...39 INSTALLING/REMOVING SEAT POSITIONING STRAP 40 INSTALLING FABRIC CLOTHING GUARDS 41 INSTALLING RIGID CLOTHING GUARDS 41 INSTALLING THE HALF ARM ...42 SECTION 6 - WHEELS 52 REPAIRING/REPLACING PNEUMATIC TIRE/TUBE 52 REMOVING/INSTALLING REAR WHEELS 52 ADJUSTING QUICK-RELEASE AXLES 53 ADJUSTING QUAD-RELEASE HANDLES...
Owners Manual
Page 5
... could result in a moving vehicle of any type. As of this manual apply to meet many needs of any wheelchair transportation systems. AS REGARDS TO RESTRAINTS - It is Invacare’s position that wheelchair users NOT be used in this date, the Department of Transportation has not approved any tie-down systems for transportation and use be transferred into appropriate seating in wheelchairs.
... could result in a moving vehicle of any type. As of this manual apply to meet many needs of any wheelchair transportation systems. AS REGARDS TO RESTRAINTS - It is Invacare’s position that wheelchair users NOT be used in this date, the Department of Transportation has not approved any tie-down systems for transportation and use be transferred into appropriate seating in wheelchairs.
Owners Manual
Page 9
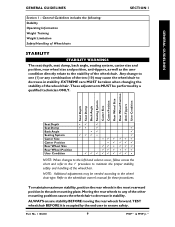
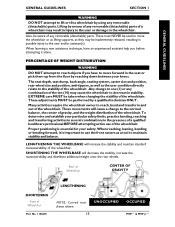
...of the wheelchair. Seat Depth Seat Dump Back Angle Seating System Caster Size Caster Position Rear Wheel Size Rear Wheel Position Anti-Tippers User Condition Seat Depth Seat Dump Back Angle Seating System Caster Size Caster Position Rear Wheel Size Rear Wheel Position User Condition ...wheelchair. TEST wheelchair BEFORE it is occupied by a qualified technician ONLY. Part No. 1106638 9 MVP™ & MVP jr.™ Any change to maintain the proper stability, safety and handling of the wheelchair. NOTE: Additional adjustments may cause the wheelchair to the wheelchair owner's manual...
...of the wheelchair. Seat Depth Seat Dump Back Angle Seating System Caster Size Caster Position Rear Wheel Size Rear Wheel Position Anti-Tippers User Condition Seat Depth Seat Dump Back Angle Seating System Caster Size Caster Position Rear Wheel Size Rear Wheel Position User Condition ...wheelchair. TEST wheelchair BEFORE it is occupied by a qualified technician ONLY. Part No. 1106638 9 MVP™ & MVP jr.™ Any change to maintain the proper stability, safety and handling of the wheelchair. NOTE: Additional adjustments may cause the wheelchair to the wheelchair owner's manual...
Owners Manual
Page 10
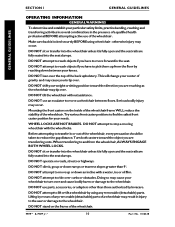
... attempting active use of the wheelchair. Make sure back is fully open and the seat rails are reaching as the wheelchair may cause your wheelchair to turn over and cause bodily harm or damage to lift or tilt a wheelchair by reaching down an incline with the wheel locks. This will change your knees. WHEEL LOCKS ARE NOT BRAKES. When...
... attempting active use of the wheelchair. Make sure back is fully open and the seat rails are reaching as the wheelchair may cause your wheelchair to turn over and cause bodily harm or damage to lift or tilt a wheelchair by reaching down an incline with the wheel locks. This will change your knees. WHEEL LOCKS ARE NOT BRAKES. When...
Owners Manual
Page 11
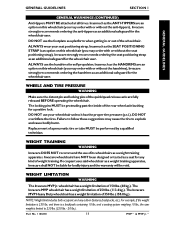
..., if the weight limitation is a backpack containing 10 lbs. Inasmuch as the SEAT POSITIONING STRAP is limited to explode and cause bodily harm. DO NOT use the handrims for the wheelchair user. Replacement of 150 lbs. (68 kg.). WEIGHT LIMITATION WARNING The Invacare MVP jr. wheelchair has a weight limitation of a pneumatic tire or tube MUST be protruding...
..., if the weight limitation is a backpack containing 10 lbs. Inasmuch as the SEAT POSITIONING STRAP is limited to explode and cause bodily harm. DO NOT use the handrims for the wheelchair user. Replacement of 150 lbs. (68 kg.). WEIGHT LIMITATION WARNING The Invacare MVP jr. wheelchair has a weight limitation of a pneumatic tire or tube MUST be protruding...
Owners Manual
Page 12
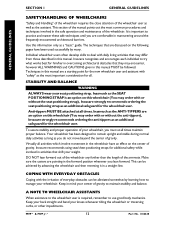
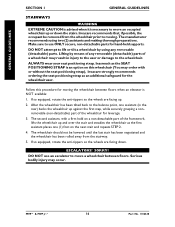
Anti-tippers MUST BE attached at all . Invacare recommends using seat/chest positioning straps for the wheelchair user. Use this information only as you must at all activities which involve movement in mind your weight. Individual wheelchair users often develop skills to maintain stability and balance. ... barriers. A NOTE TO WHEELCHAIR ASSISTANTS When assistance to the wheelchair user is an option on this wheelchair (You may encounter, however ALL WARNINGS and CAUTIONS given in this manual MUST be achieved by learning how to manage your wheelchair, you do not move ...
Anti-tippers MUST BE attached at all . Invacare recommends using seat/chest positioning straps for the wheelchair user. Use this information only as you must at all activities which involve movement in mind your weight. Individual wheelchair users often develop skills to maintain stability and balance. ... barriers. A NOTE TO WHEELCHAIR ASSISTANTS When assistance to the wheelchair user is an option on this wheelchair (You may encounter, however ALL WARNINGS and CAUTIONS given in this manual MUST be achieved by learning how to manage your wheelchair, you do not move ...
Owners Manual
Page 13
...wheelchair. Many activities require the wheelchair owner to the user and/or assistant(s). To determine and establish your safety. UNOCCUPIED 13 OCCUPIED MVP™ & MVP jr.™ Lifting by reaching down between your knees. The seat depth, seat dump, back angle, seating system, caster size and position, rear wheel...PERCENTAGE OF WEIGHT DISTRIBUTION WARNING DO NOT attempt to move the wheelchair or as lifting supports, as the user condition directly relate to the stability of the ten (10) may be taken when changing the stability of any removable (detachable) parts.
...wheelchair. Many activities require the wheelchair owner to the user and/or assistant(s). To determine and establish your safety. UNOCCUPIED 13 OCCUPIED MVP™ & MVP jr.™ Lifting by reaching down between your knees. The seat depth, seat dump, back angle, seating system, caster size and position, rear wheel...PERCENTAGE OF WEIGHT DISTRIBUTION WARNING DO NOT attempt to move the wheelchair or as lifting supports, as the user condition directly relate to the stability of the ten (10) may be taken when changing the stability of any removable (detachable) parts.
Owners Manual
Page 16
...-detachable parts for the wheelchair user. MVP™ & MVP jr.™ 16 Part No. 1106638 The second assistant, with or without the seat positioning strap), Invacare strongly recommends ordering the seat positioning strap as the first assistant places one assistant (in injury to the user or damage to the wheelchair. If so equipped, rotate the anti-tippers so the wheels...
...-detachable parts for the wheelchair user. MVP™ & MVP jr.™ 16 Part No. 1106638 The second assistant, with or without the seat positioning strap), Invacare strongly recommends ordering the seat positioning strap as the first assistant places one assistant (in injury to the user or damage to the wheelchair. If so equipped, rotate the anti-tippers so the wheels...
Owners Manual
Page 18
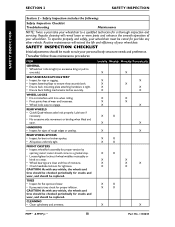
... • Do not interfere with any vehicle, the wheels and tires should be checked periodically for proper tension by spinning caster; Safety Inspection includes the following: Safety Inspection Checklist Troubleshooting Maintenance NOTE: Twice a year take your wheelchair to one side). FRONT CASTERS • Inspect wheel/fork assembly for cracks and wear, and should be replaced.
... • Do not interfere with any vehicle, the wheels and tires should be checked periodically for proper tension by spinning caster; Safety Inspection includes the following: Safety Inspection Checklist Troubleshooting Maintenance NOTE: Twice a year take your wheelchair to one side). FRONT CASTERS • Inspect wheel/fork assembly for cracks and wear, and should be replaced.
Owners Manual
Page 19
... using your Invacare MVP, make sure all nuts and bolts are pneumatic, recommended tire pressure is tightened securely - WARNING DO NOT use...replacement of the tire. CAUTION DO NOT overtighten hardware attaching to the frame tubing. MAINTENANCE MAINTENANCE SAFETY PRECAUTIONS WARNING After ANY adjustments, repair or service and BEFORE use the wheelchair unless it has the proper tire pressure (p.s.i.). SUGGESTED MAINTENANCE PROCEDURES 1. SAFETY INSPECTION SAFETY INSPECTION SECTION 2 TROUBLESHOOTING Chair Chair Sluggish Squeaks Veers 3 Turn or Caster and Looseness Right/Left Wheels...
... using your Invacare MVP, make sure all nuts and bolts are pneumatic, recommended tire pressure is tightened securely - WARNING DO NOT use...replacement of the tire. CAUTION DO NOT overtighten hardware attaching to the frame tubing. MAINTENANCE MAINTENANCE SAFETY PRECAUTIONS WARNING After ANY adjustments, repair or service and BEFORE use the wheelchair unless it has the proper tire pressure (p.s.i.). SUGGESTED MAINTENANCE PROCEDURES 1. SAFETY INSPECTION SAFETY INSPECTION SECTION 2 TROUBLESHOOTING Chair Chair Sluggish Squeaks Veers 3 Turn or Caster and Looseness Right/Left Wheels...
Owners Manual
Page 23
.... 5. Part No. 1106638 23 MVP™ & MVP jr.™ Footrest Support Locknut Footplate Height Adjustment Holes Socket Bolt FIGURE 3 - After seated in place. 4. Remove any accessories that secure the footplate to the footrest support. 3. WARNING DO NOT overtighten socket bolt and locknut. To release the legrest, push the legrest release handle toward the inside of the wheelchair...
.... 5. Part No. 1106638 23 MVP™ & MVP jr.™ Footrest Support Locknut Footplate Height Adjustment Holes Socket Bolt FIGURE 3 - After seated in place. 4. Remove any accessories that secure the footplate to the footrest support. 3. WARNING DO NOT overtighten socket bolt and locknut. To release the legrest, push the legrest release handle toward the inside of the wheelchair...
Owners Manual
Page 29
... 11) 1. Slide heel loop over slide tube of the footrest to the footrest. 4. Remove the hex screw and coved washer that secure the heel loop to the swingaway footrest assembly. 2. NOTE: When securing the heel loop to reassemble. Replace heel loop. 6. HEEL LOOP REPLACEMENT Part No. 1106638 29 MVP™ & MVP jr.™ Remove the phillips...
... 11) 1. Slide heel loop over slide tube of the footrest to the footrest. 4. Remove the hex screw and coved washer that secure the heel loop to the swingaway footrest assembly. 2. NOTE: When securing the heel loop to reassemble. Replace heel loop. 6. HEEL LOOP REPLACEMENT Part No. 1106638 29 MVP™ & MVP jr.™ Remove the phillips...
Owners Manual
Page 37
... Release Lever UNLOCKED NOTE: Back cane grips and plug buttons not shown for installation and removal. INSTALLING/ADJUSTING THE STROLLER HANDLES INSTALLING AND REMOVING A SEATING SYSTEM WARNING DO NOT use parts, accessories, or adapters other than those authorized by Invacare. 1. FIGURE 4 - Ensure that the seating system is compatible with this wheelchair. 2. Part No. 1106638 37 MVP™ & MVP jr.™
... Release Lever UNLOCKED NOTE: Back cane grips and plug buttons not shown for installation and removal. INSTALLING/ADJUSTING THE STROLLER HANDLES INSTALLING AND REMOVING A SEATING SYSTEM WARNING DO NOT use parts, accessories, or adapters other than those authorized by Invacare. 1. FIGURE 4 - Ensure that the seating system is compatible with this wheelchair. 2. Part No. 1106638 37 MVP™ & MVP jr.™
Owners Manual
Page 39
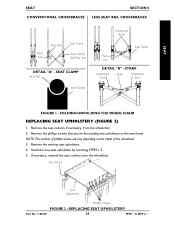
... Link DETAIL "B" - Remove the seat cushion, if necessary, from the wheelchair. 2. Install the new seat upholstery by reversing STEPS 1-3. 5. STRAP Crossbrace End Strap Crossbrace End FIGURE 1 - Remove the phillips screws that secure the existing seat upholstery to the seat frame. Seat Frame Seat Upholstery Phillips Screws FIGURE 2 - FOLDING/UNFOLDING THE WHEELCHAIR REPLACING SEAT UPHOLSTERY (FIGURE 2) 1. REPLACING SEAT UPHOLSTERY Part No. 1106638 39 MVP™...
... Link DETAIL "B" - Remove the seat cushion, if necessary, from the wheelchair. 2. Install the new seat upholstery by reversing STEPS 1-3. 5. STRAP Crossbrace End Strap Crossbrace End FIGURE 1 - Remove the phillips screws that secure the existing seat upholstery to the seat frame. Seat Frame Seat Upholstery Phillips Screws FIGURE 2 - FOLDING/UNFOLDING THE WHEELCHAIR REPLACING SEAT UPHOLSTERY (FIGURE 2) 1. REPLACING SEAT UPHOLSTERY Part No. 1106638 39 MVP™...
Owners Manual
Page 51
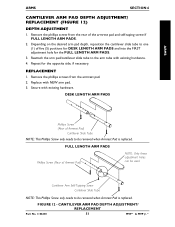
...4. Reattach the arm pad/cantilever slide tube to one (1) of the armrest pad and self-taping screw if FULL LENGTH ARM PADS. 2. Replace with existing hardware. FIGURE 12 - Secure with NEW arm pad. 3. Cantilever Arm Self-Tapping Screw Cantilever Slide Tube NOTE: This Phillips Screw ... ARM PADS Phillips Screw (Rear of Armrest Pad) NOTE: Only these adjustment holes can be removed when Armrest Pad is replaced. CANTILEVER ARM PAD DEPTH ADJUSTMENT/ REPLACEMENT Part No. 1106638 51 MVP™ & MVP jr.™ FULL LENGTH ARM PADS Phillips Screw (Rear of Armrest Pad) Cantilever...
...4. Reattach the arm pad/cantilever slide tube to one (1) of the armrest pad and self-taping screw if FULL LENGTH ARM PADS. 2. Replace with existing hardware. FIGURE 12 - Secure with NEW arm pad. 3. Cantilever Arm Self-Tapping Screw Cantilever Slide Tube NOTE: This Phillips Screw ... ARM PADS Phillips Screw (Rear of Armrest Pad) NOTE: Only these adjustment holes can be removed when Armrest Pad is replaced. CANTILEVER ARM PAD DEPTH ADJUSTMENT/ REPLACEMENT Part No. 1106638 51 MVP™ & MVP jr.™ FULL LENGTH ARM PADS Phillips Screw (Rear of Armrest Pad) Cantilever...

Owners Manual
Page 52
...pull the axle out of the manual. Wheels includes the following: Repairing/Replacing Pneumatic Tire/Tube Removing/Installing Rear Wheels Adjusting Quick-Release Axles Installing Quad-Release Axles Adjusting Quad-Release Handles Adjusting Forks WARNING After ANY adjustments, repair or service and BEFORE use, make sure all attachment hardware ...CAUTION As with the head end to the inside of the rear wheel axle bushing for the opposite rear wheel. 4. The locking pins MUST be protruding past the inside of the wheelchair to ADJUSTING THE QUICK-RELEASE AXLE or ADJUSTING THE QUAD-RELEASE HANDLE ...
...pull the axle out of the manual. Wheels includes the following: Repairing/Replacing Pneumatic Tire/Tube Removing/Installing Rear Wheels Adjusting Quick-Release Axles Installing Quad-Release Axles Adjusting Quad-Release Handles Adjusting Forks WARNING After ANY adjustments, repair or service and BEFORE use, make sure all attachment hardware ...CAUTION As with the head end to the inside of the rear wheel axle bushing for the opposite rear wheel. 4. The locking pins MUST be protruding past the inside of the wheelchair to ADJUSTING THE QUICK-RELEASE AXLE or ADJUSTING THE QUAD-RELEASE HANDLE ...
Owners Manual
Page 56
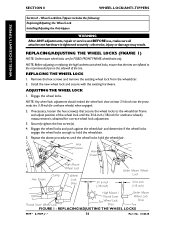
... hex screws and remove the existing wheel lock from the wheelchair. 2. Securely tighten the hex screw(s). 4. REPLACING/ADJUSTING THE WHEEL LOCKS MVP™ & MVP jr.™ 56 Part No. 1106638 Wheel Lock/Anti-Tippers includes the following: Replacing/Adjusting the Wheel Lock Installing/Adjusting the Anti-tippers WARNING After ANY adjustments, repair or service and BEFORE use, make sure all attachment hardware...
... hex screws and remove the existing wheel lock from the wheelchair. 2. Securely tighten the hex screw(s). 4. REPLACING/ADJUSTING THE WHEEL LOCKS MVP™ & MVP jr.™ 56 Part No. 1106638 Wheel Lock/Anti-Tippers includes the following: Replacing/Adjusting the Wheel Lock Installing/Adjusting the Anti-tippers WARNING After ANY adjustments, repair or service and BEFORE use, make sure all attachment hardware...
Owners Manual
Page 60
...Invacare Corporation Part No. 1106638 Rev B - 10/02 Do not return products to the original purchaser/user of the defect and, if the product is serialized, indicate the serial number. THE WARRANTY SHALL NOT APPLY TO PROBLEMS ARISING FROM NORMAL WEAR OR FAILURE TO ADHERE TO THE THESE INSTRUCTIONS...in replacement part installation or repair of any such product shall be proven to Invacare at Invacare's option. LIMITED WARRANTY PLEASE NOTE: THE WARRANTY BELOW HAS BEEN DRAFTED TO COMPLY WITH FEDERAL LAW APPLICABLE TO PRODUCTS MANUFACTURED AFTER JULY 4, 1975. This warranty gives you specific ...
...Invacare Corporation Part No. 1106638 Rev B - 10/02 Do not return products to the original purchaser/user of the defect and, if the product is serialized, indicate the serial number. THE WARRANTY SHALL NOT APPLY TO PROBLEMS ARISING FROM NORMAL WEAR OR FAILURE TO ADHERE TO THE THESE INSTRUCTIONS...in replacement part installation or repair of any such product shall be proven to Invacare at Invacare's option. LIMITED WARRANTY PLEASE NOTE: THE WARRANTY BELOW HAS BEEN DRAFTED TO COMPLY WITH FEDERAL LAW APPLICABLE TO PRODUCTS MANUFACTURED AFTER JULY 4, 1975. This warranty gives you specific ...


