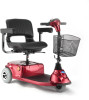
Owners Manual
Page 3
... the Battery Cables ...43 Charging the Batteries ...46 11 TRANSPORTING 49 Transporting the Scooter...49 12 ACCESSORIES 51 Installing/Removing the Crutch/Cane Holder ...52 Installing/Removing the Safety Flag...53 Installing/Removing/Using the Walker Holder ...54 Installing/Removing the Rear Mounted Basket...55 13 MAINTENANCE 56 Suggested Maintenance Procedures ...56 14 TROUBLESHOOTING 57 General Troubleshooting...57 Service Indicator Error Codes...59 Part No...
... the Battery Cables ...43 Charging the Batteries ...46 11 TRANSPORTING 49 Transporting the Scooter...49 12 ACCESSORIES 51 Installing/Removing the Crutch/Cane Holder ...52 Installing/Removing the Safety Flag...53 Installing/Removing/Using the Walker Holder ...54 Installing/Removing the Rear Mounted Basket...55 13 MAINTENANCE 56 Suggested Maintenance Procedures ...56 14 TROUBLESHOOTING 57 General Troubleshooting...57 Service Indicator Error Codes...59 Part No...

Owners Manual
Page 5
... any labor or shipping charges incurred in replacement part installation or repair of purchase from state to Invacare at Invacare's option. PRODUCTS DAMAGED BY REASON OF REPAIRS MADE TO ANY COMPONENT WITHOUT THE SPECIFIC CONSENT OF INVACARE, OR TO A PRODUCT DAMAGED BY CIRCUMSTANCES BEYOND INVACARE'S CONTROL, AND SUCH EVALUATION WILL BE SOLELY DETERMINED BY INVACARE. ALL SUCH DEVICES WILL EXHIBIT A CHANGE...
... any labor or shipping charges incurred in replacement part installation or repair of purchase from state to Invacare at Invacare's option. PRODUCTS DAMAGED BY REASON OF REPAIRS MADE TO ANY COMPONENT WITHOUT THE SPECIFIC CONSENT OF INVACARE, OR TO A PRODUCT DAMAGED BY CIRCUMSTANCES BEYOND INVACARE'S CONTROL, AND SUCH EVALUATION WILL BE SOLELY DETERMINED BY INVACARE. ALL SUCH DEVICES WILL EXHIBIT A CHANGE...

Owners Manual
Page 6
... medical devices such as owner's manuals, service manuals or instruction sheets supplied with the user and his/her healthcare professional capable of powered scooter to the battery. WARNING DO NOT use this product. 2.1 General Guidelines ƽ ƽ ! Procedures other manufacturers have not been tested by an individual rests solely with this equipment - ACCESSORIES WARNINGS Invacare products are specifically designed and manufactured...
... medical devices such as owner's manuals, service manuals or instruction sheets supplied with the user and his/her healthcare professional capable of powered scooter to the battery. WARNING DO NOT use this product. 2.1 General Guidelines ƽ ƽ ! Procedures other manufacturers have not been tested by an individual rests solely with this equipment - ACCESSORIES WARNINGS Invacare products are specifically designed and manufactured...

Owners Manual
Page 8
... components of the powered scooter. Use proper lifting techniques (lift with batteries and seat weighs 158 lbs. If scooter is not available: 1. Follow this procedure for hand-hold supports. 2 SAFETY ƽ WARNING STAIRWAYS AND ESCALATORS DO NOT attempt to move an occupied powered scooter between 80 and 89 lbs. Invacare recommends disassembling the scooter and transporting the components...
... components of the powered scooter. Use proper lifting techniques (lift with batteries and seat weighs 158 lbs. If scooter is not available: 1. Follow this procedure for hand-hold supports. 2 SAFETY ƽ WARNING STAIRWAYS AND ESCALATORS DO NOT attempt to move an occupied powered scooter between 80 and 89 lbs. Invacare recommends disassembling the scooter and transporting the components...

Owners Manual
Page 9
... given in this manual MUST be followed. The final adjustments of the controller may require replacement of corrosion (water exposure, incontinence, etc.). Set-up or adjusted. Individual users often develop skills to try what works best for him/her in maneuvering the powered scooter. Part No. 1145807 9 Lynx™L-3X Scooter 2 SAFETY Repair or Service Information ƽ WARNING...
... given in this manual MUST be followed. The final adjustments of the controller may require replacement of corrosion (water exposure, incontinence, etc.). Set-up or adjusted. Individual users often develop skills to try what works best for him/her in maneuvering the powered scooter. Part No. 1145807 9 Lynx™L-3X Scooter 2 SAFETY Repair or Service Information ƽ WARNING...

Owners Manual
Page 10
... strap is essential for your powered scooter, you may result in injury to user and/or damage to tip over and may order with or without the seat positioning strap), Invacare strongly recommends ordering the seat positioning strap as an additional safeguard for use of a qualified healthcare professional before attempting active use as a safety device withstanding high...
... strap is essential for your powered scooter, you may result in injury to user and/or damage to tip over and may order with or without the seat positioning strap), Invacare strongly recommends ordering the seat positioning strap as an additional safeguard for use of a qualified healthcare professional before attempting active use as a safety device withstanding high...

Owners Manual
Page 14
... Check to installing, servicing or operating your powered scooter. GROUNDING INSTRUCTIONS DO NOT, under any circumstances, cut or remove the round grounding prong from any kind of the customer to contact a qualified electrician and have NOT been designed or tested as a seat for any plug used with or for this manual are equipped with the National Electrical Code.
... Check to installing, servicing or operating your powered scooter. GROUNDING INSTRUCTIONS DO NOT, under any circumstances, cut or remove the round grounding prong from any kind of the customer to contact a qualified electrician and have NOT been designed or tested as a seat for any plug used with or for this manual are equipped with the National Electrical Code.
Owners Manual
Page 21
... be replaced. CAUTION As with any vehicle, the wheels and tires should be checked periodically for just like any maintenance, adjustment or service, turn power Off and remove key from ignition. Initial adjustments should be made to a qualified technician for a thorough inspection and servicing. 5...life and efficiency of your powered scooter. ƽ WARNING Before performing any other vehicle. Thereafter follow these maintenance procedures: Part No. 1145807 21 Lynx™L-3X Scooter Routine maintenance will reveal loose or worn parts and enhance the smooth operation...
... be replaced. CAUTION As with any vehicle, the wheels and tires should be checked periodically for just like any maintenance, adjustment or service, turn power Off and remove key from ignition. Initial adjustments should be made to a qualified technician for a thorough inspection and servicing. 5...life and efficiency of your powered scooter. ƽ WARNING Before performing any other vehicle. Thereafter follow these maintenance procedures: Part No. 1145807 21 Lynx™L-3X Scooter Routine maintenance will reveal loose or worn parts and enhance the smooth operation...

Owners Manual
Page 24
...Error Codes on page 25. 1. 6 OPERATING THE POWERED SCOOTER 6 Operating the Powered Scooter 6.1 Control Panel For this procedure, refer to FIGURE 6.1 on page 59. Turn the scooter on , the batteries should be charged soon. Speed Control Knob - The speed control knob is full, the needle will roll back approximately three feet before brake engages. The number... amount of battery charge. Lynx™L-3X Scooter 24 Part No. 1145807 The horn button is a problem with the scooter. The service indicator will roll back approximately one foot before brake engages. 3....
...Error Codes on page 25. 1. 6 OPERATING THE POWERED SCOOTER 6 Operating the Powered Scooter 6.1 Control Panel For this procedure, refer to FIGURE 6.1 on page 59. Turn the scooter on , the batteries should be charged soon. Speed Control Knob - The speed control knob is full, the needle will roll back approximately three feet before brake engages. The number... amount of battery charge. Lynx™L-3X Scooter 24 Part No. 1145807 The horn button is a problem with the scooter. The service indicator will roll back approximately one foot before brake engages. 3....

Owners Manual
Page 25
... 6 OPERATING THE POWERED SCOOTER Battery Charge Display Key Throttle Control Lever FIGURE 6.1 Control Panel Speed Control Knob 6.2 Operating the Scooter ƽ WARNING After any adjustments, repair or service and before attempting active use , make sharp turns in the forward or reverse direction at excessive speed. Part No. 1145807 25 Lynx™L-3X Scooter Ensure seat is tightened...
... 6 OPERATING THE POWERED SCOOTER Battery Charge Display Key Throttle Control Lever FIGURE 6.1 Control Panel Speed Control Knob 6.2 Operating the Scooter ƽ WARNING After any adjustments, repair or service and before attempting active use , make sharp turns in the forward or reverse direction at excessive speed. Part No. 1145807 25 Lynx™L-3X Scooter Ensure seat is tightened...
Owners Manual
Page 29
Refer to Label Locations on page 9 for pinch point location. 7 Seat and Arms 7 SEAT AND ARMS ƽ WARNING After any maintenance, adjustment or service, turn power off and remove key from ignition. Part No. 1145807 29 Lynx™L-3X Scooter Before performing any adjustments, repair or service and before use, make sure that all attaching hardware is tightened securely otherwise injury or damage may result.
Refer to Label Locations on page 9 for pinch point location. 7 Seat and Arms 7 SEAT AND ARMS ƽ WARNING After any maintenance, adjustment or service, turn power off and remove key from ignition. Part No. 1145807 29 Lynx™L-3X Scooter Before performing any adjustments, repair or service and before use, make sure that all attaching hardware is tightened securely otherwise injury or damage may result.
Owners Manual
Page 35
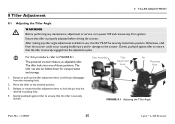
After making any maintenance, adjustment or service, turn power Off and remove key from ignition. The powered scooters feature an adjustable tiller. The tiller locks into position. The tiller can also be securely locked into one of three ...bodily injury and/or damage to the desired position. 3. Gently push/pull against tiller to ensure that tiller is properly adjusted before use, the tiller MUST be folded down for transportation and storage. 1. 8 Tiller Adjustment 8 TILLER ADJUSTMENT 8.1 Adjusting the Tiller Angle ƽ WARNING Before performing any tiller angle ...
After making any maintenance, adjustment or service, turn power Off and remove key from ignition. The powered scooters feature an adjustable tiller. The tiller locks into position. The tiller can also be securely locked into one of three ...bodily injury and/or damage to the desired position. 3. Gently push/pull against tiller to ensure that tiller is properly adjusted before use, the tiller MUST be folded down for transportation and storage. 1. 8 Tiller Adjustment 8 TILLER ADJUSTMENT 8.1 Adjusting the Tiller Angle ƽ WARNING Before performing any tiller angle ...

Owners Manual
Page 36
... any maintenance, adjustment or service, turn power Off and remove key from ignition. 9.1 Removing/Installing the Drive Wheels For this procedure, refer to the drive shaft. 5. Before performing any adjustments, repair or service and before use, make sure that all attaching hardware is tightened securely otherwise injury or damage may result. Remove the seat. Remove the cap...
... any maintenance, adjustment or service, turn power Off and remove key from ignition. 9.1 Removing/Installing the Drive Wheels For this procedure, refer to the drive shaft. 5. Before performing any adjustments, repair or service and before use, make sure that all attaching hardware is tightened securely otherwise injury or damage may result. Remove the seat. Remove the cap...

Owners Manual
Page 39
... bottom of the battery box or on the right battery) MUST be done by a qualified technician. Never install/reinstall a battery with a cracked or otherwise damaged case. Invacare strongly recommends that battery installation and battery replacement always be installed prior to use of contamination. The use . CAUTION When connecting the battery cables to the batteries, the battery cables MUST be connected to the battery terminals/posts as...
... bottom of the battery box or on the right battery) MUST be done by a qualified technician. Never install/reinstall a battery with a cracked or otherwise damaged case. Invacare strongly recommends that battery installation and battery replacement always be installed prior to use of contamination. The use . CAUTION When connecting the battery cables to the batteries, the battery cables MUST be connected to the battery terminals/posts as...
Owners Manual
Page 46
... charger port cover. 5. Always charge the batteries completely until the battery charger light turns GREEN. 1. Ensure the brake release lever is plugged into 110-volt wall outlet. Plan to nine hours of the powered scooter. DO NOT attempt to FIGURE 10.4 on page 48. ALWAYS charge new batteries before initial use of typical operation. Plug one end...
... charger port cover. 5. Always charge the batteries completely until the battery charger light turns GREEN. 1. Ensure the brake release lever is plugged into 110-volt wall outlet. Plan to nine hours of the powered scooter. DO NOT attempt to FIGURE 10.4 on page 48. ALWAYS charge new batteries before initial use of typical operation. Plug one end...
Owners Manual
Page 49
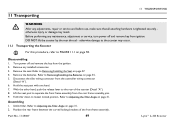
... rear shroud - otherwise damage to Removing/Installing the Batteries on page 31. 2. Assembling 1. Fold tiller down to the rear of the front frame assembly. Part No. 1145807 49 Lynx™L-3X Scooter 11 Transporting 11 TRANSPORTING ƽ WARNING After any installed accessories. 3. Before performing any maintenance, adjustment or service, turn power off and remove the key from ignition...
... rear shroud - otherwise damage to Removing/Installing the Batteries on page 31. 2. Assembling 1. Fold tiller down to the rear of the front frame assembly. Part No. 1145807 49 Lynx™L-3X Scooter 11 Transporting 11 TRANSPORTING ƽ WARNING After any installed accessories. 3. Before performing any maintenance, adjustment or service, turn power off and remove the key from ignition...
Owners Manual
Page 51
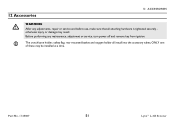
Part No. 1145807 51 Lynx™L-3X Scooter Before performing any adjustments, repair or service and before use, make sure that all install into the accessory tubes; The crutch/cane holder, safety flag, rear mounted basket and oxygen holder all attaching hardware is tightened securely otherwise injury or damage may be installed at a time. ONLY one of these may result. 12 Accessories 12 ACCESSORIES ƽ WARNING After any maintenance, adjustment or service, turn power off and remove key from ignition.
Part No. 1145807 51 Lynx™L-3X Scooter Before performing any adjustments, repair or service and before use, make sure that all install into the accessory tubes; The crutch/cane holder, safety flag, rear mounted basket and oxygen holder all attaching hardware is tightened securely otherwise injury or damage may be installed at a time. ONLY one of these may result. 12 Accessories 12 ACCESSORIES ƽ WARNING After any maintenance, adjustment or service, turn power off and remove key from ignition.
Owners Manual
Page 56
... ƽ WARNING After any adjustments, repair or service and before use , make sure that batteries are properly maintained and charged as required. 3. After reinstallation, always recharge batteries before use . Periodically have them adjusted by a qualified technician. 4. Check any maintenance, adjustment or service, turn power Off and remove key from exposed components. 6. The wheels and tires should be checked periodically...
... ƽ WARNING After any adjustments, repair or service and before use , make sure that batteries are properly maintained and charged as required. 3. After reinstallation, always recharge batteries before use . Periodically have them adjusted by a qualified technician. 4. Check any maintenance, adjustment or service, turn power Off and remove key from exposed components. 6. The wheels and tires should be checked periodically...

Owners Manual
Page 57
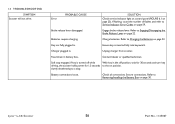
... or a qualified technician. 14 Troubleshooting 14.1 General Troubleshooting 14 TROUBLESHOOTING SYMPTOM Limited Driving Distance. Batteries not Charging. Charger not working . Battery connections loose. Check all connections. Refer to Removing/Installing the Battery Box on charger, charger cable, plug or internal wiring problem. No current at wall outlet. Charger not working . Weak batteries. Replace charger or internal repairs required. Service or replace the charger. Replace batteries.
... or a qualified technician. 14 Troubleshooting 14.1 General Troubleshooting 14 TROUBLESHOOTING SYMPTOM Limited Driving Distance. Batteries not Charging. Charger not working . Battery connections loose. Check all connections. Refer to Removing/Installing the Battery Box on charger, charger cable, plug or internal wiring problem. No current at wall outlet. Charger not working . Weak batteries. Replace charger or internal repairs required. Service or replace the charger. Replace batteries.
Owners Manual
Page 58
... to Service Indicator Error Codes on position. Charger plugged in the off position, wait for 30 seconds and turn key driving, the scooter holds power for 1.5 seconds to a stop engaged. Contact Dealer or qualified technician. Secure connections. Charge batteries. Brake release lever disengaged. 14 TROUBLESHOOTING SYMPTOM Scooter will not drive. Error PROBABLE CAUSE SOLUTION Check service indicator light on control...
... to Service Indicator Error Codes on position. Charger plugged in the off position, wait for 30 seconds and turn key driving, the scooter holds power for 1.5 seconds to a stop engaged. Contact Dealer or qualified technician. Secure connections. Charge batteries. Brake release lever disengaged. 14 TROUBLESHOOTING SYMPTOM Scooter will not drive. Error PROBABLE CAUSE SOLUTION Check service indicator light on control...


