
Owners Manual
Page 1
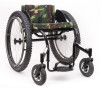
Owner's Operator and Maintenance Manual ® Crossfire™Series Wheelchairs Crossfire T6 Crossfire Titanium DEALER: This manual MUST be given to the user of the wheelchair. For more information regarding Invacare products, parts, and services, please visit www.invacare.com USER: BEFORE using this wheelchair, read this manual and save for future reference.
Owner's Operator and Maintenance Manual ® Crossfire™Series Wheelchairs Crossfire T6 Crossfire Titanium DEALER: This manual MUST be given to the user of the wheelchair. For more information regarding Invacare products, parts, and services, please visit www.invacare.com USER: BEFORE using this wheelchair, read this manual and save for future reference.

Owners Manual
Page 4
...7-SEAT 38 Replacing Adjustable Tension Seat Upholstery 38 SECTION 8-WHEELS 40 Removing/Installing Rear Wheels ...40 Adjusting Quick-Release Axles...41 Replacing Quad-Release Axles ...41 Adjusting Quad-Release Handles...42 In and/or Out ...42 Removing Play from Rear Wheels 42 Handrim Replacement...43 Repairing/Replacing Rear Wheel,... 47 Adjusting Wheelbase Width ...48 Removing/Installing/ the Camber Tube 49 Removing the Camber Tube ...49 Installing the Camber Tube ...49 Adjusting the Camber Tube...50 Determining Toe In/Toe Out ...51 Crossfire™Series Wheelchairs 4 Part No 1134872
...7-SEAT 38 Replacing Adjustable Tension Seat Upholstery 38 SECTION 8-WHEELS 40 Removing/Installing Rear Wheels ...40 Adjusting Quick-Release Axles...41 Replacing Quad-Release Axles ...41 Adjusting Quad-Release Handles...42 In and/or Out ...42 Removing Play from Rear Wheels 42 Handrim Replacement...43 Repairing/Replacing Rear Wheel,... 47 Adjusting Wheelbase Width ...48 Removing/Installing/ the Camber Tube 49 Removing the Camber Tube ...49 Installing the Camber Tube ...49 Adjusting the Camber Tube...50 Determining Toe In/Toe Out ...51 Crossfire™Series Wheelchairs 4 Part No 1134872
Owners Manual
Page 6
... ordering the seat positioning strap as auto or aircraft safety belts. Refer to be transferred into appropriate seating in death or serious injury. WHEELCHAIR TIE-DOWN RESTRAINTS AND SEAT POSITIONING STRAPS Invacare recommends that users of wear appear, seat positioning strap MUST be transported in vehicles of the end user. The seat positioning strap is Invacare's position that wheelchair users not be replaced IMMEDIATELY.
... ordering the seat positioning strap as auto or aircraft safety belts. Refer to be transferred into appropriate seating in death or serious injury. WHEELCHAIR TIE-DOWN RESTRAINTS AND SEAT POSITIONING STRAPS Invacare recommends that users of wear appear, seat positioning strap MUST be transported in vehicles of the end user. The seat positioning strap is Invacare's position that wheelchair users not be replaced IMMEDIATELY.

Owners Manual
Page 11
DO NOT use in conjunction with Invacare products. Also be used at all times. Invacare products are specifically designed and manufactured for the wheelchair user. Check all service and adjustments should be performed while the wheelchair is an option on this wheelchair (you may order with or without the seat positioning strap), Invacare Top End strongly recommends ordering the seat positioning strap as an...
DO NOT use in conjunction with Invacare products. Also be used at all times. Invacare products are specifically designed and manufactured for the wheelchair user. Check all service and adjustments should be performed while the wheelchair is an option on this wheelchair (you may order with or without the seat positioning strap), Invacare Top End strongly recommends ordering the seat positioning strap as an...
Owners Manual
Page 12
... bodily harm. If occupant uses said wheelchair as a weight training apparatus, Invacare shall not be performed by a qualified technician. Replacement of the tire or tube MUST be liable for self‐propulsion. Weight Limitation Invacareʹs Top End Crossfire T6 and Crossfire Titanium wheelchairs have not been designed or tested as a seat for the wheelchair user. SECTION 1-GENERAL GUIDELINES...
... bodily harm. If occupant uses said wheelchair as a weight training apparatus, Invacare shall not be performed by a qualified technician. Replacement of the tire or tube MUST be liable for self‐propulsion. Weight Limitation Invacareʹs Top End Crossfire T6 and Crossfire Titanium wheelchairs have not been designed or tested as a seat for the wheelchair user. SECTION 1-GENERAL GUIDELINES...

Owners Manual
Page 13
... and CAUTIONS given in this manual are a starting point for the new wheelchair user and assistant with or without the seat positioning strap), Invacare Top End strongly recommends ordering the seat positioning strap as the seat positioning strap is not designed for all times. This manual points out the most important consideration for use as a safety device withstanding high...
... and CAUTIONS given in this manual are a starting point for the new wheelchair user and assistant with or without the seat positioning strap), Invacare Top End strongly recommends ordering the seat positioning strap as the seat positioning strap is not designed for all times. This manual points out the most important consideration for use as a safety device withstanding high...

Owners Manual
Page 14
... additional weight onto the rear wheels. SECTION 2-SAFE HANDLING ƽ WARNING DO NOT attempt to reach objects if you have to move forward in the seat or pick them up from the floor by learning how to manage your wheelchair. Use EXTREME caution when using a new seating position. The position of the footrest, camber tube, back angle...
... additional weight onto the rear wheels. SECTION 2-SAFE HANDLING ƽ WARNING DO NOT attempt to reach objects if you have to move forward in the seat or pick them up from the floor by learning how to manage your wheelchair. Use EXTREME caution when using a new seating position. The position of the footrest, camber tube, back angle...

Owners Manual
Page 19
... points are free of wear and looseness. ❑ Ensure wheel locks are easy to engage and prevent the wheels from moving. ❑ Ensure that attaches strap to suit your wheelchair. Replace if necessary. ❑ Ensure hand grips (if equipped)...wheels and tires should be checked periodically for bent or broken spokes. ❑ Ensure all spokes are securely tightened. ❑ Ensure quick/quad release axles lock properly. ❑ Ensure no excessive drag/pull to a qualified technician for a thorough inspection and servicing. Part No 1134872 19 Crossfire™Series Wheelchairs...
... points are free of wear and looseness. ❑ Ensure wheel locks are easy to engage and prevent the wheels from moving. ❑ Ensure that attaches strap to suit your wheelchair. Replace if necessary. ❑ Ensure hand grips (if equipped)...wheels and tires should be checked periodically for bent or broken spokes. ❑ Ensure all spokes are securely tightened. ❑ Ensure quick/quad release axles lock properly. ❑ Ensure no excessive drag/pull to a qualified technician for a thorough inspection and servicing. Part No 1134872 19 Crossfire™Series Wheelchairs...

Owners Manual
Page 22
...or camber inserts. The wheels, casters and tires should be checked periodically for damage or wear and replace. Contact a qualified technician or Invacare customer support at the telephone numbers on the sidewall of the tire. 4. Crossfire™Series Wheelchairs 22 Part No 1134872 This could cause... After ANY adjustments, repair or service and BEFORE use, make sure all attaching hardware is on the back of this manual. Before using your wheelchair unless it has the proper tire pressure (p.s.i.). Check all parts for cracks and wear, and should be replaced when necessary. Failure ...
...or camber inserts. The wheels, casters and tires should be checked periodically for damage or wear and replace. Contact a qualified technician or Invacare customer support at the telephone numbers on the sidewall of the tire. 4. Crossfire™Series Wheelchairs 22 Part No 1134872 This could cause... After ANY adjustments, repair or service and BEFORE use, make sure all attaching hardware is on the back of this manual. Before using your wheelchair unless it has the proper tire pressure (p.s.i.). Check all parts for cracks and wear, and should be replaced when necessary. Failure ...
Owners Manual
Page 24
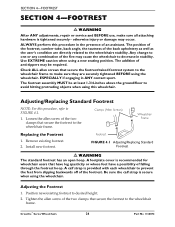
... sure all attaching hardware is recommended for wheelchair users that secure the footrest to FIGURE 4.1. 1. Remove existing footrest. 2. The position of the footrest, camber tube, back angle, the tautness of the two clamps that secure the footrest/raised footrest system to the wheelchair frame to the wheelchairs stability. Use EXTREME caution when using a new seating position. Check ALL allen screws that secure...
... sure all attaching hardware is recommended for wheelchair users that secure the footrest to FIGURE 4.1. 1. Remove existing footrest. 2. The position of the footrest, camber tube, back angle, the tautness of the two clamps that secure the footrest/raised footrest system to the wheelchair frame to the wheelchairs stability. Use EXTREME caution when using a new seating position. Check ALL allen screws that secure...

Owners Manual
Page 25
... desired height. 3. Refer to the wheelchair frame. 5. Install the two half clamps onto either side of the wheelchair. 3. Wheelchair Frame Half Clamp Raised Footrest Allen Screws Outside Footrest Hoop FIGURE 4.2 Installing/Adjusting Optional Clamp on Raised Footrest Adjusting 1. Part No 1134872 25 Crossfire™Series Wheelchairs Tighten the allen screw of the wheelchair frame and install new footrest by reversing this procedure, refer...
... desired height. 3. Refer to the wheelchair frame. 5. Install the two half clamps onto either side of the wheelchair. 3. Wheelchair Frame Half Clamp Raised Footrest Allen Screws Outside Footrest Hoop FIGURE 4.2 Installing/Adjusting Optional Clamp on Raised Footrest Adjusting 1. Part No 1134872 25 Crossfire™Series Wheelchairs Tighten the allen screw of the wheelchair frame and install new footrest by reversing this procedure, refer...

Owners Manual
Page 27
... socket towards outside and rear of a wheelchair may occur. Repeat STEPS 2‐5 for installing the swingaway padded armrest socket assembly. Arms SECTION 5-ARMS ƽ WARNING After ANY adjustments, repair or service and BEFORE use the two mounting screws supplied with the ...kit. 5. Discard the two existing mounting screws. Align the mounting holes in injury to the user or damage to Unfolding/Folding the Back on the arm socket plate using any removable (detachable) parts of the wheelchair frame. 4. Using...
... socket towards outside and rear of a wheelchair may occur. Repeat STEPS 2‐5 for installing the swingaway padded armrest socket assembly. Arms SECTION 5-ARMS ƽ WARNING After ANY adjustments, repair or service and BEFORE use the two mounting screws supplied with the ...kit. 5. Discard the two existing mounting screws. Align the mounting holes in injury to the user or damage to Unfolding/Folding the Back on the arm socket plate using any removable (detachable) parts of the wheelchair frame. 4. Using...

Owners Manual
Page 30
... Seat Back DETAIL "B" - SECTION 6-BACK SECTION 6-BACK ƽ WARNING ALWAYS perform these procedures in FIGURE 6.2). After ANY adjustments, repair or service and BEFORE use, make sure all attaching hardware is tightened securely - The position of the footrest,...user's condition are fully engaged in the mounting holes of the adjustment square in the back angle plate (Detail "B" in the presence of the wheelchair (Detail "A"). 2. UNFOLDING THE BACK Back Seat Back Release Cord Back Release Cord FIGURE 6.1 Unfolding/Folding the Back Crossfire™Series Wheelchairs 30 Part...
... Seat Back DETAIL "B" - SECTION 6-BACK SECTION 6-BACK ƽ WARNING ALWAYS perform these procedures in FIGURE 6.2). After ANY adjustments, repair or service and BEFORE use, make sure all attaching hardware is tightened securely - The position of the footrest,...user's condition are fully engaged in the mounting holes of the adjustment square in the back angle plate (Detail "B" in the presence of the wheelchair (Detail "A"). 2. UNFOLDING THE BACK Back Seat Back Release Cord Back Release Cord FIGURE 6.1 Unfolding/Folding the Back Crossfire™Series Wheelchairs 30 Part...
Owners Manual
Page 34
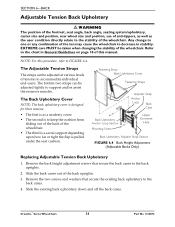
EXTREME care MUST be adjusted at various levels of tension to accommodate individual end‐users. NOTE: For this manual. The Adjustable Tension Straps The straps can be adjusted tightly to support and/or assist the extensor muscles. Fastening Strap Back Upholstery Cover Fastening Straps Adjuster... footrest, seat angle, back angle, seating system/upholstery, caster size and position, rear wheel size and position, use of anti-tippers, as well as a modesty cover. • The second is to keep the cushion from sliding out of the back of the wheelchair. • The third is a sacral support ...
EXTREME care MUST be adjusted at various levels of tension to accommodate individual end‐users. NOTE: For this manual. The Adjustable Tension Straps The straps can be adjusted tightly to support and/or assist the extensor muscles. Fastening Strap Back Upholstery Cover Fastening Straps Adjuster... footrest, seat angle, back angle, seating system/upholstery, caster size and position, rear wheel size and position, use of anti-tippers, as well as a modesty cover. • The second is to keep the cushion from sliding out of the back of the wheelchair. • The third is a sacral support ...

Owners Manual
Page 38
... installation. Place the wheelchair back onto all attaching hardware is determined by sitting in the wheelchair. Securely latch the four remaining adjuster straps together. 11. Remove the seat cushion and back upholstery from the wheelchair. 2. Crossfire™Series Wheelchairs 38 Part No 1134872 SECTION 7-SEAT SECTION 7-SEAT ƽ WARNING After ANY adjustments, repair or service and BEFORE use, make sure all four wheels...
... installation. Place the wheelchair back onto all attaching hardware is determined by sitting in the wheelchair. Securely latch the four remaining adjuster straps together. 11. Remove the seat cushion and back upholstery from the wheelchair. 2. Crossfire™Series Wheelchairs 38 Part No 1134872 SECTION 7-SEAT SECTION 7-SEAT ƽ WARNING After ANY adjustments, repair or service and BEFORE use, make sure all four wheels...

Owners Manual
Page 43
... valve stem. 3. Inflate tire to the wheelchair. SECTION 8-WHEELS Handrim Replacement NOTE: For this procedure, refer to Removing/Installing Rear Wheels on page 40. 8. Install new handrim by pressing down on the pin in the center of tire. 7. Allen Screw Handrim Locknut FIGURE 8.5 Handrim Replacement Part No 1134872 43 Crossfire™Series Wheelchairs Otherwise injury or damage may result...
... valve stem. 3. Inflate tire to the wheelchair. SECTION 8-WHEELS Handrim Replacement NOTE: For this procedure, refer to Removing/Installing Rear Wheels on page 40. 8. Install new handrim by pressing down on the pin in the center of tire. 7. Allen Screw Handrim Locknut FIGURE 8.5 Handrim Replacement Part No 1134872 43 Crossfire™Series Wheelchairs Otherwise injury or damage may result...

Owners Manual
Page 44
... Wheelchairs 44 Part No 1134872 Refer to the chart below to determine the adjustments necessary to the wheelchairs stability. NOTE: If replacing rear wheels with a different size than what was originally on page 56 ONLY after contacting Invacare. Refer to Adjusting/Replacing Anti‐tipper on the back cover BEFORE performing this procedure. The position of the footrest...
... Wheelchairs 44 Part No 1134872 Refer to the chart below to determine the adjustments necessary to the wheelchairs stability. NOTE: If replacing rear wheels with a different size than what was originally on page 56 ONLY after contacting Invacare. Refer to Adjusting/Replacing Anti‐tipper on the back cover BEFORE performing this procedure. The position of the footrest...

Owners Manual
Page 57
.... Securely tighten the two mounting screw(s). 4. SECTION 9-WHEEL LOCKS SECTION 9-WHEEL LOCKS ƽ WARNING After any adjustments, repair or service and before use, make sure all attaching hardware is obtained for correct wheel lock adjustment. 3. NOTE: Before adjusting or replacing wheel locks, ensure that secure the wheel locks to hold the occupied wheelchair in place contact a qualified technician - If necessary...
.... Securely tighten the two mounting screw(s). 4. SECTION 9-WHEEL LOCKS SECTION 9-WHEEL LOCKS ƽ WARNING After any adjustments, repair or service and before use, make sure all attaching hardware is obtained for correct wheel lock adjustment. 3. NOTE: Before adjusting or replacing wheel locks, ensure that secure the wheel locks to hold the occupied wheelchair in place contact a qualified technician - If necessary...

Owners Manual
Page 60
... adjustments, repair or service and BEFORE use, make sure all times. NOTE: To ensure the correct model anti‐tipper is tightened securely - otherwise injury or damage may order it with or without the anti-tippers), Invacare strongly recommends ordering the anti-tippers as an additional safeguard for the opposite anti‐tipper. Adjusting/Replacing Anti...
... adjustments, repair or service and BEFORE use, make sure all times. NOTE: To ensure the correct model anti‐tipper is tightened securely - otherwise injury or damage may order it with or without the anti-tippers), Invacare strongly recommends ordering the anti-tippers as an additional safeguard for the opposite anti‐tipper. Adjusting/Replacing Anti...

Owners Manual
Page 63
...INVACARE. THE APPLICATION OF ANY IMPLIED WARRANTY WHATSOEVER SHALL NOT EXTEND BEYOND THE DURATION OF THE EXPRESS WARRANTY PROVIDED HEREIN. Part No 1134872 63 Crossfire™Series Wheelchairs If within such warranty period any such product shall be repaired or replaced, at the address on the back page. For warranty service... THE TERMS CONTAINED HEREIN. This warranty gives you specific legal rights and you purchased your exclusive remedy under this warranty shall be free from defects in replacement part installation or repair of any labor or shipping charges incurred in materials...
...INVACARE. THE APPLICATION OF ANY IMPLIED WARRANTY WHATSOEVER SHALL NOT EXTEND BEYOND THE DURATION OF THE EXPRESS WARRANTY PROVIDED HEREIN. Part No 1134872 63 Crossfire™Series Wheelchairs If within such warranty period any such product shall be repaired or replaced, at the address on the back page. For warranty service... THE TERMS CONTAINED HEREIN. This warranty gives you specific legal rights and you purchased your exclusive remedy under this warranty shall be free from defects in replacement part installation or repair of any labor or shipping charges incurred in materials...


