Insignia NS-WD1450 Support and Manuals
Get Help and Manuals for this Insignia item
View All Support Options Below
Free Insignia NS-WD1450 manuals!
Problems with Insignia NS-WD1450?
Ask a Question
Free Insignia NS-WD1450 manuals!
Problems with Insignia NS-WD1450?
Ask a Question
Popular Insignia NS-WD1450 Manual Pages
User Manual (English) - Page 1

USER GUIDE
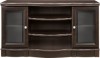
Espresso Finish Closed Cabinet TV Stand
for TVs up to 50"/95 lbs
NS-WD1450/NS-WD1450-C
SAFETY INFORMATION AND SPECIFICATIONS....2 PACKAGE CONTENTS: PARTS 3 PACKAGE CONTENTS: HARDWARE 4 ASSEMBLY INSTRUCTIONS 5 CARE AND MAINTENANCE 19
Before using your new product, please read these instructions to prevent any damage.
User Manual (English) - Page 2

... needed:
Phillips screwdriver
Hammer
2
www.insigniaproducts.com Model #: NS-WD1450
Maximum overall weight: 200 lbs. (90.7 kg) Maximum top shelf weight: 95 lbs. (43 kg) Maximum adj.
Maximum bottom shelf weight: 60 lbs. side shelf weight: 20 lbs.
ESPRESSO FINISH CLOSED CABINET TV STAND
SAFETY INFORMATION AND SPECIFICATIONS
CAUTION: The top surface of the shelf. Maximum...
User Manual (English) - Page 3

... sure that you have a label or an inked letter on the edge to help identify similar parts. Use this part identification to assemble your new TV stand. A Right End
1 K Small Adjustable Shelf
2
B Left End
1 L Long Skirt
1
C Right Upright
1 M Short Skirt
2
D Left Upright
1 O Top Molding
1
E Top
1 P Long Brace
2
F Bottom
1 Q Short Brace
1
G Back
1 R Side ...
User Manual (English) - Page 4

... 50 60 70 80 90 100mm
4
www.insigniaproducts.com
Label
Hardware
Qty. Make sure that you have all the hardware necessary to assemble your new TV stand.
ESPRESSO FINISH CLOSED CABINET TV STAND
PACKAGE CONTENTS: HARDWARE
Note: The table below shows the required hardware.
User Manual (English) - Page 10

....com Note: Make sure that the metal pins (CC) in the outer backs (H) insert into the holes in the ends (A and B).
ESPRESSO FINISH CLOSED CABINET TV STAND
Step 6: Attaching the ends
• Fasten the ends (A and B) to the top (E), then tighten the four Sauder twist-lock® fasteners (U).
User Manual (English) - Page 11

...Hidden cams must be completely tightened. Hidden cams that are not completely tightened may loosen and parts may separate.
FF Surface with eight black 1-7/8" flat head screws (FF).
2 Fasten the ... that are not completely tightened may loosen and parts may separate. CAUTION: Risk of damage or injury. ESPRESSO FINISH CLOSED CABINET TV STAND
Step 7: Attaching the bottom and the short...
User Manual (English) - Page 12

ESPRESSO FINISH CLOSED CABINET TV STAND Step 8: Preparing the braces
• Fasten the eighteen metal brackets (Y) to the long braces (P) and side braces (R) with the edges of the braces. Note: Make ...
User Manual (English) - Page 13

... Surface without metal brackets
R
P
F
Q P
You'll need:
Surface without metal brackets
Phillips screwdriver
FF (2)
www.insigniaproducts.com
FF
II (18)
13
ESPRESSO FINISH CLOSED CABINET TV STAND
Step 9: Attaching the braces
1 Fasten the long braces (P) to the bottom (F) with eight black 9/16" large head screws (II). 2 Fasten the long braces (P) to the...
User Manual (English) - Page 14

The outer base blocks (T) have only one notch and the inner base blocks (S) have two notches.
ESPRESSO FINISH CLOSED CABINET TV STAND
Step 10: Attaching the base blocks and skirts
1 Fasten the base blocks (S and T) to the bottom (F) with eight silver1-1/8" flat head screws (GG). Note: There ...
User Manual (English) - Page 15

... been provided for access through the back. Carefully cut out the holes, as needed. Push on opposite corners, if required, to make it over your TV stand onto its front edges.
Unfold the back (G) and lay it square. 3 Fasten the back (G) to the unit with nails (KK).
User Manual (English) - Page 16

... door (I ) with the uprights (C or D).
3a
I
Z
Mounting screw (depth)
Horizontal adjustment screw
C
Vertical adjustment screw
Hinge plate
3c
A I ). a. c. ESPRESSO FINISH CLOSED CABINET TV STAND
Step 12: Attaching the doors
1 Carefully stand your unit upright. 2 Fasten two hinges (Z) to each door (I
AA HH
BB
You'll need:
JJ (8)
HH (2) Phillips screwdriver
BB (4) Z (4)
16
www...
User Manual (English) - Page 17

...TV STAND
Step 13: Adjusting the doors
Refer to the enlarged diagram to side (horizontal), loosen the horizontal adjustment screws several turns, then
turn and move the doors in or out. Tighten the mounting screw after making adjustments. • To adjust the doors up or
down (vertical), loosen both sets... from side to identify the parts on the hinges. The doors may need :
...
User Manual (English) - Page 18

...Set the adjustable shelves (J and K) onto the metal pins.
2 Apply the warning label (EE) to last for important safety information.
3 This completes the assembly. Note: This is too large or too heavy.
When the TV... CABINET TV STAND
Step 14: Attach miscellaneous hardware and labels
1 Push the rubber sleeves (DD) over one end of this instruction booklet for the life of the TV must ...
User Manual (English) - Page 19

...can support 95 lbs.
• Improperly moving the stand.
• The stand can tip over . • Overloaded shelves can break.
• Never exceed the weight limits shown in the instructions....the stand. Note, older CRT TVs tend to be
unbalanced and prone to your stand correctly and safely. Have a friend help you lift the item and set on furniture specifically designed to avoid the problem:...
User Manual (English) - Page 20

... instruction/education • Installation • Set up to three (3) pixel failures (dots that are dark or incorrectly illuminated) grouped in an area smaller than a private home.
• Modification of the Product ("Warranty Period").
ESPRESSO FINISH CLOSED CABINET TV STAND
ONE-YEAR LIMITED WARRANTY - Products and parts replaced under this warranty cover?
Contact Insignia...
Insignia NS-WD1450 Reviews
We have not received any reviews for Insignia yet.