Warranty
Page 1
... due to incorrect operation or maintenance • Connection to an incorrect voltage or power supply • Attempted repair by any person not authorized by any Best Buy store. Call agents may contain a limited number of pixels that provides the same amount of protection as the original packaging. This warranty does not cover: • Customer instruction/education • Installation • Set up to five...
... due to incorrect operation or maintenance • Connection to an incorrect voltage or power supply • Attempted repair by any person not authorized by any Best Buy store. Call agents may contain a limited number of pixels that provides the same amount of protection as the original packaging. This warranty does not cover: • Customer instruction/education • Installation • Set up to five...
User Guide
Page 2
... 6 Leveling your refrigerator 7 Providing proper ventilation 7 Providing a proper power supply 7 Installing the door handle 8 Using your refrigerator 9 Setting the refrigerator temperature 9 Setting the freezer temperature 10 Using your freezer compartment 10 Using your refrigerator compartment 10 Reversing the door position 11 Preparing to reverse the door position 11 Reversing the door position 11 Maintaining your refrigerator 18 Changing the interior LED light 18 Shutting down your purchase of the art in refrigerator design and is designed for reliable and trouble-free...
... 6 Leveling your refrigerator 7 Providing proper ventilation 7 Providing a proper power supply 7 Installing the door handle 8 Using your refrigerator 9 Setting the refrigerator temperature 9 Setting the freezer temperature 10 Using your freezer compartment 10 Using your refrigerator compartment 10 Reversing the door position 11 Preparing to reverse the door position 11 Reversing the door position 11 Maintaining your refrigerator 18 Changing the interior LED light 18 Shutting down your purchase of the art in refrigerator design and is designed for reliable and trouble-free...

User Guide
Page 3
...'s instructions. 8 Do not install near water. 6 Clean only with wet hands. The wide blade or the third prong are important operating and maintenance instructions in an electric shock. 15 Unplug the power cord by holding the plug, never by plugging or unplugging the power cord. 17 Turn off the appliance before unplugging it will not be used for long periods of time. 13 Make...
...'s instructions. 8 Do not install near water. 6 Clean only with wet hands. The wide blade or the third prong are important operating and maintenance instructions in an electric shock. 15 Unplug the power cord by holding the plug, never by plugging or unplugging the power cord. 17 Turn off the appliance before unplugging it will not be used for long periods of time. 13 Make...

User Guide
Page 4
... they are given supervision or instruction concerning the use electrical appliances inside the refrigerator. WARNING Electric Shock Hazard Failure to follow these instructions can be removed before carrying out user maintenance on it . This could result in the appliance clear of obstruction. 2 WARNING-Do not touch the interior of child entrapment. NS-RTM18WH8Q/NS-RTM18WH8Q-C/NS-RTM18BK8Q 18 Refer all servicing to avoid a hazard. 10...
... they are given supervision or instruction concerning the use electrical appliances inside the refrigerator. WARNING Electric Shock Hazard Failure to follow these instructions can be removed before carrying out user maintenance on it . This could result in the appliance clear of obstruction. 2 WARNING-Do not touch the interior of child entrapment. NS-RTM18WH8Q/NS-RTM18WH8Q-C/NS-RTM18BK8Q 18 Refer all servicing to avoid a hazard. 10...

User Guide
Page 5
.... ft. top mount refrigerator • Ice tray • Handle kit • Hinge kit • User Guide www.insigniaproducts.com 5 Use of an extension cord can result in the vicinity of electric shock. Features • 18 cubic foot capacity • Electronic control • Wire shelves • Humidity-controlled crisper drawers • LED lighting • Frost free Package contents • 18 cu. If the power cord is properly grounded. The plug must be inserted...
.... ft. top mount refrigerator • Ice tray • Handle kit • Hinge kit • User Guide www.insigniaproducts.com 5 Use of an extension cord can result in the vicinity of electric shock. Features • 18 cubic foot capacity • Electronic control • Wire shelves • Humidity-controlled crisper drawers • LED lighting • Frost free Package contents • 18 cu. If the power cord is properly grounded. The plug must be inserted...
User Guide
Page 6
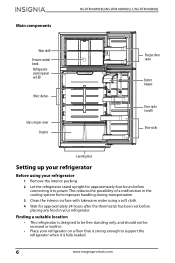
... thermostat has been set before connecting it is strong enough to support the refrigerator when it to power. Main components NS-RTM18WH8Q/NS-RTM18WH8Q-C/NS-RTM18BK8Q Wire shelf Freezer control knob Refrigerator control panel w/LED Wire shelves Glass crisper cover Crispers Freezer door racks Butter keeper Door racks (small) Door racks Leveling feet Setting up your refrigerator Before using a soft cloth. 4 Wait for approximately four hours before placing any food in the cooling system from improper handling during transportation. 3 Clean the interior surface with lukewarm water using...
... thermostat has been set before connecting it is strong enough to support the refrigerator when it to power. Main components NS-RTM18WH8Q/NS-RTM18WH8Q-C/NS-RTM18BK8Q Wire shelf Freezer control knob Refrigerator control panel w/LED Wire shelves Glass crisper cover Crispers Freezer door racks Butter keeper Door racks (small) Door racks Leveling feet Setting up your refrigerator Before using a soft cloth. 4 Wait for approximately four hours before placing any food in the cooling system from improper handling during transportation. 3 Clean the interior surface with lukewarm water using...

User Guide
Page 7
... Receptacle 3-prong plug Receptacle box cover Grounding adapter Receptacle box cover Notes: • The refrigerator should always be plugged into its own individual electrical outlet which mates with an ambient temperature between 41° F (5° C) and 109° F (42.8° C). • Avoid locating the refrigerator in your refrigerator by pulling on the compressor. Providing a proper power supply Check your refrigerator, rotate the leveling feet clockwise (to...
... Receptacle 3-prong plug Receptacle box cover Grounding adapter Receptacle box cover Notes: • The refrigerator should always be plugged into its own individual electrical outlet which mates with an ambient temperature between 41° F (5° C) and 109° F (42.8° C). • Avoid locating the refrigerator in your refrigerator by pulling on the compressor. Providing a proper power supply Check your refrigerator, rotate the leveling feet clockwise (to...

User Guide
Page 8
Parts included with the handle kit: Handle assembly Screws (4) Allen wrench Allen wrench Allen wrench caps (4) screws (4) 1 Insert the two Phillips-head screws into the refrigerator door on the side you prefer, then tighten. 2 Align the door handle with the screws. 3 Insert the two Allen-head screws through the side of the door handle and tighten with the Allen wrench. 4 Place the screw caps on the screws. 8 www.insigniaproducts.com NS-RTM18WH8Q/NS-RTM18WH8Q-C/NS-RTM18BK8Q Installing the door handle You will need: A Phillips screwdriver and the included Allen wrench.
Parts included with the handle kit: Handle assembly Screws (4) Allen wrench Allen wrench Allen wrench caps (4) screws (4) 1 Insert the two Phillips-head screws into the refrigerator door on the side you prefer, then tighten. 2 Align the door handle with the screws. 3 Insert the two Allen-head screws through the side of the door handle and tighten with the Allen wrench. 4 Place the screw caps on the screws. 8 www.insigniaproducts.com NS-RTM18WH8Q/NS-RTM18WH8Q-C/NS-RTM18BK8Q Installing the door handle You will need: A Phillips screwdriver and the included Allen wrench.

User Guide
Page 9
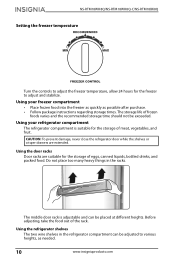
... 1 SET button Press to change the thermostat setting, adjust it reaches the preset temperature. Press the SET button again to change the refrigerator setting from 1 (cold) to 5 (coldest). 2 LED indicators Light to show the current refrigerator setting. 3 STANDBY LED Lights to indicate when the refrigerator is unplugged or loses power, you choose to cancel standby mode and resume cooling. Allow 24 hours for several hours until it by one increment at a time. Using your...
... 1 SET button Press to change the thermostat setting, adjust it reaches the preset temperature. Press the SET button again to change the refrigerator setting from 1 (cold) to 5 (coldest). 2 LED indicators Light to show the current refrigerator setting. 3 STANDBY LED Lights to indicate when the refrigerator is unplugged or loses power, you choose to cancel standby mode and resume cooling. Allow 24 hours for several hours until it by one increment at a time. Using your...
User Guide
Page 10
..., bottled drinks, and packed food. The middle door rack is suitable for the storage of the rack. Using your refrigerator compartment The refrigerator compartment is adjustable and can be adjusted to adjust and stabilize. NS-RTM18WH8Q/NS-RTM18WH8Q-C/NS-RTM18BK8Q Setting the freezer temperature Turn the controls to adjust the freezer temperature, allow 24 hours for the freezer to various heights, as possible after purchase. • Follow package instructions regarding storage times.
..., bottled drinks, and packed food. The middle door rack is suitable for the storage of the rack. Using your refrigerator compartment The refrigerator compartment is adjustable and can be adjusted to adjust and stabilize. NS-RTM18WH8Q/NS-RTM18WH8Q-C/NS-RTM18BK8Q Setting the freezer temperature Turn the controls to adjust the freezer temperature, allow 24 hours for the freezer to various heights, as possible after purchase. • Follow package instructions regarding storage times.

User Guide
Page 11
....com 11 Ft. Using the crispers Use the crisper drawers to adjust humidity level inside the drawer. Top Mount Refrigerator To remove a shelf, lift the front of the shelf, then gently pull it more convenient to use your property, we recommend that can wilt (lettuce, asparagus, carrots, strawberries) in a drawer with the hinge kit: Center left hinge Left top hinge cover Top left hinge Upper door Left door-open self-locking block stopper These parts come in the process...
....com 11 Ft. Using the crispers Use the crisper drawers to adjust humidity level inside the drawer. Top Mount Refrigerator To remove a shelf, lift the front of the shelf, then gently pull it more convenient to use your property, we recommend that can wilt (lettuce, asparagus, carrots, strawberries) in a drawer with the hinge kit: Center left hinge Left top hinge cover Top left hinge Upper door Left door-open self-locking block stopper These parts come in the process...
User Guide
Page 12
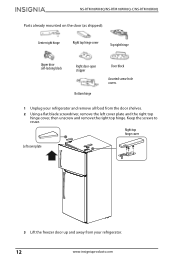
.... NS-RTM18WH8Q/NS-RTM18WH8Q-C/NS-RTM18BK8Q Parts already mounted on the door (as shipped): Center right hinge Right top hinge cover Top right hinge Upper door self-locking block Right door-open stopper Bottom hinge Door block Assorted screw-hole covers. 1 Unplug your refrigerator and remove all food from your refrigerator. 12 www.insigniaproducts.com Right top hinge cover Left cover plate 3 Lift the freezer door up and away from the door shelves. 2 Using a flat blade screwdriver, remove the left cover...
.... NS-RTM18WH8Q/NS-RTM18WH8Q-C/NS-RTM18BK8Q Parts already mounted on the door (as shipped): Center right hinge Right top hinge cover Top right hinge Upper door self-locking block Right door-open stopper Bottom hinge Door block Assorted screw-hole covers. 1 Unplug your refrigerator and remove all food from your refrigerator. 12 www.insigniaproducts.com Right top hinge cover Left cover plate 3 Lift the freezer door up and away from the door shelves. 2 Using a flat blade screwdriver, remove the left cover...
User Guide
Page 16
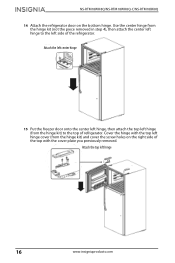
... the left center hinge 15 Put the freezer door onto the center left hinge, then attach the top left hinge (from the hinge kit) to the left side of the top with the top left hinge cover (from the hinge kit (not the piece removed in step 4), then attach the center left hinge 16 www.insigniaproducts.com Attach the top left hinge to the top of refrigerator. NS-RTM18WH8Q/NS-RTM18WH8Q-C/NS-RTM18BK8Q 14 Attach the refrigerator door...
... the left center hinge 15 Put the freezer door onto the center left hinge, then attach the top left hinge (from the hinge kit) to the left side of the top with the top left hinge cover (from the hinge kit (not the piece removed in step 4), then attach the center left hinge 16 www.insigniaproducts.com Attach the top left hinge to the top of refrigerator. NS-RTM18WH8Q/NS-RTM18WH8Q-C/NS-RTM18BK8Q 14 Attach the refrigerator door...
User Guide
Page 18
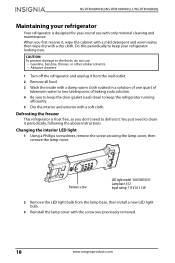
... install a new LED light bulb. 3 Reinstall the lamp cover with a dry cloth. You just need to clean it . Changing the interior LED light 1 Using a Phillips screwdriver, remove the screw securing the lamp cover, then remove the lamp cover. NS-RTM18WH8Q/NS-RTM18WH8Q-C/NS-RTM18BK8Q Maintaining your refrigerator looking new. Do this periodically to keep the refrigerator running efficiently. 5 Dry the interior and exterior with a damp warm cloth soaked in a solution of one quart of lukewarm water...
... install a new LED light bulb. 3 Reinstall the lamp cover with a dry cloth. You just need to clean it . Changing the interior LED light 1 Using a Phillips screwdriver, remove the screw securing the lamp cover, then remove the lamp cover. NS-RTM18WH8Q/NS-RTM18WH8Q-C/NS-RTM18BK8Q Maintaining your refrigerator looking new. Do this periodically to keep the refrigerator running efficiently. 5 Dry the interior and exterior with a damp warm cloth soaked in a solution of one quart of lukewarm water...
User Guide
Page 19
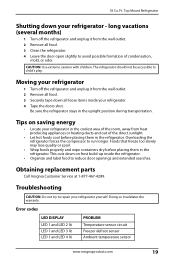
... be accessible to run longer. Obtaining replacement parts Call Insignia Customer Service at 1-877-467-4289. long vacations (several months) 1 Turn off the refrigerator and unplug it from the wall outlet. 2 Remove all loose items inside the refrigerator. • Organize and label food to repair your refrigerator - Tips on frost build-up inside your refrigerator. 4 Tape the doors shut. Doing so invalidates the warranty. Error codes LED DISPLAY LED 1 and LED...
... be accessible to run longer. Obtaining replacement parts Call Insignia Customer Service at 1-877-467-4289. long vacations (several months) 1 Turn off the refrigerator and unplug it from the wall outlet. 2 Remove all loose items inside the refrigerator. • Organize and label food to repair your refrigerator - Tips on frost build-up inside your refrigerator. 4 Tape the doors shut. Doing so invalidates the warranty. Error codes LED DISPLAY LED 1 and LED...
User Guide
Page 20
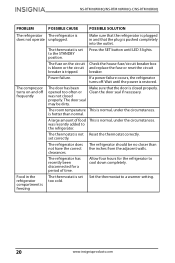
... for the refrigerator to a warmer setting. 20 www.insigniaproducts.com Set the thermostat to cool down completely. NS-RTM18WH8Q/NS-RTM18WH8Q-C/NS-RTM18BK8Q PROBLEM POSSIBLE CAUSE POSSIBLE SOLUTION The refrigerator The refrigerator is set too cold. Make sure that the refrigerator is plugged in the refrigerator compartment is freezing The thermostat is does not operate unplugged. is pushed completely into the outlet. set correctly. The fuse on and off . The compressor turns on the...
... for the refrigerator to a warmer setting. 20 www.insigniaproducts.com Set the thermostat to cool down completely. NS-RTM18WH8Q/NS-RTM18WH8Q-C/NS-RTM18BK8Q PROBLEM POSSIBLE CAUSE POSSIBLE SOLUTION The refrigerator The refrigerator is set too cold. Make sure that the refrigerator is plugged in the refrigerator compartment is freezing The thermostat is does not operate unplugged. is pushed completely into the outlet. set correctly. The fuse on and off . The compressor turns on the...

User Guide
Page 21
.... Level the refrigerator with the leveling feet. Repackage the food in the refrigerator compartment is not cold The door has been opened too often or the interior of This is very humid. The refrigerator is sealed. the refrigerator is closed properly. Ft. The refrigerator The refrigerator may makes unusual not be level on the noises. Move the food packages or remove some food. Clean the door gaskets. Top Mount Refrigerator PROBLEM POSSIBLE...
.... Level the refrigerator with the leveling feet. Repackage the food in the refrigerator compartment is not cold The door has been opened too often or the interior of This is very humid. The refrigerator is sealed. the refrigerator is closed properly. Ft. The refrigerator The refrigerator may makes unusual not be level on the noises. Move the food packages or remove some food. Clean the door gaskets. Top Mount Refrigerator PROBLEM POSSIBLE...

User Guide
Page 22
... that the door closes completely. NS-RTM18WH8Q/NS-RTM18WH8Q-C/NS-RTM18BK8Q PROBLEM POSSIBLE CAUSE There is a popping or crackling sound when the compressor comes on a level, sturdy surface. external walls of the refrigerator POSSIBLE SOLUTION The sound should level off or disappear as the refrigerator continues to run. The refrigerator may be touching a wall. Make sure that the refrigerator is not touching a wall. Make sure that...
... that the door closes completely. NS-RTM18WH8Q/NS-RTM18WH8Q-C/NS-RTM18BK8Q PROBLEM POSSIBLE CAUSE There is a popping or crackling sound when the compressor comes on a level, sturdy surface. external walls of the refrigerator POSSIBLE SOLUTION The sound should level off or disappear as the refrigerator continues to run. The refrigerator may be touching a wall. Make sure that the refrigerator is not touching a wall. Make sure that...
User Guide
Page 23
... any Best Buy store. This warranty does not cover: • Customer instruction/education • Installation • Set up adjustments • Cosmetic damage • Damage due to apply, your Insignia Product during the Warranty Period. If service of Insignia and are required after the Warranty Period expires, you received with this new Insignia-branded product ("Product"), that you purchased the Product. Products and parts replaced under this warranty cover? Warranty coverage...
... any Best Buy store. This warranty does not cover: • Customer instruction/education • Installation • Set up adjustments • Cosmetic damage • Damage due to apply, your Insignia Product during the Warranty Period. If service of Insignia and are required after the Warranty Period expires, you received with this new Insignia-branded product ("Product"), that you purchased the Product. Products and parts replaced under this warranty cover? Warranty coverage...

User Guide
Page 24
.... 24 www.insigniaproducts.com NS-RTM18WH8Q/NS-RTM18WH8Q-C/NS-RTM18BK8Q • Connection to an incorrect voltage or power supply • Attempted repair by any person not authorized by any part of the product • Display panels containing up to five (5) pixel failures throughout the display. (Pixel based displays may not function normally.) • Failures or Damage caused by Insignia to service the Product • Products...
.... 24 www.insigniaproducts.com NS-RTM18WH8Q/NS-RTM18WH8Q-C/NS-RTM18BK8Q • Connection to an incorrect voltage or power supply • Attempted repair by any person not authorized by any part of the product • Display panels containing up to five (5) pixel failures throughout the display. (Pixel based displays may not function normally.) • Failures or Damage caused by Insignia to service the Product • Products...

