RS232 Serial Commands (English)
Page 3
...the command data. Data1: Illegal Code Data2: Not supported function Data3: Wait more time * In this model, TV will not send the status during the standby mode. Color k 11. OSD Select k 14. Remote Control Lock.... Key m k 0 ~ 64 27. OK Acknowledgement [Command2][ ][Set ID][ ][OK][Data][x] The TV transmits ACK (acknowledgement) based on this format when receiving normal data. Balance k c (G p.92) 18. Treble k b (G p.92) 16. Input Select k 03. Back Light m l 0~1 LCD TV Model Only m 0~1 Plasma TV Model Only r 0 ~ 64 s 0 ~ 64 t 0 ~ 64 u 0~3 v 0 ~ ...
...the command data. Data1: Illegal Code Data2: Not supported function Data3: Wait more time * In this model, TV will not send the status during the standby mode. Color k 11. OSD Select k 14. Remote Control Lock.... Key m k 0 ~ 64 27. OK Acknowledgement [Command2][ ][Set ID][ ][OK][Data][x] The TV transmits ACK (acknowledgement) based on this format when receiving normal data. Balance k c (G p.92) 18. Treble k b (G p.92) 16. Input Select k 03. Back Light m l 0~1 LCD TV Model Only m 0~1 Plasma TV Model Only r 0 ~ 64 s 0 ~ 64 t 0 ~ 64 u 0~3 v 0 ~ ...
RS232 Serial Commands (English)
Page 6
...the ATSC tuner automatically maps the channel to , and the Minor is not required when sending a command. ISM Method (Command: j p) (Only Plasma TV model) To avoid having a fixed image remain on /off 1: Low Power on Acknowledgement [q][ ][Set ID][ ][OK/NG][Data][x] 24. Low Power (Command...: j q) (Only Plasma TV model) To control the low power function on screen. Transmission [m][a][ ][Set ID][ ][Data0][ ][Data1] [ ][Data2][ ][Data3][ ][Data4][ ][Data5][Cr] Digital...
...the ATSC tuner automatically maps the channel to , and the Minor is not required when sending a command. ISM Method (Command: j p) (Only Plasma TV model) To avoid having a fixed image remain on /off 1: Low Power on Acknowledgement [q][ ][Set ID][ ][OK/NG][Data][x] 24. Low Power (Command...: j q) (Only Plasma TV model) To control the low power function on screen. Transmission [m][a][ ][Set ID][ ][Data0][ ][Data1] [ ][Data2][ ][Data3][ ][Data4][ ][Data5][Cr] Digital...
User Manual (Spanish)
Page 3
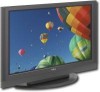
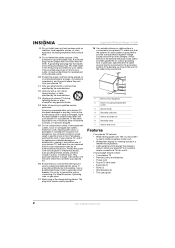
... the cabinet with the manufacturer's instructions. This is normal and does not mean that your plasma TV is defective. This label is located on the back of noise. Insignia NS-PDP50 50" Plasma TV-720P Contents Introduction 1 Safety information 1 Features 2 Front 3 Back 3 Remote control 4 Setting up your plasma TV 5 Installing batteries 5 Bundling cables 5 Grounding 6 Connecting an antenna or cable...
... the cabinet with the manufacturer's instructions. This is normal and does not mean that your plasma TV is defective. This label is located on the back of noise. Insignia NS-PDP50 50" Plasma TV-720P Contents Introduction 1 Safety information 1 Features 2 Front 3 Back 3 Remote control 4 Setting up your plasma TV 5 Installing batteries 5 Bundling cables 5 Grounding 6 Connecting an antenna or cable...
User Manual (Spanish)
Page 4
...upon. Your package should contain: • Your plasma TV • Remote control and batteries • Power cord • Round 75 ohm cable • Eye-bolts (2) • Bolts (2) • Wall brackets (2) • This user guide 2 www.insignia-products.com Pay particular attention to plugs, wall ...supply cord or plug is damaged, liquid has been spilled or objects have a qualified electrician install a separate circuit breaker. Insignia NS-PDP50 50" Plasma TV-720P 8 Do not install near any way, such as being walked on or pinched particularly at plugs, convenience receptacles, and...
...upon. Your package should contain: • Your plasma TV • Remote control and batteries • Power cord • Round 75 ohm cable • Eye-bolts (2) • Bolts (2) • Wall brackets (2) • This user guide 2 www.insignia-products.com Pay particular attention to plugs, wall ...supply cord or plug is damaged, liquid has been spilled or objects have a qualified electrician install a separate circuit breaker. Insignia NS-PDP50 50" Plasma TV-720P 8 Do not install near any way, such as being walked on or pinched particularly at plugs, convenience receptacles, and...
User Manual (Spanish)
Page 5
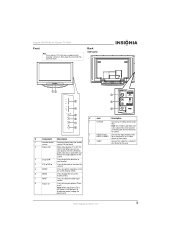
... the on-screen display (OSD). 6 MENU Press to open the on or off. When you turn your plasma TV, this jack. Insignia NS-PDP50 50" Plasma TV-720P Front Note If your plasma TV is off , this jack. You must connect an audio cable to the audio jacks for sound. 2 AUDIO... 3 VOL 4 ENTER 5 MENU 6 INPUT 7 8 # Component Description 1 Remote control Receives signals from the remote sensor control. www.insignia-products.com 3 Note: When your plasma TV stand has a protective film covering, remove it, then wipe the stand with the polishing cloth. Note: An S-Video cable does not ...
... the on-screen display (OSD). 6 MENU Press to open the on or off. When you turn your plasma TV, this jack. Insignia NS-PDP50 50" Plasma TV-720P Front Note If your plasma TV is off , this jack. You must connect an audio cable to the audio jacks for sound. 2 AUDIO... 3 VOL 4 ENTER 5 MENU 6 INPUT 7 8 # Component Description 1 Remote control Receives signals from the remote sensor control. www.insignia-products.com 3 Note: When your plasma TV stand has a protective film covering, remove it, then wipe the stand with the polishing cloth. Note: An S-Video cable does not ...
User Manual (Spanish)
Page 6
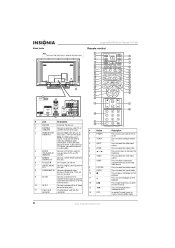
... cable carries sound, so you need to these jacks. In analog TV mode, press to start videotape or DVD playback. A DVI cable does not carry sound. Insignia NS-PDP50 50" Plasma TV-720P Remote control 1 2 MODE TUNER POWER TV 23 3 INPUT DVD 24 4 ZOOM VCR 25 5 6 VIDEO ... +/ - 6 VIDEO 7 COMP 8 PICTURE 9 AUDIO 10 11 12 13 14 CCD Description Press to /HDMI IN 2 these jacks. Do not use your plasma TV on a disc. Press to select a connected component device as a PC (RGB/DVI) monitor. 5 REMOTE Connect a wired remote control to go the previous ...
... cable carries sound, so you need to these jacks. In analog TV mode, press to start videotape or DVD playback. A DVI cable does not carry sound. Insignia NS-PDP50 50" Plasma TV-720P Remote control 1 2 MODE TUNER POWER TV 23 3 INPUT DVD 24 4 ZOOM VCR 25 5 6 VIDEO ... +/ - 6 VIDEO 7 COMP 8 PICTURE 9 AUDIO 10 11 12 13 14 CCD Description Press to /HDMI IN 2 these jacks. Do not use your plasma TV on a disc. Press to select a connected component device as a PC (RGB/DVI) monitor. 5 REMOTE Connect a wired remote control to go the previous ...
User Manual (Spanish)
Page 7
...of used batteries as the video input source. Press to go to select the audio format for a connected computer. Setting up your plasma TV Installing batteries To install remote control batteries: 1 Open the battery compartment cover. 2 Insert two AA batteries into the battery compartment. Press... HDMI 28 DISPLAY 29 PC ADJ 30 Press to select a connected HDMI device as the video input source. Press to select TV as hazardous waste. Insignia NS-PDP50 50" Plasma TV-720P # Button Description 15 EXIT Press to close the on-screen display (OSD). 16 , , , Press to make selections...
...of used batteries as the video input source. Press to go to select the audio format for a connected computer. Setting up your plasma TV Installing batteries To install remote control batteries: 1 Open the battery compartment cover. 2 Insert two AA batteries into the battery compartment. Press... HDMI 28 DISPLAY 29 PC ADJ 30 Press to select a connected HDMI device as the video input source. Press to select TV as hazardous waste. Insignia NS-PDP50 50" Plasma TV-720P # Button Description 15 EXIT Press to close the on-screen display (OSD). 16 , , , Press to make selections...
User Manual (Spanish)
Page 8
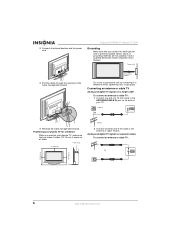
... one end of a 75 ohm cable to the ANTENNA/CABLE IN jack on all external devices and the power cord. Insignia NS-PDP50 50" Plasma TV-720P Grounding Make sure that you connect the earth ground wire to telephone wires, lightening rods, or gas pipes. Power outlet 3 Pull the cables through ...the opening on separate cables To connect an antenna or cable TV: OR ANTENNA/ CABLE IN 4" (10.16 cm) 4" (10.16 cm) 6 www.insignia-products.com 2 Connect all sides. 4" (10.16 cm) 4" (10.16 cm) Antenna 2 Connect the other end of your plasma TV, make sure that you leave 4 inches (10.16 cm) of...
... one end of a 75 ohm cable to the ANTENNA/CABLE IN jack on all external devices and the power cord. Insignia NS-PDP50 50" Plasma TV-720P Grounding Make sure that you connect the earth ground wire to telephone wires, lightening rods, or gas pipes. Power outlet 3 Pull the cables through ...the opening on separate cables To connect an antenna or cable TV: OR ANTENNA/ CABLE IN 4" (10.16 cm) 4" (10.16 cm) 6 www.insignia-products.com 2 Connect all sides. 4" (10.16 cm) 4" (10.16 cm) Antenna 2 Connect the other end of your plasma TV, make sure that you leave 4 inches (10.16 cm) of...
User Manual (Spanish)
Page 9
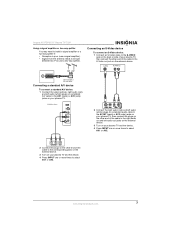
www.insignia-products.com 7 ANTENNA/ CABLE IN Signal amplifier or two-way splitter Connecting a standard A/V device To connect a standard A/V device: 1 Connect the video (yellow), right audio (red), and left audio out jacks on the external device. 3 Turn on your plasma TV and the device. 4 Press ...INPUT one or more times to select AV1 or AV2. Insignia NS-PDP50 50" Plasma TV-720P Using a signal amplifier or two-way splitter You may need to install a signal amplifier...
www.insignia-products.com 7 ANTENNA/ CABLE IN Signal amplifier or two-way splitter Connecting a standard A/V device To connect a standard A/V device: 1 Connect the video (yellow), right audio (red), and left audio out jacks on the external device. 3 Turn on your plasma TV and the device. 4 Press ...INPUT one or more times to select AV1 or AV2. Insignia NS-PDP50 50" Plasma TV-720P Using a signal amplifier or two-way splitter You may need to install a signal amplifier...
User Manual (Spanish)
Page 10
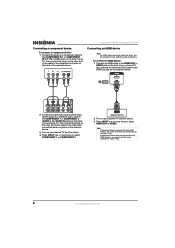
... to the component out jacks on the back of the external device. Connecting an HDMI device Note An HDMI cable carries both video and audio. Insignia NS-PDP50 50" Plasma TV-720P Connecting a component device To connect a component device: 1 Connect the plugs on a component cable to the COMPONENT IN 1 or COMPONENT IN 2 (Y, Pb,... additional audio connections. To connect an HDMI device: 1 Connect an HDMI cable to the HDMI1/DVI or HDMI2 jack on the back of your plasma TV, then connect the other end of the cable to the HDMI out jack on the external device. 2 Connect the right audio (red) and ...
... to the component out jacks on the back of the external device. Connecting an HDMI device Note An HDMI cable carries both video and audio. Insignia NS-PDP50 50" Plasma TV-720P Connecting a component device To connect a component device: 1 Connect the plugs on a component cable to the COMPONENT IN 1 or COMPONENT IN 2 (Y, Pb,... additional audio connections. To connect an HDMI device: 1 Connect an HDMI cable to the HDMI1/DVI or HDMI2 jack on the back of your plasma TV, then connect the other end of the cable to the HDMI out jack on the external device. 2 Connect the right audio (red) and ...
User Manual (Spanish)
Page 11
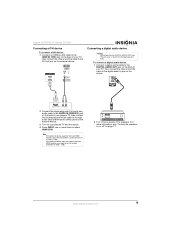
... connect the other end of the cable to the DVI out jack on the external device. For more times to select HDMI1/DVI. www.insignia-products.com 9 Insignia NS-PDP50 50" Plasma TV-720P Connecting a DVI device To connect a DVI device: 1 Connect an HDMI-to-DVI cable to the HDMI IN 1/DVI jack on the back...
... connect the other end of the cable to the DVI out jack on the external device. For more times to select HDMI1/DVI. www.insignia-products.com 9 Insignia NS-PDP50 50" Plasma TV-720P Connecting a DVI device To connect a DVI device: 1 Connect an HDMI-to-DVI cable to the HDMI IN 1/DVI jack on the back...
User Manual (Spanish)
Page 12
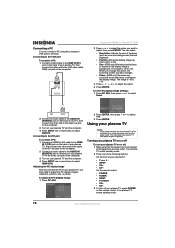
...audio cable to the AUDIO IN (RGB/DVI) jack on the back of your plasma TV to adjust the option. 4 Press ENTER. Turning your plasma TV on or off To turn off your plasma TV on the remote control. Insignia NS-PDP50 50" Plasma TV-720P 2 Press or to select the option you may need to the VGA ...(also called RGB) out jack on your plasma TV for an extended time, unplug the power cord...
...audio cable to the AUDIO IN (RGB/DVI) jack on the back of your plasma TV to adjust the option. 4 Press ENTER. Turning your plasma TV on or off To turn off your plasma TV on the remote control. Insignia NS-PDP50 50" Plasma TV-720P 2 Press or to select the option you may need to the VGA ...(also called RGB) out jack on your plasma TV for an extended time, unplug the power cord...
User Manual (Spanish)
Page 13
...to select the video source. When you press INPUT, only the video sources that have devices connected to select SETUP. www.insignia-products.com 11 Insignia NS-PDP50 50" Plasma TV-720P Selecting the video input source To select the video input source: • Press TUNER or INPUT to select the ...input source you can select digital or analog TV. Note Your plasma TV remembers the last selected video input source even if the power cord...
...to select the video source. When you press INPUT, only the video sources that have devices connected to select SETUP. www.insignia-products.com 11 Insignia NS-PDP50 50" Plasma TV-720P Selecting the video input source To select the video input source: • Press TUNER or INPUT to select the ...input source you can select digital or analog TV. Note Your plasma TV remembers the last selected video input source even if the power cord...
User Manual (Spanish)
Page 14
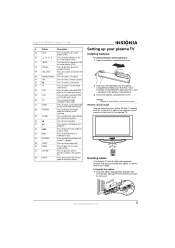
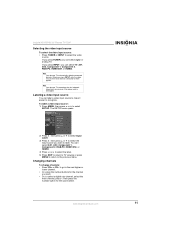
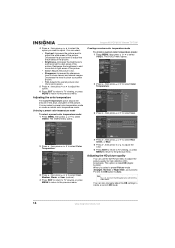
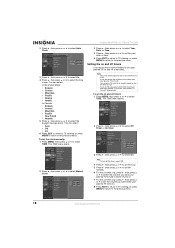
... the EZ Scan menu When you scan from the EZ Scan menu, or you let your plasma TV scan for available channels in your area and stores them in the channel list. Your plasma TV skips any channels that you can create the channel list manually. Note Make sure that have ...channel list When you first set up the channel list when you press CH+ or CH-, your plasma TV. You should update the channel list when your plasma TV scans for both ANTENNA and CABLE channels. Insignia NS-PDP50 50" Plasma TV-720P Adjusting the volume To adjust the volume: • Press VOL+ or VOL- You can ...
... the EZ Scan menu When you scan from the EZ Scan menu, or you let your plasma TV scan for available channels in your area and stores them in the channel list. Your plasma TV skips any channels that you can create the channel list manually. Note Make sure that have ...channel list When you first set up the channel list when you press CH+ or CH-, your plasma TV. You should update the channel list when your plasma TV scans for both ANTENNA and CABLE channels. Insignia NS-PDP50 50" Plasma TV-720P Adjusting the volume To adjust the volume: • Press VOL+ or VOL- You can ...
User Manual (Spanish)
Page 15
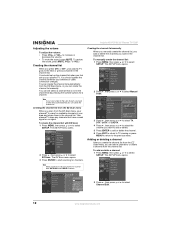
...can also select a preset picture mode from the Video menu. Note You can select a preset picture mode or create a custom picture mode. www.insignia-products.com 13 The SETUP menu opens. Selecting a preset picture mode To select a preset picture mode: 1 Press PICTURE one or more times to...menu. Note A favorite channel has a heart icon next to it. 5 Press EXIT to return to TV viewing, or press MENU to return to select VIDEO. Note To go to select Channel Edit. 3 Press . Insignia NS-PDP50 50" Plasma TV-720P 3 Press . The VIDEO menu opens. 2 Press , then press or to a favorite channel, ...
...can also select a preset picture mode from the Video menu. Note You can select a preset picture mode or create a custom picture mode. www.insignia-products.com 13 The SETUP menu opens. Selecting a preset picture mode To select a preset picture mode: 1 Press PICTURE one or more times to...menu. Note A favorite channel has a heart icon next to it. 5 Press EXIT to return to TV viewing, or press MENU to return to select VIDEO. Note To go to select Channel Edit. 3 Press . Insignia NS-PDP50 50" Plasma TV-720P 3 Press . The VIDEO menu opens. 2 Press , then press or to a favorite channel, ...
User Manual (Spanish)
Page 16
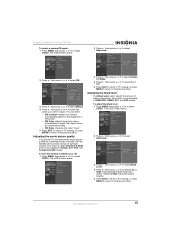
..., then press or to adjust the option. 6 Press EXIT to return to TV viewing, or press MENU to return to the previous menu. Decreases the level to show cleaner and clearer images. Insignia NS-PDP50 50" Plasma TV-720P 4 Press , then press or to select the option you select a preset... Picture mode (Daylight, Normal, or Night time), your plasma TV sets the DB option to Auto. Creating a custom color temperature mode...
..., then press or to adjust the option. 6 Press EXIT to return to TV viewing, or press MENU to return to the previous menu. Decreases the level to show cleaner and clearer images. Insignia NS-PDP50 50" Plasma TV-720P 4 Press , then press or to select the option you select a preset... Picture mode (Daylight, Normal, or Night time), your plasma TV sets the DB option to Auto. Creating a custom color temperature mode...
User Manual (Spanish)
Page 17
...to return to select Low or High. Selecting High makes the picture brighter. 5 Press EXIT to return to TV viewing, or press MENU to return to select VIDEO. Insignia NS-PDP50 50" Plasma TV-720P To create a custom DB mode: 1 Press MENU, then press or to the previous menu. Adjusting... the movie picture quality Your plasma TV can select: • DB Contrast-Adjusts the contrast automatically based on or off: 1 Press...
...to return to select Low or High. Selecting High makes the picture brighter. 5 Press EXIT to return to TV viewing, or press MENU to return to select VIDEO. Insignia NS-PDP50 50" Plasma TV-720P To create a custom DB mode: 1 Press MENU, then press or to the previous menu. Adjusting... the movie picture quality Your plasma TV can select: • DB Contrast-Adjusts the contrast automatically based on or off: 1 Press...
User Manual (Spanish)
Page 18
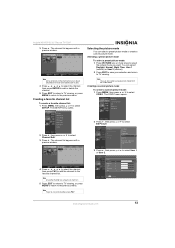
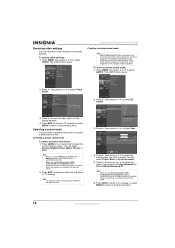
...select AUDIO. Note When you switch to another mode, the balance is restored to the previous value. 6 Press EXIT to return to TV viewing, or press MENU to return to select VIDEO. Dialog clarity, bass enrichment, and the addition of any multi-channel format without ... Front Surround. 5 Press , then press or to the factory defaults. The options for Front Surround are Off or SRS TruSurround XT. Insignia NS-PDP50 50" Plasma TV-720P Creating a custom sound mode Note SRS TruSurround XT takes advantage of stereo audio enhancement produces an impressive sound experience from the AUDIO menu...
...select AUDIO. Note When you switch to another mode, the balance is restored to the previous value. 6 Press EXIT to return to TV viewing, or press MENU to return to select VIDEO. Dialog clarity, bass enrichment, and the addition of any multi-channel format without ... Front Surround. 5 Press , then press or to the factory defaults. The options for Front Surround are Off or SRS TruSurround XT. Insignia NS-PDP50 50" Plasma TV-720P Creating a custom sound mode Note SRS TruSurround XT takes advantage of stereo audio enhancement produces an impressive sound experience from the AUDIO menu...
User Manual (Spanish)
Page 19
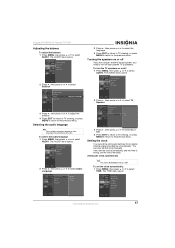
... previous menu. Selecting the audio language Note The available languages depend on or off your plasma TV's speakers. The TIME menu opens. To select the audio language: 1 Press MENU, then press or to the previous menu. www.insignia-products.com 17 To turn off If you are using an external sound system, you... can also set the clock automatically: 1 Press MENU, then press or to select AUDIO. To set the clock manually. You can set the clock manually. Insignia NS-PDP50 50" Plasma TV-720P Adjusting the balance To adjust the balance: 1 Press MENU, then press or to select TIME.
... previous menu. Selecting the audio language Note The available languages depend on or off your plasma TV's speakers. The TIME menu opens. To select the audio language: 1 Press MENU, then press or to the previous menu. www.insignia-products.com 17 To turn off If you are using an external sound system, you... can also set the clock automatically: 1 Press MENU, then press or to select AUDIO. To set the clock manually. You can set the clock manually. Insignia NS-PDP50 50" Plasma TV-720P Adjusting the balance To adjust the balance: 1 Press MENU, then press or to select TIME.
User Manual (Spanish)
Page 20
Insignia NS-PDP50 50" Plasma TV-720P 2 Press , then press or to select Auto Clock. 3 Press , then press or to select On. 4 Press , then press or to select On. The TIME ... times to the same time, your plasma TV turns off. Your plasma TV must set the volume you do not press any button within two hours after your plasma TV turns on, your plasma TV turns on timer to the previous menu. 18 www.insignia-products.com If you want when your plasma TV turns off timers to select TIME. Note...
Insignia NS-PDP50 50" Plasma TV-720P 2 Press , then press or to select Auto Clock. 3 Press , then press or to select On. 4 Press , then press or to select On. The TIME ... times to the same time, your plasma TV turns off. Your plasma TV must set the volume you do not press any button within two hours after your plasma TV turns on, your plasma TV turns on timer to the previous menu. 18 www.insignia-products.com If you want when your plasma TV turns off timers to select TIME. Note...


