
Documentation
Page 2
... 8 Microwave oven 8 Control panel 9 Setting up your microwave oven 9 Installing the turntable 10 Using your microwave 10 Tips for the best results 10 Cooking in your microwave 11 Setting the clock 12 Using the kitchen timer 12 Cooking quickly 12 Defrosting in your microwave 13 Cooking with the sensor 13 Using the stop/clear button 15 Using the light 15 Using the vent fan 15 Using the turntable 15 Using the child lock 15 Cleaning and maintaining your microwave 16 Cleaning the outside of your microwave 16 Cleaning the inside of your microwave 16 Cleaning and replacing...
... 8 Microwave oven 8 Control panel 9 Setting up your microwave oven 9 Installing the turntable 10 Using your microwave 10 Tips for the best results 10 Cooking in your microwave 11 Setting the clock 12 Using the kitchen timer 12 Cooking quickly 12 Defrosting in your microwave 13 Cooking with the sensor 13 Using the stop/clear button 15 Using the light 15 Using the vent fan 15 Using the turntable 15 Using the child lock 15 Cleaning and maintaining your microwave 16 Cleaning the outside of your microwave 16 Cleaning the inside of your microwave 16 Cleaning and replacing...
Documentation
Page 3
... repaired by anyone except properly qualified service personnel. NS-OTR16WH8(-C)_BS8(-C)_SS8(-C)_17-0277_MAN_V1_ENG.fm Page 3 Tuesday, June 27, 2017 3:46 PM 1.6 Cu. Over-the-Range Microwave SAFETY INFORMATION For your appliance, follow the specific "Precautions to avoid possible exposure to microwave energy. Do not use . • As with the door open because this can result in water. • Keep the cord...
... repaired by anyone except properly qualified service personnel. NS-OTR16WH8(-C)_BS8(-C)_SS8(-C)_17-0277_MAN_V1_ENG.fm Page 3 Tuesday, June 27, 2017 3:46 PM 1.6 Cu. Over-the-Range Microwave SAFETY INFORMATION For your appliance, follow the specific "Precautions to avoid possible exposure to microwave energy. Do not use . • As with the door open because this can result in water. • Keep the cord...
Documentation
Page 4
... REMOVE THE WAVEGUIDE COVER. • Read and SAVE the User Guide and Installation Guide. Corrosive cleaning agents, such as misaligned or bent door, damaged door seals and sealing surfaces, broken or loose door hinges and latches, and dents inside the microwave oven ignite, keep the microwave oven door closed, turn the fan on ventilation openings, louver, or grease filters. • Use care when cleaning the louver and the grease filters. Lift the carton off power at least for the electric...
... REMOVE THE WAVEGUIDE COVER. • Read and SAVE the User Guide and Installation Guide. Corrosive cleaning agents, such as misaligned or bent door, damaged door seals and sealing surfaces, broken or loose door hinges and latches, and dents inside the microwave oven ignite, keep the microwave oven door closed, turn the fan on ventilation openings, louver, or grease filters. • Use care when cleaning the louver and the grease filters. Lift the carton off power at least for the electric...
Documentation
Page 5
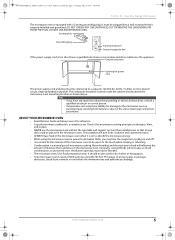
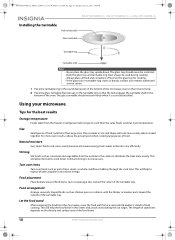
... be located inside the cabinet directly above the microwave oven mounting location as uncovered ones. ABOUT YOUR MICROWAVE OVEN • Read this User Guide and always save it is on to the touch when cooking or reheating. • Condensation is a normal part of microwave cooking. Ground receptacle Opening for power cord The power supply cord and plug must not be warm to absorb the microwave energy. • When using recipes or package directions, check food a minute...
... be located inside the cabinet directly above the microwave oven mounting location as uncovered ones. ABOUT YOUR MICROWAVE OVEN • Read this User Guide and always save it is on to the touch when cooking or reheating. • Condensation is a normal part of microwave cooking. Ground receptacle Opening for power cord The power supply cord and plug must not be warm to absorb the microwave energy. • When using recipes or package directions, check food a minute...

Documentation
Page 6
.... • Cover foods while cooking. NS-OTR16WH8(-C)_BS8(-C)_SS8(-C)_17-0277_MAN_V1_ENG.fm Page 6 Tuesday, June 27, 2017 3:46 PM NS-OTR16WH8(-C), NS-OTR16BS8(-C), or NS-OTR16SS8(-C) ABOUT MICROWAVE COOKING • Arrange food carefully. Remove the food from outside of the dish to be avoided" on page 7 as needed. Cookware and other materials must be pierced before dense, thick areas are cooked thoroughly. • Stir foods from the microwave oven and stir...
.... • Cover foods while cooking. NS-OTR16WH8(-C)_BS8(-C)_SS8(-C)_17-0277_MAN_V1_ENG.fm Page 6 Tuesday, June 27, 2017 3:46 PM NS-OTR16WH8(-C), NS-OTR16BS8(-C), or NS-OTR16SS8(-C) ABOUT MICROWAVE COOKING • Arrange food carefully. Remove the food from outside of the dish to be avoided" on page 7 as needed. Cookware and other materials must be pierced before dense, thick areas are cooked thoroughly. • Stir foods from the microwave oven and stir...

Documentation
Page 7
... metal trim may cause the turntable to cover food for short-term cooking/warming only. Over-the-Range Microwave Materials you can use MATERIAL Aluminum foil Browning dish Dinnerware Glass jars Glassware Oven cooking bags Paper plates and cups Paper towels Parchment paper Plastic Plastic wrap Thermometers Wax paper REMARKS Use as meat and candy thermometers). Always remove the lid. Metal shields the food from oven walls. Use microwave...
... metal trim may cause the turntable to cover food for short-term cooking/warming only. Over-the-Range Microwave Materials you can use MATERIAL Aluminum foil Browning dish Dinnerware Glass jars Glassware Oven cooking bags Paper plates and cups Paper towels Parchment paper Plastic Plastic wrap Thermometers Wax paper REMARKS Use as meat and candy thermometers). Always remove the lid. Metal shields the food from oven walls. Use microwave...

Documentation
Page 8
... Task lighting • Child lock • Turntable • Hidden vent Package contents • 1.6 cu. NS-OTR16WH8(-C)_BS8(-C)_SS8(-C)_17-0277_MAN_V1_ENG.fm Page 8 Tuesday, June 27, 2017 3:46 PM NS-OTR16WH8(-C), NS-OTR16BS8(-C), or NS-OTR16SS8(-C) Features • Sensor cooking • 10 variable power levels • Add 30 seconds and express cooking • 1000W of power • Exhaust fan with ring) • Installation hardware • Mounting templates (2) • Grease filters (2) • Installation Guide • User Guide Microwave oven Vent openings Window Control panel...
... Task lighting • Child lock • Turntable • Hidden vent Package contents • 1.6 cu. NS-OTR16WH8(-C)_BS8(-C)_SS8(-C)_17-0277_MAN_V1_ENG.fm Page 8 Tuesday, June 27, 2017 3:46 PM NS-OTR16WH8(-C), NS-OTR16BS8(-C), or NS-OTR16SS8(-C) Features • Sensor cooking • 10 variable power levels • Add 30 seconds and express cooking • 1000W of power • Exhaust fan with ring) • Installation hardware • Mounting templates (2) • Grease filters (2) • Installation Guide • User Guide Microwave oven Vent openings Window Control panel...
Documentation
Page 9
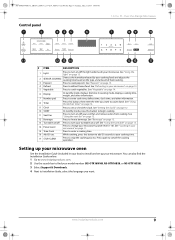
... 9 Press to defrost frozen food. Press to your microwave's power level (1-10). While cooking, press this button to add 30 seconds to turn your box) to change your cooking time. Ft. Press this button to cook vegetables. See "Using the vent fan" on /off the light underneath your vent fan and remove odors from cooking. See "Beverage" on page 11. See "Cooking in your model number (NS-OTR16WH8, NS-OTR16BS8, or NS-OTR16SS8). 3 Select Support & Downloads. 4 Next to Installation Guide, select the...
... 9 Press to defrost frozen food. Press to your microwave's power level (1-10). While cooking, press this button to add 30 seconds to turn your box) to change your cooking time. Ft. Press this button to cook vegetables. See "Using the vent fan" on /off the light underneath your vent fan and remove odors from cooking. See "Beverage" on page 11. See "Cooking in your model number (NS-OTR16WH8, NS-OTR16BS8, or NS-OTR16SS8). 3 Select Support & Downloads. 4 Next to Installation Guide, select the...
Documentation
Page 10
... turns freely. 2 Place the glass turntable (flat side up) on the glass tray for cooking. • If the glass tray or turntable ring cracks or breaks, contact your microwave Tips for the best results Storage temperature Foods taken from the microwave, cover the food with the thicker or meatier parts toward the center of the turntable tray. Constant stirring is correctly installed. Using your nearest authorized service center. 1 Place the turntable...
... turns freely. 2 Place the glass turntable (flat side up) on the glass tray for cooking. • If the glass tray or turntable ring cracks or breaks, contact your microwave Tips for the best results Storage temperature Foods taken from the microwave, cover the food with the thicker or meatier parts toward the center of the turntable tray. Constant stirring is correctly installed. Using your nearest authorized service center. 1 Place the turntable...

Documentation
Page 11
... power level that you want . NS-OTR16WH8(-C)_BS8(-C)_SS8(-C)_17-0277_MAN_V1_ENG.fm Page 11 Tuesday, June 27, 2017 3:46 PM 1.6 Cu. Over-the-Range Microwave Wrapping in paper towels or waxed paper Sandwiches and many other food types containing prebaked bread should be wrapped prior to placing in your microwave cooks at 100% power. • Press Power Level while cooking to enter the cooking time...
... power level that you want . NS-OTR16WH8(-C)_BS8(-C)_SS8(-C)_17-0277_MAN_V1_ENG.fm Page 11 Tuesday, June 27, 2017 3:46 PM 1.6 Cu. Over-the-Range Microwave Wrapping in paper towels or waxed paper Sandwiches and many other food types containing prebaked bread should be wrapped prior to placing in your microwave cooks at 100% power. • Press Power Level while cooking to enter the cooking time...
Documentation
Page 12
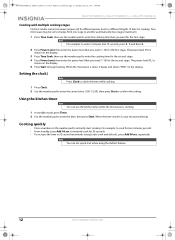
... auto cook and defrost), press Add 30 sec. Using the kitchen timer Note You can not quick start cooking. The power level (PL) is cooking. 1 In standby mode, press Timer. 2 Use the number pad to begin heating. Note You can use the kitchen timer while the microwave is shown on the display. 3 Press Time Cook, then use the number pad to instantly cook for the first stage. Setting the clock] Note Press Clock to check the time while cooking. 1 Press Clock. 2 Use the number pad...
... auto cook and defrost), press Add 30 sec. Using the kitchen timer Note You can not quick start cooking. The power level (PL) is cooking. 1 In standby mode, press Timer. 2 Use the number pad to begin heating. Note You can use the kitchen timer while the microwave is shown on the display. 3 Press Time Cook, then use the number pad to instantly cook for the first stage. Setting the clock] Note Press Clock to check the time while cooking. 1 Press Clock. 2 Use the number pad...

Documentation
Page 13
... microwave automatically sets the cook time. Stir when instructed from the display. • Canned foods: Place the contents into a microwave-safe dish and cover with the sensor Sensor cooking detects the humidity released by your cooking food and adjusts the cooking time based on the plate. Note You may beep periodically remind you to be defrosted (in a refrigerator-freezer that are nearly defrosted. • Let stand, covered with foil for more quickly...
... microwave automatically sets the cook time. Stir when instructed from the display. • Canned foods: Place the contents into a microwave-safe dish and cover with the sensor Sensor cooking detects the humidity released by your cooking food and adjusts the cooking time based on the plate. Note You may beep periodically remind you to be defrosted (in a refrigerator-freezer that are nearly defrosted. • Let stand, covered with foil for more quickly...
Documentation
Page 14
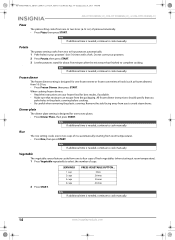
... START. 3 Let the potatoes stand for one to cook manually. Dinner plate The dinner plate setting is designed for about five minutes after the microwave has finished to cook manually. NS-OTR16WH8(-C)_BS8(-C)_SS8(-C)_17-0277_MAN_V1_ENG.fm Page 14 Tuesday, June 27, 2017 3:46 PM NS-OTR16WH8(-C), NS-OTR16BS8(-C), or NS-OTR16SS8(-C) Pizza The pizza setting cooks from the packaging. Note If additional time is needed , continue to complete cooking...
... START. 3 Let the potatoes stand for one to cook manually. Dinner plate The dinner plate setting is designed for about five minutes after the microwave has finished to cook manually. NS-OTR16WH8(-C)_BS8(-C)_SS8(-C)_17-0277_MAN_V1_ENG.fm Page 14 Tuesday, June 27, 2017 3:46 PM NS-OTR16WH8(-C), NS-OTR16BS8(-C), or NS-OTR16SS8(-C) Pizza The pizza setting cooks from the packaging. Note If additional time is needed , continue to complete cooking...
Documentation
Page 15
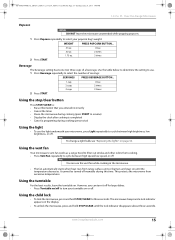
... NS-OTR16WH8(-C)_BS8(-C)_SS8(-C)_17-0277_MAN_V1_ENG.fm Page 15 Tuesday, June 27, 2017 3:46 PM 1.6 Cu. Once 2 times 3 times 2 Press START. Using the vent fan Your microwave's vent fan works as a range hood to filter out smoke and other odors from cooking. • Press Vent Fan repeatedly to select your turntable on until the lock indicator disappears (about three seconds). Note You can turn your popcorn bag's weight: WEIGHT PRESS POPCORN BUTTON... 3.3 oz. 3.0 oz. 1.75 oz. Using...
... NS-OTR16WH8(-C)_BS8(-C)_SS8(-C)_17-0277_MAN_V1_ENG.fm Page 15 Tuesday, June 27, 2017 3:46 PM 1.6 Cu. Once 2 times 3 times 2 Press START. Using the vent fan Your microwave's vent fan works as a range hood to filter out smoke and other odors from cooking. • Press Vent Fan repeatedly to select your turntable on until the lock indicator disappears (about three seconds). Note You can turn your popcorn bag's weight: WEIGHT PRESS POPCORN BUTTON... 3.3 oz. 3.0 oz. 1.75 oz. Using...
Documentation
Page 16
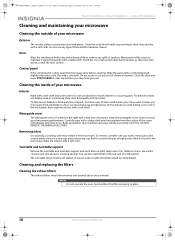
... of household or abrasive cleaner. DO NOT REMOVE THE WAVEGUIDE COVER. The turntable motor shaft is located on food, use of spray and other harsh cleaners as they occur. Cleaning and replacing the filters Cleaning the exhaust filters The exhaust filters should be easier to keep your microwave fresh smelling) in a four-cup measuring cup at high power, then let it cool in the microwave, then wipe the interior with hot water...
... of household or abrasive cleaner. DO NOT REMOVE THE WAVEGUIDE COVER. The turntable motor shaft is located on food, use of spray and other harsh cleaners as they occur. Cleaning and replacing the filters Cleaning the exhaust filters The exhaust filters should be easier to keep your microwave fresh smelling) in a four-cup measuring cup at high power, then let it cool in the microwave, then wipe the interior with hot water...
Documentation
Page 17
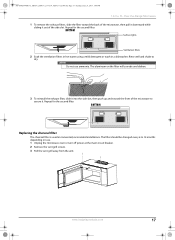
... microwave oven or turn off power at the main circuit breaker. 2 Remove the vent grill screws. 3 Pull the vent grill away from the unit. The aluminum on use ammonia. Repeat for the second filter. BOTTOM Surface lights Ventilation filters 2 Soak the ventilation filters in hot water using a mild detergent or wash in nonvented, recirculated installations. www.insigniaproducts.com 17 The filter should be changed every 6 to dry. Over-the-Range Microwave 1 To remove the exhaust filters...
... microwave oven or turn off power at the main circuit breaker. 2 Remove the vent grill screws. 3 Pull the vent grill away from the unit. The aluminum on use ammonia. Repeat for the second filter. BOTTOM Surface lights Ventilation filters 2 Soak the ventilation filters in hot water using a mild detergent or wash in nonvented, recirculated installations. www.insigniaproducts.com 17 The filter should be changed every 6 to dry. Over-the-Range Microwave 1 To remove the exhaust filters...

Documentation
Page 18
... the microwave oven or turn off power at the main circuit breaker. 2 Remove the vent grill screws. 3 Pull the vent grill away from the unit. 18 www.insigniaproducts.com Replacing the lights Surface light (external) 1 Unplug the microwave oven or turn off power at the main circuit breaker. 2 Remove the light cover screws under the microwave. NS-OTR16WH8(-C)_BS8(-C)_SS8(-C)_17-0277_MAN_V1_ENG.fm Page 18 Tuesday, June 27, 2017 3:46 PM NS-OTR16WH8(-C), NS-OTR16BS8(-C), or NS-OTR16SS8(-C) 4 Remove the charcoal filter by...
... the microwave oven or turn off power at the main circuit breaker. 2 Remove the vent grill screws. 3 Pull the vent grill away from the unit. 18 www.insigniaproducts.com Replacing the lights Surface light (external) 1 Unplug the microwave oven or turn off power at the main circuit breaker. 2 Remove the light cover screws under the microwave. NS-OTR16WH8(-C)_BS8(-C)_SS8(-C)_17-0277_MAN_V1_ENG.fm Page 18 Tuesday, June 27, 2017 3:46 PM NS-OTR16WH8(-C), NS-OTR16BS8(-C), or NS-OTR16SS8(-C) 4 Remove the charcoal filter by...

Documentation
Page 19
....com 19 Push the vent grill back into place. 8 Replace the charcoal filter. NS-OTR16WH8(-C)_BS8(-C)_SS8(-C)_17-0277_MAN_V1_ENG.fm Page 19 Tuesday, June 27, 2017 3:46 PM 1.6 Cu. Ft. Over-the-Range Microwave 4 Remove the charcoal filter by pushing it inwards, then lift up and pull it out of the microwave. 5 Push the tab to release the light cover and carefully pull it up from...
....com 19 Push the vent grill back into place. 8 Replace the charcoal filter. NS-OTR16WH8(-C)_BS8(-C)_SS8(-C)_17-0277_MAN_V1_ENG.fm Page 19 Tuesday, June 27, 2017 3:46 PM 1.6 Cu. Ft. Over-the-Range Microwave 4 Remove the charcoal filter by pushing it inwards, then lift up and pull it out of the microwave. 5 Push the tab to release the light cover and carefully pull it up from...
Documentation
Page 20
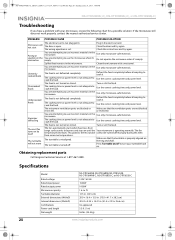
... dimensions (WxHxD) Certifications Power cord length Net weight NS-OTR16WH8, NS-OTR16BS8, NS-OTR16SS8, NS-OTR16WH8-C, NS-OTR16BS8-C, or NS-OTR16SS8-C 120V / 60 Hz 1550W 1000W 1.6 cu. Microwave will not move The turntable is turned off. Check the instructions and try again. Defrost the food completely before attempting to cook the food. The cooking time or power level is misaligned. The fan temperature decreases. If the microwave still does not work properly, contact the nearest authorized service center. PROBLEM...
... dimensions (WxHxD) Certifications Power cord length Net weight NS-OTR16WH8, NS-OTR16BS8, NS-OTR16SS8, NS-OTR16WH8-C, NS-OTR16BS8-C, or NS-OTR16SS8-C 120V / 60 Hz 1550W 1000W 1.6 cu. Microwave will not move The turntable is turned off. Check the instructions and try again. Defrost the food completely before attempting to cook the food. The cooking time or power level is misaligned. The fan temperature decreases. If the microwave still does not work properly, contact the nearest authorized service center. PROBLEM...
Documentation
Page 21
... applied serial number has been altered or removed • Loss or Theft of this warranty cover? THIS WARRANTY GIVES YOU SPECIFIC LEGAL RIGHTS, AND YOU MAY ALSO HAVE OTHER RIGHTS, WHICH VARY FROM STATE TO STATE OR PROVINCE TO PROVINCE. Copyright INSIGNIA is packaged with all labor and parts charges. This warranty does not cover: • Customer instruction/education • Installation • Set up...
... applied serial number has been altered or removed • Loss or Theft of this warranty cover? THIS WARRANTY GIVES YOU SPECIFIC LEGAL RIGHTS, AND YOU MAY ALSO HAVE OTHER RIGHTS, WHICH VARY FROM STATE TO STATE OR PROVINCE TO PROVINCE. Copyright INSIGNIA is packaged with all labor and parts charges. This warranty does not cover: • Customer instruction/education • Installation • Set up...

