
Firmware Installation Guide (English)
Page 1
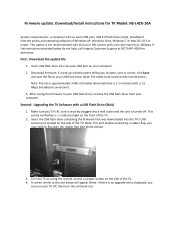
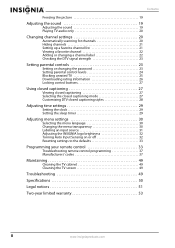
..., click Save and save the file to open USB port on the side of the TV. 2. If the instructions provided below do not help, call Insignia Customer Support at (877) 467‐4289 for TV Model: NS‐L42X‐10A System requirements: a computer with an open the rubber flap (See photo below will appear (Note...
..., click Save and save the file to open USB port on the side of the TV. 2. If the instructions provided below do not help, call Insignia Customer Support at (877) 467‐4289 for TV Model: NS‐L42X‐10A System requirements: a computer with an open the rubber flap (See photo below will appear (Note...
Firmware Installation Guide (English)
Page 2
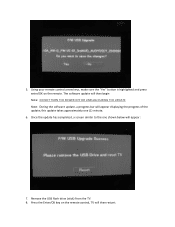
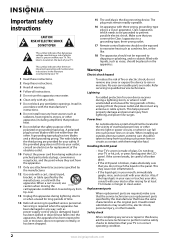
5. Remove the USB flash drive (stick) from the TV. 8. this update takes approximately one shown below will appear: 7. The software update will then begin Note: DO NOT TURN THE POWER OFF OR UNPLUG DURING THE UPDATE Note: During the software update, a progress bar will then restart. Press the Enter/OK key on the remote. Using your remote control arrow keys, make sure the "Yes" button is highlighted and press enter/OK on the remote control, TV will appear displaying the progress of the update; Once the update has completed, a screen similar to the one (1) minute. 6.
5. Remove the USB flash drive (stick) from the TV. 8. this update takes approximately one shown below will appear: 7. The software update will then begin Note: DO NOT TURN THE POWER OFF OR UNPLUG DURING THE UPDATE Note: During the software update, a progress bar will then restart. Press the Enter/OK key on the remote. Using your remote control arrow keys, make sure the "Yes" button is highlighted and press enter/OK on the remote control, TV will appear displaying the progress of the update; Once the update has completed, a screen similar to the one (1) minute. 6.

Firmware Installation Guide (English)
Page 3
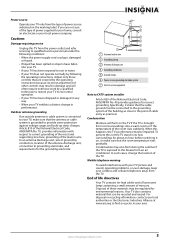
If the TV did not then, power off then Powered back on . Note: You will need to reprogram your computer prior to using your favorite channels and any custom settings that you erase/delete the update file from the USB flash drive using the USB flash drive again. Note: If you may have set up the process is recommended that you experience any issues while performing this upgrade, call Insignia Customer Support at (877) 467‐4289 for assistance. then power the TV back on . Once the TV is powered up . 9. Note: It is complete. Verify TV Powered off the TV;
If the TV did not then, power off then Powered back on . Note: You will need to reprogram your computer prior to using your favorite channels and any custom settings that you erase/delete the update file from the USB flash drive using the USB flash drive again. Note: If you may have set up the process is recommended that you experience any issues while performing this upgrade, call Insignia Customer Support at (877) 467‐4289 for assistance. then power the TV back on . Once the TV is powered up . 9. Note: It is complete. Verify TV Powered off the TV;

Warranty (English)
Page 1
... that requires service, terms of the product in its original packaging or packaging that the Product shall be loaned to you until your TV is determined to the address listed on the web site. Call agents will diagnose and correct the issue over the phone or will ..."). This warranty lasts as long as the original packaging. To obtain in the United States. Two-year limited warranty Insignia Products ("Insignia") warrants to you. Should the Insignia-approved repair person not correct the issue on the receipt you sell or otherwise transfer the Product. Where is printed on...
... that requires service, terms of the product in its original packaging or packaging that the Product shall be loaned to you until your TV is determined to the address listed on the web site. Call agents will diagnose and correct the issue over the phone or will ..."). This warranty lasts as long as the original packaging. To obtain in the United States. Two-year limited warranty Insignia Products ("Insignia") warrants to you. Should the Insignia-approved repair person not correct the issue on the receipt you sell or otherwise transfer the Product. Where is printed on...
What is Firmware? (English)
Page 1
... greatest features for your GPS would quickly become obsolete. Give me an example. If your photos. Whether it's a cell phone, remote control, calculator, digital camera, TV, or GPS, the firmware is added to contact the manufacturer of media. Without new firmware, your existing product without having to take over if necessary...
... greatest features for your GPS would quickly become obsolete. Give me an example. If your photos. Whether it's a cell phone, remote control, calculator, digital camera, TV, or GPS, the firmware is added to contact the manufacturer of media. Without new firmware, your existing product without having to take over if necessary...
User Manual (English)
Page 3
... 8 Using the remote control holder 8 Programming a universal remote control to work with your TV . . . . 8 Making connections 9 Connecting the power 9 Connecting an outdoor antenna 9 Connecting cable TV 9 Connecting satellite TV via a satellite TV box 10 Connecting a VCR 10 Connecting a camcorder or game console 11 Connecting an HDMI ...13 Connecting a digital audio amplifier 13 Connecting an analog audio amplifier 14 Turning on your TV for the first time 14 Understanding the basics 15 Turning your TV on or off 15 Selecting the video input source 15 On-screen menu overview 15 ...
... 8 Using the remote control holder 8 Programming a universal remote control to work with your TV . . . . 8 Making connections 9 Connecting the power 9 Connecting an outdoor antenna 9 Connecting cable TV 9 Connecting satellite TV via a satellite TV box 10 Connecting a VCR 10 Connecting a camcorder or game console 11 Connecting an HDMI ...13 Connecting a digital audio amplifier 13 Connecting an analog audio amplifier 14 Turning on your TV for the first time 14 Understanding the basics 15 Turning your TV on or off 15 Selecting the video input source 15 On-screen menu overview 15 ...
User Manual (English)
Page 4
... the DTV signal strength 23 Setting parental controls 23 Setting or changing the password 23 Setting parental control levels 24 Blocking unrated TV 25 Downloading rating information 26 Locking control buttons 27 Using closed captioning 27 Viewing closed captioning 27 Selecting the closed captioning mode... 29 Adjusting menu settings 30 Selecting the menu language 30 Changing the menu transparency 30 Labeling an input source 31 Adjusting the INSIGNIA logo brightness 32 Turning Auto Input Sensing on or off 32 Resetting settings to the defaults 33 Programming your remote control 33...
... the DTV signal strength 23 Setting parental controls 23 Setting or changing the password 23 Setting parental control levels 24 Blocking unrated TV 25 Downloading rating information 26 Locking control buttons 27 Using closed captioning 27 Viewing closed captioning 27 Selecting the closed captioning mode... 29 Adjusting menu settings 30 Selecting the menu language 30 Changing the menu transparency 30 Labeling an input source 31 Adjusting the INSIGNIA logo brightness 32 Turning Auto Input Sensing on or off 32 Resetting settings to the defaults 33 Programming your remote control 33...

User Manual (English)
Page 5
...otherwise listed by an independent laboratory as a chest of drawers. • Remember that the wall where you are mounting the TV is a growing trend, and larger TVs are inappropriately placed on the proper stands or installed according to the manufacturer's recommendations. Wall mounting If you decide to wall... mount your TV, always remember: • One size of TV stand does not fit all . Tune into safety • One size of wall mount does not fit all . f...
...otherwise listed by an independent laboratory as a chest of drawers. • Remember that the wall where you are mounting the TV is a growing trend, and larger TVs are inappropriately placed on the proper stands or installed according to the manufacturer's recommendations. Wall mounting If you decide to wall... mount your TV, always remember: • One size of TV stand does not fit all . Tune into safety • One size of wall mount does not fit all . f...
User Manual (English)
Page 6
...property damage and personal injury from touching such power lines or circuits as contact with liquids, such as the original part. Do not drop your TV. 1 Read these instructions. 2 Keep these instructions. 3 Heed all warnings. 4 Follow all servicing to qualified service personnel. This may result ...prong, grounding-type plug is used, use this apparatus near any antenna or cable system. Also, if the liquid gets in your TV. Unauthorized substitutions may cause skin inflammation. • If the liquid gets in your eyes or touches your safety. Safety check After completing...
...property damage and personal injury from touching such power lines or circuits as contact with liquids, such as the original part. Do not drop your TV. 1 Read these instructions. 2 Keep these instructions. 3 Heed all warnings. 4 Follow all servicing to qualified service personnel. This may result ...prong, grounding-type plug is used, use this apparatus near any antenna or cable system. Also, if the liquid gets in your TV. Unauthorized substitutions may cause skin inflammation. • If the liquid gets in your eyes or touches your safety. Safety check After completing...
User Manual (English)
Page 7
...surroundings for about an hour before switching it states that are not sure of the type of power supplied to your TV exhibits a distinct change the location of other controls may be regulated for correct grounding. Mobile telephone warning To avoid interference...by a qualified technician to restore your area. Condensation Moisture will often require extensive work by the operating instructions because incorrect adjustment of the TV. In such cases, change in wire 2 Grounding clamp 3 Antenna discharge unit 4 Grounding conductors 5 Ground clamps 6 Power service grounding ...
...surroundings for about an hour before switching it states that are not sure of the type of power supplied to your TV exhibits a distinct change the location of other controls may be regulated for correct grounding. Mobile telephone warning To avoid interference...by a qualified technician to restore your area. Condensation Moisture will often require extensive work by the operating instructions because incorrect adjustment of the TV. In such cases, change in wire 2 Grounding clamp 3 Antenna discharge unit 4 Grounding conductors 5 Ground clamps 6 Power service grounding ...
User Manual (English)
Page 8
... you could better hear whispering during a movie scene? This television incorporates some scenes are not considered defects. SRS TruSurround HD: At Insignia, providing you automatically. To reduce the risk of your television settings will be easier. (The button is held steady, making the ... others. Audyssey Dynamic EQ is a feature that you are on your remote control. More game settings instructions are qualified to your TV speakers sound more lifelike. Introduction Congratulations on page 17). 1080p, 120Hz with Motion-Detection Technology: With a 120 Hz screen refresh ...
... you could better hear whispering during a movie scene? This television incorporates some scenes are not considered defects. SRS TruSurround HD: At Insignia, providing you automatically. To reduce the risk of your television settings will be easier. (The button is held steady, making the ... others. Audyssey Dynamic EQ is a feature that you are on your remote control. More game settings instructions are qualified to your TV speakers sound more lifelike. Introduction Congratulations on page 17). 1080p, 120Hz with Motion-Detection Technology: With a 120 Hz screen refresh ...
User Manual (English)
Page 9
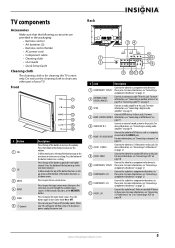
..."Connecting a VCR" on page 12. 8 AV IN 1 VIDEO Connect the video for a component video device to display the Game mode status. TV components Accessories Make sure that the following accessories are provided in the packaging: • Remote control • AA batteries (2) • Remote control ... sound system to this jack. Front 1 2 3 4 GAME 5 6 # Button 1 VOL 2 CH 3 MENU 4 INPUT 5 GAME 6 (power) Description Press the top of your TV is for a component video device to the next higher channel. Press the top of the button to go to the next menu or to clean...
..."Connecting a VCR" on page 12. 8 AV IN 1 VIDEO Connect the video for a component video device to display the Game mode status. TV components Accessories Make sure that the following accessories are provided in the packaging: • Remote control • AA batteries (2) • Remote control ... sound system to this jack. Front 1 2 3 4 GAME 5 6 # Button 1 VOL 2 CH 3 MENU 4 INPUT 5 GAME 6 (power) Description Press the top of your TV is for a component video device to the next higher channel. Press the top of the button to go to the next menu or to clean...
User Manual (English)
Page 10
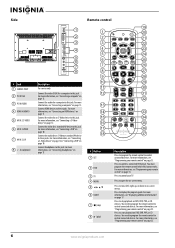
...For more information, see "Connecting a VCR" on page 13. For more information, see "Connecting headphones" on page 10. Press to control your TV. You need to program the remote control to this jack. Connect the video for an S-Video device to this jack. Connect headphones to control connected...7 26 8 27 9 28 10 29 11 30 12 31 32 13 14 33 15 34 16 GAME 35 DYN VOL 17 36 18 NS-RC02U-10A 37 # Button 1 SET 2 DVD 3 TV 4 MENU 5 6 GUIDE 7 (stop playback on page 33. For more information, see "Programming your remote control" on page 11. For ...
...For more information, see "Connecting a VCR" on page 13. For more information, see "Connecting headphones" on page 10. Press to control your TV. You need to program the remote control to this jack. Connect the video for an S-Video device to this jack. Connect headphones to control connected...7 26 8 27 9 28 10 29 11 30 12 31 32 13 14 33 15 34 16 GAME 35 DYN VOL 17 36 18 NS-RC02U-10A 37 # Button 1 SET 2 DVD 3 TV 4 MENU 5 6 GUIDE 7 (stop playback on page 33. For more information, see "Programming your remote control" on page 11. For ...
User Manual (English)
Page 11
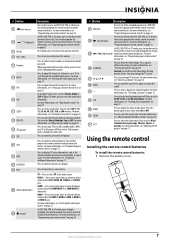
... 15, 30, 60, 90, 120, 180, or 240 minutes. For more information, see "Viewing closed captioning on page 33. Press to go change TV channels. Press to the COMPONENT 1 or COMPONENT 2 video jacks. For more information, see "Adjusting the sound" on page 19. For more times to ...skip back to enter device and programming codes. For more information, see "Setting up a favorite channel list" on page 17. Press to display TV status information, such as the video source. You need to program the remote control to enter a digital sub-channel number. For more information, ...
... 15, 30, 60, 90, 120, 180, or 240 minutes. For more information, see "Viewing closed captioning on page 33. Press to go change TV channels. Press to the COMPONENT 1 or COMPONENT 2 video jacks. For more information, see "Adjusting the sound" on page 19. For more times to ...skip back to enter device and programming codes. For more information, see "Setting up a favorite channel list" on page 17. Press to display TV status information, such as the video source. You need to program the remote control to enter a digital sub-channel number. For more information, ...
User Manual (English)
Page 12
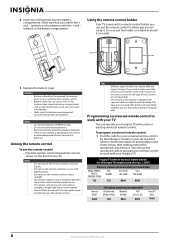
... use the correct screws for your universal remote control by identifying its model (or your Insignia TV. If chemicals touch your skin, wash immediately. • Make sure that you can operate your Insignia TV with your set-top box's remote control manufacturer and model) on the charts below it... VIP508, VIP622 DRC800 TIVO Series 3, HD 720 0463 0091 DirectTV RC23 10463 8 www.insigniaproducts.com symbols on a table or mount it . Insignia TV codes for universal remote controls (for all types of walls. Do not place the remote control in an area with a remote control holder you...
... use the correct screws for your universal remote control by identifying its model (or your Insignia TV. If chemicals touch your skin, wash immediately. • Make sure that you can operate your Insignia TV with your set-top box's remote control manufacturer and model) on the charts below it... VIP508, VIP622 DRC800 TIVO Series 3, HD 720 0463 0091 DirectTV RC23 10463 8 www.insigniaproducts.com symbols on a table or mount it . Insignia TV codes for universal remote controls (for all types of walls. Do not place the remote control in an area with a remote control holder you...
User Manual (English)
Page 13
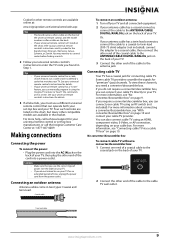
...converter/descrambler box. If you use a different universal remote control that matches your TV. Cautions • Make sure that you do not intend to the cable TV wall outlet. See your cable TV using the Insignia TV remote to the ANTENNA/CABLE DIGITAL/ANALOG jack on the back of your...; Plug the power cord into a power outlet. Connecting cable TV Your TV has a coaxial jack for "premium" (pay) channels. For more help, call the Insignia Customer Care Center at 1-877-467-4289. You can connect your TV, then plug the other compatible models are available in the market...
...converter/descrambler box. If you use a different universal remote control that matches your TV. Cautions • Make sure that you do not intend to the cable TV wall outlet. See your cable TV using the Insignia TV remote to the ANTENNA/CABLE DIGITAL/ANALOG jack on the back of your...; Plug the power cord into a power outlet. Connecting cable TV Your TV has a coaxial jack for "premium" (pay) channels. For more help, call the Insignia Customer Care Center at 1-877-467-4289. You can connect your TV, then plug the other compatible models are available in the market...
User Manual (English)
Page 14
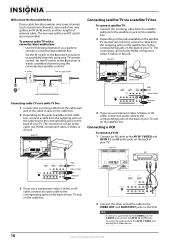
... device is connected to the AV IN 1 VIDEO jack, unplug the S-Video device. 10 www.insigniaproducts.com Back of TV Cable box IANNTENONUAT Connecting satellite TV via a cable TV box 1 Connect the incoming cable from the cable wall jack to the cable-in jack on the satellite box. 2 ...L and R jacks. Connecting a VCR To connect a VCR: 1 Connect an AV cable to the corresponding jacks on the satellite box. To connect cable TV with a converter/descrambler box: • Use the following illustration as premium channels), you need a two-way splitter, an RF (A/B) switch, and four ...
... device is connected to the AV IN 1 VIDEO jack, unplug the S-Video device. 10 www.insigniaproducts.com Back of TV Cable box IANNTENONUAT Connecting satellite TV via a cable TV box 1 Connect the incoming cable from the cable wall jack to the cable-in jack on the satellite box. 2 ...L and R jacks. Connecting a VCR To connect a VCR: 1 Connect an AV cable to the corresponding jacks on the satellite box. To connect cable TV with a converter/descrambler box: • Use the following illustration as premium channels), you need a two-way splitter, an RF (A/B) switch, and four ...
User Manual (English)
Page 15
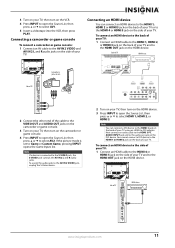
... VIDEO OUT and AUDIO OUT jacks on the camcorder or game console. 3 Turn on your TV. Side of your TV. To assign the audio jacks to the AV IN 2 VIDEO jack, unplug the S-Video device. 2 Turn on your...: 1 Connect an AV cable to the AV IN 2 VIDEO and AV IN 2 L and R audio jacks on the side of your TV, then turn on the VCR. 4 Press INPUT to open the Source List, then press or to select AV1. 5 Insert a videotape into... device You can connect a DVI device to the HDMI 3 jack on the back of your TV and to the HDMI OUT jack on the HDMI device. To connect an HDMI device to the back of your...
... VIDEO OUT and AUDIO OUT jacks on the camcorder or game console. 3 Turn on your TV. Side of your TV. To assign the audio jacks to the AV IN 2 VIDEO jack, unplug the S-Video device. 2 Turn on your...: 1 Connect an AV cable to the AV IN 2 VIDEO and AV IN 2 L and R audio jacks on the side of your TV, then turn on the VCR. 4 Press INPUT to open the Source List, then press or to select AV1. 5 Insert a videotape into... device You can connect a DVI device to the HDMI 3 jack on the back of your TV and to the HDMI OUT jack on the HDMI device. To connect an HDMI device to the back of your...
User Manual (English)
Page 16
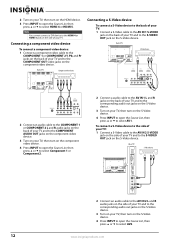
... select Component 1 or Component 2. 2 Connect a audio cable to the AV IN 1 L and R jacks on the back of your TV and to the corresponding audio out jacks on the S-Video device. 3 Turn on your TV, then turn on the S-Video device. 4 Press INPUT to open the Source List, then press or to the... List, then press or to select HDMI 4 or HDMI 5 . Note You cannot connect a DVI device to select AV2. 12 www.insigniaproducts.com 2 Turn on your TV, then turn on the S-Video device. 4 Press INPUT to open the Source List, then press or to the HDMI 4 or HDMI 5 jack on the side...
... select Component 1 or Component 2. 2 Connect a audio cable to the AV IN 1 L and R jacks on the back of your TV and to the corresponding audio out jacks on the S-Video device. 3 Turn on your TV, then turn on the S-Video device. 4 Press INPUT to open the Source List, then press or to the... List, then press or to select HDMI 4 or HDMI 5 . Note You cannot connect a DVI device to select AV2. 12 www.insigniaproducts.com 2 Turn on your TV, then turn on the S-Video device. 4 Press INPUT to open the Source List, then press or to the HDMI 4 or HDMI 5 jack on the side...

User Manual (English)
Page 17
...on the computer. Connecting a computer Note If the computer has an HDMI jack, you "wake" your computer, press (power) on your TV or remote control. Back of your TV's speakers is muted. Connecting a digital audio amplifier To connect a digital audio amplifier: • Connect a digital audio cable to the ...SPDIF jack on the back of your TV and to the PC IN VGA jack on the amplifier. To connect a computer: 1 Connect a VGA cable to the digital audio jack on the side...
...on the computer. Connecting a computer Note If the computer has an HDMI jack, you "wake" your computer, press (power) on your TV or remote control. Back of your TV's speakers is muted. Connecting a digital audio amplifier To connect a digital audio amplifier: • Connect a digital audio cable to the ...SPDIF jack on the back of your TV and to the PC IN VGA jack on the amplifier. To connect a computer: 1 Connect a VGA cable to the digital audio jack on the side...


