Warranty
Page 1
...; Food, beverage, and or medicine loss/spoilage. • Customer instruction/education • Installation • Set up to three (3) pixel failures (dots that are dark or incorrectly illuminated) grouped in an area smaller than a private home. • Modification of any part of the Product is determined to obtain warranty service? Products and parts replaced under this warranty become the property of Insignia and are required after...
...; Food, beverage, and or medicine loss/spoilage. • Customer instruction/education • Installation • Set up to three (3) pixel failures (dots that are dark or incorrectly illuminated) grouped in an area smaller than a private home. • Modification of any part of the Product is determined to obtain warranty service? Products and parts replaced under this warranty become the property of Insignia and are required after...
User Guide
Page 1
Ice Maker NS-ICEF2W2 USER GUIDE Before using your new product, please read these instructions to prevent any damage.
Ice Maker NS-ICEF2W2 USER GUIDE Before using your new product, please read these instructions to prevent any damage.
User Guide
Page 2
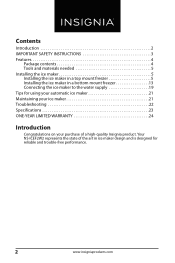
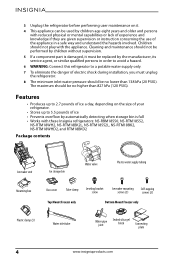
Your NS-ICEF2W2 represents the state of a high-quality Insignia product. Contents Introduction 2 IMPORTANT SAFETY INSTRUCTIONS 3 Features 4 Package contents 4 Tools and materials needed 5 Installing the ice maker 5 Installing the ice maker in a top mount freezer 5 Installing the ice maker in a bottom mount freezer 13 Connecting the ice maker to the water supply 19 Tips for using your automatic ice maker 21 Maintaining your ice maker 21 Troubleshooting 22 Specifications 23 ONE-YEAR LIMITED WARRANTY 24 Introduction Congratulations on your...
Your NS-ICEF2W2 represents the state of a high-quality Insignia product. Contents Introduction 2 IMPORTANT SAFETY INSTRUCTIONS 3 Features 4 Package contents 4 Tools and materials needed 5 Installing the ice maker 5 Installing the ice maker in a top mount freezer 5 Installing the ice maker in a bottom mount freezer 13 Connecting the ice maker to the water supply 19 Tips for using your automatic ice maker 21 Maintaining your ice maker 21 Troubleshooting 22 Specifications 23 ONE-YEAR LIMITED WARRANTY 24 Introduction Congratulations on your...
User Guide
Page 3
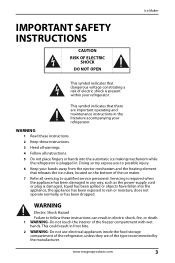
... power-supply cord or plug is present within your refrigerator. This could result in frost bite. 2 WARNING-Do not use electrical appliances inside the food storage compartment of the refrigerator, unless they are important operating and maintenance instructions in . This symbol indicates that there are of electric shock is damaged, liquid has been spilled or objects have fallen into the automatic ice making mechanism while the refrigerator is plugged...
... power-supply cord or plug is present within your refrigerator. This could result in frost bite. 2 WARNING-Do not use electrical appliances inside the food storage compartment of the refrigerator, unless they are important operating and maintenance instructions in . This symbol indicates that there are of electric shock is damaged, liquid has been spilled or objects have fallen into the automatic ice making mechanism while the refrigerator is plugged...
User Guide
Page 4
... bin Water valve Plastic water supply tubing Mounting box Box cover Tube clamp Leveling bracket screw Ice maker mounting Self-tapping screws (3) screws (3) Top Mount Freezer only Bottom Mount Freezer only Plastic clamp (3) Water inlet tube Water pipe joint Sealed silica gel block Connecting plate 4 www.insigniaproducts.com Cleaning and maintenance should not be performed by children without supervision. 5 If a component part is full • Works...
... bin Water valve Plastic water supply tubing Mounting box Box cover Tube clamp Leveling bracket screw Ice maker mounting Self-tapping screws (3) screws (3) Top Mount Freezer only Bottom Mount Freezer only Plastic clamp (3) Water inlet tube Water pipe joint Sealed silica gel block Connecting plate 4 www.insigniaproducts.com Cleaning and maintenance should not be performed by children without supervision. 5 If a component part is full • Works...
User Guide
Page 5
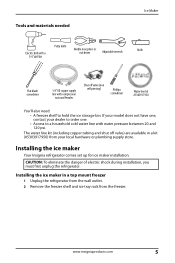
... materials needed Ice Maker Putty knife Electric drill with a Needle nose pliers or nut driver Adjustable wrench Knife 1/4" drill bit Flat blade screwdriver 1/4" OD copper supply line with water pressure between 20 and 120 psi. The water line kit (including copper tubing and shut off valve (non self piercing) Phillips screwdriver Water line kit #5303917950 You'll also need: • A freezer shelf to a household cold water line...
... materials needed Ice Maker Putty knife Electric drill with a Needle nose pliers or nut driver Adjustable wrench Knife 1/4" drill bit Flat blade screwdriver 1/4" OD copper supply line with water pressure between 20 and 120 psi. The water line kit (including copper tubing and shut off valve (non self piercing) Phillips screwdriver Water line kit #5303917950 You'll also need: • A freezer shelf to a household cold water line...

User Guide
Page 6
Retain the foam for future use. Plug 4 Peel off the label covering the ice maker hole on the back of the refrigerator, then remove the foam from the inside of the freezer compartment with the needle nose pliers. Remove label 6 www.insigniaproducts.com 3 Remove the plug from the hole with a putty knife.
Retain the foam for future use. Plug 4 Peel off the label covering the ice maker hole on the back of the refrigerator, then remove the foam from the inside of the freezer compartment with the needle nose pliers. Remove label 6 www.insigniaproducts.com 3 Remove the plug from the hole with a putty knife.

User Guide
Page 9
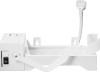
Ice Maker 10 With the ice maker in one hand, plug the wiring harness connector into the terminal located at the top of ice maker. Make sure that the connection is tight. Ice maker mounting screws Water inlet tube Fill cup www.insigniaproducts.com 9 Make sure that the wiring harness is sitting inside the fill cup, then tighten the screws. Make sure that the water inlet tube is still in step 8. Terminal Wiring harness connector 11 Mount the ice maker onto the two ice maker mounting screws you installed in the hook on the back of the freezer panel.
Ice Maker 10 With the ice maker in one hand, plug the wiring harness connector into the terminal located at the top of ice maker. Make sure that the connection is tight. Ice maker mounting screws Water inlet tube Fill cup www.insigniaproducts.com 9 Make sure that the wiring harness is sitting inside the fill cup, then tighten the screws. Make sure that the water inlet tube is still in step 8. Terminal Wiring harness connector 11 Mount the ice maker onto the two ice maker mounting screws you installed in the hook on the back of the freezer panel.

User Guide
Page 10
12 Adjust the leveling bracket to level the ice maker. Ice maker Screws Leveling bracket 13 With the ice maker level, insert the third ice maker mounting screw at the top and bottom. The ice maker is level when the gap between the freezer wall and the ice maker is the same at the bottom of the ice maker and tighten. 14 Reinstall the freezer shelf and set the ice storage bin on the shelf. Ice storage bin 10 www.insigniaproducts.com
12 Adjust the leveling bracket to level the ice maker. Ice maker Screws Leveling bracket 13 With the ice maker level, insert the third ice maker mounting screw at the top and bottom. The ice maker is level when the gap between the freezer wall and the ice maker is the same at the bottom of the ice maker and tighten. 14 Reinstall the freezer shelf and set the ice storage bin on the shelf. Ice storage bin 10 www.insigniaproducts.com

User Guide
Page 11
Fixing clamps Water valve 16 Connect the wiring harness to drive the two self-drilling screws through the bracket and into the cabinet. Align the water valve bracket with the factory drilled holes, then use a Phillips head screwdriver to the water valve, making sure that the connection is tight, then install the mounting box and box cover on the plug. Wiring harness plug www.insigniaproducts.com 11 Ice Maker 15 Locate the pre-punched holes at the bottom right corner of the back panel of the refrigerator.
Fixing clamps Water valve 16 Connect the wiring harness to drive the two self-drilling screws through the bracket and into the cabinet. Align the water valve bracket with the factory drilled holes, then use a Phillips head screwdriver to the water valve, making sure that the connection is tight, then install the mounting box and box cover on the plug. Wiring harness plug www.insigniaproducts.com 11 Ice Maker 15 Locate the pre-punched holes at the bottom right corner of the back panel of the refrigerator.

User Guide
Page 13
Ice Maker Installing the ice maker in a bottom mount freezer 1 Unplug the refrigerator from the wall outlet. 2 Remove the drawers from the freezer compartment. 3 Remove the small screws on both sides of the guide rail of the freezer compartment door, then remove the freezer compartment door, with the guide rail support, from the guide rail. 4 Remove the ice maker unit and the connection plate from the accessories bag, then insert the connection plate...
Ice Maker Installing the ice maker in a bottom mount freezer 1 Unplug the refrigerator from the wall outlet. 2 Remove the drawers from the freezer compartment. 3 Remove the small screws on both sides of the guide rail of the freezer compartment door, then remove the freezer compartment door, with the guide rail support, from the guide rail. 4 Remove the ice maker unit and the connection plate from the accessories bag, then insert the connection plate...

User Guide
Page 16
... the quick change sealing ring at the bottom of your refrigerator, and secure it with the long screw from the accessory bag. 16 www.insigniaproducts.com Thermal insulation 11 Remove the water tube connector, silicone seal, long water supply tube, and white head screw from the hole you just exposed. Make sure that all parts are securely assembled. 10 Use needle nose...
... the quick change sealing ring at the bottom of your refrigerator, and secure it with the long screw from the accessory bag. 16 www.insigniaproducts.com Thermal insulation 11 Remove the water tube connector, silicone seal, long water supply tube, and white head screw from the hole you just exposed. Make sure that all parts are securely assembled. 10 Use needle nose...

User Guide
Page 17
Factory pre-punched holes Water valve 14 Connect the wiring harness to drive the two self-drilling screws through the bracket and into the cabinet. Wiring harness plug www.insigniaproducts.com 17 Align the water valve bracket with the factory drilled holes, then use a Phillips head screwdriver to the water valve, making sure that the connection is tight, then install the mounting box and box cover on the plug. Ice Maker 13 Locate the pre-punched holes at the bottom right corner of the back panel of the refrigerator.
Factory pre-punched holes Water valve 14 Connect the wiring harness to drive the two self-drilling screws through the bracket and into the cabinet. Wiring harness plug www.insigniaproducts.com 17 Align the water valve bracket with the factory drilled holes, then use a Phillips head screwdriver to the water valve, making sure that the connection is tight, then install the mounting box and box cover on the plug. Ice Maker 13 Locate the pre-punched holes at the bottom right corner of the back panel of the refrigerator.

User Guide
Page 19
... household cold water line behind the refrigerator or adjacent base cabinet) as close to the wall as a power drill) during installation. 1 Disconnect the refrigerator from the wall after installation. 7 Connect the tubing to the valve by the refrigerator or ice maker manufacturer. • Follow these instructions carefully to minimize the risk of water damage. • Water hammer (water banging in the pipe) in the water line kit that the refrigerator...
... household cold water line behind the refrigerator or adjacent base cabinet) as close to the wall as a power drill) during installation. 1 Disconnect the refrigerator from the wall after installation. 7 Connect the tubing to the valve by the refrigerator or ice maker manufacturer. • Follow these instructions carefully to minimize the risk of water damage. • Water hammer (water banging in the pipe) in the water line kit that the refrigerator...

User Guide
Page 20
...; If your refrigerator does not have a water filter, we recommend installing one additional turn with water until it will go or ¼-inch, then slide the ferrule (sleeve) into the valve inlet and finger tighten the compression nut onto the valve. DO NOT overtighten. 13 Secure the water supply line to the refrigerator, be sure the refrigerator power cord is hand-tight...
...; If your refrigerator does not have a water filter, we recommend installing one additional turn with water until it will go or ¼-inch, then slide the ferrule (sleeve) into the valve inlet and finger tighten the compression nut onto the valve. DO NOT overtighten. 13 Secure the water supply line to the refrigerator, be sure the refrigerator power cord is hand-tight...
User Guide
Page 21
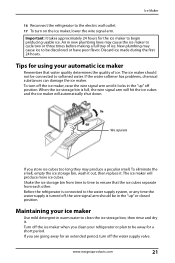
.... Air in warm water to the water supply system, or any time the water supply is full, the wire signal arm will hit the ice cubes and the ice maker will produce more ice cubes. To eliminate the smell, empty the ice storage bin, wash it out, then replace it locks in the "up " or closed position. The ice maker will automatically shut down. If...
.... Air in warm water to the water supply system, or any time the water supply is full, the wire signal arm will hit the ice cubes and the ice maker will produce more ice cubes. To eliminate the smell, empty the ice storage bin, wash it out, then replace it locks in the "up " or closed position. The ice maker will automatically shut down. If...
User Guide
Page 22
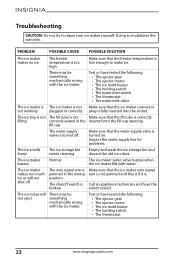
... switch • The thermostat • The water inlet valve Make sure that the ice maker connector plug is low enough to repair your ice maker yourself. fill cup. Test or have the switch tested. The ice maker is too high. Make sure that the freezer temperature is fully inserted into the fill cup opening. Troubleshooting CAUTION: Do not try to make ice. PROBLEM POSSIBLE CAUSE POSSIBLE SOLUTION The ice maker makes no ice The freezer temperature is not plugged...
... switch • The thermostat • The water inlet valve Make sure that the ice maker connector plug is low enough to repair your ice maker yourself. fill cup. Test or have the switch tested. The ice maker is too high. Make sure that the freezer temperature is fully inserted into the fill cup opening. Troubleshooting CAUTION: Do not try to make ice. PROBLEM POSSIBLE CAUSE POSSIBLE SOLUTION The ice maker makes no ice The freezer temperature is not plugged...
User Guide
Page 23
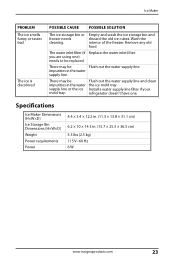
... or the ice Install a water supply line filter if your mold tray. The water inlet filter (if Replace the water inlet filter. There may be Flush out the water supply line and clean impurities in . (15.7 × 25.3 × 36.3 cm) 5.5 lbs (2.5 kg) 115 V~60 Hz 6 W www.insigniaproducts.com 23 There may be replaced. Specifications Ice Maker Dimensions (H×W×D) Ice Storage Bin Dimensions (H×W×D) Weight Power requirements Power 4.4 × 5.4 ×...
... or the ice Install a water supply line filter if your mold tray. The water inlet filter (if Replace the water inlet filter. There may be Flush out the water supply line and clean impurities in . (15.7 × 25.3 × 36.3 cm) 5.5 lbs (2.5 kg) 115 V~60 Hz 6 W www.insigniaproducts.com 23 There may be replaced. Specifications Ice Maker Dimensions (H×W×D) Ice Storage Bin Dimensions (H×W×D) Weight Power requirements Power 4.4 × 5.4 ×...

User Guide
Page 24
... received with new or rebuilt parts; This warranty does not cover: • Food, beverage, and or medicine loss/spoilage • Customer instruction/education • Installation • Set up adjustments • Cosmetic damage • Damage due to weather, lightning, and other acts of God, such as the original packaging. For this warranty to apply, your Product must pay all labor and...
... received with new or rebuilt parts; This warranty does not cover: • Food, beverage, and or medicine loss/spoilage • Customer instruction/education • Installation • Set up adjustments • Cosmetic damage • Damage due to weather, lightning, and other acts of God, such as the original packaging. For this warranty to apply, your Product must pay all labor and...
User Guide
Page 25
....com INSIGNIA is " or "with all faults" • Consumables, including but not limited to liquids, gels or pastes. All rights reserved. REPAIR REPLACEMENT AS PROVIDED UNDER THIS WARRANTY IS YOUR EXCLUSIVE REMEDY FOR BREACH OF WARRANTY. Ice Maker • Damage due to incorrect operation or maintenance • Connection to an incorrect voltage or power supply • Attempted repair by Best Buy...
....com INSIGNIA is " or "with all faults" • Consumables, including but not limited to liquids, gels or pastes. All rights reserved. REPAIR REPLACEMENT AS PROVIDED UNDER THIS WARRANTY IS YOUR EXCLUSIVE REMEDY FOR BREACH OF WARRANTY. Ice Maker • Damage due to incorrect operation or maintenance • Connection to an incorrect voltage or power supply • Attempted repair by Best Buy...

