Warranty
Page 1
....com INSIGNIA is " or "with new or rebuilt parts; To obtain warranty service, in China www.insigniaproducts.com This warranty does not cover: • Customer instruction/education • Installation • Set up to be purchased in ). • Damage due to incorrect operation or maintenance • Connection to an incorrect voltage or power supply • Attempted repair by any part of the product • Display panels containing...
....com INSIGNIA is " or "with new or rebuilt parts; To obtain warranty service, in China www.insigniaproducts.com This warranty does not cover: • Customer instruction/education • Installation • Set up to be purchased in ). • Damage due to incorrect operation or maintenance • Connection to an incorrect voltage or power supply • Attempted repair by any part of the product • Display panels containing...
User guide
Page 2
... need 20 Materials you start 20 Step-by-step instructions 21 Stacking your washer and dryer (optional 26 Using your dryer 33 Drying a load of clothes 33 Unloading your dryer 34 Setting the child lock 34 Cleaning the lint filters 35 Emptying the water reservoir 38 Dryer options and settings 38 Special laundry tips 42 Maintaining your dryer 43 Cleaning the heat exchanger 43 Cleaning the exterior 43 Cleaning the drum 43 Cleaning the control panel 43 Cleaning the moisture sensors 44 Troubleshooting...
... need 20 Materials you start 20 Step-by-step instructions 21 Stacking your washer and dryer (optional 26 Using your dryer 33 Drying a load of clothes 33 Unloading your dryer 34 Setting the child lock 34 Cleaning the lint filters 35 Emptying the water reservoir 38 Dryer options and settings 38 Special laundry tips 42 Maintaining your dryer 43 Cleaning the heat exchanger 43 Cleaning the exterior 43 Cleaning the drum 43 Cleaning the control panel 43 Cleaning the moisture sensors 44 Troubleshooting...
User guide
Page 3
... and Important Safety Instructions in this manual carefully before installation and operation of your dryer. You are responsible for using your dryer, these basic safety precautions SHOULD be performed by a qualified installer, service agency, or the gas supplier. CAUTION This indicates that hazards or unsafe practices may cause serious personal injury or death. www.insigniaproducts.com 3 SAFETY & PRECAUTIONS NS-FDRE44W1/NS-FDRE44W1-C SAFETY AND PRECAUTIONS...
... and Important Safety Instructions in this manual carefully before installation and operation of your dryer. You are responsible for using your dryer, these basic safety precautions SHOULD be performed by a qualified installer, service agency, or the gas supplier. CAUTION This indicates that hazards or unsafe practices may cause serious personal injury or death. www.insigniaproducts.com 3 SAFETY & PRECAUTIONS NS-FDRE44W1/NS-FDRE44W1-C SAFETY AND PRECAUTIONS...

User guide
Page 4
... dryer before the end of the drying cycle unless all instructions before using your appliance, follow the fabric care instructions supplied by itself. 7 Do not store or use the dryer to dry clothes ...temperatures. 12 Do not tamper with the controls. 13 Do not repair or replace any part of the appliance or attempt any servicing unless it will be properly installed as described in this manual. 4 ALWAYS follow basic precautions, including the following: 1 Read all items are quickly removed and spread out so that the heat is specifically recommended in the user-maintenance instructions...
... dryer before the end of the drying cycle unless all instructions before using your appliance, follow the fabric care instructions supplied by itself. 7 Do not store or use the dryer to dry clothes ...temperatures. 12 Do not tamper with the controls. 13 Do not repair or replace any part of the appliance or attempt any servicing unless it will be properly installed as described in this manual. 4 ALWAYS follow basic precautions, including the following: 1 Read all items are quickly removed and spread out so that the heat is specifically recommended in the user-maintenance instructions...

User guide
Page 5
... the exhaust opening and surrounding areas free from lint, dust, and dirt. 21 The interior of the dryer and exhaust duct should not be placed in the dryer until all traces of fire or explosion • Do not dry items that could ignite or explode. Keep the door closed when not in accordance with local and national codes. Never plug the power cord into...
... the exhaust opening and surrounding areas free from lint, dust, and dirt. 21 The interior of the dryer and exhaust duct should not be placed in the dryer until all traces of fire or explosion • Do not dry items that could ignite or explode. Keep the door closed when not in accordance with local and national codes. Never plug the power cord into...

User guide
Page 6
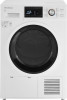
... dry clothing with large buckles, buttons, or other heavy metal or solid things. 4 Install and use in accordance with the manufacturer's instructions. 5 Do not place items in your dryer can create a fire hazard. 8 Take care that have been spotted or soaked with NS-FWM27W1 washer) • Drain hose • User Guide 6 www.insigniaproducts.com Piling, stacking, or storing these instructions. Features Package contents • 16-Cycle Electric Dryer...
... dry clothing with large buckles, buttons, or other heavy metal or solid things. 4 Install and use in accordance with the manufacturer's instructions. 5 Do not place items in your dryer can create a fire hazard. 8 Take care that have been spotted or soaked with NS-FWM27W1 washer) • Drain hose • User Guide 6 www.insigniaproducts.com Piling, stacking, or storing these instructions. Features Package contents • 16-Cycle Electric Dryer...

User guide
Page 8
... favorite drying cycle. All buttons except Power are locked when the child lock is pressed again. Press once to turn your dryer is already dry, and can be "My Cycle." The load is on the display and the delay icon blinks. Press once to add the wrinkle prevent step into stand-by. The child lock indicator lights. Press again to turn off . Control panel INSTALLATION INSTRUCTIONS # ITEM Power 1 Wrinkle Prevent 2 Delay 3 Time Adjust 4 Dryness 5 Signal 6 Child lock...
... favorite drying cycle. All buttons except Power are locked when the child lock is pressed again. Press once to turn your dryer is already dry, and can be "My Cycle." The load is on the display and the delay icon blinks. Press once to add the wrinkle prevent step into stand-by. The child lock indicator lights. Press again to turn off . Control panel INSTALLATION INSTRUCTIONS # ITEM Power 1 Wrinkle Prevent 2 Delay 3 Time Adjust 4 Dryness 5 Signal 6 Child lock...

User guide
Page 9
... Press to select the ideal cycle for your clothes. The cycle time shows how long until your dryer's delay start or pause the program. www.insigniaproducts.com 9 Cycle selector Turn the knob to start setting is ideal for ironing. Wool, Air Fluff, Time Dry, and Refresh are Sensor cycles. The dryer beeps for 10 seconds when the moisture in your type of the display. INSTALLATION INSTRUCTIONS NS-FDRE44W1/NS-FDRE44W1-C # ITEM DESCRIPTION Damp Alert Press...
... Press to select the ideal cycle for your clothes. The cycle time shows how long until your dryer's delay start or pause the program. www.insigniaproducts.com 9 Cycle selector Turn the knob to start setting is ideal for ironing. Wool, Air Fluff, Time Dry, and Refresh are Sensor cycles. The dryer beeps for 10 seconds when the moisture in your type of the display. INSTALLATION INSTRUCTIONS NS-FDRE44W1/NS-FDRE44W1-C # ITEM DESCRIPTION Damp Alert Press...

User guide
Page 11
... a child being replaced. A dryer produces combustible lint. BASIC REQUIREMENTS Make sure you have everything necessary for the dryer being trapped and suffocating. The dryer must be located where there are no air-flow obstructions. • The dryer must be kept clear of combustible materials, gasoline, and other flammable vapors and liquids. After unplugging, cut off power cord. Choosing a location INSTALLATION REQUIREMENTS IMPORTANT TO THE INSTALLER Read the following instructions carefully...
... a child being replaced. A dryer produces combustible lint. BASIC REQUIREMENTS Make sure you have everything necessary for the dryer being trapped and suffocating. The dryer must be located where there are no air-flow obstructions. • The dryer must be kept clear of combustible materials, gasoline, and other flammable vapors and liquids. After unplugging, cut off power cord. Choosing a location INSTALLATION REQUIREMENTS IMPORTANT TO THE INSTALLER Read the following instructions carefully...

User guide
Page 18
... separate) circuit serving only your dryer is UL listed and rated at the dryer cabinet with tinned leads. • Do not reuse a power supply cord from an old dryer. U.S. electric model dryers. The power cord electric supply wiring must be done in accordance with local codes, or in the absence of local codes, with U.S. INSTALLATION INSTRUCTIONS Electric requirements WARNING: The wiring diagram is located on the back panel of your dryer. • Incorrectly connecting your dryer's grounding conductor...
... separate) circuit serving only your dryer is UL listed and rated at the dryer cabinet with tinned leads. • Do not reuse a power supply cord from an old dryer. U.S. electric model dryers. The power cord electric supply wiring must be done in accordance with local codes, or in the absence of local codes, with U.S. INSTALLATION INSTRUCTIONS Electric requirements WARNING: The wiring diagram is located on the back panel of your dryer. • Incorrectly connecting your dryer's grounding conductor...

User guide
Page 19
... neutral conductor must be identified by -step instructions on page 21 for instructions on how to connect a power cord to your dryer has an optional cord with an equipment-grounding conductor and a grounding plug, which is a four-wire (four-prong) outlet, choose a four-wire power supply cord with ring or spade terminals and UL listed strain relief. Grounding requirements Your dryer must be grounded. For products sold in...
... neutral conductor must be identified by -step instructions on page 21 for instructions on how to connect a power cord to your dryer has an optional cord with an equipment-grounding conductor and a grounding plug, which is a four-wire (four-prong) outlet, choose a four-wire power supply cord with ring or spade terminals and UL listed strain relief. Grounding requirements Your dryer must be grounded. For products sold in...

User guide
Page 20
... : • The location you will need • 3- Check with the circuit conductors and connected to install your dryer. Note: For Canadian models, the power cord comes pre-installed. 20 www.insigniaproducts.com See Grounding requirements on blower housing). WARNING: • Improper connection of electric shock. models, you start Before you have the correct type power cord (not included). See Electric requirements on owner's house) electric power cord Before you start installing your dryer, make sure that opens Cutting knife Pliers...
... : • The location you will need • 3- Check with the circuit conductors and connected to install your dryer. Note: For Canadian models, the power cord comes pre-installed. 20 www.insigniaproducts.com See Grounding requirements on blower housing). WARNING: • Improper connection of electric shock. models, you start Before you have the correct type power cord (not included). See Electric requirements on owner's house) electric power cord Before you start installing your dryer, make sure that opens Cutting knife Pliers...
User guide
Page 21
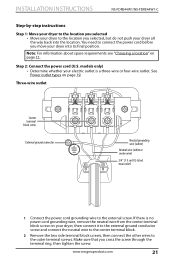
If there is a three-wire or four-wire outlet. Make sure that you cross the screw through the terminal ring, then tighten the screw. You need to connect the power cord before you move your dryer into the location. INSTALLATION INSTRUCTIONS NS-FDRE44W1/NS-FDRE44W1-C Step-by-step instructions Step 1: Move your dryer to the location you selected • Move your dryer to the location you selected, but do not push your...
If there is a three-wire or four-wire outlet. Make sure that you cross the screw through the terminal ring, then tighten the screw. You need to connect the power cord before you move your dryer into the location. INSTALLATION INSTRUCTIONS NS-FDRE44W1/NS-FDRE44W1-C Step-by-step instructions Step 1: Move your dryer to the location you selected • Move your dryer to the location you selected, but do not push your...
User guide
Page 23
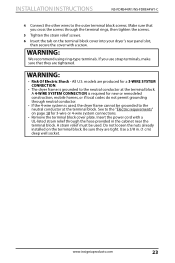
... installed on the terminal block. www.insigniaproducts.com 23 Insert the power cord with a screw. Use a 3/8 in the cabinet near the terminal block. Be sure they are produced for 3-wire or 4-wire system connections. • Remove the terminal block cover plate. WARNING: • Risk Of Electric Shock - A strain relief must be used , the dryer frame cannot be grounded to the neutral conductor at the terminal block. INSTALLATION INSTRUCTIONS NS-FDRE44W1/NS-FDRE44W1-C 4 Connect the other wires to the "Electric requirements...
... installed on the terminal block. www.insigniaproducts.com 23 Insert the power cord with a screw. Use a 3/8 in the cabinet near the terminal block. Be sure they are produced for 3-wire or 4-wire system connections. • Remove the terminal block cover plate. WARNING: • Risk Of Electric Shock - A strain relief must be used , the dryer frame cannot be grounded to the neutral conductor at the terminal block. INSTALLATION INSTRUCTIONS NS-FDRE44W1/NS-FDRE44W1-C 4 Connect the other wires to the "Electric requirements...
User guide
Page 26
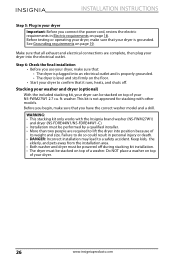
INSTALLATION INSTRUCTIONS Step 5: Plug in your dryer Important: Before you connect the power cord, review the electric requirements in personal injury or death. • DANGER: Incorrect installation may lead to lift the dryer into the electrical outlet. Make sure that it runs, heats, and shuts off during stacking kit installation. • The dryer must be stacked on the floor. • Start your dryer to confirm that all exhaust and electrical connections are required to a safety accident. Stacking your washer and dryer (optional...
INSTALLATION INSTRUCTIONS Step 5: Plug in your dryer Important: Before you connect the power cord, review the electric requirements in personal injury or death. • DANGER: Incorrect installation may lead to lift the dryer into the electrical outlet. Make sure that it runs, heats, and shuts off during stacking kit installation. • The dryer must be stacked on the floor. • Start your dryer to confirm that all exhaust and electrical connections are required to a safety accident. Stacking your washer and dryer (optional...

User guide
Page 34
... Damp Alert buttons for three seconds. When you are ready to prevent children from changing the settings on , you cannot start drying again, close the door, then press Start/Pause. The child lock light turns on. 2 To turn on page 35. You must press Start/Pause to add or remove items or adjust the load), press Start/Pause, then open the door. OPERATING INSTRUCTIONS 2 If you need to pause the cycle (for...
... Damp Alert buttons for three seconds. When you are ready to prevent children from changing the settings on , you cannot start drying again, close the door, then press Start/Pause. The child lock light turns on. 2 To turn on page 35. You must press Start/Pause to add or remove items or adjust the load), press Start/Pause, then open the door. OPERATING INSTRUCTIONS 2 If you need to pause the cycle (for...
User guide
Page 44
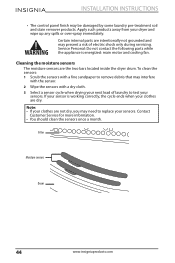
... parts are not dry, you may need to replace your clothes are intentionally not grounded and may be damaged by some laundry pre-treatment soil and stain remover products. Service Personal: Do not contact the following parts while the appliance is working correctly, the cycle ends when your clothes are the two bars located inside the dryer drum. Note: • If your sensors. INSTALLATION INSTRUCTIONS • The control panel...
... parts are not dry, you may need to replace your clothes are intentionally not grounded and may be damaged by some laundry pre-treatment soil and stain remover products. Service Personal: Do not contact the following parts while the appliance is working correctly, the cycle ends when your clothes are the two bars located inside the dryer drum. Note: • If your sensors. INSTALLATION INSTRUCTIONS • The control panel...
User guide
Page 45
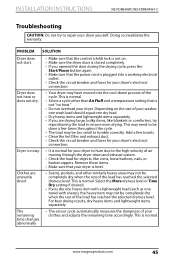
... exhaust duct. • Check the circuit breaker and fuses for your washer, one wash load should equal one towel with a lightweight load (such as one dry load. • Dry heavy items and lightweight items separately. • If you opened the door during the drying cycle, press the Start/Pause button again. • Make sure that your dryer is level. • Seams, pockets, and other than Air Fluff and a temperature setting that the control (child) lock...
... exhaust duct. • Check the circuit breaker and fuses for your washer, one wash load should equal one towel with a lightweight load (such as one dry load. • Dry heavy items and lightweight items separately. • If you opened the door during the drying cycle, press the Start/Pause button again. • Make sure that your dryer is level. • Seams, pockets, and other than Air Fluff and a temperature setting that the control (child) lock...

User guide
Page 46
... clean. • Select a higher drying intensity or time cycle. 46 www.insigniaproducts.com The Wrinkle Prevent setting works best when the items in the dryer load are dried. Check the water reservoir: • If it is full, pour out the condensate water and restart the dryer. • If the reservoir is not full, you can break up into small pieces that turn on the clothing. INSTALLATION INSTRUCTIONS PROBLEM SOLUTION Dryer shuts...
... clean. • Select a higher drying intensity or time cycle. 46 www.insigniaproducts.com The Wrinkle Prevent setting works best when the items in the dryer load are dried. Check the water reservoir: • If it is full, pour out the condensate water and restart the dryer. • If the reservoir is not full, you can break up into small pieces that turn on the clothing. INSTALLATION INSTRUCTIONS PROBLEM SOLUTION Dryer shuts...
User guide
Page 49
...;2020 Best Buy. INSIGNIA SHALL NOT BE LIABLE FOR ANY INCIDENTAL OR CONSEQUENTIAL DAMAGES FOR THE BREACH OF ANY EXPRESS OR IMPLIED WARRANTY ON THIS PRODUCT, INCLUDING, BUT NOT LIMITED TO, LOST DATA, LOSS OF USE OF YOUR PRODUCT, LOST BUSINESS OR LOST PROFITS. INSTALLATION INSTRUCTIONS NS-FDRE44W1/NS-FDRE44W1-C • Connection to an incorrect voltage or power supply • Attempted repair by...
...;2020 Best Buy. INSIGNIA SHALL NOT BE LIABLE FOR ANY INCIDENTAL OR CONSEQUENTIAL DAMAGES FOR THE BREACH OF ANY EXPRESS OR IMPLIED WARRANTY ON THIS PRODUCT, INCLUDING, BUT NOT LIMITED TO, LOST DATA, LOSS OF USE OF YOUR PRODUCT, LOST BUSINESS OR LOST PROFITS. INSTALLATION INSTRUCTIONS NS-FDRE44W1/NS-FDRE44W1-C • Connection to an incorrect voltage or power supply • Attempted repair by...


