Quick Setup Guide (English)
Page 1
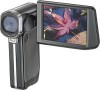
..., see your User Guide for initial setup of your purchase of a high-quality Insignia product. V1 FINAL FOR PRINT Quick Setup Guide l NS-DV720PBL2 Congratulations on your camcorder. Your NS-DV720PBL2 is designed for reliable and trouble-free performance. Package contents • Insignia 720p digital camcorder • USB cable • A/V cable • AC Adapter • Lithium-ion rechargeable...
..., see your User Guide for initial setup of your purchase of a high-quality Insignia product. V1 FINAL FOR PRINT Quick Setup Guide l NS-DV720PBL2 Congratulations on your camcorder. Your NS-DV720PBL2 is designed for reliable and trouble-free performance. Package contents • Insignia 720p digital camcorder • USB cable • A/V cable • AC Adapter • Lithium-ion rechargeable...
Quick Setup Guide (English)
Page 4
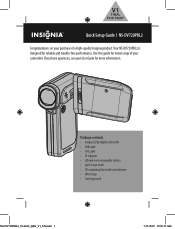
...: number of pictures remaining at current resolution with the + and - OR - • Connect the USB cable to the mini USB jack on your camcorder and to your camcorder while the AC charger is plugged in 2 Pull th Getti NOTE: Rem To turn Press dow - OR Close the Initial When yo Simple M Turnin... When yo and set th NS-DV720PBL2_10-0624_QSG_V1_EN.indd 4 7/13/2010 10:03:48 AM To turn Press dow - symbols on the battery line up your camcorder To install the battery: • Slide the battery cover off only) Inser Your cam memory...
...: number of pictures remaining at current resolution with the + and - OR - • Connect the USB cable to the mini USB jack on your camcorder and to your camcorder while the AC charger is plugged in 2 Pull th Getti NOTE: Rem To turn Press dow - OR Close the Initial When yo Simple M Turnin... When yo and set th NS-DV720PBL2_10-0624_QSG_V1_EN.indd 4 7/13/2010 10:03:48 AM To turn Press dow - symbols on the battery line up your camcorder To install the battery: • Slide the battery cover off only) Inser Your cam memory...

Quick Setup Guide (English)
Page 5
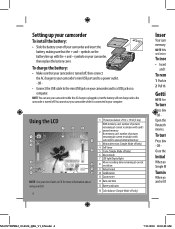
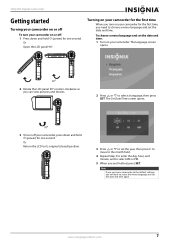
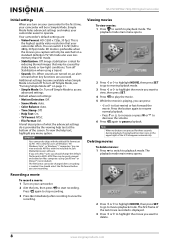
...on : Press down and hold the power button for one second. - Initial settings: When you turn your camcorder will need to choose a menu language and set the date and time. 5 NS-DV720PBL2_10-0624_QSG_V1_EN.indd 5 7/13/2010 10:03:49 AM Rotate the LCD panel 90° counter-clockwise ...to operate. To remove an installed memory card: 1 Push in Simple Mode. To turn on your camcorder for the first time, your camcorder on the memory card.
...on : Press down and hold the power button for one second. - Initial settings: When you turn your camcorder will need to choose a menu language and set the date and time. 5 NS-DV720PBL2_10-0624_QSG_V1_EN.indd 5 7/13/2010 10:03:49 AM Rotate the LCD panel 90° counter-clockwise ...to operate. To remove an installed memory card: 1 Push in Simple Mode. To turn on your camcorder for the first time, your camcorder on the memory card.
Quick Setup Guide (English)
Page 6
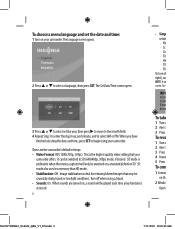
...8226; Simp settin · Mo · Sc · Co · Tim · He · TV · Fil To turn off when using your camcorder. When sounds are the camcorder's default settings: • Video Format: HD (1280x720p, 30 fps). Turn off right), an NOTE: A sim screen. SD mode is preferable when the movies... Sounds: On. The Set Date/Time screen opens. 3 Press or to select set the date and time: 1 Turn on th 2 Windo Open NS-DV720PBL2_10-0624_QSG_V1_EN.indd 6 7/13/2010 10:03:49 AM These are turned on, a sound will only be played each time a key function is ideal for...
...8226; Simp settin · Mo · Sc · Co · Tim · He · TV · Fil To turn off when using your camcorder. When sounds are the camcorder's default settings: • Video Format: HD (1280x720p, 30 fps). Turn off right), an NOTE: A sim screen. SD mode is preferable when the movies... Sounds: On. The Set Date/Time screen opens. 3 Press or to select set the date and time: 1 Turn on th 2 Windo Open NS-DV720PBL2_10-0624_QSG_V1_EN.indd 6 7/13/2010 10:03:49 AM These are turned on, a sound will only be played each time a key function is ideal for...
Quick Setup Guide (English)
Page 7
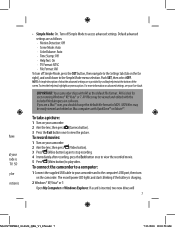
... menu selection. Default advanced settings are as the default file format. IMPORTANT:Your camcorder ships with the included MediaImpression software. AVI files may be nction is inserted, two new drives will 7 NS-DV720PBL2_10-0624_QSG_V1_EN.indd 7 7/13/2010 10:03:50 AM To record movies: ...1 Turn on the far right), and scroll down to play video. If you are is TV. Formoreinformationonadvancedsettings,seeyourUserGuide. To connect the camcorder to a computer: 1 Connect ...
... menu selection. Default advanced settings are as the default file format. IMPORTANT:Your camcorder ships with the included MediaImpression software. AVI files may be nction is inserted, two new drives will 7 NS-DV720PBL2_10-0624_QSG_V1_EN.indd 7 7/13/2010 10:03:50 AM To record movies: ...1 Turn on the far right), and scroll down to play video. If you are is TV. Formoreinformationonadvancedsettings,seeyourUserGuide. To connect the camcorder to a computer: 1 Connect ...
Quick Setup Guide (English)
Page 8
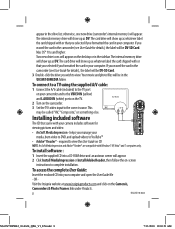
...that you selected if you erased the card in your camera includes software for viewing pictures and video: • ArcSoft MediaImpression - Visit the Insignia website at www.insigniaproducts.com and click on CD NOTE: ArcSoft MediaImpression and Adobe® Reader® are compatible with your computer. The internal... folder. This may be in your media, burn video to DVD, and upload videos to view the User Guide on the Camera's, Camcorders & Photo Frames link under Products. 8 ENGLISH 10-0624 NS-DV720PBL2_10-0624_QSG_V1_EN.indd 8 7/13/2010 10:03:51 AM
...that you selected if you erased the card in your camera includes software for viewing pictures and video: • ArcSoft MediaImpression - Visit the Insignia website at www.insigniaproducts.com and click on CD NOTE: ArcSoft MediaImpression and Adobe® Reader® are compatible with your computer. The internal... folder. This may be in your media, burn video to DVD, and upload videos to view the User Guide on the Camera's, Camcorders & Photo Frames link under Products. 8 ENGLISH 10-0624 NS-DV720PBL2_10-0624_QSG_V1_EN.indd 8 7/13/2010 10:03:51 AM
User Manual (English)
Page 2
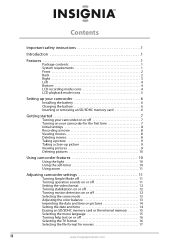
...recording mode icons 4 LCD playback mode icons 5 Setting up your camcorder 6 Installing the battery 6 Charging the battery 6 Inserting or removing an SD/SDHC memory card 6 Getting started 7 Turning your camcorder on or off 7 Turning on your camcorder for the first time 7 Initial settings 8 Recording a movie ... picture 9 Taking a close-up picture 9 Viewing pictures 9 Deleting pictures 10 Using camcorder features 10 Using the light 10 Using the self-timer 10 Using zoom 11 Adjusting camcorder settings 11 Turning Simple Mode off 11 Turning operation sounds on or off 11 Setting ...
...recording mode icons 4 LCD playback mode icons 5 Setting up your camcorder 6 Installing the battery 6 Charging the battery 6 Inserting or removing an SD/SDHC memory card 6 Getting started 7 Turning your camcorder on or off 7 Turning on your camcorder for the first time 7 Initial settings 8 Recording a movie ... picture 9 Taking a close-up picture 9 Viewing pictures 9 Deleting pictures 10 Using camcorder features 10 Using the light 10 Using the self-timer 10 Using zoom 11 Adjusting camcorder settings 11 Turning Simple Mode off 11 Turning operation sounds on or off 11 Setting ...
User Manual (English)
Page 5
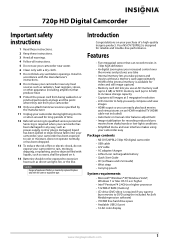
... where they exit from shaky hands or low-light conditions • Simplified menu and user interface makes using your camcorder easy Package contents • NS-DV720PBL2 720p HD digital camcorder • USB cable • A/V cable • AC adapter/charger • Lithium-ion rechargeable battery •... pictures on your purchase of explosion if battery is designed for reliable and trouble-free performance. Caution Danger of a high-quality Insignia product. Features • Five megapixel sensor that produce heat. 9 Protect the power cord from being walked on or pinched particularly...
... where they exit from shaky hands or low-light conditions • Simplified menu and user interface makes using your camcorder easy Package contents • NS-DV720PBL2 720p HD digital camcorder • USB cable • A/V cable • AC adapter/charger • Lithium-ion rechargeable battery •... pictures on your purchase of explosion if battery is designed for reliable and trouble-free performance. Caution Danger of a high-quality Insignia product. Features • Five megapixel sensor that produce heat. 9 Protect the power cord from being walked on or pinched particularly...
User Manual (English)
Page 6
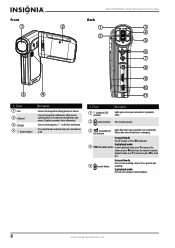
... you press on or off. # Item 1 (playback) LED indicator Description Lights green when your camcorder is in playback mode. 2 (camera) button Press to zoom in record mode. Displays camcorder status information. In record mode Press T to take a picture. 3 (record/power) LED indicator... playback mode, press T to zoom in or press W to start recording a movie. Lets you are capturing them. In playback mode Press to zoom out. NS-DV720PBL2 720p HD Digital Camcorder Front Back 1 2 1 3 4 2 5 6 7 8 9 10 3 4 11 # Item 1 Lens 2 LCD panel 3 LED light 4 (power button)...
... you press on or off. # Item 1 (playback) LED indicator Description Lights green when your camcorder is in playback mode. 2 (camera) button Press to zoom in record mode. Displays camcorder status information. In record mode Press T to take a picture. 3 (record/power) LED indicator... playback mode, press T to zoom in or press W to start recording a movie. Lets you are capturing them. In playback mode Press to zoom out. NS-DV720PBL2 720p HD Digital Camcorder Front Back 1 2 1 3 4 2 5 6 7 8 9 10 3 4 11 # Item 1 Lens 2 LCD panel 3 LED light 4 (power button)...
User Manual (English)
Page 7
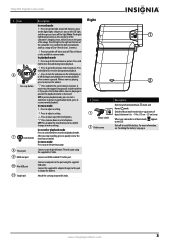
...an HDMI-enabled TV to this port using the supplied A/V cable. Slide off . Note: The digital light function increases the sensitivity of the camcorder's imaging sensor, which increases the grain of 2 to 4 feet (0.6 to 1.2 meters). Press and hold to fast-reverse during movie playback...Battery cover 1 2 Description Slide to switch between 6 in. ~ 10 in movie playback when a movie is decreased. www.insigniaproducts.com 3 720p HD Digital Camcorder # Item 6 Five-way button 7 (exit) button 8 TV out port 9 HDMI out port 10 Mini USB port 11 Strap hook Description In record mode...
...an HDMI-enabled TV to this port using the supplied A/V cable. Slide off . Note: The digital light function increases the sensitivity of the camcorder's imaging sensor, which increases the grain of 2 to 4 feet (0.6 to 1.2 meters). Press and hold to fast-reverse during movie playback...Battery cover 1 2 Description Slide to switch between 6 in. ~ 10 in movie playback when a movie is decreased. www.insigniaproducts.com 3 720p HD Digital Camcorder # Item 6 Five-way button 7 (exit) button 8 TV out port 9 HDMI out port 10 Mini USB port 11 Strap hook Description In record mode...
User Manual (English)
Page 8
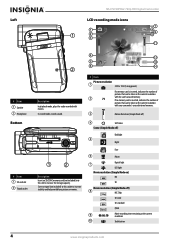
...mode, records sound. 1 2 Description Insert an SD/SDHC memory card (not included) into this socket to increase the storage capacity. NS-DV720PBL2 720p HD Digital Camcorder Left LCD recording mode icons 1 1 2 3 7 8 9 10 11 # Item 1 Speaker 2 Microphone Bottom # Item 1 SD... card slot 2 Tripod socket 2 Description In playback mode, plays the audio recorded with your camcorder's unused internal memory. 3 Motion Detection (Simple Mode off) 4 Self-timer Scene (Simple Mode off) Backlight 5 Night Face 6 Macro Digital light 7...
...mode, records sound. 1 2 Description Insert an SD/SDHC memory card (not included) into this socket to increase the storage capacity. NS-DV720PBL2 720p HD Digital Camcorder Left LCD recording mode icons 1 1 2 3 7 8 9 10 11 # Item 1 Speaker 2 Microphone Bottom # Item 1 SD... card slot 2 Tripod socket 2 Description In playback mode, plays the audio recorded with your camcorder's unused internal memory. 3 Motion Detection (Simple Mode off) 4 Self-timer Scene (Simple Mode off) Backlight 5 Night Face 6 Macro Digital light 7...

User Manual (English)
Page 9
720p HD Digital Camcorder # Item 11 Zoom meter: 4x digital zoom 12 2009/05/19 1 : 00 PM Date and time Battery power full Battery power medium 13 Battery power ... or pictures 3 Volume # Item Movie resolution (Simple Mode on) HD SD Movie resolution (Simple Mode off) 4 HD 720p SD wide SD standard QVGA Indicates your camcorder is in movie playback mode. 5 The icon on the right toggles between and each time you press . 1 2 3 1:00 PM 4 # Item 1 2 0005/0005 3 4 2009/05/19...
720p HD Digital Camcorder # Item 11 Zoom meter: 4x digital zoom 12 2009/05/19 1 : 00 PM Date and time Battery power full Battery power medium 13 Battery power ... or pictures 3 Volume # Item Movie resolution (Simple Mode on) HD SD Movie resolution (Simple Mode off) 4 HD 720p SD wide SD standard QVGA Indicates your camcorder is in movie playback mode. 5 The icon on the right toggles between and each time you press . 1 2 3 1:00 PM 4 # Item 1 2 0005/0005 3 4 2009/05/19...
User Manual (English)
Page 10
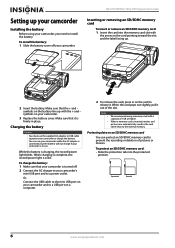
... adapter is in use the supplied AC adapter or USB cable to power your camcorder's mini USB port and to a USB port on a computer. 2 To remove the card, press in place. NS-DV720PBL2 720p HD Digital Camcorder Inserting or removing an SD/SDHC memory card To insert or remove an SD/...SDHC memory card: 1 Insert the card into the protected position. Make sure that it is solid. When charging is complete, the record/power light is firmly in on your camcorder. symbols...
... adapter is in use the supplied AC adapter or USB cable to power your camcorder's mini USB port and to a USB port on a computer. 2 To remove the card, press in place. NS-DV720PBL2 720p HD Digital Camcorder Inserting or removing an SD/SDHC memory card To insert or remove an SD/...SDHC memory card: 1 Insert the card into the protected position. Make sure that it is solid. When charging is complete, the record/power light is firmly in on your camcorder. symbols...
User Manual (English)
Page 11
... the default settings, you will have to choose a menu language and set the date and time again. Turning on your camcorder for the first time When you turn on your camcorder for the first time, you are finished, press SET. The Set Date/Time screen opens. 3 To turn off : 1 Press... down and hold (power) for one second. 720p HD Digital Camcorder Getting started Turning your camcorder on or off To turn your camcorder on or off your camcorder, press down and hold (power) for one second. To choose a menu language and set the year, then press...
... the default settings, you will have to choose a menu language and set the date and time again. Turning on your camcorder for the first time When you turn on your camcorder for the first time, you are finished, press SET. The Set Date/Time screen opens. 3 To turn off : 1 Press... down and hold (power) for one second. 720p HD Digital Camcorder Getting started Turning your camcorder on or off To turn your camcorder on or off your camcorder, press down and hold (power) for one second. To choose a menu language and set the year, then press...
User Manual (English)
Page 12
... the recording. The playback mode main menu opens. 2 Press or to highlight MOVIE, then press SET to go to playback mode. NS-DV720PBL2 720p HD Digital Camcorder Initial settings When you turn off Simple Mode, see "Turning Simple Mode off" on page 11. • Simple Mode: On....Press or to highlight the movie you want to stop recording. 3 Press immediately after a recording is ideal for reducing blurred images that your camcorder for three seconds during playback, the playback function icons in Simple Mode. Turn off . AVI is created. This is the highest quality video...
... the recording. The playback mode main menu opens. 2 Press or to highlight MOVIE, then press SET to go to playback mode. NS-DV720PBL2 720p HD Digital Camcorder Initial settings When you turn off Simple Mode, see "Turning Simple Mode off" on page 11. • Simple Mode: On....Press or to highlight the movie you want to stop recording. 3 Press immediately after a recording is ideal for reducing blurred images that your camcorder for three seconds during playback, the playback function icons in Simple Mode. Turn off . AVI is created. This is the highest quality video...
User Manual (English)
Page 13
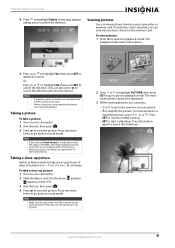
...previous or next picture. • T to view the picture. Note If the selected Video Format is inserted, you can delete only movies stored on your camcorder. 2 Aim the lens, then press . 3 Press to magnify the picture. Taking a close-up picture Switch to Macro mode to take a close ... mode. Press SET to resume normal viewing • SET to highlight Delete. Press two more times to go to delete the movie. 720p HD Digital Camcorder 4 Press to start a slideshow. A message appears asking you are not taking close -up pictures of objects between 6 in. ~ 10 in a ...
...previous or next picture. • T to view the picture. Note If the selected Video Format is inserted, you can delete only movies stored on your camcorder. 2 Aim the lens, then press . 3 Press to magnify the picture. Taking a close-up picture Switch to Macro mode to take a close ... mode. Press SET to resume normal viewing • SET to highlight Delete. Press two more times to go to delete the movie. 720p HD Digital Camcorder 4 Press to start a slideshow. A message appears asking you are not taking close -up pictures of objects between 6 in. ~ 10 in a ...
User Manual (English)
Page 14
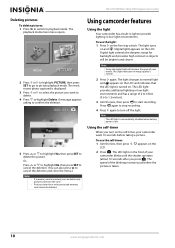
...light provides additional lighting in image quality is normal. 2 Press again. LCD. This slight reduction in low-light environments and has a range of your camcorder waits 10 seconds before the picture is inserted, you want to delete. 4 Press to start recording. To use the light: 1 Press on the card...normal light and appears on the LCD and indicates that the LED light is low. Notes Using the digital light will be deleted. NS-DV720PBL2 720p HD Digital Camcorder Deleting pictures To delete pictures: 1 Press to switch to provide lighting in low-light environments.
...light provides additional lighting in image quality is normal. 2 Press again. LCD. This slight reduction in low-light environments and has a range of your camcorder waits 10 seconds before the picture is inserted, you want to delete. 4 Press to start recording. To use the light: 1 Press on the card...normal light and appears on the LCD and indicates that the LED light is low. Notes Using the digital light will be deleted. NS-DV720PBL2 720p HD Digital Camcorder Deleting pictures To delete pictures: 1 Press to switch to provide lighting in low-light environments.

User Manual (English)
Page 15
... on the Tele/Wide button to highlight the (settings) tab. 720p HD Digital Camcorder Using zoom Zoom magnifies images when recording movies or taking pictures. To use right out of your camcorder makes sounds when you access advaced settings, such as video format options, motion detection... condition, and color balance. The maximum digital zoom is 4x. 2 Press W on or off Your camcorder comes from the factory in . Adjusting camcorder settings Turning Simple Mode off By default, your camcorder lights blue. 2 Press SET. The record/power indicator on Simple Mode, select On. 6 Press to...
... on the Tele/Wide button to highlight the (settings) tab. 720p HD Digital Camcorder Using zoom Zoom magnifies images when recording movies or taking pictures. To use right out of your camcorder makes sounds when you access advaced settings, such as video format options, motion detection... condition, and color balance. The maximum digital zoom is 4x. 2 Press W on or off Your camcorder comes from the factory in . Adjusting camcorder settings Turning Simple Mode off By default, your camcorder lights blue. 2 Press SET. The record/power indicator on Simple Mode, select On. 6 Press to...
User Manual (English)
Page 16
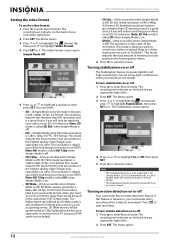
...movies will be upconverted to a TV using a tripod. mode resolution is also excellent for still images. This mode requires the least amount of your camcorder can offer. The Menu opens. 3 Press or to highlight the (movie) tab, then press to highlight a resolution, then press SET. Simple ... Mode is ideal if you will be watching your movies on the back of your camcorder starts recording when it detects movement. The record/power indicator on an HDTV. NS-DV720PBL2 720p HD Digital Camcorder Setting the video format To set the video format: 1 Press to highlight Stabilization,...
...movies will be upconverted to a TV using a tripod. mode resolution is also excellent for still images. This mode requires the least amount of your camcorder can offer. The Menu opens. 3 Press or to highlight the (movie) tab, then press to highlight a resolution, then press SET. Simple ... Mode is ideal if you will be watching your movies on the back of your camcorder starts recording when it detects movement. The record/power indicator on an HDTV. NS-DV720PBL2 720p HD Digital Camcorder Setting the video format To set the video format: 1 Press to highlight Stabilization,...

User Manual (English)
Page 17
.... 6 Press to highlight Motion Detection, then press SET or . Note To avoid blurry pictures when Night mode is off . Your camcorder will automatically choose the best settings for most conditions. To turn it back on and you can select: • Auto-Select this...Auto-Select this option for special conditions. However, you stop recording, Motion Detection is automatically turned off " on the back of your camcorder automatically adjust the white balance. • Daylight-Select this option when recording movies or taking pictures outdoors. • Fluorescent-Select this option...
.... 6 Press to highlight Motion Detection, then press SET or . Note To avoid blurry pictures when Night mode is off . Your camcorder will automatically choose the best settings for most conditions. To turn it back on and you can select: • Auto-Select this...Auto-Select this option for special conditions. However, you stop recording, Motion Detection is automatically turned off " on the back of your camcorder automatically adjust the white balance. • Daylight-Select this option when recording movies or taking pictures outdoors. • Fluorescent-Select this option...


