
Firmware Installation Guide (English)
Page 1
... display on the LCD as shown below. 2. If your Insignia camcorder model NS-DV111080F shows version 1.06, it to the latest firmware version if needed. Insignia NS-DV111080F Camcorder Firmware Version 1.06 Update Instructions (April 2010) The instructions below describe how you can check the firmware version on your Insignia NS-DV111080F camcorder and the steps to update it already has the...
... display on the LCD as shown below. 2. If your Insignia camcorder model NS-DV111080F shows version 1.06, it to the latest firmware version if needed. Insignia NS-DV111080F Camcorder Firmware Version 1.06 Update Instructions (April 2010) The instructions below describe how you can check the firmware version on your Insignia NS-DV111080F camcorder and the steps to update it already has the...
Firmware Installation Guide (English)
Page 2
... on the Insigniaproducts.com website (http://www.insigniaproducts.com/products/digitalcameras/NS-DV111080F.html). 3. The update process will erase all content from your camcorder's internal memory and SD card to your camcorder and it's SD card. 2. Turn the camcorder power on and wait. 6. Copy any images or video from your PC first. The update process...
... on the Insigniaproducts.com website (http://www.insigniaproducts.com/products/digitalcameras/NS-DV111080F.html). 3. The update process will erase all content from your camcorder's internal memory and SD card to your camcorder and it's SD card. 2. Turn the camcorder power on and wait. 6. Copy any images or video from your PC first. The update process...
Quick Setup Guide (English)
Page 1
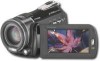
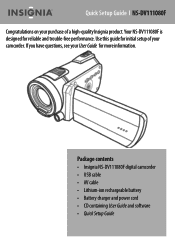
If you have questions, see your purchase of your camcorder. Package contents • Insignia NS-DV111080F digital camcorder • USB cable • AV cable • Lithium-ion rechargeable battery • Battery charger and power cord • CD containing User Guide and software • Quick Setup Guide Quick Setup Guide l NS-DV111080F Congratulations on your User Guide for more information. Use this guide for reliable and trouble-free performance. Your NS-DV111080F is designed for initial setup of a high-quality Insignia product.
If you have questions, see your purchase of your camcorder. Package contents • Insignia NS-DV111080F digital camcorder • USB cable • AV cable • Lithium-ion rechargeable battery • Battery charger and power cord • CD containing User Guide and software • Quick Setup Guide Quick Setup Guide l NS-DV111080F Congratulations on your User Guide for more information. Use this guide for reliable and trouble-free performance. Your NS-DV111080F is designed for initial setup of a high-quality Insignia product.
Quick Setup Guide (English)
Page 2
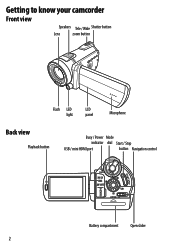
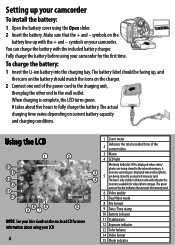
Getting to know your camcorder Front view Speakers Tele / Wide Shutter button Lens zoom button Flash LED LCD light panel Microphone Back view Playback button Busy / Power Mode indicator dial Start / Stop USB / mini HDMI port button Navigation control START/ STOP SET BUSY POWER CB OPEN Battery compartment Open slider 2
Getting to know your camcorder Front view Speakers Tele / Wide Shutter button Lens zoom button Flash LED LCD light panel Microphone Back view Playback button Busy / Power Mode indicator dial Start / Stop USB / mini HDMI port button Navigation control START/ STOP SET BUSY POWER CB OPEN Battery compartment Open slider 2
Quick Setup Guide (English)
Page 4
...Macro 4 LED light Memory indicator: INT is displayed when video/photos 5 are being stored to the wall outlet. It takes about using your camcorder. When charging is only visible in Video mode and indicates the memory available for video/photo storage. A memory card image is displayed when video/... photos are being stored to fully charge the battery. Make sure that the + and - symbols on your camcorder for more information about five hours to the internal memory. The bar is complete, the LED turns green. symbols on the battery line up ...
...Macro 4 LED light Memory indicator: INT is displayed when video/photos 5 are being stored to the wall outlet. It takes about using your camcorder. When charging is only visible in Video mode and indicates the memory available for video/photo storage. A memory card image is displayed when video/... photos are being stored to fully charge the battery. Make sure that the + and - symbols on your camcorder for more information about five hours to the internal memory. The bar is complete, the LED turns green. symbols on the battery line up ...

Quick Setup Guide (English)
Page 5
... the card. 4 Close the SD/SDHC card slot cover. To turn off your SD/SDHC card: 1 Power off . Initial settings When you turn on your camcorder: • Open the LCD monitor 90° or press the Power button for video/photo capture. The default settings in Simple mode are: 5 To remove... video or several photos, so it clicks into the slot. 3 Close the SD/SDHC card slot cover. Inserting or removing an SD/SDHC card Your camcorder has 128 MB of internal memory, approximately 70 MB of which is available for video/photo capture. 70 MB will be in Simple mode. Getting...
... the card. 4 Close the SD/SDHC card slot cover. To turn off your SD/SDHC card: 1 Power off . Initial settings When you turn on your camcorder: • Open the LCD monitor 90° or press the Power button for video/photo capture. The default settings in Simple mode are: 5 To remove... video or several photos, so it clicks into the slot. 3 Close the SD/SDHC card slot cover. Inserting or removing an SD/SDHC card Your camcorder has 128 MB of internal memory, approximately 70 MB of which is available for video/photo capture. 70 MB will be in Simple mode. Getting...

Quick Setup Guide (English)
Page 6
System setting Video mode Beep On Auto power off Simple mode. IMPORTANT:Your camcorder ships with the included TotalMedia™ HDCam software. TV format NTSC Help text On Simple mode On Video format Stabilizer Time stamp Color balance Dual ... the default file format. If you are a Mac™ user, you should change the default file format to turn off Simple Mode: 1 Turn on your camcorder. 2 Turn the Mode dial to SET. 3 Press the Navigation button to highlight the Simple mode icon, then press the center navigation control button or press...
System setting Video mode Beep On Auto power off Simple mode. IMPORTANT:Your camcorder ships with the included TotalMedia™ HDCam software. TV format NTSC Help text On Simple mode On Video format Stabilizer Time stamp Color balance Dual ... the default file format. If you are a Mac™ user, you should change the default file format to turn off Simple Mode: 1 Turn on your camcorder. 2 Turn the Mode dial to SET. 3 Press the Navigation button to highlight the Simple mode icon, then press the center navigation control button or press...

Quick Setup Guide (English)
Page 7
... normal playback speed. • To pause playback, press . • To view the video in slow playback, press . To view saved pictures: 1 Turn on your camcorder. 2 Turn the Mode dial to . 3 Press the Playback button next to the LCD screen to switch to take a picture: 1 Turn on your...the volume during playback, press . 6 Press the center navigation control button inwards or press to toggle the speed. To play saved videos: 1 Turn on your camcorder. 2 Turn the Mode dial to . 3 Press the Playback button next to the LCD screen to switch to Playback mode. 4 Press the Navigation control right/...
... normal playback speed. • To pause playback, press . • To view the video in slow playback, press . To view saved pictures: 1 Turn on your camcorder. 2 Turn the Mode dial to . 3 Press the Playback button next to the LCD screen to switch to take a picture: 1 Turn on your...the volume during playback, press . 6 Press the center navigation control button inwards or press to toggle the speed. To play saved videos: 1 Turn on your camcorder. 2 Turn the Mode dial to . 3 Press the Playback button next to the LCD screen to switch to Playback mode. 4 Press the Navigation control right/...
Quick Setup Guide (English)
Page 8
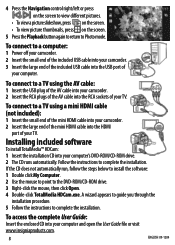
... to complete the installation. To connect to a TV using a mini HDMI cable (not included): 1 Insert the small end of the mini HDMI cable into your camcorder. 2 Insert the large end of the mini HDMI cable into the USB port of your computer and open the User Guide file or visit www... into the HDMI port of your computer. To connect to a TV using the AV cable: 1 Insert the USB plug of the AV cable into your camcorder. 2 Insert the RCA plugs of the AV cable into the RCA sockets of your computer's DVD-ROM/CD-ROM drive. 2 The CD runs automatically.
... to complete the installation. To connect to a TV using a mini HDMI cable (not included): 1 Insert the small end of the mini HDMI cable into your camcorder. 2 Insert the large end of the mini HDMI cable into the USB port of your computer and open the User Guide file or visit www... into the HDMI port of your computer. To connect to a TV using the AV cable: 1 Insert the USB plug of the AV cable into your camcorder. 2 Insert the RCA plugs of the AV cable into the RCA sockets of your computer's DVD-ROM/CD-ROM drive. 2 The CD runs automatically.

User Manual (English)
Page 2
...Front 2 Back 3 Right 3 Left 3 Bottom 4 Understanding the LCD panel icons 4 Setting up your camcorder 8 Charging the battery 8 Installing the battery 8 Inserting or removing an SD/SDHC memory card 8 Getting started 9 Turning your camcorder on or off 9 Initial settings 9 Recording a video 9 Taking a close-up video 9 Viewing ... 11 Taking a close-up photo 11 Viewing photos 11 Deleting photos 12 Using camcorder features 12 Using the flash 12 Using zoom 12 Using the LED light 13 Adjusting camcorder settings 13 Turning Simple mode off 13 Using the self-timer 13 Turning face ...
...Front 2 Back 3 Right 3 Left 3 Bottom 4 Understanding the LCD panel icons 4 Setting up your camcorder 8 Charging the battery 8 Installing the battery 8 Inserting or removing an SD/SDHC memory card 8 Getting started 9 Turning your camcorder on or off 9 Initial settings 9 Recording a video 9 Taking a close-up video 9 Viewing ... 11 Taking a close-up photo 11 Viewing photos 11 Deleting photos 12 Using camcorder features 12 Using the flash 12 Using zoom 12 Using the LED light 13 Adjusting camcorder settings 13 Turning Simple mode off 13 Using the self-timer 13 Turning face ...
User Manual (English)
Page 3
... 20 Turning help text on or off 20 Using the Auto Power Off function 21 Selecting the TV format 21 Resetting your camcorder to the factory default settings 22 Transferring files to a computer 22 Connecting your camcorder to a computer 22 Installing the included software 22 Using the included software 23 Connecting your... camcorder to a TV 23 Connecting to a TV using the provided AV cable 23 Connecting to a TV using a mini HDMI cable 23 Troubleshooting 23 Specifications and default ...
... 20 Turning help text on or off 20 Using the Auto Power Off function 21 Selecting the TV format 21 Resetting your camcorder to the factory default settings 22 Transferring files to a computer 22 Connecting your camcorder to a computer 22 Installing the included software 22 Using the included software 23 Connecting your... camcorder to a TV 23 Connecting to a TV using the provided AV cable 23 Connecting to a TV using a mini HDMI cable 23 Troubleshooting 23 Specifications and default ...
User Manual (English)
Page 5
...cord or plug is incorrectly replaced. Caution Danger of explosion if battery is damaged, liquid has been spilled or objects have fallen into your camcorder, your camcorder has been exposed to rain or moisture, does not operate normally, or has been dropped. 13 To reduce the risk of fire or... electric shock, do not expose your camcorder during lightning storms or when unused for long periods of time. 12 Refer all servicing to qualified service personnel. Important safety instructions 1 Read ...
...cord or plug is incorrectly replaced. Caution Danger of explosion if battery is damaged, liquid has been spilled or objects have fallen into your camcorder, your camcorder has been exposed to rain or moisture, does not operate normally, or has been dropped. 13 To reduce the risk of fire or... electric shock, do not expose your camcorder during lightning storms or when unused for long periods of time. 12 Refer all servicing to qualified service personnel. Important safety instructions 1 Read ...
User Manual (English)
Page 6
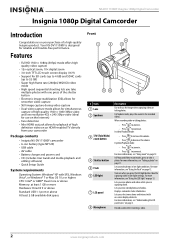
...and low resolution 432 × 240 30fps video (ideal for use on an HDMI-enabled TV directly from your camcorder Package contents • Insignia NS-DV111080F camcorder • Li-ion battery (type NP120) • USB cable • AV cable • Battery charger...8226; Dual-video capture mode allows for simultaneous capture of a high-quality Insignia product. NS-DV111080F Insignia 1080p Digital Camcorder Insignia 1080p Digital Camcorder Introduction Congratulations on page 13. Your NS-DV111080F is designed for reliable and trouble-free performance. Lets you take multiple photos ...
...and low resolution 432 × 240 30fps video (ideal for use on an HDMI-enabled TV directly from your camcorder Package contents • Insignia NS-DV111080F camcorder • Li-ion battery (type NP120) • USB cable • AV cable • Battery charger...8226; Dual-video capture mode allows for simultaneous capture of a high-quality Insignia product. NS-DV111080F Insignia 1080p Digital Camcorder Insignia 1080p Digital Camcorder Introduction Congratulations on page 13. Your NS-DV111080F is designed for reliable and trouble-free performance. Lets you take multiple photos ...
User Manual (English)
Page 7
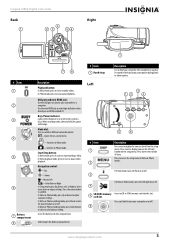
...battery into this compartment. # Item 1 Hand strap Left Description Use to select menu items or adjust settings. Press three times to view recorded videos. Insignia 1080p Digital Camcorder Back Right START/ STOP SET BUSY POWER CB OPEN # Item 1 2 3 4 5 6 7 Battery compartment 8 Description Playback button: In Video ... on -screen menu. -Switches to Video mode. -Switches to start or pause video playback. Mode dial: Turn to switch to different camcorder modes: SET-Opens the on the setup menu. The included lens cap may be stored in Video or Photo modes. DISP MENU OPEN ...
...battery into this compartment. # Item 1 Hand strap Left Description Use to select menu items or adjust settings. Press three times to view recorded videos. Insignia 1080p Digital Camcorder Back Right START/ STOP SET BUSY POWER CB OPEN # Item 1 2 3 4 5 6 7 Battery compartment 8 Description Playback button: In Video ... on -screen menu. -Switches to Video mode. -Switches to start or pause video playback. Mode dial: Turn to switch to different camcorder modes: SET-Opens the on the setup menu. The included lens cap may be stored in Video or Photo modes. DISP MENU OPEN ...
User Manual (English)
Page 8
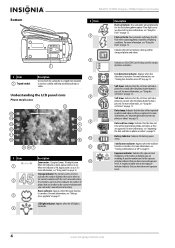
...page 13. Exposure indicator: Indicates the exposure level (brightness) of photos and videos. A positive number next to On: Your camcorder will automatically fire the flash during photo capture if low-light scenes are recording. For more information, see "Using the self... For more information, see "Using the flash" on photos and videos as they are captured. NS-DV111080F Insignia 1080p Digital Camcorder Bottom # Item 5 6 # Item Description 7 Use to attach the camcorder to a tripod (not included) 1 Tripod socket to the exposure indicator indicates that you have ...
...page 13. Exposure indicator: Indicates the exposure level (brightness) of photos and videos. A positive number next to On: Your camcorder will automatically fire the flash during photo capture if low-light scenes are recording. For more information, see "Using the self... For more information, see "Using the flash" on photos and videos as they are captured. NS-DV111080F Insignia 1080p Digital Camcorder Bottom # Item 5 6 # Item Description 7 Use to attach the camcorder to a tripod (not included) 1 Tripod socket to the exposure indicator indicates that you have ...

User Manual (English)
Page 9
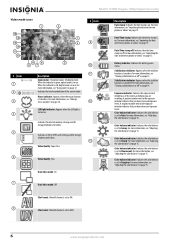
...the next photo. Image resolution: 2 megapixels. Image resolution: 10 megapixels. Delete: Touch this icon to Auto. Insignia 1080p Digital Camcorder # Item 13 14 15 Description Color balance indicator: Indicates the color balance is set to delete a photo. Image resolution: 5...page 15. For more information, see "Adjusting the color balance" on page 18. # Item 1 2 3 4 5 6 Description Indicates your camcorder is in rapid succession when you press the shutter button. Image resolution: 10 megapixel burst. Indicates the number of captured photos. Slideshow mode: Touch...
...the next photo. Image resolution: 2 megapixels. Image resolution: 10 megapixels. Delete: Touch this icon to Auto. Insignia 1080p Digital Camcorder # Item 13 14 15 Description Color balance indicator: Indicates the color balance is set to delete a photo. Image resolution: 5...page 15. For more information, see "Adjusting the color balance" on page 18. # Item 1 2 3 4 5 6 Description Indicates your camcorder is in rapid succession when you press the shutter button. Image resolution: 10 megapixel burst. Indicates the number of captured photos. Slideshow mode: Touch...
User Manual (English)
Page 10
... information, see "Adjusting the color balance" on page 15. Date/Time stamp off: Indicates the date/time stamp is turned off " on or off . NS-DV111080F Insignia 1080p Digital Camcorder Video mode icons # Item 9 # Item 1 2 3 4 5 6 10 11 Description Zoom meter: 12x optical zoom, 10x digital zoom. Dual video mode: On Description Date stamp: Indicates...
... information, see "Adjusting the color balance" on page 15. Date/Time stamp off: Indicates the date/time stamp is turned off " on or off . NS-DV111080F Insignia 1080p Digital Camcorder Video mode icons # Item 9 # Item 1 2 3 4 5 6 10 11 Description Zoom meter: 12x optical zoom, 10x digital zoom. Dual video mode: On Description Date stamp: Indicates...

User Manual (English)
Page 11
... view the previous video. This format is ideal for capturing fast action scenes and then playing them back in slow motion on your camcorder is 848 × 640p. Video resolution: Indicates the resolution of the video file currently displayed is in Simple mode. Video resolution:... video format is captured in Video playback mode. # Item 1 2 3 4 Description Volume: Indicates the volume level of the current video. Insignia 1080p Digital Camcorder # Item 14 15 Description Video format: The video format is in this icon to play the currently selected video. Note: No sound is set...
... view the previous video. This format is ideal for capturing fast action scenes and then playing them back in slow motion on your camcorder is 848 × 640p. Video resolution: Indicates the resolution of the video file currently displayed is in Simple mode. Video resolution:... video format is captured in Video playback mode. # Item 1 2 3 4 Description Volume: Indicates the volume level of the current video. Insignia 1080p Digital Camcorder # Item 14 15 Description Video format: The video format is in this icon to play the currently selected video. Note: No sound is set...
User Manual (English)
Page 12
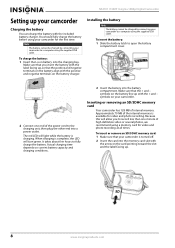
...be charged by connecting your camcorder is charging. symbols on the battery line up , so that you to record less than one end of high definition video or several photos, we recommend using the supplied USB cable. NS-DV111080F Insignia 1080p Digital Camcorder Setting up . 8 www....insigniaproducts.com Make sure that your camcorder to fully charge the battery. When charging is complete, the LED will light while the...
...be charged by connecting your camcorder is charging. symbols on the battery line up , so that you to record less than one end of high definition video or several photos, we recommend using the supplied USB cable. NS-DV111080F Insignia 1080p Digital Camcorder Setting up . 8 www....insigniaproducts.com Make sure that your camcorder to fully charge the battery. When charging is complete, the LED will light while the...

User Manual (English)
Page 13
... then press the button to start recording. 4 Press the button again to Video www.insigniaproducts.com 9 to switch to Video To turn on your camcorder before you need to change this setting before inserting or removing a memory card. to switch to stop recording. Note • • •...format: AVI • Dual video: Off Note The default file format for the first time, your camcorder: • Close the LCD panel, or press the (power) button for one second. Insignia 1080p Digital Camcorder 3 To remove the card, press in on the card to release it out of the slot.
... then press the button to start recording. 4 Press the button again to Video www.insigniaproducts.com 9 to switch to Video To turn on your camcorder before you need to change this setting before inserting or removing a memory card. to switch to stop recording. Note • • •...format: AVI • Dual video: Off Note The default file format for the first time, your camcorder: • Close the LCD panel, or press the (power) button for one second. Insignia 1080p Digital Camcorder 3 To remove the card, press in on the card to release it out of the slot.


