
Quick Setup Guide (English)
Page 2
Getting to know your camera 1 Shutter button 2 Flash 3 Power button 4 Self-timer lamp 5 Speaker 6 USB/AV terminal 7 Microphone 8 Lens 9 Strap ring 10 Zoom button 11 Playback button 12 Menu button 13 Four-way control Flash button Macro button SET/DISP button 14 LCD screen 15 Power Indicator 16 ASM/Delete button 17 Mode button 18 Tripod socket 19 Battery and memory card cover Note: The memory card slot is located behind the battery cover, next to the battery compartment. 2
Getting to know your camera 1 Shutter button 2 Flash 3 Power button 4 Self-timer lamp 5 Speaker 6 USB/AV terminal 7 Microphone 8 Lens 9 Strap ring 10 Zoom button 11 Playback button 12 Menu button 13 Four-way control Flash button Macro button SET/DISP button 14 LCD screen 15 Power Indicator 16 ASM/Delete button 17 Mode button 18 Tripod socket 19 Battery and memory card cover Note: The memory card slot is located behind the battery cover, next to the battery compartment. 2

Quick Setup Guide (English)
Page 3
... AA batteries with the arrow pointing in PLAYBACK mode. 2 Press POWER again to turn the camera off. 3 OR Press PLAYBACK to turn the camera on in . 3 Close the battery cover. Inserting the memory card 1 Open the battery cover. 2 Insert the card with the label facing up and with the positive (+) and negative (-) terminals matching matching...
... AA batteries with the arrow pointing in PLAYBACK mode. 2 Press POWER again to turn the camera off. 3 OR Press PLAYBACK to turn the camera on in . 3 Close the battery cover. Inserting the memory card 1 Open the battery cover. 2 Insert the card with the label facing up and with the positive (+) and negative (-) terminals matching matching...
Quick Setup Guide (English)
Page 7
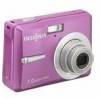
...image] appears on the display. 2 Press to see the previous image or to a computer: • Insert the memory card into a card reader - The last-recorded image appears on and set the camera to adjust image size. Recording video clips 1 Turn the power on. 2 Press the SCN button to display the...mode. 3 Center your subject in Movie mode. 5 Press the shutter button again to stop recording when memory capacity has been reached. Playing back images 1 Turn the power on the display. Digital zoom cannot be used in the focus area . Note: Sound is not recorded while zoom button is ...
...image] appears on the display. 2 Press to see the previous image or to a computer: • Insert the memory card into a card reader - The last-recorded image appears on and set the camera to adjust image size. Recording video clips 1 Turn the power on. 2 Press the SCN button to display the...mode. 3 Center your subject in Movie mode. 5 Press the shutter button again to stop recording when memory capacity has been reached. Playing back images 1 Turn the power on the display. Digital zoom cannot be used in the focus area . Note: Sound is not recorded while zoom button is ...
Quick Setup Guide (English)
Page 8
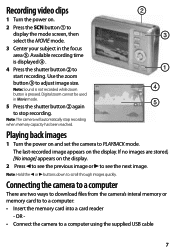
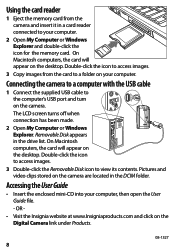
... icon to your computer. 2 Open My Computer or Windows Explorer and double-click the icon for the memory card. On Macintosh computers, the card will appear on the camera are located in the drive list. Pictures and video clips stored on the desktop. Connecting the... from the camera and insert it in a card reader connected to view its contents. OR - • Visit the Insignia website at www.Insigniaproducts.com and click on the camera. B B Using the card reader 1 Eject the memory card from the card to the computer's USB port and turn on the Digital Camera link under Products...
... icon to your computer. 2 Open My Computer or Windows Explorer and double-click the icon for the memory card. On Macintosh computers, the card will appear on the camera are located in the drive list. Pictures and video clips stored on the desktop. Connecting the... from the camera and insert it in a card reader connected to view its contents. OR - • Visit the Insignia website at www.Insigniaproducts.com and click on the camera. B B Using the card reader 1 Eject the memory card from the card to the computer's USB port and turn on the Digital Camera link under Products...

User Manual (English)
Page 4
... cycle through the available flash options. 6 SET/DISP button In REC or PLAYBACK mode, press to install batteries and an optional memory card. Back Insignia NS-DSC7B-09, NS-DSC7P-09, or NS-DSC7S-09 7 Megapixel Digital Camera Top, bottom and side 8 9 10 # Component Description 1 Zoom button Press T to zoom in on a subject for telephoto photos, or press...
... cycle through the available flash options. 6 SET/DISP button In REC or PLAYBACK mode, press to install batteries and an optional memory card. Back Insignia NS-DSC7B-09, NS-DSC7P-09, or NS-DSC7S-09 7 Megapixel Digital Camera Top, bottom and side 8 9 10 # Component Description 1 Zoom button Press T to zoom in on a subject for telephoto photos, or press...

User Manual (English)
Page 5
... the batteries To install the batteries: 1 Open the battery cover by the camera will be viewed on the batteries with a cloth. If a memory card is inserted, images and movie clips are nearly exhausted. Insignia NS-DSC7B-09, NS-DSC7P-09, or NS-DSC7S-09 7 Megapixel Digital Camera Setting up and the arrow pointing in the battery compartment. 3 Close the...
... the batteries To install the batteries: 1 Open the battery cover by the camera will be viewed on the batteries with a cloth. If a memory card is inserted, images and movie clips are nearly exhausted. Insignia NS-DSC7B-09, NS-DSC7P-09, or NS-DSC7S-09 7 Megapixel Digital Camera Setting up and the arrow pointing in the battery compartment. 3 Close the...
User Manual (English)
Page 7
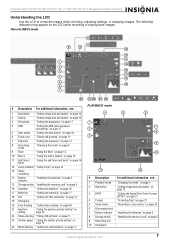
... "Installing the batteries" on page 5 8 Storage media "Installing the memory card" on the LCD while recording or playing back images. The following indicators may appear on page 5 9 Recording info 10 Histogram www.insignia-products.com 7 Insignia NS-DSC7B-09, NS-DSC7P-09, or NS-DSC7S-09 7 Megapixel Digital Camera Understanding the LCD Use the LCD to compose images while...
... "Installing the batteries" on page 5 8 Storage media "Installing the memory card" on the LCD while recording or playing back images. The following indicators may appear on page 5 9 Recording info 10 Histogram www.insignia-products.com 7 Insignia NS-DSC7B-09, NS-DSC7P-09, or NS-DSC7S-09 7 Megapixel Digital Camera Understanding the LCD Use the LCD to compose images while...

User Manual (English)
Page 11
...begins. Menu item Battery Type Reset All Available settings Lets you are downloaded to initial default settings. Insignia NS-DSC7B-09, NS-DSC7P-09, or NS-DSC7S-09 7 Megapixel Digital Camera Setup menu Menu item Sounds Auto Review Power Save Date & Time Language File No. The focus ... be created" error. • Series-Stores the latest used file number whether deleting files or inserting a new memory card. • Reset-Resets file numbering each time the memory card is completed. To avoid a blurred photo, use a tripod to focus the image. Image Format Available settings Lets...
...begins. Menu item Battery Type Reset All Available settings Lets you are downloaded to initial default settings. Insignia NS-DSC7B-09, NS-DSC7P-09, or NS-DSC7S-09 7 Megapixel Digital Camera Setup menu Menu item Sounds Auto Review Power Save Date & Time Language File No. The focus ... be created" error. • Series-Stores the latest used file number whether deleting files or inserting a new memory card. • Reset-Resets file numbering each time the memory card is completed. To avoid a blurred photo, use a tripod to focus the image. Image Format Available settings Lets...

User Manual (English)
Page 19
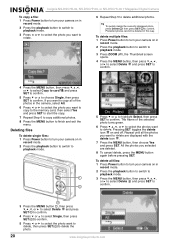
Insignia NS-DSC7B-09, NS-DSC7P-09, or NS-DSC7S-09 7 Megapixel Digital Camera 4 Press , , , or to select the photo you want, then ... Editing your photos Rotating still photos To rotate a photo: 1 Press Power button to turn your camera (see "Installing the memory card" on in record mode. 2 Press the playback button to switch to playback mode. 3 Press ...176; clockwise. 6 Press or to select OK, then press SET again to a memory card. OR - Make sure that you have inserted a memory card into your camera on in record mode. 2 Press the playback button to switch to playback mode....
Insignia NS-DSC7B-09, NS-DSC7P-09, or NS-DSC7S-09 7 Megapixel Digital Camera 4 Press , , , or to select the photo you want, then ... Editing your photos Rotating still photos To rotate a photo: 1 Press Power button to turn your camera (see "Installing the memory card" on in record mode. 2 Press the playback button to switch to playback mode. 3 Press ...176; clockwise. 6 Press or to select OK, then press SET again to a memory card. OR - Make sure that you have inserted a memory card into your camera on in record mode. 2 Press the playback button to switch to playback mode....
User Manual (English)
Page 20
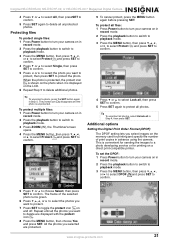
...mode. 5 Press or to highlight Select, then press SET to confirm. The frame of the photos in the camera, select All. 6 Press or to select the photo you want to copy to the memory card, then select Yes and press SET to start the copy. 7 Repeat Step 6 to copy additional photos. ... 6 Repeat Step 5 to delete additional photos. Repeat until all the photos you want to delete. Insignia NS-DSC7B-09, NS-DSC7P-09, or NS-DSC7S-09 7 Megapixel Digital Camera To copy a file: 1 Press Power button to turn your camera on in record mode. 2 Press the playback button to switch to playback mode. 3 Press or to...
...mode. 5 Press or to highlight Select, then press SET to confirm. The frame of the photos in the camera, select All. 6 Press or to select the photo you want to copy to the memory card, then select Yes and press SET to start the copy. 7 Repeat Step 6 to copy additional photos. ... 6 Repeat Step 5 to delete additional photos. Repeat until all the photos you want to delete. Insignia NS-DSC7B-09, NS-DSC7P-09, or NS-DSC7S-09 7 Megapixel Digital Camera To copy a file: 1 Press Power button to turn your camera on in record mode. 2 Press the playback button to switch to playback mode. 3 Press or to...
User Manual (English)
Page 21
... Press Power button to turn your camera on the memory card for printing on the LCD. 6 Repeat Step 5 to delete additional photos. Tip To unprotect a photo, press the SET button again in Step 5. Insignia NS-DSC7B-09, NS-DSC7P-09, or NS-DSC7S-09 7 Megapixel Digital Camera 4 Press or to select All..., then pressSET to confirm. 5 Press SET again to delete all in Step 4, then press SET. www.insignia-products.com 21
... Press Power button to turn your camera on the memory card for printing on the LCD. 6 Repeat Step 5 to delete additional photos. Tip To unprotect a photo, press the SET button again in Step 5. Insignia NS-DSC7B-09, NS-DSC7P-09, or NS-DSC7S-09 7 Megapixel Digital Camera 4 Press or to select All..., then pressSET to confirm. 5 Press SET again to delete all in Step 4, then press SET. www.insignia-products.com 21
User Manual (English)
Page 23
... mode. Install a correctly. Install the USB driver before the image was captured. Insignia NS-DSC7B-09, NS-DSC7P-09, or NS-DSC7S-09 7 Megapixel Digital Camera 3 Double-click Removable Disc to your computer by removing the memory card from your camera and plugging it into your PC's card reader. Folders stored on the LCD, replace the battery immediately. Note You...
... mode. Install a correctly. Install the USB driver before the image was captured. Insignia NS-DSC7B-09, NS-DSC7P-09, or NS-DSC7S-09 7 Megapixel Digital Camera 3 Double-click Removable Disc to your computer by removing the memory card from your camera and plugging it into your PC's card reader. Folders stored on the LCD, replace the battery immediately. Note You...

User Manual (English)
Page 24
... still images, movie clips, and other information. If new files are created, a new folder named in the internal memory or memory card. Insignia NS-DSC7B-09, NS-DSC7P-09, or NS-DSC7S-09 7 Megapixel Digital Camera Appendix Understanding folder and file names Your digital camera automatically creates a directory of the following solutions: • Reset the file number and plug in a new...
... still images, movie clips, and other information. If new files are created, a new folder named in the internal memory or memory card. Insignia NS-DSC7B-09, NS-DSC7P-09, or NS-DSC7S-09 7 Megapixel Digital Camera Appendix Understanding folder and file names Your digital camera automatically creates a directory of the following solutions: • Reset the file number and plug in a new...