
Quick Setup Guide
Page 1
... the appliance has been exposed to eliminate ice and condensation build-up • Touch controls and LED display • Interior white LED light • Reversible door • Removable and adjustable shelves Control panel/display Standby Light LED display Temperature +/- ° °F/°C Fan Glass door Shelf Steel bar Leveling feet SETTING UP YOUR COOLER Before using your cooler on top of it in any other outside location. Go to User Guide, click the language you want. FEATURES...
... the appliance has been exposed to eliminate ice and condensation build-up • Touch controls and LED display • Interior white LED light • Reversible door • Removable and adjustable shelves Control panel/display Standby Light LED display Temperature +/- ° °F/°C Fan Glass door Shelf Steel bar Leveling feet SETTING UP YOUR COOLER Before using your cooler on top of it in any other outside location. Go to User Guide, click the language you want. FEATURES...

Quick Setup Guide
Page 2
... cool air from escaping. • Make sure that the door seals completely to keep your cooler running efficiently. • Make sure that the door is closed properly. • Clean the door gaskets. • Set the temperature to keep your cooler and unplug it from the wall outlet. 2 Remove all beverages. 3 Wash the interior with a damp, warm cloth. Wait until the power is closed properly. My cooler turns...
... cool air from escaping. • Make sure that the door seals completely to keep your cooler running efficiently. • Make sure that the door is closed properly. • Clean the door gaskets. • Set the temperature to keep your cooler and unplug it from the wall outlet. 2 Remove all beverages. 3 Wash the interior with a damp, warm cloth. Wait until the power is closed properly. My cooler turns...
User Guide
Page 1
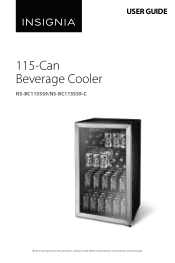
USER GUIDE 115-Can Beverage Cooler NS-BC115SS9/NS-BC115SS9-C Before using your new product, please read these instructions to prevent any damage.
USER GUIDE 115-Can Beverage Cooler NS-BC115SS9/NS-BC115SS9-C Before using your new product, please read these instructions to prevent any damage.
User Guide
Page 2
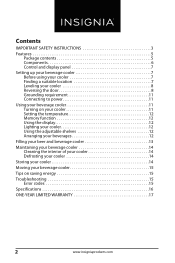
Contents IMPORTANT SAFETY INSTRUCTIONS 3 Features 5 Package contents 5 Components 6 Control and display panel 7 Setting up your beverage cooler 7 Before using your cooler 7 Finding a suitable location 7 Leveling your cooler 8 Reversing the door 8 Grounding requirement 11 Connecting to power 11 Using your beverage cooler 11 Turning on your cooler 11 Setting the temperature 12 Memory function 12 Using the display 12 Lighting your cooler 12 Using the adjustable shelves 12 Arranging your beverages 12 Filling your...
Contents IMPORTANT SAFETY INSTRUCTIONS 3 Features 5 Package contents 5 Components 6 Control and display panel 7 Setting up your beverage cooler 7 Before using your cooler 7 Finding a suitable location 7 Leveling your cooler 8 Reversing the door 8 Grounding requirement 11 Connecting to power 11 Using your beverage cooler 11 Turning on your cooler 11 Setting the temperature 12 Memory function 12 Using the display 12 Lighting your cooler 12 Using the adjustable shelves 12 Arranging your beverages 12 Filling your...

User Guide
Page 3
... not use this appliance near water. 6 Clean only with the manufacturer's instructions. 8 Do not install near any ventilation openings. Install in accordance with a damp cloth. 7 Do not block any heat sources such as radiators, heat registers, stoves, or other apparatuses (including amplifiers) that the available AC power matches the voltage requirements of the polarized or grounding-type plug. A grounding type plug has...
... not use this appliance near water. 6 Clean only with the manufacturer's instructions. 8 Do not install near any ventilation openings. Install in accordance with a damp cloth. 7 Do not block any heat sources such as radiators, heat registers, stoves, or other apparatuses (including amplifiers) that the available AC power matches the voltage requirements of the polarized or grounding-type plug. A grounding type plug has...
User Guide
Page 4
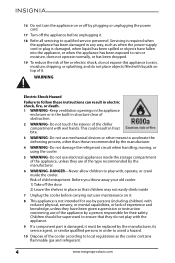
... according to local regulations as when the power-supply cord or plug is not intended for their safety. Risk of the type recommended by plugging or unplugging the power cord. 17 Turn off the appliance before unplugging it. 18 Refer all servicing to qualified service personnel. Children should be replaced by a person responsible for use of the appliance by the manufacturer...
... according to local regulations as when the power-supply cord or plug is not intended for their safety. Risk of the type recommended by plugging or unplugging the power cord. 17 Turn off the appliance before unplugging it. 18 Refer all servicing to qualified service personnel. Children should be replaced by a person responsible for use of the appliance by the manufacturer...
User Guide
Page 5
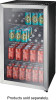
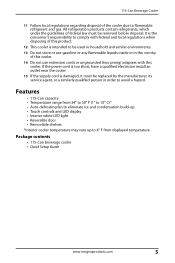
...Setup Guide www.insigniaproducts.com 5 Features • 115-Can capacity • Temperature range from 34° to 50° F (1° to 10° C)* • Auto-defrosting fan to eliminate ice and condensation build-up • Touch controls and LED display • Interior white LED light • Reversible door • Removable shelves *Interior cooler temperature may vary up to flammable refrigerant...If the power cord is too short, have a qualified electrician install an outlet near the cooler. 15 If the supply cord is intended to be replaced by the manufacturer, its service agent, ...
...Setup Guide www.insigniaproducts.com 5 Features • 115-Can capacity • Temperature range from 34° to 50° F (1° to 10° C)* • Auto-defrosting fan to eliminate ice and condensation build-up • Touch controls and LED display • Interior white LED light • Reversible door • Removable shelves *Interior cooler temperature may vary up to flammable refrigerant...If the power cord is too short, have a qualified electrician install an outlet near the cooler. 15 If the supply cord is intended to be replaced by the manufacturer, its service agent, ...

User Guide
Page 7
... power on or off . • Hold for approximately half an hour before connecting it with a damp, warm cloth. www.insigniaproducts.com 7 Press to decrease the temperature by one degree. Press both buttons simultaneously to turn the interior light on or off . BUTTON FUNCTION • Press to change the display from incorrect handling during transportation. • Clean the interior surface with sharp objects. Control and display panel Standby Light...
... power on or off . • Hold for approximately half an hour before connecting it with a damp, warm cloth. www.insigniaproducts.com 7 Press to decrease the temperature by one degree. Press both buttons simultaneously to turn the interior light on or off . BUTTON FUNCTION • Press to change the display from incorrect handling during transportation. • Clean the interior surface with sharp objects. Control and display panel Standby Light...
User Guide
Page 8
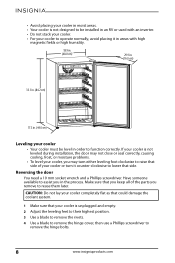
.... (44.0 cm) Leveling your cooler or turn either leveling foot clockwise to raise that side of the parts you in the process. If your cooler is unplugged and empty. 2 Adjust the leveling feet to their highest position. 3 Use a blade to remove the rivets. 4 Use a blade to remove the hinge cover, then use a Phillips screwdriver to remove the hinge bolts. 8 www.insigniaproducts.com Reversing the door You need a 10 mm...
.... (44.0 cm) Leveling your cooler or turn either leveling foot clockwise to raise that side of the parts you in the process. If your cooler is unplugged and empty. 2 Adjust the leveling feet to their highest position. 3 Use a blade to remove the rivets. 4 Use a blade to remove the hinge cover, then use a Phillips screwdriver to remove the hinge bolts. 8 www.insigniaproducts.com Reversing the door You need a 10 mm...

User Guide
Page 9
Rivets Axle sleeve 6 Remove the door from your cooler. 115-Can Beverage Cooler Hinge cover Hinge bolts Upper hinge Axle sleeve 7 Use a Phillips screwdriver to remove the door stopper screws, then remove the door stopper. Door stopper Axle sleeve Door stopper screws www.insigniaproducts.com 9 5 Remove the upper hinge.
Rivets Axle sleeve 6 Remove the door from your cooler. 115-Can Beverage Cooler Hinge cover Hinge bolts Upper hinge Axle sleeve 7 Use a Phillips screwdriver to remove the door stopper screws, then remove the door stopper. Door stopper Axle sleeve Door stopper screws www.insigniaproducts.com 9 5 Remove the upper hinge.
User Guide
Page 10
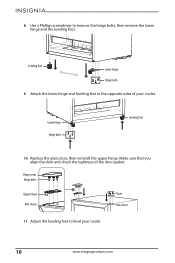
Lower hinge Hinge bolts Leveling foot 10 Replace the glass door, then reinstall the upper hinge. Make sure that you align the door and check the tightness of your cooler. 10 www.insigniaproducts.com Hinge cover Hinge bolts Upper hinge Axle sleeve Rivet Axle sleeve 11 Adjust the leveling feet to remove the hinge bolts, then remove the lower hinge and the leveling foot. Leveling foot Lower hinge Hinge bolts 9 Attach the lower hinge and leveling feet to the opposite sides of the door gasket. 8 Use a Phillips screwdriver to level your cooler.
Lower hinge Hinge bolts Leveling foot 10 Replace the glass door, then reinstall the upper hinge. Make sure that you align the door and check the tightness of your cooler. 10 www.insigniaproducts.com Hinge cover Hinge bolts Upper hinge Axle sleeve Rivet Axle sleeve 11 Adjust the leveling feet to remove the hinge bolts, then remove the lower hinge and the leveling foot. Leveling foot Lower hinge Hinge bolts 9 Attach the lower hinge and leveling feet to the opposite sides of the door gasket. 8 Use a Phillips screwdriver to level your cooler.

User Guide
Page 11
... the button to be operated on . CAUTION: Your cooler is not designed to turn your cooler's performance. Your cooler should be installed in an RV or used with a grounding plug. Use of electric shock. • Do not, under any temperature adjustments and before making any circumstances, cut or remove the third ground prong from other setting is in effect (the display is not blinking). Connecting to...
... the button to be operated on . CAUTION: Your cooler is not designed to turn your cooler's performance. Your cooler should be installed in an RV or used with a grounding plug. Use of electric shock. • Do not, under any temperature adjustments and before making any circumstances, cut or remove the third ground prong from other setting is in effect (the display is not blinking). Connecting to...
User Guide
Page 12
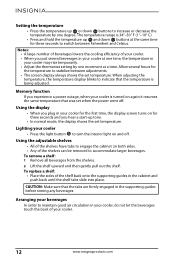
... shelves can be removed to maintain good air circulation in the cabinet and push back until the shelf tabs slide into place. To remove a shelf: 1 Remove all beverages from the shelves. 2 Lift the shelf upward and then gently pull out the shelf. Setting the temperature • Press the temperature up or down buttons at a time. CAUTION: Make sure that was set when the power went off . Using the display...
... shelves can be removed to maintain good air circulation in the cabinet and push back until the shelf tabs slide into place. To remove a shelf: 1 Remove all beverages from the shelves. 2 Lift the shelf upward and then gently pull out the shelf. Setting the temperature • Press the temperature up or down buttons at a time. CAUTION: Make sure that was set when the power went off . Using the display...

User Guide
Page 13
115-Can Beverage Cooler Filling your beer and beverage cooler The following illustrations are provided to show the best way to fill your cooler for maximum storage: Inner row Top shelf - 8 cans Second shelf - 16 cans Third shelf - 16 cans Middle row Top shelf - 6 cans Second shelf - 5 cans Third shelf - 5 cans Base - 6 cans Outer row Top shelf - 12 cans Second shelf - 12 cans Third shelf - 12 cans Base - 17 cans www.insigniaproducts.com 13
115-Can Beverage Cooler Filling your beer and beverage cooler The following illustrations are provided to show the best way to fill your cooler for maximum storage: Inner row Top shelf - 8 cans Second shelf - 16 cans Third shelf - 16 cans Middle row Top shelf - 6 cans Second shelf - 5 cans Third shelf - 5 cans Base - 6 cans Outer row Top shelf - 12 cans Second shelf - 12 cans Third shelf - 12 cans Base - 17 cans www.insigniaproducts.com 13

User Guide
Page 14
... button, the compressor and circulation fan stops running while defrosting is inside your cooler is designed for year-round use : • Gasoline, benzine, thinner, or other similar solvents. • Abrasive cleaners. If the door accidentally closes while a child is in process. Note: We recommend that children do not use with a damp, warm cloth. Defrost water drains out of backing soda. 4 Clean the door gasket (seal) so the door...
... button, the compressor and circulation fan stops running while defrosting is inside your cooler is designed for year-round use : • Gasoline, benzine, thinner, or other similar solvents. • Abrasive cleaners. If the door accidentally closes while a child is in process. Note: We recommend that children do not use with a damp, warm cloth. Defrost water drains out of backing soda. 4 Clean the door gasket (seal) so the door...

User Guide
Page 15
... compressor to a colder setting. • Level the cooler with the leveling feet. • Move your cooler turns off your cooler and unplug it from heat-producing appliances or heating ducts, and out of these error codes appears on again. • Adjust the shelf correctly. • Clean the door gaskets. • Level your cooler with the leveling feet. • Make sure that the door is sufficiently ventilated, with adequate air...
... compressor to a colder setting. • Level the cooler with the leveling feet. • Move your cooler turns off your cooler and unplug it from heat-producing appliances or heating ducts, and out of these error codes appears on again. • Adjust the shelf correctly. • Clean the door gaskets. • Level your cooler with the leveling feet. • Make sure that the door is sufficiently ventilated, with adequate air...
User Guide
Page 16
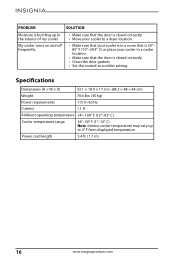
My cooler turns on and off frequently. • Make sure that the door is closed correctly. • Clean the door gaskets. • Set the control to a colder setting. Specifications Dimensions (H × W × D) 33.1 × 18.9 × 17.3 in a cooler location. • Make sure that the door is building up to 4° F from displayed temperature. Power cord length 5.4 ft. (1.7 m) 16 www.insigniaproducts.com PROBLEM SOLUTION Moisture is closed correctly. •...
My cooler turns on and off frequently. • Make sure that the door is closed correctly. • Clean the door gaskets. • Set the control to a colder setting. Specifications Dimensions (H × W × D) 33.1 × 18.9 × 17.3 in a cooler location. • Make sure that the door is building up to 4° F from displayed temperature. Power cord length 5.4 ft. (1.7 m) 16 www.insigniaproducts.com PROBLEM SOLUTION Moisture is closed correctly. •...

User Guide
Page 17
...Insignia and are required after the Warranty Period expires, you received with new or rebuilt comparable products or parts. Warranty coverage terminates if you purchased the Product. This warranty does not cover: • Customer instruction/education • Installation • Set up adjustments • Cosmetic damage • Damage due to weather, lightning, and other acts of God, such as power...4289. or (2) replace the Product at Best Buy branded retail stores or websites to obtain warranty service? If you purchased the Product at a Best Buy retail store location or from the ...
...Insignia and are required after the Warranty Period expires, you received with new or rebuilt comparable products or parts. Warranty coverage terminates if you purchased the Product. This warranty does not cover: • Customer instruction/education • Installation • Set up adjustments • Cosmetic damage • Damage due to weather, lightning, and other acts of God, such as power...4289. or (2) replace the Product at Best Buy branded retail stores or websites to obtain warranty service? If you purchased the Product at a Best Buy retail store location or from the ...
User Guide
Page 18
..., ARE LIMITED IN DURATION TO THE WARRANTY PERIOD SET FORTH ABOVE AND NO WARRANTIES, WHETHER EXPRESS OR IMPLIED, WILL APPLY AFTER THE WARRANTY PERIOD. • Connection to an incorrect voltage or power supply • Attempted repair by any contact including but not limited to batteries (i.e. Contact Insignia: 1-877-467-4289 www.insigniaproducts.com INSIGNIA is a trademark of pixels that may...
..., ARE LIMITED IN DURATION TO THE WARRANTY PERIOD SET FORTH ABOVE AND NO WARRANTIES, WHETHER EXPRESS OR IMPLIED, WILL APPLY AFTER THE WARRANTY PERIOD. • Connection to an incorrect voltage or power supply • Attempted repair by any contact including but not limited to batteries (i.e. Contact Insignia: 1-877-467-4289 www.insigniaproducts.com INSIGNIA is a trademark of pixels that may...

User Guide
Page 19
www.insigniaproducts.com 1-877-467-4289 (U.S. Distributed by Best Buy Purchasing, LLC 7601 Penn Ave South, Richfield, MN 55423 U.S.A. ©2020 Best Buy. All rights reserved. and Canada) or 01-800-926-3000 (Mexico) INSIGNIA is a trademark of Best Buy and its affiliated companies. V5 ENGLISH 20-0237
www.insigniaproducts.com 1-877-467-4289 (U.S. Distributed by Best Buy Purchasing, LLC 7601 Penn Ave South, Richfield, MN 55423 U.S.A. ©2020 Best Buy. All rights reserved. and Canada) or 01-800-926-3000 (Mexico) INSIGNIA is a trademark of Best Buy and its affiliated companies. V5 ENGLISH 20-0237

