

Quick Setup Guide (English)
Page 1
...L8) Installing a wall-mount bracket 1 If the stand is sold separately. Setting up your TV using the two screws (not included). symbols in the U.S., call 1-800-726-7864. 51"/59" Plasma HDTV 600Hz 1080p QUICK SETUP GUIDE NS-51P680A12/NS-59P680A12 Thank You for years to come Remote control and 2 AAA batteries AC power... an antenna Connect a 75 ohm cable (not included) to the ANT IN jack on the back of this product for purchasing this fine Insignia television. Installing the ferrite core Open the ferrite core, slide the cables into the slot, then close the core. Universal remote...
...L8) Installing a wall-mount bracket 1 If the stand is sold separately. Setting up your TV using the two screws (not included). symbols in the U.S., call 1-800-726-7864. 51"/59" Plasma HDTV 600Hz 1080p QUICK SETUP GUIDE NS-51P680A12/NS-59P680A12 Thank You for years to come Remote control and 2 AAA batteries AC power... an antenna Connect a 75 ohm cable (not included) to the ANT IN jack on the back of this product for purchasing this fine Insignia television. Installing the ferrite core Open the ferrite core, slide the cables into the slot, then close the core. Universal remote...

Quick Setup Guide (English)
Page 2
...to steps to more times to highlight a language. INSIGNIA is ready to a different channel in your cable TV provider. Your TV is a trademark of cable TV signal you do not know which type of BBY Solutions, Inc. Your TV starts searching for available channels in the channel list... The Select the Antenna source to memorize screen opens. 6 Press ▲ or ▼ to highlight your TV. 51"/59" Plasma HDTV I QUICK SETUP GUIDE I NS-51P680A12/NS-59P680A12 Turning on your TV for the first time 1 Connect the power cord. 2 Press (power) to turn off the daylight saving...
...to steps to more times to highlight a language. INSIGNIA is ready to a different channel in your cable TV provider. Your TV is a trademark of cable TV signal you do not know which type of BBY Solutions, Inc. Your TV starts searching for available channels in the channel list... The Select the Antenna source to memorize screen opens. 6 Press ▲ or ▼ to highlight your TV. 51"/59" Plasma HDTV I QUICK SETUP GUIDE I NS-51P680A12/NS-59P680A12 Turning on your TV for the first time 1 Connect the power cord. 2 Press (power) to turn off the daylight saving...

User Manual (English)
Page 2
...control 7 Using the remote control 7 Installing remote control batteries 7 Aiming the remote control 8 Programming a universal remote control to work with your TV . . . . 8 Programming a different universal remote control 8 Common universal remote control codes 9 Making connections 9 Connecting the power 9 Installing... the ferrite core 9 Connecting an outdoor antenna 10 Connecting cable TV 10 Connecting satellite TV via a satellite TV box 11 Connecting a VCR 12 Connecting a camcorder or game console 12 Connecting an HDMI device 13 ...
...control 7 Using the remote control 7 Installing remote control batteries 7 Aiming the remote control 8 Programming a universal remote control to work with your TV . . . . 8 Programming a different universal remote control 8 Common universal remote control codes 9 Making connections 9 Connecting the power 9 Installing... the ferrite core 9 Connecting an outdoor antenna 10 Connecting cable TV 10 Connecting satellite TV via a satellite TV box 11 Connecting a VCR 12 Connecting a camcorder or game console 12 Connecting an HDMI device 13 ...

User Manual (English)
Page 3
... the password 29 Turning parental controls on or off 29 Temporarily unblocking a channel 30 Setting U.S. Contents Adjusting the picture 19 Adjusting the TV picture 19 Turning the brightness sensor on or off 20 Adjusting advanced picture settings 20 Improving the image from a game console 22 Adjusting... Resetting the Plug & Play option 39 Resetting settings to the defaults 39 Viewing the Open Source License Notice 40 Upgrading TV software 40 Maintaining 41 Cleaning the TV cabinet 41 Cleaning the TV screen 41 Troubleshooting 41 Specifications 43 www.insigniaproducts.com ii
... the password 29 Turning parental controls on or off 29 Temporarily unblocking a channel 30 Setting U.S. Contents Adjusting the picture 19 Adjusting the TV picture 19 Turning the brightness sensor on or off 20 Adjusting advanced picture settings 20 Improving the image from a game console 22 Adjusting... Resetting the Plug & Play option 39 Resetting settings to the defaults 39 Viewing the Open Source License Notice 40 Upgrading TV software 40 Maintaining 41 Cleaning the TV cabinet 41 Cleaning the TV screen 41 Troubleshooting 41 Specifications 43 www.insigniaproducts.com ii

User Manual (English)
Page 5
... home theater entertainment experience is appropriate. If you are mounting the TV is a growing trend, and larger TVs are not designed to be mounted to walls backed with entertainment system furniture and TVs. • Don't place TVs on furniture that has been recommended by curious children. At least ... and the consumer electronics industry are not always supported on the proper stands or installed according to safely wall mount your TV. • Follow all . Use only a TV stand rated for the weight of your new product, keep these safety tips in this manual, or otherwise listed by...
... home theater entertainment experience is appropriate. If you are mounting the TV is a growing trend, and larger TVs are not designed to be mounted to walls backed with entertainment system furniture and TVs. • Don't place TVs on furniture that has been recommended by curious children. At least ... and the consumer electronics industry are not always supported on the proper stands or installed according to safely wall mount your TV. • Follow all . Use only a TV stand rated for the weight of your new product, keep these safety tips in this manual, or otherwise listed by...

User Manual (English)
Page 6
...near any ventilation openings. Unauthorized substitutions may result in the vicinity of overhead power lines or other hazards. Handling the TV screen Your TV's screen is the disconnecting device. Safety check After completing any antenna or cable system. This symbol indicates that there ... A grounding type plug has two blades and a third grounding prong. The wide blade or the third prong are inside. NS-51P680A12/NS-59P680A12 Important safety instructions CAUTION RISK OF ELECTRIC SHOCK DO NOT OPEN This symbol indicates that dangerous voltage constituting a risk of ...
...near any ventilation openings. Unauthorized substitutions may result in the vicinity of overhead power lines or other hazards. Handling the TV screen Your TV's screen is the disconnecting device. Safety check After completing any antenna or cable system. This symbol indicates that there ... A grounding type plug has two blades and a third grounding prong. The wide blade or the third prong are inside. NS-51P680A12/NS-59P680A12 Important safety instructions CAUTION RISK OF ELECTRIC SHOCK DO NOT OPEN This symbol indicates that dangerous voltage constituting a risk of ...

User Manual (English)
Page 7
... film transistors, which provide exceptionally sharp video quality. Occasionally, a few non-active pixels may appear on the top of the plasma TV The top side of the product may be hot after long periods of these materials may also form during the summer if the... failure of the building as close to provide some protection against voltage surges and built-up static charges. For disposal or recycling information, contact your TV has been dropped or damaged in wire 2 Grounding clamp 3 Antenna discharge unit 4 Grounding conductors 5 Ground clamps 6 Power service grounding electrode system ...
... film transistors, which provide exceptionally sharp video quality. Occasionally, a few non-active pixels may appear on the top of the plasma TV The top side of the product may be hot after long periods of these materials may also form during the summer if the... failure of the building as close to provide some protection against voltage surges and built-up static charges. For disposal or recycling information, contact your TV has been dropped or damaged in wire 2 Grounding clamp 3 Antenna discharge unit 4 Grounding conductors 5 Ground clamps 6 Power service grounding electrode system ...

User Manual (English)
Page 8
...L8 screws (included). You should use : Stand Chemicals Grease Oil 2 Carefully place your TV screen face-down on a cushioned, clean surface to the stand with the four M4 X L12 screws (included). NS-51P680A12/NS-59P680A12 3 Slide the guide base into the stand, then secure the guide base to ... (sold separately). The stand could fall and cause serious injury. • Always store your TV upright. 1 Slide the guide base into the back of a high-quality Insignia product. Introduction Congratulations on your TV can cause it . M4 X L12 screw (4) Top view Guide base Attention: Do not...
...L8 screws (included). You should use : Stand Chemicals Grease Oil 2 Carefully place your TV screen face-down on a cushioned, clean surface to the stand with the four M4 X L12 screws (included). NS-51P680A12/NS-59P680A12 3 Slide the guide base into the stand, then secure the guide base to ... (sold separately). The stand could fall and cause serious injury. • Always store your TV upright. 1 Slide the guide base into the back of a high-quality Insignia product. Introduction Congratulations on your TV can cause it . M4 X L12 screw (4) Top view Guide base Attention: Do not...

User Manual (English)
Page 9
...do not comply with two AAA batteries Power cord Ferrite core Warnings • Make sure that you purchased. To reduce the risk of your TV. M4 X L12 screws (4) M4 X L8 screws (4) Cleaning cloth Important Information Document and Quick Setup Guide Cleaning cloth The cleaning cloth ... in the packaging: Accessories Remote control with the VESA standard screw specifications. • Do not exceed a 15° tilt when mounting your TV using four M8 screws (not included). Installing a wall-mount bracket Warning This apparatus is for screw lengths. To install a wall-mount bracket:...
...do not comply with two AAA batteries Power cord Ferrite core Warnings • Make sure that you purchased. To reduce the risk of your TV. M4 X L12 screws (4) M4 X L8 screws (4) Cleaning cloth Important Information Document and Quick Setup Guide Cleaning cloth The cleaning cloth ... in the packaging: Accessories Remote control with the VESA standard screw specifications. • Do not exceed a 15° tilt when mounting your TV using four M8 screws (not included). Installing a wall-mount bracket Warning This apparatus is for screw lengths. To install a wall-mount bracket:...

User Manual (English)
Page 10
...and R-AUDIO-L Connect a component video device to these jacks. For more information, see "Connecting an outdoor antenna" on page 10 or "Connecting cable TV" on page 10. 3 DIGITAL AUDIO OUT (OPTICAL) 4 SERVICE1 Connect a digital audio amplifier to increase or decrease the volume. Used for service only... Press to tune to the HDMI IN 1 jack. For more information, see "Connecting an HDMI device" on your TV, power still flows into it. Front SOURCE Back NS-51P680A12/NS-59P680A12 SOURCE # Item Description 1 (power) Press to open the on-screen menu. When you are using one) ...
...and R-AUDIO-L Connect a component video device to these jacks. For more information, see "Connecting an outdoor antenna" on page 10 or "Connecting cable TV" on page 10. 3 DIGITAL AUDIO OUT (OPTICAL) 4 SERVICE1 Connect a digital audio amplifier to increase or decrease the volume. Used for service only... Press to tune to the HDMI IN 1 jack. For more information, see "Connecting an HDMI device" on your TV, power still flows into it. Front SOURCE Back NS-51P680A12/NS-59P680A12 SOURCE # Item Description 1 (power) Press to open the on-screen menu. When you are using one) ...

User Manual (English)
Page 11
... the sound" on page 23. # Button 1 POWER 2 Numbers 3- 4 MUTE 5 VOL+/VOL- 6 MENU 7 STWX 8 ENTER Description Press to turn your TV, power still flows into it. For more information, see "Selecting a channel" on page 28. Press to turn off (standby mode). www.insigniaproducts.com 7 For... more information, see "Adjusting the TV picture" on page 19. Press to tune to the next or previous channel in the channel list. For more information, see "Selecting a channel...
... the sound" on page 23. # Button 1 POWER 2 Numbers 3- 4 MUTE 5 VOL+/VOL- 6 MENU 7 STWX 8 ENTER Description Press to turn your TV, power still flows into it. For more information, see "Selecting a channel" on page 28. Press to turn off (standby mode). www.insigniaproducts.com 7 For... more information, see "Adjusting the TV picture" on page 19. Press to tune to the next or previous channel in the channel list. For more information, see "Selecting a channel...

User Manual (English)
Page 12
...registers, or fire. • Battery chemicals can manually program it clicks into the battery compartment. Tips • If your Insignia TV with high humidity. Cautions • Batteries should not be exposed to identify a code that you have problems programming your ...different types. Notes Do not mix batteries of correctly. NS-51P680A12/NS-59P680A12 2 Insert two AAA batteries into place. Notes • • • • Do not expose the remote control to program. • Call the Insignia Customer Care Center 1-877-467-4289. 8 www....
...registers, or fire. • Battery chemicals can manually program it clicks into the battery compartment. Tips • If your Insignia TV with high humidity. Cautions • Batteries should not be exposed to identify a code that you have problems programming your ...different types. Notes Do not mix batteries of correctly. NS-51P680A12/NS-59P680A12 2 Insert two AAA batteries into place. Notes • • • • Do not expose the remote control to program. • Call the Insignia Customer Care Center 1-877-467-4289. 8 www....

User Manual (English)
Page 13
... name is often visible on the front of the universal remote control, and the model number is a list of power. Insignia TV codes for universal remote controls (for all Insignia TVs manufactured after Jan. 1, 2007) Universal remote control makes and models One for All 0054 Phillips 0198, 0490 RCA 135 Sony... for the remote control code. See the label on . You may need to use your TV for an extended period of your TV, then connect the other end to your cable or satellite TV provide for other remote controls are using a surge protector, make sure that it is turned ...
... name is often visible on the front of the universal remote control, and the model number is a list of power. Insignia TV codes for universal remote controls (for all Insignia TVs manufactured after Jan. 1, 2007) Universal remote control makes and models One for All 0054 Phillips 0198, 0490 RCA 135 Sony... for the remote control code. See the label on . You may need to use your TV for an extended period of your TV, then connect the other end to your cable or satellite TV provide for other remote controls are using a surge protector, make sure that it is turned ...

User Manual (English)
Page 14
... equipment. 2 Connect the antenna cable to the ANT IN jack on the cable TV box and the cable TV wall jack. With a cable TV box that unscrambles all channels To connect a cable TV box that unscrambles all channels: 1 Turn off your TV. NS-51P680A12/NS-59P680A12 Connecting an outdoor antenna Connecting a coaxial antenna 3 Connect the combiner to the...
... equipment. 2 Connect the antenna cable to the ANT IN jack on the cable TV box and the cable TV wall jack. With a cable TV box that unscrambles all channels To connect a cable TV box that unscrambles all channels: 1 Turn off your TV. NS-51P680A12/NS-59P680A12 Connecting an outdoor antenna Connecting a coaxial antenna 3 Connect the combiner to the...

User Manual (English)
Page 15
...switch to the cable in jack 3 Connect this cable to the A-IN jack on the RF (A/B) switch. Cable in jack on the back of your TV to the cable box's output channel, which is connected to the B position, you set the switch to the B position to view scrambled channels. ... or component video connection. Splitter Cable box INPUT OUTPUT RF (A/B) switch 6 Connect the third coaxial cable to the other OUT jack on the cable TV box. Splitter OUT Cable box INPUT OUTPUT Splitter Cable box RF (A/B) switch 7 Connect the fourth coaxial cable between the OUTPUT jack on the splitter...
...switch to the cable in jack 3 Connect this cable to the A-IN jack on the RF (A/B) switch. Cable in jack on the back of your TV to the cable box's output channel, which is connected to the B position, you set the switch to the B position to view scrambled channels. ... or component video connection. Splitter Cable box INPUT OUTPUT RF (A/B) switch 6 Connect the third coaxial cable to the other OUT jack on the cable TV box. Splitter OUT Cable box INPUT OUTPUT Splitter Cable box RF (A/B) switch 7 Connect the fourth coaxial cable between the OUTPUT jack on the splitter...

User Manual (English)
Page 16
...connects to the ANT OUT jack on the VCR to the ANT IN jack on the back of TV Connecting a camcorder or game console Notes • • The AV IN 1 VIDEO (Y/VIDEO) ...TV. If the camcorder or game console has an HDMI jack, you can connect it to the HDMI IN 1 (DVI) or HDMI IN 2 jack on the back of your TV and the AUDIO OUT jacks on the VCR. NS-51P680A12/NS...-59P680A12 Connecting a VCR To connect a VCR: 1 Turn off your TV and all connected equipment. 2 If the antenna or cable TV cable is connected to your TV, disconnect the cable from your TV. 3 Connect the antenna or cable TV...
...connects to the ANT OUT jack on the VCR to the ANT IN jack on the back of TV Connecting a camcorder or game console Notes • • The AV IN 1 VIDEO (Y/VIDEO) ...TV. If the camcorder or game console has an HDMI jack, you can connect it to the HDMI IN 1 (DVI) or HDMI IN 2 jack on the back of your TV and the AUDIO OUT jacks on the VCR. NS-51P680A12/NS...-59P680A12 Connecting a VCR To connect a VCR: 1 Turn off your TV and all connected equipment. 2 If the antenna or cable TV cable is connected to your TV, disconnect the cable from your TV. 3 Connect the antenna or cable TV...

User Manual (English)
Page 17
... equipment. 2 Connect an HDMI/DVI cable (not included) or DVI-HDMI adapter (not included) between the DVI AUDIO IN jack on the back of your TV and the DVI AUDIO OUT jacks on the DVI device. 4 Turn on the HDMI device. Audio cable HDMI/DVI cable 3 Connect an audio cable (not... included) between the HDMI IN 1 (DVI) jack on the back of your TV, then turn on your TV. HDMI cables that provided the HDMI device to confirm the HDMI version, then request an upgrade. www.insigniaproducts.com 13 You cannot use...
... equipment. 2 Connect an HDMI/DVI cable (not included) or DVI-HDMI adapter (not included) between the DVI AUDIO IN jack on the back of your TV and the DVI AUDIO OUT jacks on the DVI device. 4 Turn on the HDMI device. Audio cable HDMI/DVI cable 3 Connect an audio cable (not... included) between the HDMI IN 1 (DVI) jack on the back of your TV, then turn on your TV. HDMI cables that provided the HDMI device to confirm the HDMI version, then request an upgrade. www.insigniaproducts.com 13 You cannot use...

User Manual (English)
Page 18
... a component video cable (not included) between the COMPONENT IN 1 or COMPONENT IN 2 jacks on the back of your TV and the COMPONENT VIDEO OUT jack on the computer. 14 www.insigniaproducts.com NS-51P680A12/NS-59P680A12 Connecting a component video device Note Make sure that you connect the video to the COMPONENT IN 1 video jacks...
... a component video cable (not included) between the COMPONENT IN 1 or COMPONENT IN 2 jacks on the back of your TV and the COMPONENT VIDEO OUT jack on the computer. 14 www.insigniaproducts.com NS-51P680A12/NS-59P680A12 Connecting a component video device Note Make sure that you connect the video to the COMPONENT IN 1 video jacks...

User Manual (English)
Page 19
... audio amplifier: • Connect a digital audio optical cable (not included) between the DIGITAL AUDIO OUT (OPTICAL) jack on the back of TV Turning on your TV for the first time The first time you turn on your home screen appears. Press S or T to select Plug&Play, press ENTER, ... Note You can select English, French, or Spanish. 4 Press ENTER. For more information, see "Resetting the Plug & Play option" on your TV sends out 5.1-channel sound to highlight SETUP, then press ENTER. Connecting a digital audio amplifier Notes • • • • When you connect your...
... audio amplifier: • Connect a digital audio optical cable (not included) between the DIGITAL AUDIO OUT (OPTICAL) jack on the back of TV Turning on your TV for the first time The first time you turn on your home screen appears. Press S or T to select Plug&Play, press ENTER, ... Note You can select English, French, or Spanish. 4 Press ENTER. For more information, see "Resetting the Plug & Play option" on your TV sends out 5.1-channel sound to highlight SETUP, then press ENTER. Connecting a digital audio amplifier Notes • • • • When you connect your...
User Manual (English)
Page 20
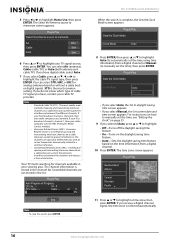
... to highlight Home Use, then press ENTER. If your first broadcast channel is stored in the list. The channel information is channel 2, then your TV signal source, then press ENTER. Plug & Play Sets the Clock Mode. Clock Mode : AAuutoto Manual • If you select Cable, press S... channel is a method of distortion. Air : 8 DTV Cable : -- Air 11 3% Stop Note To stop the search, press ENTER. NS-51P680A12/NS-59P680A12 When the search is the most widely used method of spacing and transmitting television channels on a cable television system to automatically set the time...
... to highlight Home Use, then press ENTER. If your first broadcast channel is stored in the list. The channel information is channel 2, then your TV signal source, then press ENTER. Plug & Play Sets the Clock Mode. Clock Mode : AAuutoto Manual • If you select Cable, press S... channel is a method of distortion. Air : 8 DTV Cable : -- Air 11 3% Stop Note To stop the search, press ENTER. NS-51P680A12/NS-59P680A12 When the search is the most widely used method of spacing and transmitting television channels on a cable television system to automatically set the time...

