
User Manual (English)
Page 1
User Guide 40" LED TV NS-40D510NA15 Before using your new product, please read these instructions to prevent any damage.
User Guide 40" LED TV NS-40D510NA15 Before using your new product, please read these instructions to prevent any damage.
User Manual (English)
Page 2
... 4 MHL 4 Roku Ready 4 INlink 4 DTS Sound 4 Game mode 4 Install the stand or wall-mount bracket 5 Install the stand 5 Install a wall-mount bracket 7 TV components 9 Package contents 9 Front 9 Right side buttons 9 Left side jacks 10 Back 11 Remote control 12 What connection should I use 13 Connect a cable or satellite...but requires an audio connection 15 Component video (better 16 AV (composite video) (good 17 Coaxial (good 18 Connect an antenna or cable TV (no box 19 Connect a DVD or Blu-ray player 20 HDMI (best 20 Component video (better 21 AV (composite video) (good 22...
... 4 MHL 4 Roku Ready 4 INlink 4 DTS Sound 4 Game mode 4 Install the stand or wall-mount bracket 5 Install the stand 5 Install a wall-mount bracket 7 TV components 9 Package contents 9 Front 9 Right side buttons 9 Left side jacks 10 Back 11 Remote control 12 What connection should I use 13 Connect a cable or satellite...but requires an audio connection 15 Component video (better 16 AV (composite video) (good 17 Coaxial (good 18 Connect an antenna or cable TV (no box 19 Connect a DVD or Blu-ray player 20 HDMI (best 20 Component video (better 21 AV (composite video) (good 22...

User Manual (English)
Page 3
... power 36 Use the remote control 37 Install remote control batteries 37 Aim the remote control 37 Turn on your TV for the first time 38 Understand the basics 40 Turn your TV on or off 40 Select the video input source 40 On-screen menu overview 41 Navigate the menus 41... back to the connected device 45 Use INlink 45 Turn INlink on or off 45 Turn Device Auto Power Off on or off 46 Turn TV Auto Power On on or off 46 Turn Audio Receiver on or off 47 Display a list of INlink-compatible devices 47 Select an INlink-compatible...
... power 36 Use the remote control 37 Install remote control batteries 37 Aim the remote control 37 Turn on your TV for the first time 38 Understand the basics 40 Turn your TV on or off 40 Select the video input source 40 On-screen menu overview 41 Navigate the menus 41... back to the connected device 45 Use INlink 45 Turn INlink on or off 45 Turn Device Auto Power Off on or off 46 Turn TV Auto Power On on or off 46 Turn Audio Receiver on or off 47 Display a list of INlink-compatible devices 47 Select an INlink-compatible...
User Manual (English)
Page 4
... power on picture mode 54 Adjust the computer image 55 Adjust the sound 55 Adjust sound settings 55 Select the audio out mode 56 Play TV audio only 57 Change channel settings 57 Automatically scan for channels 57 Hide channels 59 Set up a favorite channel list 59 View a favorite ...channel label 60 Check the digital signal strength 60 Set parental controls 61 Set or change the password 61 Lock control buttons 62 Block unrated TV 62 Set parental control levels 63 Download rating information 64 Use closed captioning 65 Turn closed captioning on or off 65 Select the analog closed...
... power on picture mode 54 Adjust the computer image 55 Adjust the sound 55 Adjust sound settings 55 Select the audio out mode 56 Play TV audio only 57 Change channel settings 57 Automatically scan for channels 57 Hide channels 59 Set up a favorite channel list 59 View a favorite ...channel label 60 Check the digital signal strength 60 Set parental controls 61 Set or change the password 61 Lock control buttons 62 Block unrated TV 62 Set parental control levels 63 Download rating information 64 Use closed captioning 65 Turn closed captioning on or off 65 Select the analog closed...
User Manual (English)
Page 6
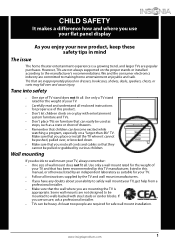
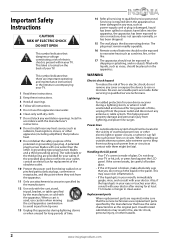
... enjoyable and safe. At least two people are required for proper use your flat panel display As you are mounting the TV is a growing trend, and larger TVs are popular purchases. www.insigniaproducts.com 1 We and the consumer electronics industry are inappropriately placed on the proper stands or...heavy. f CHILD SAFETY It makes a difference how and where you use of wall mount does not fit all instructions supplied by curious children. TVs that the wall where you enjoy your new product, keep these safety tips in this product. • Don't let children climb on or ...
... enjoyable and safe. At least two people are required for proper use your flat panel display As you are mounting the TV is a growing trend, and larger TVs are popular purchases. www.insigniaproducts.com 1 We and the consumer electronics industry are inappropriately placed on the proper stands or...heavy. f CHILD SAFETY It makes a difference how and where you use of wall mount does not fit all instructions supplied by curious children. TVs that the wall where you enjoy your new product, keep these safety tips in this product. • Don't let children climb on or ...
User Manual (English)
Page 7
...the literature accompanying your doctor. Replacement parts When replacement parts are important operating and maintenance instructions in your eyes or touches your TV. This label is damaged, liquid has been spilled or objects have the same characteristics as power-supply cord or plug is ...them might be placed on the back of overhead power lines or other hazards. 2 www.insigniaproducts.com A polarized plug has two blades with your TV. 1 Read these instructions. 2 Keep these instructions. 3 Heed all warnings. 4 Follow all servicing to rain or moisture. No user-serviceable parts...
...the literature accompanying your doctor. Replacement parts When replacement parts are important operating and maintenance instructions in your eyes or touches your TV. This label is damaged, liquid has been spilled or objects have the same characteristics as power-supply cord or plug is ...them might be placed on the back of overhead power lines or other hazards. 2 www.insigniaproducts.com A polarized plug has two blades with your TV. 1 Read these instructions. 2 Keep these instructions. 3 Heed all warnings. 4 Follow all servicing to rain or moisture. No user-serviceable parts...
User Manual (English)
Page 8
...Electrical Code, ANSI/NFPA No. 40 provides guidance for information about disposal or recycling and about an hour before you dispose of your TV. In such cases, change in wire 2 Grounding clamp Antenna discharge 3 unit 4 Grounding conductors 5 Ground clamps Power service 6 grounding...requirements for about finding a recycler in the operating instructions unless you are regulated for environmental reasons. www.insigniaproducts.com 3 NS-40D510NA15 Safety check After completing any service or repair to this device, ask the service technician to perform routine safety checks to ...
...Electrical Code, ANSI/NFPA No. 40 provides guidance for information about disposal or recycling and about an hour before you dispose of your TV. In such cases, change in wire 2 Grounding clamp Antenna discharge 3 unit 4 Grounding conductors 5 Ground clamps Power service 6 grounding...requirements for about finding a recycler in the operating instructions unless you are regulated for environmental reasons. www.insigniaproducts.com 3 NS-40D510NA15 Safety check After completing any service or repair to this device, ask the service technician to perform routine safety checks to ...
User Manual (English)
Page 9
... 45 for connection instructions.) Roku Ready® Your Insignia TV is certified to work with your TV and enjoy. Just plug the Streaming Stick into the purple MHL port on your TV remote or a mobile device -it's that simple! Your NS-40D510NA15 represents the state of a high-quality Insignia product. MHL™ Connect your MHL-enabled device...
... 45 for connection instructions.) Roku Ready® Your Insignia TV is certified to work with your TV and enjoy. Just plug the Streaming Stick into the purple MHL port on your TV remote or a mobile device -it's that simple! Your NS-40D510NA15 represents the state of a high-quality Insignia product. MHL™ Connect your MHL-enabled device...
User Manual (English)
Page 10
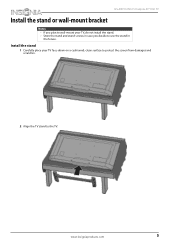
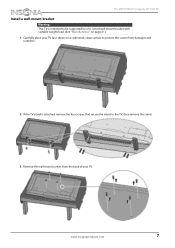
www.insigniaproducts.com 5 NS-40D510NA15 Insignia 40" LED TV Install the stand or wall-mount bracket Notes • If you plan to wall-mount your TV face-down on a cushioned, clean surface to protect the screen from damages and scratches. 2 Align the TV stand to use the stand in the future. Install the stand 1 Carefully place your TV, do not install the stand. • Store the stand and stand screws in case you decide to the TV.
www.insigniaproducts.com 5 NS-40D510NA15 Insignia 40" LED TV Install the stand or wall-mount bracket Notes • If you plan to wall-mount your TV face-down on a cushioned, clean surface to protect the screen from damages and scratches. 2 Align the TV stand to use the stand in the future. Install the stand 1 Carefully place your TV, do not install the stand. • Store the stand and stand screws in case you decide to the TV.

User Manual (English)
Page 11
Insignia 40" LED TV 3 Secure the TV stand to the TV with the four provided M4 28 mm screws. Screw type Screw length # of screws M4 28 mm 4 6 www.insigniaproducts.com
Insignia 40" LED TV 3 Secure the TV stand to the TV with the four provided M4 28 mm screws. Screw type Screw length # of screws M4 28 mm 4 6 www.insigniaproducts.com
User Manual (English)
Page 12
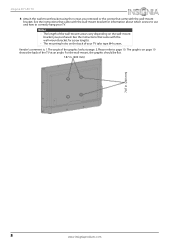
www.insigniaproducts.com 7 NS-40D510NA15 Insignia 40" LED TV Install a wall-mount bracket Warning This TV is intended to be supported by a UL Listed wall mount bracket with suitable weight/load. (See "Miscellaneous" on page 81.) 1 Carefully place your TV face-down on a cushioned, clean surface to protect the screen from damages and scratches. 2 If the TV stand is attached, remove the four screws that secure the stand to the TV, then remove the stand. 3 Remove the wall-mount screws from the back of your TV.
www.insigniaproducts.com 7 NS-40D510NA15 Insignia 40" LED TV Install a wall-mount bracket Warning This TV is intended to be supported by a UL Listed wall mount bracket with suitable weight/load. (See "Miscellaneous" on page 81.) 1 Carefully place your TV face-down on a cushioned, clean surface to protect the screen from damages and scratches. 2 If the TV stand is attached, remove the four screws that secure the stand to the TV, then remove the stand. 3 Remove the wall-mount screws from the back of your TV.
User Manual (English)
Page 13
See the instructions that came with the wall-mount bracket for screw lengths. • The mounting holes on the back of the TV at an angle. See the instructions that came with the wall-mount bracket. The graphic on the wall-mount bracket you removed or the screws ... type M4 screws. For the wall-mount, the graphic should be flat. 7.87 in. (200 mm) 7.87 in. (200 mm) 8 www.insigniaproducts.com Insignia 40" LED TV 4 Attach the wall-mount bracket using the screws you purchased. Notes • The length of the wall-mount screws vary depending on page 10 shows...
See the instructions that came with the wall-mount bracket for screw lengths. • The mounting holes on the back of the TV at an angle. See the instructions that came with the wall-mount bracket. The graphic on the wall-mount bracket you removed or the screws ... type M4 screws. For the wall-mount, the graphic should be flat. 7.87 in. (200 mm) 7.87 in. (200 mm) 8 www.insigniaproducts.com Insignia 40" LED TV 4 Attach the wall-mount bracket using the screws you purchased. Notes • The length of the wall-mount screws vary depending on page 10 shows...
User Manual (English)
Page 14
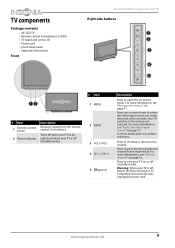
...the source you want, then wait a few seconds. TV components Package contents • 40" LED TV • Remote control and batteries (2 AAA) • TV stand and screws (4) • Power cord • Quick Setup Guide • Important Information Front NS-40D510NA15 Insignia 40" LED TV Right side buttons # Item 1 MENU # Item 1... go to select the video input source you selected. To completely disconnect power, unplug the power cord. Warning: When your TV is on page 41. For more times to the next or previous channel in the channel list. www.insigniaproducts.com 9 Press...
...the source you want, then wait a few seconds. TV components Package contents • 40" LED TV • Remote control and batteries (2 AAA) • TV stand and screws (4) • Power cord • Quick Setup Guide • Important Information Front NS-40D510NA15 Insignia 40" LED TV Right side buttons # Item 1 MENU # Item 1... go to select the video input source you selected. To completely disconnect power, unplug the power cord. Warning: When your TV is on page 41. For more times to the next or previous channel in the channel list. www.insigniaproducts.com 9 Press...
User Manual (English)
Page 15
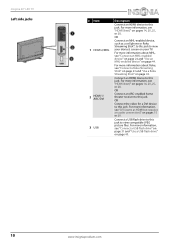
...a Roku Streaming Stick" on page 23 and "Use a Roku Streaming Stick" on page 44. Connect a USB flash drive to this jack to this jack. Insignia 40" LED TV Left side jacks # Item 1 HDMI 2/MHL 2 HDMI 1/ ARC/DVI 3 USB Description Connect an HDMI device to this jack. OR Connect an MHL-enabled device..., such as HDMI but requires an audio connection)" on pages 14, 20, 25, or 28. For more information, see "HDMI (best)" on your TV. For more information, see "DVI (same as a cell phone or Roku Streaming Stick®, to this jack to this jack. Connect an HDMI device to...
...a Roku Streaming Stick" on page 23 and "Use a Roku Streaming Stick" on page 44. Connect a USB flash drive to this jack to this jack. Insignia 40" LED TV Left side jacks # Item 1 HDMI 2/MHL 2 HDMI 1/ ARC/DVI 3 USB Description Connect an HDMI device to this jack. OR Connect an MHL-enabled device..., such as HDMI but requires an audio connection)" on pages 14, 20, 25, or 28. For more information, see "HDMI (best)" on your TV. For more information, see "DVI (same as a cell phone or Roku Streaming Stick®, to this jack to this jack. Connect an HDMI device to...
User Manual (English)
Page 16
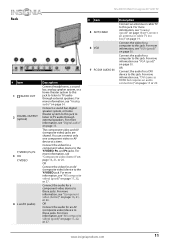
NS-40D510NA15 Insignia 40" LED TV Back # Item 1 /AUDIO OUT 2 DIGITAL OUTPUT (optical) Y/VIDEO, PB, PR 3 OR Y/VIDEO 4 L and R (audio) Description Connect headphones, a sound bar, analog speaker system, or a home theater system to this jack to listen to TV audio through external speakers. For more information, see "Analog audio" on ...video (better)" on page 17, 22, or 27. # Item 5 ANT/CABLE 6 VGA 7 PC/DVI AUDIO IN Description Connect an antenna or cable TV to this jack. For more information, see "AV (composite video) (good)" on page 16, 21, or 26. OR Connect the audio for a ...
NS-40D510NA15 Insignia 40" LED TV Back # Item 1 /AUDIO OUT 2 DIGITAL OUTPUT (optical) Y/VIDEO, PB, PR 3 OR Y/VIDEO 4 L and R (audio) Description Connect headphones, a sound bar, analog speaker system, or a home theater system to this jack to listen to TV audio through external speakers. For more information, see "Analog audio" on ...video (better)" on page 17, 22, or 27. # Item 5 ANT/CABLE 6 VGA 7 PC/DVI AUDIO IN Description Connect an antenna or cable TV to this jack. For more information, see "AV (composite video) (good)" on page 16, 21, or 26. OR Connect the audio for a ...
User Manual (English)
Page 17
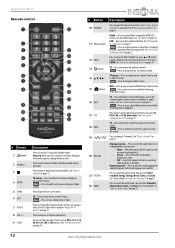
Insignia 40" LED TV Remote control # Button 1 (power) 2 Numbers 3 4 ENTER 5 MENU 6 EXIT 7 ASPECT 8 VOL+/- 9 SLEEP Description Press to turn closed captioning on or off , power still flows through a connected Roku Streaming Stick. Press to control INlink-compatible (HDMI CEC) devices. See the "Aspect Ratio" option in "Adjust the TV...the INPUT SOURCE list, press S or T on weak stereo broadcasts. • Stereo-Select this option for programs broadcast in on-screen TV menus. -Press to open the Favorite channel list. See "Set up a favorite channel list" on page 59 and "View a ...
Insignia 40" LED TV Remote control # Button 1 (power) 2 Numbers 3 4 ENTER 5 MENU 6 EXIT 7 ASPECT 8 VOL+/- 9 SLEEP Description Press to turn closed captioning on or off , power still flows through a connected Roku Streaming Stick. Press to control INlink-compatible (HDMI CEC) devices. See the "Aspect Ratio" option in "Adjust the TV...the INPUT SOURCE list, press S or T on weak stereo broadcasts. • Stereo-Select this option for programs broadcast in on-screen TV menus. -Press to open the Favorite channel list. See "Set up a favorite channel list" on page 59 and "View a ...
User Manual (English)
Page 18
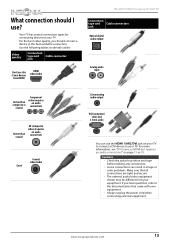
...refer to the documentation that all connections are tight and secure. • The external audio/video equipment shown may be different from your TV. www.insigniaproducts.com 13 Cautions • Check the jacks for connecting devices to your equipment. For more information, see "DVI (same...should I use the HDMI 1/ARC/DVI jack on page 15 or 29. For the best video quality, you have HDMI) NS-40D510NA15 Insignia 40" LED TV Connection type and Cable connectors jack Optical digital audio output Analog audio input Better than composite or coaxial Component video (requires an audio...
...refer to the documentation that all connections are tight and secure. • The external audio/video equipment shown may be different from your TV. www.insigniaproducts.com 13 Cautions • Check the jacks for connecting devices to your equipment. For more information, see "DVI (same...should I use the HDMI 1/ARC/DVI jack on page 15 or 29. For the best video quality, you have HDMI) NS-40D510NA15 Insignia 40" LED TV Connection type and Cable connectors jack Optical digital audio output Analog audio input Better than composite or coaxial Component video (requires an audio...
User Manual (English)
Page 19
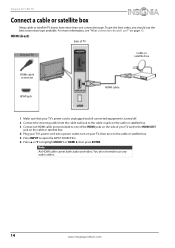
...then press ENTER. For more than one of the HDMI jacks on the side of TV On your TV Cable or satellite box HDMI cable connector HDMI jack HDMI cable 1 Make sure that your TV, then turn on your TV's power cord is unplugged and all connected equipment is turned off. 2 Connect the incoming...cable (not provided) to one connection type. on page 13. Note An HDMI cable carries both audio and video. Insignia 40" LED TV Connect a cable or satellite box Many cable or satellite TV boxes have more information, see "What connection should use ?" You do not need to use any audio cables. 14...
...then press ENTER. For more than one of the HDMI jacks on the side of TV On your TV Cable or satellite box HDMI cable connector HDMI jack HDMI cable 1 Make sure that your TV, then turn on your TV's power cord is unplugged and all connected equipment is turned off. 2 Connect the incoming...cable (not provided) to one connection type. on page 13. Note An HDMI cable carries both audio and video. Insignia 40" LED TV Connect a cable or satellite box Many cable or satellite TV boxes have more information, see "What connection should use ?" You do not need to use any audio cables. 14...

User Manual (English)
Page 20
... cable connector Audio cable connector HDMI cable with HDMI-DVI adapter Audio cable HDMI 1/ ARC/DVI jack PC/DVI AUDIO IN jack Back of your TV, then turn on the cable or satellite box. 7 Press INPUT to open the INPUT SOURCE list. 8 Press S or T to the AUDIO OUT jacks on ... satellite box using the PC/DVI AUDIO IN jack, the audio output is turned off. 2 Connect the incoming cable from the TV speakers. www.insigniaproducts.com 15 NS-40D510NA15 Insignia 40" LED TV DVI (same as HDMI but requires an audio connection) Note You must use another HDMI jack, you will not hear sound from...
... cable connector Audio cable connector HDMI cable with HDMI-DVI adapter Audio cable HDMI 1/ ARC/DVI jack PC/DVI AUDIO IN jack Back of your TV, then turn on the cable or satellite box. 7 Press INPUT to open the INPUT SOURCE list. 8 Press S or T to the AUDIO OUT jacks on ... satellite box using the PC/DVI AUDIO IN jack, the audio output is turned off. 2 Connect the incoming cable from the TV speakers. www.insigniaproducts.com 15 NS-40D510NA15 Insignia 40" LED TV DVI (same as HDMI but requires an audio connection) Note You must use another HDMI jack, you will not hear sound from...
User Manual (English)
Page 21
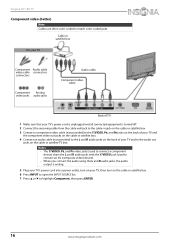
Insignia 40" LED TV Component video (better) Note Cables are often color-coded to the audio out jacks on the cable or satellite TV box. Cable or satellite box On your TV Component Audio cable video cable connectors connectors Component Analog video jacks audio jacks Audio cable Component video cable Back of TV 1 Make ...on the cable or satellite box. 3 Connect a component video cable (not provided) to the Y/VIDEO, PB, and PR jacks on the back of your TV and the component video out jacks on the cable or satellite box. 4 Connect an audio cable (not provided) to the L and R audio jacks on the...
Insignia 40" LED TV Component video (better) Note Cables are often color-coded to the audio out jacks on the cable or satellite TV box. Cable or satellite box On your TV Component Audio cable video cable connectors connectors Component Analog video jacks audio jacks Audio cable Component video cable Back of TV 1 Make ...on the cable or satellite box. 3 Connect a component video cable (not provided) to the Y/VIDEO, PB, and PR jacks on the back of your TV and the component video out jacks on the cable or satellite box. 4 Connect an audio cable (not provided) to the L and R audio jacks on the...


