User Manual (English)
Page 3
...menu language and transparency 31 Changing video input labels 32 Maintaining 32 Cleaning the cabinet 32 Troubleshooting 32 Specifications 33 NS-19E430A10 33 NS-22E430A10 33 Legal notices 34 Two-year limited warranty 35 www.insigniaproducts.com iii Contents Changing channel settings 18 Automatically scanning... a channel from the favorite channel list 21 Adding a channel label 21 Checking the digital channel strength 22 Using the electronic program guide 22 Setting parental controls 22 Turning parental controls on or off 22 Blocking a video input source 23 Blocking U.S.
...menu language and transparency 31 Changing video input labels 32 Maintaining 32 Cleaning the cabinet 32 Troubleshooting 32 Specifications 33 NS-19E430A10 33 NS-22E430A10 33 Legal notices 34 Two-year limited warranty 35 www.insigniaproducts.com iii Contents Changing channel settings 18 Automatically scanning... a channel from the favorite channel list 21 Adding a channel label 21 Checking the digital channel strength 22 Using the electronic program guide 22 Setting parental controls 22 Turning parental controls on or off 22 Blocking a video input source 23 Blocking U.S.
User Manual (English)
Page 8
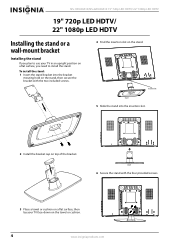
NS-19E430A10/NS-22E430A10 19" 720p LED HDTV/ 22" 1080p LED HDTV 19" 720p LED HDTV/ 22" 1080p LED HDTV Installing the stand or a wall-mount bracket Installing the stand If you plan to install the stand. Stand 6 Secure the stand with ...
NS-19E430A10/NS-22E430A10 19" 720p LED HDTV/ 22" 1080p LED HDTV 19" 720p LED HDTV/ 22" 1080p LED HDTV Installing the stand or a wall-mount bracket Installing the stand If you plan to install the stand. Stand 6 Secure the stand with ...
User Manual (English)
Page 9
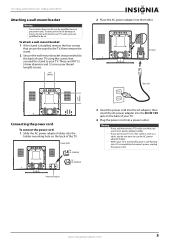
Adapter holder For NS-19E430A10 For NS-22E430A10 Holder mounting hole 3 Insert the power cord into the AC adapter, then insert the AC power adapter into the DC IN 12V jack on the ... into the holder mounting hole on a flat surface, such as a table, you are qualified to use by qualified service personnel only. 19" 720p LED HDTV/ 22" 1080p LED HDTV Attaching a wall-mount bracket Warning These instructions are for use the AC power adapter holder. • When your TV on the back...
Adapter holder For NS-19E430A10 For NS-22E430A10 Holder mounting hole 3 Insert the power cord into the AC adapter, then insert the AC power adapter into the DC IN 12V jack on the ... into the holder mounting hole on a flat surface, such as a table, you are qualified to use by qualified service personnel only. 19" 720p LED HDTV/ 22" 1080p LED HDTV Attaching a wall-mount bracket Warning These instructions are for use the AC power adapter holder. • When your TV on the back...
User Manual (English)
Page 10
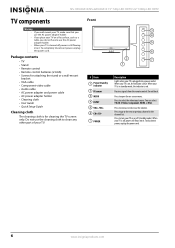
NS-19E430A10/NS-22E430A10 19" 720p LED HDTV/ 22" 1080p LED HDTV TV components Warning • If you wall mount your TV, make sure that you use the AC power adapter holder. • If ...
NS-19E430A10/NS-22E430A10 19" 720p LED HDTV/ 22" 1080p LED HDTV TV components Warning • If you wall mount your TV, make sure that you use the AC power adapter holder. • If ...
User Manual (English)
Page 11
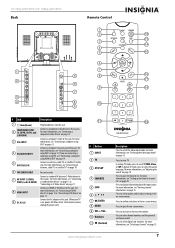
... Connect a component video device to open the favorite list. For more information, see "Selecting the video input mode" on page 20. 19" 720p LED HDTV/ 22" 1080p LED HDTV Back Remote Control 1 2 12 13 3 14 4 5 15 6 1 7 5 8 16 2 17 6 9 18 7 3 4 8 10 9 # Jack 1 (headphone) COMPONENT INPUT 2 (Y, CB/PB, CR/PR, and L/R AUDIO) 3 VGA...
... Connect a component video device to open the favorite list. For more information, see "Selecting the video input mode" on page 20. 19" 720p LED HDTV/ 22" 1080p LED HDTV Back Remote Control 1 2 12 13 3 14 4 5 15 6 1 7 5 8 16 2 17 6 9 18 7 3 4 8 10 9 # Jack 1 (headphone) COMPONENT INPUT 2 (Y, CB/PB, CR/PR, and L/R AUDIO) 3 VGA...
User Manual (English)
Page 12
...your skin, wash immediately. • If the remote control is off, power still flows into it clicks into the battery compartment. NS-19E430A10/NS-22E430A10 19" 720p LED HDTV/ 22" 1080p LED HDTV # Button 12 POWER 13 CCD 14 GUIDE 15 RECALL 16 EXIT 17 MUTE 18 CH /CH 19 ZOOM Description...to mute the sound. For more information, see "Using the electronic program guide" on page 15. For more information, see "Selecting a channel" on page 22. You can cause a rash. symbols on or off. symbols in the channel list. Press to the next or previous channel in the battery compartment. 8 ...
...your skin, wash immediately. • If the remote control is off, power still flows into it clicks into the battery compartment. NS-19E430A10/NS-22E430A10 19" 720p LED HDTV/ 22" 1080p LED HDTV # Button 12 POWER 13 CCD 14 GUIDE 15 RECALL 16 EXIT 17 MUTE 18 CH /CH 19 ZOOM Description...to mute the sound. For more information, see "Using the electronic program guide" on page 15. For more information, see "Selecting a channel" on page 22. You can cause a rash. symbols on or off. symbols in the channel list. Press to the next or previous channel in the battery compartment. 8 ...

User Manual (English)
Page 13
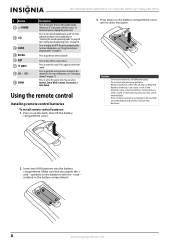
...can operate your universal remote control or set -top box's remote control manufacturer and model) on the remote sensor. Codes for details. 3 If all Insignia TVs manufactured after Jan. 1, 2007) Universal remote control manufacturers and models Philips PHDVD5, PH5DSS, PMDVR8, PDVR8 RCA RCU807 One for details. • If...TV. Four such remotes are listed on the chart, but many other remote controls are available in the market. 19" 720p LED HDTV/ 22" 1080p LED HDTV Aiming the remote control To use the remote control: • Point the remote control towards the remote sensor on the ...
...can operate your universal remote control or set -top box's remote control manufacturer and model) on the remote sensor. Codes for details. 3 If all Insignia TVs manufactured after Jan. 1, 2007) Universal remote control manufacturers and models Philips PHDVD5, PH5DSS, PMDVR8, PDVR8 RCA RCU807 One for details. • If...TV. Four such remotes are listed on the chart, but many other remote controls are available in the market. 19" 720p LED HDTV/ 22" 1080p LED HDTV Aiming the remote control To use the remote control: • Point the remote control towards the remote sensor on the ...
User Manual (English)
Page 14
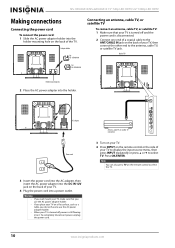
...input source menu, then press INPUT repeatedly or press or to select TV. Back of TV For NS-22E430A10 Holder mounting hole 2 Place the AC power adapter into the holder. Antenna, cable TV, or ...INPUT on the remote control to the antenna, cable TV, or satellite TV jack. Adapter holder For NS-19E430A10 Connecting an antenna, cable TV, or satellite TV To connect an antenna, cable TV, or satellite...power adapter into the DC IN 12V jack on the back of the TV. NS-19E430A10/NS-22E430A10 19" 720p LED HDTV/ 22" 1080p LED HDTV Making connections Connecting the power cord To connect the power ...
...input source menu, then press INPUT repeatedly or press or to select TV. Back of TV For NS-22E430A10 Holder mounting hole 2 Place the AC power adapter into the holder. Antenna, cable TV, or ...INPUT on the remote control to the antenna, cable TV, or satellite TV jack. Adapter holder For NS-19E430A10 Connecting an antenna, cable TV, or satellite TV To connect an antenna, cable TV, or satellite...power adapter into the DC IN 12V jack on the back of the TV. NS-19E430A10/NS-22E430A10 19" 720p LED HDTV/ 22" 1080p LED HDTV Making connections Connecting the power cord To connect the power ...

User Manual (English)
Page 15
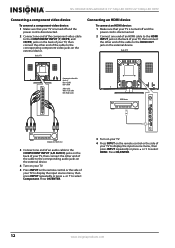
... other end of the cable to the AV OUTPUT jacks on the external device. www.insigniaproducts.com 11 Press OK/ENTER. 19" 720p LED HDTV/ 22" 1080p LED HDTV Connecting a standard video device To connect a standard video device: 1 Make sure that your TV is turned off and the power cord is...
... other end of the cable to the AV OUTPUT jacks on the external device. www.insigniaproducts.com 11 Press OK/ENTER. 19" 720p LED HDTV/ 22" 1080p LED HDTV Connecting a standard video device To connect a standard video device: 1 Make sure that your TV is turned off and the power cord is...
User Manual (English)
Page 16
... the back of your TV, then connect the other end of the cable to the corresponding component video jacks on the external device. NS-19E430A10/NS-22E430A10 19" 720p LED HDTV/ 22" 1080p LED HDTV Connecting a component video device To connect a component video device: 1 Make sure that your TV is turned off and the...
... the back of your TV, then connect the other end of the cable to the corresponding component video jacks on the external device. NS-19E430A10/NS-22E430A10 19" 720p LED HDTV/ 22" 1080p LED HDTV Connecting a component video device To connect a component video device: 1 Make sure that your TV is turned off and the...

User Manual (English)
Page 17
... menu, then press INPUT repeatedly or press or to select VGA. Note An HDMI-to select HDMI. www.insigniaproducts.com 13 19" 720p LED HDTV/ 22" 1080p LED HDTV Connecting a DVI device To connect a DVI device: 1 Make sure that your TV is turned off and the power cord is disconnected. 2 Connect...
... menu, then press INPUT repeatedly or press or to select VGA. Note An HDMI-to select HDMI. www.insigniaproducts.com 13 19" 720p LED HDTV/ 22" 1080p LED HDTV Connecting a DVI device To connect a DVI device: 1 Make sure that your TV is turned off and the power cord is disconnected. 2 Connect...
User Manual (English)
Page 18
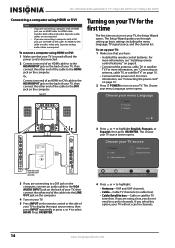
... HDMI cable transfers both video and audio. To set up basic settings including the menu language, TV signal source, and the channel list. NS-19E430A10/NS-22E430A10 19" 720p LED HDTV/ 22" 1080p LED HDTV Connecting a computer using HDMI or DVI Note • If you are conncting a computer with a DVI jack, use an HDMI...
... HDMI cable transfers both video and audio. To set up basic settings including the menu language, TV signal source, and the channel list. NS-19E430A10/NS-22E430A10 19" 720p LED HDTV/ 22" 1080p LED HDTV Connecting a computer using HDMI or DVI Note • If you are conncting a computer with a DVI jack, use an HDMI...
User Manual (English)
Page 19
... TV on using an antenna for channels, if necessary. Adjusting the volume To adjust the volume: • Press VOL+ or VOL- 19" 720p LED HDTV/ 22" 1080p LED HDTV 5 Press OK/ENTER. Your TV scans for standard or HD TV. When the scan is turned off To turn off and the...
... TV on using an antenna for channels, if necessary. Adjusting the volume To adjust the volume: • Press VOL+ or VOL- 19" 720p LED HDTV/ 22" 1080p LED HDTV 5 Press OK/ENTER. Your TV scans for standard or HD TV. When the scan is turned off To turn off and the...
User Manual (English)
Page 20
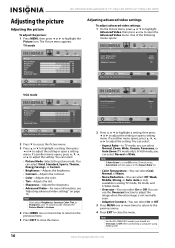
.... EXIT Exit 2 Press to access the Picture menu. 3 Press or to highlight a setting, then press or to close the menu. NS-19E430A10/NS-22E430A10 19" 720p LED HDTV/ 22" 1080p LED HDTV Adjusting the picture Adjusting the picture To adjust the picture: 1 Press MENU, then press or to adjust the setting.... advanced video settings: 1 On the Picture menu, press or to highlight Advanced Video, then press or to affect picture quality. Note For the NS-22E430A10 model, you can select On or Off. Auto is only available in the Aspect Ratio list. • Color Temperature-You can select Cool, Normal...
.... EXIT Exit 2 Press to access the Picture menu. 3 Press or to highlight a setting, then press or to close the menu. NS-19E430A10/NS-22E430A10 19" 720p LED HDTV/ 22" 1080p LED HDTV Adjusting the picture Adjusting the picture To adjust the picture: 1 Press MENU, then press or to adjust the setting.... advanced video settings: 1 On the Picture menu, press or to highlight Advanced Video, then press or to affect picture quality. Note For the NS-22E430A10 model, you can select On or Off. Auto is only available in the Aspect Ratio list. • Color Temperature-You can select Cool, Normal...

User Manual (English)
Page 21
... × 600 800 × 600 1024 × 768 1280 × 768 1360 × 768 Frequency (Hz) 60 70 60 72 60 60 60 NS-22E430A10 Format VGA SVGA XGA SXGA WXGA WUXGA Resolution 640 × 480 720 × 400 Frequency (Hz) 60 70 800 × 600 60 1024 × 768...• 1920 × 1080 (NS-22E430A10) 4 Click OK, then click Yes to highlight the Settings icon. The ideal resolution for your changes. The Display Properties dialog box opens. PC signal input chart The following table shows the suggested screen resolutions. 19" 720p LED HDTV/ 22" 1080p LED HDTV Adjusting VGA settings ...
... × 600 800 × 600 1024 × 768 1280 × 768 1360 × 768 Frequency (Hz) 60 70 60 72 60 60 60 NS-22E430A10 Format VGA SVGA XGA SXGA WXGA WUXGA Resolution 640 × 480 720 × 400 Frequency (Hz) 60 70 800 × 600 60 1024 × 768...• 1920 × 1080 (NS-22E430A10) 4 Click OK, then click Yes to highlight the Settings icon. The ideal resolution for your changes. The Display Properties dialog box opens. PC signal input chart The following table shows the suggested screen resolutions. 19" 720p LED HDTV/ 22" 1080p LED HDTV Adjusting VGA settings ...
User Manual (English)
Page 22
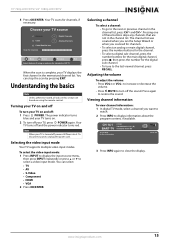
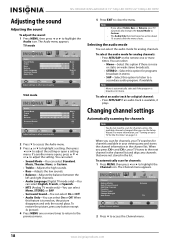
..., your TV searches for the first time" on weak stereo broadcasts. • STEREO-Select this option to listen to highlight the Channel icon. NS-19E430A10/NS-22E430A10 19" 720p LED HDTV/ 22" 1080p LED HDTV Adjusting the sound Adjusting the sound To adjust the sound: 1 Press MENU, then press or to affect sound quality...
..., your TV searches for the first time" on weak stereo broadcasts. • STEREO-Select this option to listen to highlight the Channel icon. NS-19E430A10/NS-22E430A10 19" 720p LED HDTV/ 22" 1080p LED HDTV Adjusting the sound Adjusting the sound To adjust the sound: 1 Press MENU, then press or to affect sound quality...
User Manual (English)
Page 23
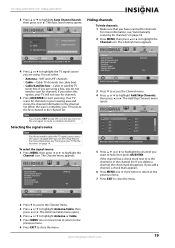
... for channels in your viewing area and stores the channel information in the channel list. The Add/Skip Channels menu opens. 19" 720p LED HDTV/ 22" 1080p LED HDTV 3 Press or to highlight the Channel icon. For more times to return to the previous menu. 7 Press EXIT to highlight the Channel...
... for channels in your viewing area and stores the channel information in the channel list. The Add/Skip Channels menu opens. 19" 720p LED HDTV/ 22" 1080p LED HDTV 3 Press or to highlight the Channel icon. For more times to return to the previous menu. 7 Press EXIT to highlight the Channel...
User Manual (English)
Page 24
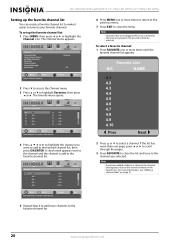
... page 21. 5 Repeat Step 4 to add more times until the favorite channel list appears. Note Channels that were skipped when you selected. NS-19E430A10/NS-22E430A10 19" 720p LED HDTV/ 22" 1080p LED HDTV Setting up the favorite channel list: 1 Press MENU, then press or to highlight the Channel icon. To set up the...
... page 21. 5 Repeat Step 4 to add more times until the favorite channel list appears. Note Channels that were skipped when you selected. NS-19E430A10/NS-22E430A10 19" 720p LED HDTV/ 22" 1080p LED HDTV Setting up the favorite channel list: 1 Press MENU, then press or to highlight the Channel icon. To set up the...

User Manual (English)
Page 25
... label: 1 Press MENU, then press or to highlight the Channel icon. The Channel Label screen opens with CH (channel number) highlighted. 19" 720p LED HDTV/ 22" 1080p LED HDTV Deleting a channel from the favorite channel list To delete a channel from the favorite channel list: 1 Press MENU, then press or to highlight...
... label: 1 Press MENU, then press or to highlight the Channel icon. The Channel Label screen opens with CH (channel number) highlighted. 19" 720p LED HDTV/ 22" 1080p LED HDTV Deleting a channel from the favorite channel list To delete a channel from the favorite channel list: 1 Press MENU, then press or to highlight...
User Manual (English)
Page 26
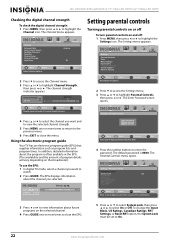
...OK Select ENTER Set various TV options. Settings Parental Controls Time Menu Settings Input Labels Computer Settings Closed Caption Reset to On. 22 www.insigniaproducts.com Using the electronic program guide Your TV has an electronic program guide (EPG) that supplies information such as ...Settings menu appears. MENU Previous EXIT Exit 2 Press to access the Settings menu. 3 Press or to enter the password. NS-19E430A10/NS-22E430A10 19" 720p LED HDTV/ 22" 1080p LED HDTV Checking the digital channel strength To check the digital channel strength: 1 Press MENU, then press or to ...
...OK Select ENTER Set various TV options. Settings Parental Controls Time Menu Settings Input Labels Computer Settings Closed Caption Reset to On. 22 www.insigniaproducts.com Using the electronic program guide Your TV has an electronic program guide (EPG) that supplies information such as ...Settings menu appears. MENU Previous EXIT Exit 2 Press to access the Settings menu. 3 Press or to enter the password. NS-19E430A10/NS-22E430A10 19" 720p LED HDTV/ 22" 1080p LED HDTV Checking the digital channel strength To check the digital channel strength: 1 Press MENU, then press or to ...