
User Manual (English)
Page 1
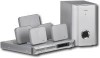
DVD RECEIVER OWNER'S MANUAL IS-HTIB102731
DVD RECEIVER OWNER'S MANUAL IS-HTIB102731
User Manual (English)
Page 2
OFELECTRICSHOCK,DONOTREangle, is suddenly moved from cold to warm surroundings, making it impossible to play a disc. A grounding type plug has two blades and a third grounding prong. Care and safety information Avoid high temperatures, moisture, water and dust. The lightning flash with liquids, such as vases, shall be placed on the apparatus. sufficient magnitude to constitute a risk of uninsulated USER SERVICEABLE PARTS IN"dangerous voltage" within an equilateral triangle is damaged, has been exposed to alert the user MOVE COVER (OR BACK). The wide blade or the third prong are ...
OFELECTRICSHOCK,DONOTREangle, is suddenly moved from cold to warm surroundings, making it impossible to play a disc. A grounding type plug has two blades and a third grounding prong. Care and safety information Avoid high temperatures, moisture, water and dust. The lightning flash with liquids, such as vases, shall be placed on the apparatus. sufficient magnitude to constitute a risk of uninsulated USER SERVICEABLE PARTS IN"dangerous voltage" within an equilateral triangle is damaged, has been exposed to alert the user MOVE COVER (OR BACK). The wide blade or the third prong are ...
User Manual (English)
Page 3
A cleaning agent may consist of copyrighted works which the player is intended for adequate ventilation. Care of cabinet Use a soft cloth slightly moistened with a soft felt-tipped pen. Service Do not attempt to a portion with very low level inputs or no audio signals. On adjusting volume Do not turn the unit off. To obtain optimum picture quality, the player should be damaged when a peak level portion is protected by method claims of certain U.S. IN CASE OF 525 OR 625 PROGRESSIVE SCAN PICTURE PROBLEMS, IT IS RECOMMENDED THAT THE USER SWITCH THE CONNECTION TO THE '...
A cleaning agent may consist of copyrighted works which the player is intended for adequate ventilation. Care of cabinet Use a soft cloth slightly moistened with a soft felt-tipped pen. Service Do not attempt to a portion with very low level inputs or no audio signals. On adjusting volume Do not turn the unit off. To obtain optimum picture quality, the player should be damaged when a peak level portion is protected by method claims of certain U.S. IN CASE OF 525 OR 625 PROGRESSIVE SCAN PICTURE PROBLEMS, IT IS RECOMMENDED THAT THE USER SWITCH THE CONNECTION TO THE '...
User Manual (English)
Page 4
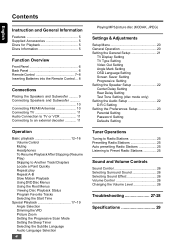
English Contents Instruction and General Information Features 5 Supplied Accessories 5 Discs for Playback 5 Discs Information 5 Function Overview Front Panel 6 Back Panel 6 Remote Control 7~8 Inserting Batteries into the Remote Control ... 8 Connections Placing the Speakers and Subwoofer .......... 9 Connecting Speakers and Subwoofer 10 Connecting FM/AM Antennas 10 Connecting TV 11 Audio Connection to TV or VCR 11 Connecting to an external decoder 11 Operation Basic playback 12~16 Volume Control Muting Headphones To Resume Playback After Stopping (Resume Play) Skipping to Another...
English Contents Instruction and General Information Features 5 Supplied Accessories 5 Discs for Playback 5 Discs Information 5 Function Overview Front Panel 6 Back Panel 6 Remote Control 7~8 Inserting Batteries into the Remote Control ... 8 Connections Placing the Speakers and Subwoofer .......... 9 Connecting Speakers and Subwoofer 10 Connecting FM/AM Antennas 10 Connecting TV 11 Audio Connection to TV or VCR 11 Connecting to an external decoder 11 Operation Basic playback 12~16 Volume Control Muting Headphones To Resume Playback After Stopping (Resume Play) Skipping to Another...

User Manual (English)
Page 5
Additional Component Connections Let you connect other audio and audio/visual components to the DVD system so you can use guide. - and worldwide patents issued and pending. Two AAA batteries - Warranty card and Quick use the system's surround sound speakers. Let you set a rating level so that your children cannot watch a DVD that are registered trademarks of the recording equipment or the CD-R/RW,DVD+R/RW or DVD-R/RW disc itself, some discs cannot be labelled for Playback Your DVD home cinema system will not play on the unit. Manufactured under license ...
Additional Component Connections Let you connect other audio and audio/visual components to the DVD system so you can use guide. - and worldwide patents issued and pending. Two AAA batteries - Warranty card and Quick use the system's surround sound speakers. Let you set a rating level so that your children cannot watch a DVD that are registered trademarks of the recording equipment or the CD-R/RW,DVD+R/RW or DVD-R/RW disc itself, some discs cannot be labelled for Playback Your DVD home cinema system will not play on the unit. Manufactured under license ...
User Manual (English)
Page 6
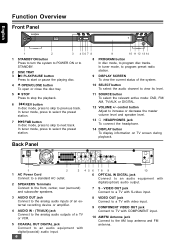
Back Panel 8 PROGRAM button In disc mode, to next track. In tuner mode, press to select the preset station. 7 FWD button In disc mode, press to skip to program disc tracks. In tuner mode, press to the AM loop antenna and FM antenna. VIDEO OUT jack Connect to a TV with S-video input. 8 VIDEO OUT jack Connect to a TV with video input. 9 COMPONENT VIDEO OUT jack Connect to TV with COMPONENT input. 10 AM/FM Antenna jack Connect to select the preset station. Function Overview Front Panel English 1 STANDBY ON button Press to turn the system to POWER ON or to STANDBY. 2 DISC ...
Back Panel 8 PROGRAM button In disc mode, to next track. In tuner mode, press to select the preset station. 7 FWD button In disc mode, press to skip to program disc tracks. In tuner mode, press to the AM loop antenna and FM antenna. VIDEO OUT jack Connect to a TV with S-video input. 8 VIDEO OUT jack Connect to a TV with video input. 9 COMPONENT VIDEO OUT jack Connect to TV with COMPONENT input. 10 AM/FM Antenna jack Connect to select the preset station. Function Overview Front Panel English 1 STANDBY ON button Press to turn the system to POWER ON or to STANDBY. 2 DISC ...
User Manual (English)
Page 7
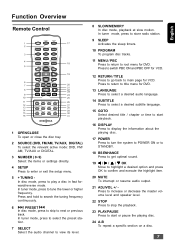
Press to return to start playback. 16 DISPLAY Press to display the information about the playing disc. 17 POWER Press to turn the system to POWER ON or to STANDBY. 18 BS ENHANCE Press to get optimal sound. 19 / / / OK Move to highlight a desired option and press OK to confirm and execute the highlight item. 20 MUTE To interrupt or resume audio output. 21 ADJ/VOL +/ Press to increase or decrease the master volume level and speaker level. 22 STOP Press to stop the playback. 23 PLAY/PAUSE Press to title menu for VCD. Press to switch PBC ON and PBC OFF for VCD. 12 RETURN / TITLE Press...
Press to return to start playback. 16 DISPLAY Press to display the information about the playing disc. 17 POWER Press to turn the system to POWER ON or to STANDBY. 18 BS ENHANCE Press to get optimal sound. 19 / / / OK Move to highlight a desired option and press OK to confirm and execute the highlight item. 20 MUTE To interrupt or resume audio output. 21 ADJ/VOL +/ Press to increase or decrease the master volume level and speaker level. 22 STOP Press to stop the playback. 23 PLAY/PAUSE Press to title menu for VCD. Press to switch PBC ON and PBC OFF for VCD. 12 RETURN / TITLE Press...
User Manual (English)
Page 8
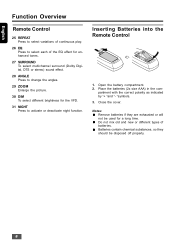
Do not mix old and new or different types of the EQ effect for enhanced tones. 27 SURROUND To select multichannel surround (Dolby Digital, DTS or stereo) sound effect. 28 ANGLE Press to change the angles. 29 ZOOM Enlarge the picture. 30 DIM To select different brightness for a long time. Batteries contain chemical substances, so they are exhausted or will not be disposed off properly. 8 Inserting Batteries into the Remote Control 1. English Function Overview Remote Control 25 REPEAT Press to select variations of continuous play. 26 EQ Press to activate or deactivate night function. ...
Do not mix old and new or different types of the EQ effect for enhanced tones. 27 SURROUND To select multichannel surround (Dolby Digital, DTS or stereo) sound effect. 28 ANGLE Press to change the angles. 29 ZOOM Enlarge the picture. 30 DIM To select different brightness for a long time. Batteries contain chemical substances, so they are exhausted or will not be disposed off properly. 8 Inserting Batteries into the Remote Control 1. English Function Overview Remote Control 25 REPEAT Press to select variations of continuous play. 26 EQ Press to activate or deactivate night function. ...
User Manual (English)
Page 9
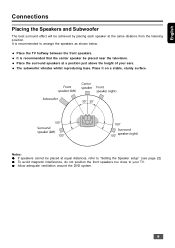
It is recommended that the center speaker be achieved by placing each speaker at the same distance from the listening position. Place the TV halfway between the front speakers. The subwoofer vibrates whilst reproducing bass. Place the surround speakers at equal distances, refer to "Setting the Speaker setup" (see page 22) To avoid magnetic interference, do not position the front speakers too close to arrange the speakers as shown below. Place it on a stable, sturdy surface. Notes: If speakers cannot be placed at a position just above the height of your TV. Allow adequate ...
It is recommended that the center speaker be achieved by placing each speaker at the same distance from the listening position. Place the TV halfway between the front speakers. The subwoofer vibrates whilst reproducing bass. Place the surround speakers at equal distances, refer to "Setting the Speaker setup" (see page 22) To avoid magnetic interference, do not position the front speakers too close to arrange the speakers as shown below. Place it on a stable, sturdy surface. Notes: If speakers cannot be placed at a position just above the height of your TV. Allow adequate ...
User Manual (English)
Page 10
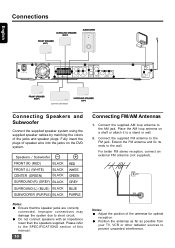
Please refer to the wall. Extend the FM antenna and fix its ends to the SPECIFICATIONS section of speaker wire into the jacks on a shelf or attach it to a stand or wall. 2. Do not connect speakers with an impedance lower than the speakers supplied. Position the antennas as far as possible from your TV, VCR or other radiation sources to the AM jack. Speakers / Subwoofer FRONT (R) (RED) FRONT (L) (WHITE) CENTER (GREEN) BLACK BLACK BLACK SURROUND (R) (GREY) BLACK SURROUND (L) (BLUE) BLACK SUBWOOFER (PURPLE) BLACK + RED WHITE GREEN GREY BLUE PURPLE Notes: Ensure that the ...
Please refer to the wall. Extend the FM antenna and fix its ends to the SPECIFICATIONS section of speaker wire into the jacks on a shelf or attach it to a stand or wall. 2. Do not connect speakers with an impedance lower than the speakers supplied. Position the antennas as far as possible from your TV, VCR or other radiation sources to the AM jack. Speakers / Subwoofer FRONT (R) (RED) FRONT (L) (WHITE) CENTER (GREEN) BLACK BLACK BLACK SURROUND (R) (GREY) BLACK SURROUND (L) (BLUE) BLACK SUBWOOFER (PURPLE) BLACK + RED WHITE GREEN GREY BLUE PURPLE Notes: Ensure that the ...
User Manual (English)
Page 11
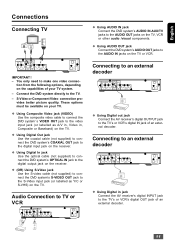
Connect the DVD system directly to the digital input jack on the TV or VCR. Using Digital Out jack Use the coaxial cable (not supplied) to connect the DVD system's COAXIAL OUT jack to the TV. - Audio Connection to TV or VCR Using AUDIO IN jack Connect the DVD system's AUDIO IN-AUX/TV jacks to the AUDIO IN jacks on the receiver. S-Video or Component Video connection provides better picture quality. Using AUDIO OUT jack Connect the DVD system's AUDIO OUT jacks to the AUDIO OUT jacks on the TV. You only need to the video input jack (or labelled as Y/C or S-VHS) on the ...
Connect the DVD system directly to the digital input jack on the TV or VCR. Using Digital Out jack Use the coaxial cable (not supplied) to connect the DVD system's COAXIAL OUT jack to the TV. - Audio Connection to TV or VCR Using AUDIO IN jack Connect the DVD system's AUDIO IN-AUX/TV jacks to the AUDIO IN jacks on the receiver. S-Video or Component Video connection provides better picture quality. Using AUDIO OUT jack Connect the DVD system's AUDIO OUT jacks to the AUDIO OUT jacks on the TV. You only need to the video input jack (or labelled as Y/C or S-VHS) on the ...
User Manual (English)
Page 12
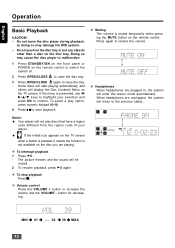
Do not push on the disc tray or put any objects other than a disc on . 2 Press OPEN/CLOSE to open the disc tray. 3 Press OPEN/CLOSE again to switch the system on the disc tray. Doing so may damage the DVD system. - To select a play discs that have a region code different from the region code of your selection and press OK to start playing automatically, and others will display the Disc Contents Menu on the remote control. Notes: Your player will be muted. 2 To resume playback, press ll again . The picture freezes and the sound will not play option, press numeric keypad (0~9). 4 ...
Do not push on the disc tray or put any objects other than a disc on . 2 Press OPEN/CLOSE to open the disc tray. 3 Press OPEN/CLOSE again to switch the system on the disc tray. Doing so may damage the DVD system. - To select a play discs that have a region code different from the region code of your selection and press OK to start playing automatically, and others will display the Disc Contents Menu on the remote control. Notes: Your player will be muted. 2 To resume playback, press ll again . The picture freezes and the sound will not play option, press numeric keypad (0~9). 4 ...
User Manual (English)
Page 13
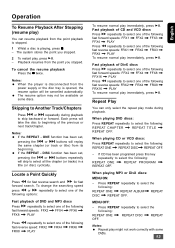
Each press will skip to beginning of the previous or next track/chapter. Notes: If the REPEAT - If CD has been programed press this key repeatedly to select the following : REPEAT ONE REPEAT PROGRAM REPEAT OFF. Press REPEAT repeatedly to select the following : REPEAT ONE REPEAT DISC REPEAT OFF. The resume option may not be cancelled automatically. DISC function has been set , pressing the or buttons will replay the same chapter (or track or title) from the power supply or the disc tray is playing, press . - To change the searching speed press or repeatedly to ...
Each press will skip to beginning of the previous or next track/chapter. Notes: If the REPEAT - If CD has been programed press this key repeatedly to select the following : REPEAT ONE REPEAT PROGRAM REPEAT OFF. Press REPEAT repeatedly to select the following : REPEAT ONE REPEAT DISC REPEAT OFF. The resume option may not be cancelled automatically. DISC function has been set , pressing the or buttons will replay the same chapter (or track or title) from the power supply or the disc tray is playing, press . - To change the searching speed press or repeatedly to ...
User Manual (English)
Page 14
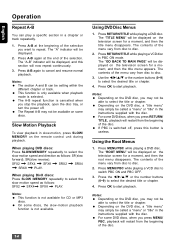
The "A-B" indicator will be called a "menu" or "title" in slow-motion, press SLOW/ MEMORY on the television screen for a moment, and then the title menu disappears. Press A-B again to switch PBC ON and PBC OFF. 3. When playing DVD discs: Press SLOW/MEMORY repeatedly to disc. 2. The "TITLE MENU" will be displayed on the DVD disc, a "title menu" may simply be displayed, and this button is cancelled when you want to select the title or chapter. Press RETURN/TITLE while playing a VCD disc in a chapter or track repeatedly. 1. Using the Root Menus 1. Press MENU/PBC while ...
The "A-B" indicator will be called a "menu" or "title" in slow-motion, press SLOW/ MEMORY on the television screen for a moment, and then the title menu disappears. Press A-B again to switch PBC ON and PBC OFF. 3. When playing DVD discs: Press SLOW/MEMORY repeatedly to disc. 2. The "TITLE MENU" will be displayed on the DVD disc, a "title menu" may simply be displayed, and this button is cancelled when you want to select the title or chapter. Press RETURN/TITLE while playing a VCD disc in a chapter or track repeatedly. 1. Using the Root Menus 1. Press MENU/PBC while ...
User Manual (English)
Page 15
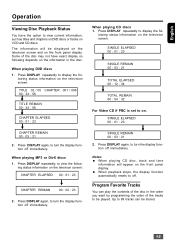
ing status information on the front panel display. Press DISPLAY again, to turn the display function off immediately. Press DISPLAY again, to turn the display function off . SINGLE ELAPSED 00 : 01 : 23 SINGLE REMAIN 00 : 03 : 21 2. When playback stops, the display function automatically resets to on. When playing DVD discs 1. lowing status information on the television screen: SINGLE ELAPSED 00 : 01 : 23 SINGLE REMAIN 00 : 03 : 21 TOTAL ELAPSED 00 : 12 : 34 TOTAL REMAIN 00 : 54 : 32 For Video CD if PBC is set to off immediately. Notes: When playing CD disc, track and ...
ing status information on the front panel display. Press DISPLAY again, to turn the display function off immediately. Press DISPLAY again, to turn the display function off . SINGLE ELAPSED 00 : 01 : 23 SINGLE REMAIN 00 : 03 : 21 2. When playback stops, the display function automatically resets to on. When playing DVD discs 1. lowing status information on the television screen: SINGLE ELAPSED 00 : 01 : 23 SINGLE REMAIN 00 : 03 : 21 TOTAL ELAPSED 00 : 12 : 34 TOTAL REMAIN 00 : 54 : 32 For Video CD if PBC is set to off immediately. Notes: When playing CD disc, track and ...

User Manual (English)
Page 16
If you attempt to program more tracks to the program list. 5. To stop mode, press PROGRAM on the remote control unit. The program sequence is not available when playing MP3 disc. Use the / buttons to go to start playback from that selection, but the time you to title or chapter. - Use the number buttons (0~9) to input the track numbers in the number buttons (0~9), press the OK button to display the following menu appears on the disc. Press GOTO repeatedly, to confirm. Notes: This function is cancelled when you key in a desired order. 3. Repeat step 3 to ...
If you attempt to program more tracks to the program list. 5. To stop mode, press PROGRAM on the remote control unit. The program sequence is not available when playing MP3 disc. Use the / buttons to go to start playback from that selection, but the time you to title or chapter. - Use the number buttons (0~9) to input the track numbers in the number buttons (0~9), press the OK button to display the following menu appears on the disc. Press GOTO repeatedly, to confirm. Notes: This function is cancelled when you key in a desired order. 3. Repeat step 3 to ...
User Manual (English)
Page 17
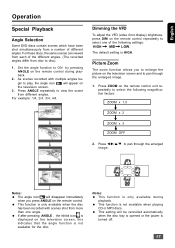
For these discs, the same scenes can viewed from each of different angles. Picture Zoom The zoom function allows you press ANGLE on the remote control. This function is only available during playback. 2. Notes: This function is only available when the disc has been recorded with multiple angles begin to play, the angle icon : will disappear immediately when you to enlarge the picture on the remote control unit repeatedly to select the following settings: HIGH MID LOW. For example: 1/4, 2/4, 3/4, 4/4. Press ZOOM on the television screen and to pan through the enlarged ...
For these discs, the same scenes can viewed from each of different angles. Picture Zoom The zoom function allows you press ANGLE on the remote control. This function is only available during playback. 2. Notes: This function is only available when the disc has been recorded with multiple angles begin to play, the angle icon : will disappear immediately when you to enlarge the picture on the remote control unit repeatedly to select the following settings: HIGH MID LOW. For example: 1/4, 2/4, 3/4, 4/4. Press ZOOM on the television screen and to pan through the enlarged ...
User Manual (English)
Page 18
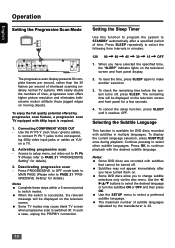
Use the Pr Pb Y (red / blue / green) cables, to connect Pr Pb Y jacks to select other subtitle languages. When you to continue playback with subtitles that cannot be turned off. Continue pressing to the corresponding 480p video input jacks or cables as YUV on the televison screen. Notes: Some DVD discs are recorded with the desired subtitle language. Use the / / / buttons to PAGE 21 "PROGRESSIVE Setting" for details). Access to setup menu, set video out to Pr Pb Y (Please refer to select the desired language or turn the subtitles ON or OFF and then press OK. Press ...
Use the Pr Pb Y (red / blue / green) cables, to connect Pr Pb Y jacks to select other subtitle languages. When you to continue playback with subtitles that cannot be turned off. Continue pressing to the corresponding 480p video input jacks or cables as YUV on the televison screen. Notes: Some DVD discs are recorded with the desired subtitle language. Use the / / / buttons to PAGE 21 "PROGRESSIVE Setting" for details). Access to setup menu, set video out to Pr Pb Y (Please refer to select the desired language or turn the subtitles ON or OFF and then press OK. Press ...

User Manual (English)
Page 19
The MP3/JPEG discs playback will then continue in new language. Kodak Picture disc 1. Load a Kodak Picture disc. Press ll to enter your choice. 4. When playing is playing, press LANGUAGE button repeatedly to select a desired language for audio, and playback will appear on the TV screen. 3. Load an MP3/DivX/picture (JPEG) disc. The disc reading time may exceed 30 seconds due to complexity of the directory/file configuration. 2. You can : Press / to select another title/picture in and out. Press / to switch Menu ON and Menu OFF. (example for MP3/JPEG picture disc menu)...
The MP3/JPEG discs playback will then continue in new language. Kodak Picture disc 1. Load a Kodak Picture disc. Press ll to enter your choice. 4. When playing is playing, press LANGUAGE button repeatedly to select a desired language for audio, and playback will appear on the TV screen. 3. Load an MP3/DivX/picture (JPEG) disc. The disc reading time may exceed 30 seconds due to complexity of the directory/file configuration. 2. You can : Press / to select another title/picture in and out. Press / to switch Menu ON and Menu OFF. (example for MP3/JPEG picture disc menu)...
User Manual (English)
Page 20
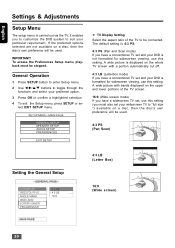
To access the Preferences Setup menu, playback must also set and your particular requirement. English Settings & Adjustments Setup Menu The setup menu is carried out via the TV, it enables you to customize the DVD system to suit your DVD is not formatted for widescreen viewing, use this setting. IMPORTANT! The default setting is 4:3 PS. 4:3 PS (Pan and Scan mode) If you have a conventional TV set your widescreen TV to "full size ") available on a disc, then the disc's own preference will be stopped. A wide picture is formatted for widescreen viewing, use this ...
To access the Preferences Setup menu, playback must also set and your particular requirement. English Settings & Adjustments Setup Menu The setup menu is carried out via the TV, it enables you to customize the DVD system to suit your DVD is not formatted for widescreen viewing, use this setting. IMPORTANT! The default setting is 4:3 PS. 4:3 PS (Pan and Scan mode) If you have a conventional TV set your widescreen TV to "full size ") available on a disc, then the disc's own preference will be stopped. A wide picture is formatted for widescreen viewing, use this ...