Specifications
Page 1
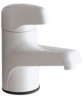
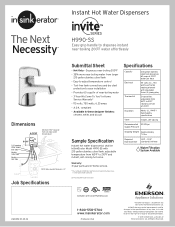
compliant • Available in USA The Emerson logo is a trademark and service mark of Emerson Electric Co. All Rights Reserved. Required 1-1/4" - 1-1/2" Hole Diameter standard sink hole HWD394-11F-45-02 Complies with Lead Plumbing Law 1-800-558-5700 www.insinkerator.com Printed in these designer finishes: chrome, white, and biscuit Sample Specification Instant hot water dispenser(s) shall be InSinkErator Model H990-SS with 2/3-gallon stainless steel tank, adjustable...
compliant • Available in USA The Emerson logo is a trademark and service mark of Emerson Electric Co. All Rights Reserved. Required 1-1/4" - 1-1/2" Hole Diameter standard sink hole HWD394-11F-45-02 Complies with Lead Plumbing Law 1-800-558-5700 www.insinkerator.com Printed in these designer finishes: chrome, white, and biscuit Sample Specification Instant hot water dispenser(s) shall be InSinkErator Model H990-SS with 2/3-gallon stainless steel tank, adjustable...

Owners Manual
Page 1
TranScape™ View™ TranScape™ Wave™ HC3/GN3 H990 H770 Instant Hot Water Dispenser Owner's Manual Installation, Care & Use Instalacion, cuidado & uso Installation, soin et utilisation
TranScape™ View™ TranScape™ Wave™ HC3/GN3 H990 H770 Instant Hot Water Dispenser Owner's Manual Installation, Care & Use Instalacion, cuidado & uso Installation, soin et utilisation
Owners Manual
Page 2
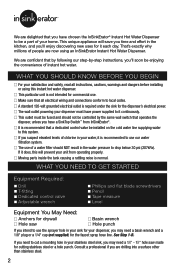
... the kitchen, and you need a basin wrench and a 1/8" plug or a 1/4" cap (not supplied) for cutting stainless steel or a hole punch. I It is required under the sink for commercial use our water filtration system. I A standard 120-volt grounded electrical outlet is recommended that all instructions, cautions, warnings and dangers before installing or using an InSinkErator Instant Hot Water Dispenser. I This particular unit is recommended to local codes. This...
... the kitchen, and you need a basin wrench and a 1/8" plug or a 1/4" cap (not supplied) for cutting stainless steel or a hole punch. I It is required under the sink for commercial use our water filtration system. I A standard 120-volt grounded electrical outlet is recommended that all instructions, cautions, warnings and dangers before installing or using an InSinkErator Instant Hot Water Dispenser. I This particular unit is recommended to local codes. This...
Owners Manual
Page 3
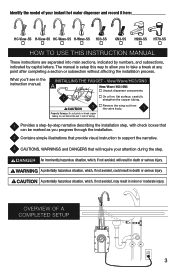
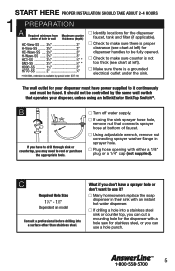
... instant hot water dispenser and record it here HC-View-SS H-View-SS HC-Wave-SS H-Wave-SS HC3-SS GN3-SS H990-SS H770-SS HOW TO USE THIS INSTRUCTION MANUAL These instructions are separated into main sections, indicated by numbers, and subsections, indicated by -step narrative describing the installation step, with check boxes that can be marked as you progress through the installation. 2 Contains simple illustrations that provide visual instruction to support...
... instant hot water dispenser and record it here HC-View-SS H-View-SS HC-Wave-SS H-Wave-SS HC3-SS GN3-SS H990-SS H770-SS HOW TO USE THIS INSTRUCTION MANUAL These instructions are separated into main sections, indicated by numbers, and subsections, indicated by -step narrative describing the installation step, with check boxes that can be marked as you progress through the installation. 2 Contains simple illustrations that provide visual instruction to support...
Owners Manual
Page 4
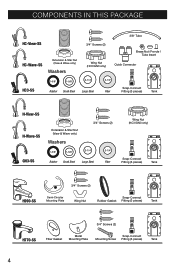
... Nut / Ferrule / Tube Insert Quick Connector HC3-SS 1-5/8" 1-5/8" 2-1/4" Rubber Small Steel Large Steel 2-1/4" Fiber Snap-Connect Fitting (3 pieces) Tank H-View-SS H-Wave-SS GN3-SS Extension & Star Nut (View & Wave only) Washers 1-5/8" 1-5/8" 3/4" Screws (2) 2-1/4" 2-1/4" Rubber Small Steel Large Steel Fiber Wing Nut (HC3/GN3 only) Snap-Connect Fitting (3 pieces) Tank 3/4" Screws (2) H990-SS Semi-Circular Mounting Plate Wing Nut Snap-Connect Rubber Gasket Fitting (3 pieces) Tank H770-SS 3/4" Screws (2) Fiber Gasket Metal Mounting Plate Snap-Connect Mounting Screw...
... Nut / Ferrule / Tube Insert Quick Connector HC3-SS 1-5/8" 1-5/8" 2-1/4" Rubber Small Steel Large Steel 2-1/4" Fiber Snap-Connect Fitting (3 pieces) Tank H-View-SS H-Wave-SS GN3-SS Extension & Star Nut (View & Wave only) Washers 1-5/8" 1-5/8" 3/4" Screws (2) 2-1/4" 2-1/4" Rubber Small Steel Large Steel Fiber Wing Nut (HC3/GN3 only) Snap-Connect Fitting (3 pieces) Tank 3/4" Screws (2) H990-SS Semi-Circular Mounting Plate Wing Nut Snap-Connect Rubber Gasket Fitting (3 pieces) Tank H770-SS 3/4" Screws (2) Fiber Gasket Metal Mounting Plate Snap-Connect Mounting Screw...
Owners Manual
Page 5
.... I Many homeowners replace the soap dispenser in sprayer hole. I Using adjustable wrench, remove nut connecting sprayer washer flange in their sink with an instant hot water dispenser. I Turn off water supply. What if you may need to be controlled by special order (EXT-10) I Identify locations for the dispenser faucet, tank and filter (if applicable). I Plug hose opening with a hole saw for stainless steel, or you can use it continuously and must...
.... I Many homeowners replace the soap dispenser in sprayer hole. I Using adjustable wrench, remove nut connecting sprayer washer flange in their sink with an instant hot water dispenser. I Turn off water supply. What if you may need to be controlled by special order (EXT-10) I Identify locations for the dispenser faucet, tank and filter (if applicable). I Plug hose opening with a hole saw for stainless steel, or you can use it continuously and must...
Owners Manual
Page 6
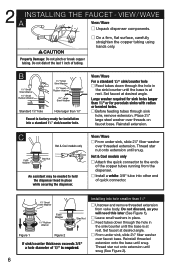
... 1). I Feed tubes down through the hole in the sink/counter until the base is at rest. View / Wave For a standard 11⁄2" sink/counter hole I Install a white 3/8" tube into a standard 11⁄2" sink/counter hole. Large washer required for sink holes larger than 11⁄2" Faucet is required. C Fiber Washer Hot & Cool models only Star Nut An assistant may be needed to the ends of tubing. I Feed tubes down through the hole...
... 1). I Feed tubes down through the hole in the sink/counter until the base is at rest. View / Wave For a standard 11⁄2" sink/counter hole I Install a white 3/8" tube into a standard 11⁄2" sink/counter hole. Large washer required for sink holes larger than 11⁄2" Faucet is required. C Fiber Washer Hot & Cool models only Star Nut An assistant may be needed to the ends of tubing. I Feed tubes down through the hole...

Owners Manual
Page 7
... from the valve body. HC3 / GN3 I Feed tubes down through the hole in place while securing the dispenser. I On a firm, flat surface, carefully straighten the copper tubing using black plastic wing nut. I Install a white 3/8" tube into quick connector. Call 1-800-558-5700 to ensure proper operation and seal. I Remove the wing nut from the dispenser. HC3 only I Make sure faucet head is available...
... from the valve body. HC3 / GN3 I Feed tubes down through the hole in place while securing the dispenser. I On a firm, flat surface, carefully straighten the copper tubing using black plastic wing nut. I Install a white 3/8" tube into quick connector. Call 1-800-558-5700 to ensure proper operation and seal. I Remove the wing nut from the dispenser. HC3 only I Make sure faucet head is available...
Owners Manual
Page 8
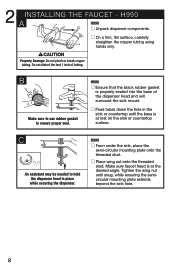
... until snug, while ensuring the semicircular mounting plate extends beyond the sink hole. 8 Tighten the wing nut until the base is properly seated into the base of tubing. Property Damage: Do not pinch or break copper tubing. H990 I Feed tubes down the hole in place while securing the dispenser. I On a firm, flat surface, carefully straighten the copper tubing using hands only. Make sure faucet...
... until snug, while ensuring the semicircular mounting plate extends beyond the sink hole. 8 Tighten the wing nut until the base is properly seated into the base of tubing. Property Damage: Do not pinch or break copper tubing. H990 I Feed tubes down the hole in place while securing the dispenser. I On a firm, flat surface, carefully straighten the copper tubing using hands only. Make sure faucet...

Owners Manual
Page 9
... smaller hole. I Feed tubes down the hole in place while securing the dispenser. Do not distort the last 1 inch of dispenser. B Fiber Gasket Make sure to use fiber gasket to hold the dispenser head in the sink or countertop until snug. 9 2 INSTALLING THE FAUCET - Property Damage: Do not pinch or break copper tubing. H770 I Slide washer over the mounting screw, ensuring the mounting plate covers the sink hole. C An...
... smaller hole. I Feed tubes down the hole in place while securing the dispenser. Do not distort the last 1 inch of dispenser. B Fiber Gasket Make sure to use fiber gasket to hold the dispenser head in the sink or countertop until snug. 9 2 INSTALLING THE FAUCET - Property Damage: Do not pinch or break copper tubing. H770 I Slide washer over the mounting screw, ensuring the mounting plate covers the sink hole. C An...
Owners Manual
Page 10
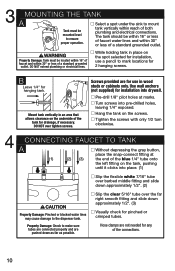
...-drill 1/8" pilot holes at (1) (2) (3) the end of both plumbing and electrical connections. I Select a spot under the sink to mount Tank must be within 16" or less of faucet water lines and within reach of the blue 1/4" tube onto the left fitting on the screws. Use wall anchors (not supplied) for pinched or crimped tubes. 3 MOUNTING THE TANK A I Visually check for installation into drywall...
...-drill 1/8" pilot holes at (1) (2) (3) the end of both plumbing and electrical connections. I Select a spot under the sink to mount Tank must be within 16" or less of faucet water lines and within reach of the blue 1/4" tube onto the left fitting on the screws. Use wall anchors (not supplied) for pinched or crimped tubes. 3 MOUNTING THE TANK A I Visually check for installation into drywall...
Owners Manual
Page 11
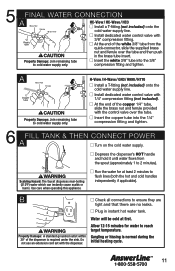
... fitting and tighten. 6 FILL TANK & THEN CONNECT POWER A I Install dedicated water control valve with the control valve over the tube and then push in instant hot water tank. I Insert the copper tube into the 3/8" compression fitting and tighten. 5 FINAL WATER CONNECTION A Brass Nut Ferrule Brass Inser Plastic tube Property Damage: Join remaining tube to cold water supply only. Use care when operating this appliance. Property Damage: A standard...
... fitting and tighten. 6 FILL TANK & THEN CONNECT POWER A I Install dedicated water control valve with the control valve over the tube and then push in instant hot water tank. I Insert the copper tube into the 3/8" compression fitting and tighten. 5 FINAL WATER CONNECTION A Brass Nut Ferrule Brass Inser Plastic tube Property Damage: Join remaining tube to cold water supply only. Use care when operating this appliance. Property Damage: A standard...
Owners Manual
Page 12
... also have a proper outlet installed by unit serial number and/or date of the original dispenser's warranty. Do not modify the plug provided with a leak detector, should be for leakage and replaced when necessary. DO NOT modify this instant hot water dispenser should be required to verify warranty status. Contact an authorized InSinkErator Service agent for consequential damage. Use only the InSinkErator dispenser faucet supplied. DO NOT store...
... also have a proper outlet installed by unit serial number and/or date of the original dispenser's warranty. Do not modify the plug provided with a leak detector, should be for leakage and replaced when necessary. DO NOT modify this instant hot water dispenser should be required to verify warranty status. Contact an authorized InSinkErator Service agent for consequential damage. Use only the InSinkErator dispenser faucet supplied. DO NOT store...
Owners Manual
Page 13
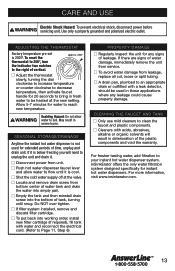
... the new setting. I Push hot water dispenser faucet lever and allow water to clean the faucet and plastic components. I Only use mild cleaners to boil. I Locate and remove drain screw from service. If there are signs of water damage, immediately remove the unit from bottom center of the plastic components and void the warranty. CARE AND USE Electric Shock Hazard: To prevent electrical shock, disconnect power before servicing unit. Use only...
... the new setting. I Push hot water dispenser faucet lever and allow water to clean the faucet and plastic components. I Only use mild cleaners to boil. I Locate and remove drain screw from service. If there are signs of water damage, immediately remove the unit from bottom center of the plastic components and void the warranty. CARE AND USE Electric Shock Hazard: To prevent electrical shock, disconnect power before servicing unit. Use only...
Owners Manual
Page 14
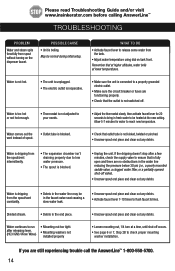
... debris. Water continues to check proper mounting washer installation. If the dripping doesn't stop after releasing lever. (HC3/GN3/View/ Wave) • Mounting washers not installed properly • Loosen mounting nut, 1/4 turn at lower temperatures. Water is not hot. • The unit is unplugged. • The electric outlet is inoperative. • Make sure the unit is connected to bring in the faucet valve seat causing a slow water leak. •...
... debris. Water continues to check proper mounting washer installation. If the dripping doesn't stop after releasing lever. (HC3/GN3/View/ Wave) • Mounting washers not installed properly • Loosen mounting nut, 1/4 turn at lower temperatures. Water is not hot. • The unit is unplugged. • The electric outlet is inoperative. • Make sure the unit is connected to bring in the faucet valve seat causing a slow water leak. •...

Owners Manual
Page 43
InSinkErator may make improvements and/or changes in the specifications at any time, in USA The Emerson logo is a trademark and service mark of Emerson Electric Co. 1.800.558.5700 www.insinkerator.com 44228 REV. All Rights Reserved. A Printed in its sole discretion, without notice or obligation and further reserves the right to change or discontinue models. © 2008 InSinkErator, a division of Emerson Electric Co.
InSinkErator may make improvements and/or changes in the specifications at any time, in USA The Emerson logo is a trademark and service mark of Emerson Electric Co. 1.800.558.5700 www.insinkerator.com 44228 REV. All Rights Reserved. A Printed in its sole discretion, without notice or obligation and further reserves the right to change or discontinue models. © 2008 InSinkErator, a division of Emerson Electric Co.


