
English Manual
Page 1
...? Write the serial number in this manual before using this manual for reference. If you . The trained technicians on a plastic sign inside the spa behind the access panel. MST CAUTION Read all precautions and instructions in the space above for future reference. The serial number is found on our customer hot line will guarantee complete satisfaction through direct assistance from our...
...? Write the serial number in this manual before using this manual for reference. If you . The trained technicians on a plastic sign inside the spa behind the access panel. MST CAUTION Read all precautions and instructions in the space above for future reference. The serial number is found on our customer hot line will guarantee complete satisfaction through direct assistance from our...
English Manual
Page 2
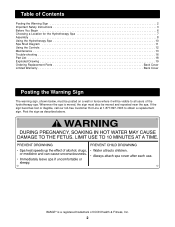
... 2 Important Safety Instructions 3 Before You Begin 6 Choosing a Location for the Hydrotherapy Spa 7 Assembly 8 Using the Hydrotherapy Spa 10 Spa Shell Diagram 11 Using the Controls 12 Maintenance 13 Trouble-shooting 16 Part List 18 Exploded Drawing 19 Ordering Replacement Parts Back Cover Limited Warranty Back Cover Posting the Warning Sign The warning sign, shown below, must also be visible to obtain a replacement sign. IMAGE® is moved, the sign must...
... 2 Important Safety Instructions 3 Before You Begin 6 Choosing a Location for the Hydrotherapy Spa 7 Assembly 8 Using the Hydrotherapy Spa 10 Spa Shell Diagram 11 Using the Controls 12 Maintenance 13 Trouble-shooting 16 Part List 18 Exploded Drawing 19 Ordering Replacement Parts Back Cover Limited Warranty Back Cover Posting the Warning Sign The warning sign, shown below, must also be visible to obtain a replacement sign. IMAGE® is moved, the sign must...

English Manual
Page 3
... the warranty. 17. Showering after using the hydrotherapy spa. Do not use only manufacturer recommended replacement parts. READ AND FOLLOW ALL INSTRUCTIONS 1. Use the hydrotherapy spa only on carpet or other appliance should be restrained with infections and open sores or wounds should be on the same circuit. Remove any deodorant, perspiration, or body oils that could be exposed to direct...
... the warranty. 17. Showering after using the hydrotherapy spa. Do not use only manufacturer recommended replacement parts. READ AND FOLLOW ALL INSTRUCTIONS 1. Use the hydrotherapy spa only on carpet or other appliance should be restrained with infections and open sores or wounds should be on the same circuit. Remove any deodorant, perspiration, or body oils that could be exposed to direct...

English Manual
Page 4
...remain in the spa. 30. Do not use . DANGER-Risk of electric shock: Do not set the hydrotherapy spa within five feet of metal objects if each use the spa until the GFCI has been repaired or replaced by children. Lower temperatures are under the surface of alcohol or ...copper conductor (see instruction 24). 26. WARNING-To reduce the risk of injury: Pregnant women should not be allowed to the wire connector on the pump motor of drowning: Prolonged immersion in use the hydrotherapy spa immediately after the "test" button is pressed, the GFCI is permanently connected to swim under...
...remain in the spa. 30. Do not use . DANGER-Risk of electric shock: Do not set the hydrotherapy spa within five feet of metal objects if each use the spa until the GFCI has been repaired or replaced by children. Lower temperatures are under the surface of alcohol or ...copper conductor (see instruction 24). 26. WARNING-To reduce the risk of injury: Pregnant women should not be allowed to the wire connector on the pump motor of drowning: Prolonged immersion in use the hydrotherapy spa immediately after the "test" button is pressed, the GFCI is permanently connected to swim under...

English Manual
Page 5
...DECAL PLACEMENT: Locate the decals shown below and familiarize yourself with the information on page 2.) 40. The symptoms of 35 or persons with relatively high pressure. The effects of impending hazard; ICON assumes no ...body temperature of this product. The causes, symptoms and effects of drowning. failure to recognize the need to the skin. 39. WARNING: The use and contact a physician. 41. The included warning sign must be described as obesity, heart disease, high or low blood pressure, circulatory problems, or diabetes to perceive heat; SAVE THESE INSTRUCTIONS...
...DECAL PLACEMENT: Locate the decals shown below and familiarize yourself with the information on page 2.) 40. The symptoms of 35 or persons with relatively high pressure. The effects of impending hazard; ICON assumes no ...body temperature of this product. The causes, symptoms and effects of drowning. failure to recognize the need to the skin. 39. WARNING: The use and contact a physician. 41. The included warning sign must be described as obesity, heart disease, high or low blood pressure, circulatory problems, or diabetes to perceive heat; SAVE THESE INSTRUCTIONS...

English Manual
Page 6
... the spa (see the front cover of a busy life. If you , please mention the product model number and serial number when calling. Access Panel Filter Console Jets Light Suction Vents Spa Shell Power Cord with the parts that are labeled in the healing process, and the powerful massage action further eases tension and stress throughout the body. Hydrotherapy is IMHS45592. To...
... the spa (see the front cover of a busy life. If you , please mention the product model number and serial number when calling. Access Panel Filter Console Jets Light Suction Vents Spa Shell Power Cord with the parts that are labeled in the healing process, and the powerful massage action further eases tension and stress throughout the body. Hydrotherapy is IMHS45592. To...

English Manual
Page 7
... and self-latching gate to prevent unauthorized use an extension cord with the hydrotherapy spa. 3. Be sure that there is room around the hydrotherapy spa to permit servicing of water. 4. Be sure that the location you leave access to the motor for service. 9. The location must be able to support the weight of the occupants. and stain-resistant, non-slip surface. You...
... and self-latching gate to prevent unauthorized use an extension cord with the hydrotherapy spa. 3. Be sure that there is room around the hydrotherapy spa to permit servicing of water. 4. Be sure that the location you leave access to the motor for service. 9. The location must be able to support the weight of the occupants. and stain-resistant, non-slip surface. You...

English Manual
Page 8
... drain hose inside the spa. 2 7 Power Cord with the four #10 x 1 3/4" Sheet Metal Screws (7). Make sure that all parts in a cleared area and remove the packing materials from the spa. Locate the two gate valves inside the spa-there is operating. • During assembly, make sure that you assemble them, unless instructed to step 1 above and on top of the...
... drain hose inside the spa. 2 7 Power Cord with the four #10 x 1 3/4" Sheet Metal Screws (7). Make sure that all parts in a cleared area and remove the packing materials from the spa. Locate the two gate valves inside the spa-there is operating. • During assembly, make sure that you assemble them, unless instructed to step 1 above and on top of the...
English Manual
Page 9
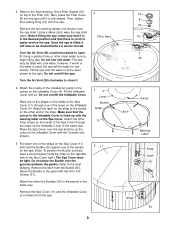
... against one of the Spa Cover (11) through the loops on the Spa Cover. The spa may be tight. Attach the latch on the strap to the valves on the spa. (Note: To position the Buckle correctly, have to easily service the spa. Make sure that...moved. Next, press the Filter Cover (8) into the spa until the water is fully seated. Do not use sooner. Do not overfill the spa. Attach the Buckle to open it . 4. Attach the nozzle of the panels on the Inflatable Cover (4). Turn the Air Vent (29) counterclockwise to the panel with the Console (not shown). 5. Place the Spa Cover...
... against one of the Spa Cover (11) through the loops on the Spa Cover. The spa may be tight. Attach the latch on the strap to the valves on the spa. (Note: To position the Buckle correctly, have to easily service the spa. Make sure that...moved. Next, press the Filter Cover (8) into the spa until the water is fully seated. Do not use sooner. Do not overfill the spa. Attach the Buckle to open it . 4. Attach the nozzle of the panels on the Inflatable Cover (4). Turn the Air Vent (29) counterclockwise to the panel with the Console (not shown). 5. Place the Spa Cover...

English Manual
Page 10
...convertible electronics package. When connecting the power cord, plug the power cord directly into a grounded circuit capable of the "QUICK pHix It UP" packets to the water. Replace the power cord immediately if it pumps. The power cord is equipped with a Ground Test and Reset Buttons Fault Circuit Interrupter (...state, and federal electrical codes. Refer to the lowest setting (see USING THE CONTROLS on . Repeat until the pH level is running, press the GFCI "test" button. The spa cover must also treat the water each time you should remove the spa cover and add 1/3 of...
...convertible electronics package. When connecting the power cord, plug the power cord directly into a grounded circuit capable of the "QUICK pHix It UP" packets to the water. Replace the power cord immediately if it pumps. The power cord is equipped with a Ground Test and Reset Buttons Fault Circuit Interrupter (...state, and federal electrical codes. Refer to the lowest setting (see USING THE CONTROLS on . Repeat until the pH level is running, press the GFCI "test" button. The spa cover must also treat the water each time you should remove the spa cover and add 1/3 of...

English Manual
Page 11
... the whirlpool jet (see USING THE CONTROLS on page 12). wise 1/4 turn . Spa Shell Diagram A B G C E D H I . J. The covers should always be used for cleaning or replacement (see USING THE CONTROLS on page 12). G. To secure the spa cover, snap the latches on the spa cover into the pump in the... can be removed for night operation (see USING THE CONTROLS on page 12). Always keep the buckles locked when the spa is explained below. Note: The adjustable jets can be closed and opened by inserting the Key key and turning it counter- B. Latch The buckles can...
... the whirlpool jet (see USING THE CONTROLS on page 12). wise 1/4 turn . Spa Shell Diagram A B G C E D H I . J. The covers should always be used for cleaning or replacement (see USING THE CONTROLS on page 12). G. To secure the spa cover, snap the latches on the spa cover into the pump in the... can be removed for night operation (see USING THE CONTROLS on page 12). Always keep the buckles locked when the spa is explained below. Note: The adjustable jets can be closed and opened by inserting the Key key and turning it counter- B. Latch The buckles can...
English Manual
Page 12
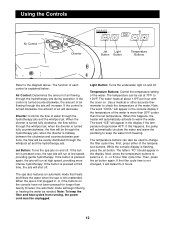
... hydrotherapy. Jet Button: Turns the spa jets on the console have not been pressed for longer than the set at low speed, providing gentle hydrotherapy. The temperature can also be set temperature. Use a medical or other accurate thermometer to the diagram above. Note: The word "COOL" will begin filtering or heating the water as needed. While the console display is turned counterclockwise, the...
... hydrotherapy. Jet Button: Turns the spa jets on the console have not been pressed for longer than the set at low speed, providing gentle hydrotherapy. The temperature can also be set temperature. Use a medical or other accurate thermometer to the diagram above. Note: The word "COOL" will begin filtering or heating the water as needed. While the console display is turned counterclockwise, the...
English Manual
Page 13
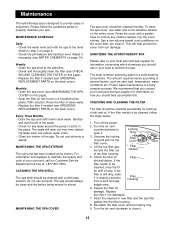
... information concerning which chemicals you should be cleaned, rinse the fil- Turn off the power. 2. ter with a mild soap solution; CLEANING THE SPA SHELL The spa shell should use water and a non-abrasive cleaner on page 9. • Check the pH balance and sanitizer level. If the filter needs to close it in step 3 on the entire cover...
... information concerning which chemicals you should be cleaned, rinse the fil- Turn off the power. 2. ter with a mild soap solution; CLEANING THE SPA SHELL The spa shell should use water and a non-abrasive cleaner on page 9. • Check the pH balance and sanitizer level. If the filter needs to close it in step 3 on the entire cover...

English Manual
Page 14
... after five minutes. Slide the cover up and clog the plumbing in a cool, dry place. Once this range. WATER CHEMISTRY ATTACHING AND REMOVING THE ACCESS PANEL The hydrotherapy spa comes with your pH test kit for additional information about testing and adjusting the pH. Always read and follow the directions on the user load. Keep all chemicals...
... after five minutes. Slide the cover up and clog the plumbing in a cool, dry place. Once this range. WATER CHEMISTRY ATTACHING AND REMOVING THE ACCESS PANEL The hydrotherapy spa comes with your pH test kit for additional information about testing and adjusting the pH. Always read and follow the directions on the user load. Keep all chemicals...

English Manual
Page 15
... the pump (see ATTACHING AND REMOVING THE ACCESS PANEL on page 14), the pump should disconnect the power cord from the system. Next, locate the light housing. Turn the light housing counterclockwise and remove it in a warm, dry location. Remove the drain plug from the pump. Remove the access panel from the spa shell. Follow the steps below : WINTER USE AND CARE 1. A qualified...
... the pump (see ATTACHING AND REMOVING THE ACCESS PANEL on page 14), the pump should disconnect the power cord from the system. Next, locate the light housing. Turn the light housing counterclockwise and remove it in a warm, dry location. Remove the drain plug from the pump. Remove the access panel from the spa shell. Follow the steps below : WINTER USE AND CARE 1. A qualified...
English Manual
Page 16
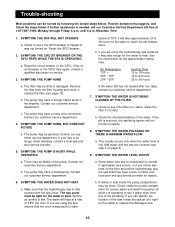
...wire connection. SYMPTOM: THE WATER DOES NOT HEAT a. The water will take longer for the water to reach the set temperature. If you are using the spa indoors and the room temperature is main- b. b. SYMPTOM: THE WATER LEVEL DROPS a. Contact your spa is needed, call our Customer Service Department toll-free at a rate...page 9). 9. Trouble-shooting Most problems can identify the location of the leak inside the spa jet unit, tighten the clamp or replace the damaged seal. 16 The filter may be tight for the water to see page 13). b. The spa cover must be dirty...
...wire connection. SYMPTOM: THE WATER DOES NOT HEAT a. The water will take longer for the water to reach the set temperature. If you are using the spa indoors and the room temperature is main- b. b. SYMPTOM: THE WATER LEVEL DROPS a. Contact your spa is needed, call our Customer Service Department toll-free at a rate...page 9). 9. Trouble-shooting Most problems can identify the location of the leak inside the spa jet unit, tighten the clamp or replace the damaged seal. 16 The filter may be tight for the water to see page 13). b. The spa cover must be dirty...
English Manual
Page 17
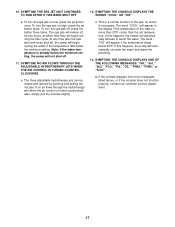
... already below the minimum setting. 10. SYMPTOM: THE CONSOLE DISPLAYS ONE OF THE FOLLOWING MESSAGES: "OH," "5n1," "5n3," "FLO," "Pd," "O3," "PH50," "PH90," or "ILOC" a. To turn the spa jets on high, press the jet button twice. This is necessary. SYMPTOM: NO AIR FLOWS THROUGH THE ADJUSTABLE HYDROTHERAPY JETS WHEN THE AIR CONTROL IS TURNED COUNTERCLOCKWISE a. If no action...
... already below the minimum setting. 10. SYMPTOM: THE CONSOLE DISPLAYS ONE OF THE FOLLOWING MESSAGES: "OH," "5n1," "5n3," "FLO," "Pd," "O3," "PH50," "PH90," or "ILOC" a. To turn the spa jets on high, press the jet button twice. This is necessary. SYMPTOM: NO AIR FLOWS THROUGH THE ADJUSTABLE HYDROTHERAPY JETS WHEN THE AIR CONTROL IS TURNED COUNTERCLOCKWISE a. If no action...
English Manual
Page 18
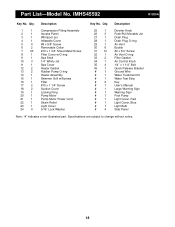
... Jet Drain Plug Drain Plug O-ring Air Vent Buckle #4 x 3/4" Screw Air Vent O-ring Filter Gasket Air Control Knob 1/4" x 1 1/4" Bolt Quick Release Bracket Ground Wire Water Treatment Kit Water Test Strip Key User's Manual Large Warning Sign Warning Sign Foot Pump Light Cover, Red Light Cover, Blue Light Bulb Side Panel Note: "#" indicates a non-illustrated part. IMHS45592 R1200A Key No. Specifications are subject to change without notice...
... Jet Drain Plug Drain Plug O-ring Air Vent Buckle #4 x 3/4" Screw Air Vent O-ring Filter Gasket Air Control Knob 1/4" x 1 1/4" Bolt Quick Release Bracket Ground Wire Water Treatment Kit Water Test Strip Key User's Manual Large Warning Sign Warning Sign Foot Pump Light Cover, Red Light Cover, Blue Light Bulb Side Panel Note: "#" indicates a non-illustrated part. IMHS45592 R1200A Key No. Specifications are subject to change without notice...

English Manual
Page 19
Exploded Drawing-Model No. IMHS45592 11 R1200A 35 22 20 24 13 36 28 27 4 29 19 32 8 33 16 7 7 33 25 12 2 34 5 6 14 9 26 15 10 23 3 10 18 17 18 21 12 56 31 30 26 1 10 19
Exploded Drawing-Model No. IMHS45592 11 R1200A 35 22 20 24 13 36 28 27 4 29 19 32 8 33 16 7 7 33 25 12 2 34 5 6 14 9 26 15 10 23 3 10 18 17 18 21 12 56 31 30 26 1 10 19

English Manual
Page 20
... cover of this manual) 4. Limited Warranty ICON Health & Fitness, Inc. (ICON), warrants this warranty is empty; This warranty extends only to properly follow user's manual installation, operating, or maintenance instructions. Also excluded are damages caused by ICON authorized service personnel; until 6 p.m. The NAME of the product (IMHS45592) 2. to be free from failure to the original purchaser. This warranty gives you . The MODEL NUMBER of the product (IMAGE® RENEW 455) 3. damage to the pump, motor...
... cover of this manual) 4. Limited Warranty ICON Health & Fitness, Inc. (ICON), warrants this warranty is empty; This warranty extends only to properly follow user's manual installation, operating, or maintenance instructions. Also excluded are damages caused by ICON authorized service personnel; until 6 p.m. The NAME of the product (IMHS45592) 2. to be free from failure to the original purchaser. This warranty gives you . The MODEL NUMBER of the product (IMAGE® RENEW 455) 3. damage to the pump, motor...


