Instruction Manual
Page 36
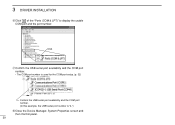
3 DRIVER INSTALLATION yClick " " of the "Ports (COM & LPT)" to display the usable COM port and the port number. Click uConfirm the USB serial port availability and the COM port number. • The COM port number is used for the COM port setup. (p. 32) Confirm the USB serial port availability and the COM port number. (In this example, the USB serial port number is "4.") iClose the Device Manager, System Properties screen and then Control panel. 29
3 DRIVER INSTALLATION yClick " " of the "Ports (COM & LPT)" to display the usable COM port and the port number. Click uConfirm the USB serial port availability and the COM port number. • The COM port number is used for the COM port setup. (p. 32) Confirm the USB serial port availability and the COM port number. (In this example, the USB serial port number is "4.") iClose the Device Manager, System Properties screen and then Control panel. 29
Instruction Manual
Page 37
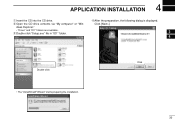
4 APPLICATION INSTALLATION q Insert the CD into the CD drive. Click [Next>]. e Double click "Setup.exe" file in "ID1" folder. 3 4 Double click • The "InstallShield® Wizard" starts preparing the installation. rAfter the preparation, the following dialog is displayed. wOpen the CD drive contents via "My computer" or "Win- dows Explorer." • "Driver" and "ID1" folders are available. Click 30
4 APPLICATION INSTALLATION q Insert the CD into the CD drive. Click [Next>]. e Double click "Setup.exe" file in "ID1" folder. 3 4 Double click • The "InstallShield® Wizard" starts preparing the installation. rAfter the preparation, the following dialog is displayed. wOpen the CD drive contents via "My computer" or "Win- dows Explorer." • "Driver" and "ID1" folders are available. Click 30
Instruction Manual
Page 39
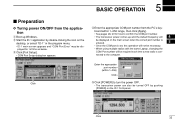
... 1-256) Click t Click [POWER] to turn the power OFF. • The transceiver power can also be turned OFF by double clicking the icon on the ID-1 front panel. nected to confirm the COM port number. • The transceiver power comes up Windows. rEnter the appropriate COM port number from... Port number will 4 be displayed on the main screen when the correct port number is entered. 5 • Once the COM port is con- e Click [Port Setup]. • COM Port Setup dialog box appears.
... 1-256) Click t Click [POWER] to turn the power OFF. • The transceiver power can also be turned OFF by double clicking the icon on the ID-1 front panel. nected to confirm the COM port number. • The transceiver power comes up Windows. rEnter the appropriate COM port number from... Port number will 4 be displayed on the main screen when the correct port number is entered. 5 • Once the COM port is con- e Click [Port Setup]. • COM Port Setup dialog box appears.
Instruction Manual
Page 56
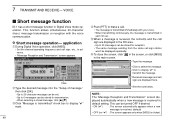
... Type the message. Received message and call sign are displayed in advance. • "Message Reception and Transmission" screen appears. VOICE Short message function ID-1 has a short message function in the main screen. application q During Digital Voice operation, click [MSG]. • Set the desired operating frequency ...same call . • The message is received in each 30 sec. Click to transmit the message. Click wType the desired message into the "Setup of message," then click [OK]. • Up to 20-character message can be set. • Up to make a call sign station...
... Type the message. Received message and call sign are displayed in advance. • "Message Reception and Transmission" screen appears. VOICE Short message function ID-1 has a short message function in the main screen. application q During Digital Voice operation, click [MSG]. • Set the desired operating frequency ...same call . • The message is received in each 30 sec. Click to transmit the message. Click wType the desired message into the "Setup of message," then click [OK]. • Up to 20-character message can be set. • Up to make a call sign station...