

Instruction Manual
Page 6
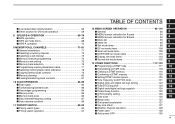
... operation 31 ■ Auto repeater function 32 ■ 1750 Hz tone 33 7 DV MODE OPERATION 34-59 ■ Digital mode operation 34 ■ Call sign programming 34 ■ Digital voice mode operation 38 ■ About the D-STAR system 40 ■ Digital repeater operation 41 ■ Received call sign 46 ■ Copying...
... operation 31 ■ Auto repeater function 32 ■ 1750 Hz tone 33 7 DV MODE OPERATION 34-59 ■ Digital mode operation 34 ■ Call sign programming 34 ■ Digital voice mode operation 38 ■ About the D-STAR system 40 ■ Digital repeater operation 41 ■ Received call sign 46 ■ Copying...
Instruction Manual
Page 7
...clearing 80 ■ Erasing/transferring bank contents 81 10 SCAN OPERATION 82-89 ■ Scan types 82 ■ Full/band/programmed scan 83 ■ Scan edges programming 84 ■ Memory scan 85 ■ Memory bank scan 86 ■ Skip channel/frequency setting 87 ■ Scan resume... DUP/TONE set mode items 110 ■ Display set mode items 112 8 ■ Sounds set mode items 115 9 13 OTHER FUNCTIONS 117-133 ■ Programming a DTMF code 117 10 ■ Transmitting a DTMF code 118 ■ Clearing a DTMF memory 119 11 ■ Confirming a DTMF memory 120...
...clearing 80 ■ Erasing/transferring bank contents 81 10 SCAN OPERATION 82-89 ■ Scan types 82 ■ Full/band/programmed scan 83 ■ Scan edges programming 84 ■ Memory scan 85 ■ Memory bank scan 86 ■ Skip channel/frequency setting 87 ■ Scan resume... DUP/TONE set mode items 110 ■ Display set mode items 112 8 ■ Sounds set mode items 115 9 13 OTHER FUNCTIONS 117-133 ■ Programming a DTMF code 117 10 ■ Transmitting a DTMF code 118 ■ Clearing a DTMF memory 119 11 ■ Confirming a DTMF memory 120...
Instruction Manual
Page 11
... scanning, changes the scanning direction. (p. 83) ➥ While pushing and holding [SQL], sets the squelch level. (p. 21) ➥ While pushing and holding [BAND], selects the programmed bank in memory mode. (p. 75) The assigned function for [VOL] and [ ]/[ ] can be exchanged in initial set the received call channel/TV channel/weather channel...
... scanning, changes the scanning direction. (p. 83) ➥ While pushing and holding [SQL], sets the squelch level. (p. 21) ➥ While pushing and holding [BAND], selects the programmed bank in memory mode. (p. 75) The assigned function for [VOL] and [ ]/[ ] can be exchanged in initial set the received call channel/TV channel/weather channel...

Instruction Manual
Page 15
...; No indicator appears when high power is selected. !4 MEMORY INDICATOR (p. 72) Appears when memory mode is selected. !5 NAME INDICATOR (p. 78) During memory mode operation, the programmed memory or memory bank name is displayed. !6 MAIN BAND INDICATOR (p. 14) Shows which operating band, "A" or "B," is selected for the main band. !7 OPERATING MODE INDICATOR...
...; No indicator appears when high power is selected. !4 MEMORY INDICATOR (p. 72) Appears when memory mode is selected. !5 NAME INDICATOR (p. 78) During memory mode operation, the programmed memory or memory bank name is displayed. !6 MAIN BAND INDICATOR (p. 14) Shows which operating band, "A" or "B," is selected for the main band. !7 OPERATING MODE INDICATOR...
Instruction Manual
Page 23
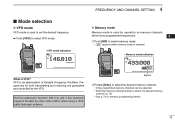
... DTCS FM PRIO WX EMR A433 000 MemoName PSKIP µ 001 LOW ATT Appear w Rotate [DIAL] to select the desired memory channel. • Only programmed memory channels can be selected. • Enter the memory channel directly to select the desired memory channel. (p. 72) • See p. 74 for both ... indication +DUP DTCS FM PRIO WX EMR A146 010 MemoName PSKIP µ 000 LOW ATT What is used for operation on memory channels which store programmed frequencies. 4 q Push [MR] to select VFO mode. D Memory mode Memory mode is used to set the desired frequency. ➥ Push [VFO] to...
... DTCS FM PRIO WX EMR A433 000 MemoName PSKIP µ 001 LOW ATT Appear w Rotate [DIAL] to select the desired memory channel. • Only programmed memory channels can be selected. • Enter the memory channel directly to select the desired memory channel. (p. 72) • See p. 74 for both ... indication +DUP DTCS FM PRIO WX EMR A146 010 MemoName PSKIP µ 000 LOW ATT What is used for operation on memory channels which store programmed frequencies. 4 q Push [MR] to select VFO mode. D Memory mode Memory mode is used to set the desired frequency. ➥ Push [VFO] to...
Instruction Manual
Page 24
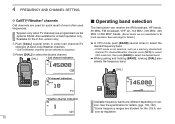
... receive the AM broadcast, HF bands, 50 MHz, FM broadcast, VHF air, 144 MHz, 300 MHz, 400 MHz or 800 MHz* bands. (Some bands are programmed via the optional RS-92.
... receive the AM broadcast, HF bands, 50 MHz, FM broadcast, VHF air, 144 MHz, 300 MHz, 400 MHz or 800 MHz* bands. (Some bands are programmed via the optional RS-92.
Instruction Manual
Page 31
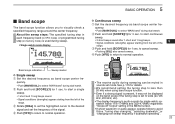
... may not be muted in 13 sounds set mode. About the sweep steps: The specified tuning step in each frequency band (in VFO mode) or programmed tuning step (in the MENU screen. 18 • If ghost waveform or audio appear, operate follow to normal operation. 8 9 [SQL] 1CLR SCOPE +DUP DTCS FM...
... may not be muted in 13 sounds set mode. About the sweep steps: The specified tuning step in each frequency band (in VFO mode) or programmed tuning step (in the MENU screen. 18 • If ghost waveform or audio appear, operate follow to normal operation. 8 9 [SQL] 1CLR SCOPE +DUP DTCS FM...

Instruction Manual
Page 36
q Push [CALL] several times to toggle the skip setting ON and OFF. • "SKIP" appears when the channel is available only when TV channels are programmed using the optional RS-92. (p. 137) Also available for 1 sec. w Push [SCAN](2) to select TV channels. • "TV" and channel number...; "TV" and channel number ap- +DUP DTCS WFM PRIO WX EMR A 2 25 pear. MemoNameP SKIP µ TV LOW ATT • The programming will automatically stop after scanning all channels including skip channel. [DIAL] CALLC RX CS TV mode indication Channel indication +DUP DTCS WFM PRIO WX EMR...
q Push [CALL] several times to toggle the skip setting ON and OFF. • "SKIP" appears when the channel is available only when TV channels are programmed using the optional RS-92. (p. 137) Also available for 1 sec. w Push [SCAN](2) to select TV channels. • "TV" and channel number...; "TV" and channel number ap- +DUP DTCS WFM PRIO WX EMR A 2 25 pear. MemoNameP SKIP µ TV LOW ATT • The programming will automatically stop after scanning all channels including skip channel. [DIAL] CALLC RX CS TV mode indication Channel indication +DUP DTCS WFM PRIO WX EMR...

Instruction Manual
Page 37
... Auto repeater function uses standard values of the transmit frequency. (-DUP or +DUP; It is in use (U.S.A. peater requirements. 4 • "TONE" appears. [SQL] 5 Refer to program repeater information into memory channels. (p. 74) 144.700 MHz Repeater 144.700 MHz 145.300 MHz 145.300 MHz Uplink (transmitting freq.) Downlink (receiving freq...
... Auto repeater function uses standard values of the transmit frequency. (-DUP or +DUP; It is in use (U.S.A. peater requirements. 4 • "TONE" appears. [SQL] 5 Refer to program repeater information into memory channels. (p. 74) 144.700 MHz Repeater 144.700 MHz 145.300 MHz 145.300 MHz Uplink (transmitting freq.) Downlink (receiving freq...

Instruction Manual
Page 42
... transmit and receive. MY CALL SIGN rM01 / :SET :BACK :SEL :EDIT CLR:CLR e Rotate [DIAL]† to 8 characters. 34 D Your own call sign programming Your own call sign set mode. ❮MENU screen❯ ➪ ❮CALL SIGN❯ ➪ ❮MY❯ (Push [MENU/ ]) (Rotate [... RS-232 output/NMEA format/4800 bps/9600 bps) and transmit/receive position data. ■ Call sign programming Four types of [DIAL] and [ ](5). ■ Digital mode operation The IC-92AD can store up to select the desired call sign memories are available instead of call sign memory, "M01"...
... transmit and receive. MY CALL SIGN rM01 / :SET :BACK :SEL :EDIT CLR:CLR e Rotate [DIAL]† to 8 characters. 34 D Your own call sign programming Your own call sign set mode. ❮MENU screen❯ ➪ ❮CALL SIGN❯ ➪ ❮MY❯ (Push [MENU/ ]) (Rotate [... RS-232 output/NMEA format/4800 bps/9600 bps) and transmit/receive position data. ■ Call sign programming Four types of [DIAL] and [ ](5). ■ Digital mode operation The IC-92AD can store up to select the desired call sign memories are available instead of call sign memory, "M01"...
Instruction Manual
Page 43
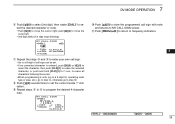
...erase the selected character, or push and hold [CLR](1) for operating radio type or area, etc.), go to step i, otherwise go to store the programmed call sign can be set the cursor beside "/" indication. MY CALL SIGN rM01 MYCALL /IC92 :SET :BACK :SEL :EDIT CLR:CLR 1 !0 Push... and returns to MY CALL SIGN screen. 2 !1 Push [MENU/ ] to return to a 4-digit for 1 sec. to erase all characters following the cursor. • When programming a note (up to frequency indication. 3 4 5 6 7 8 9 10 11 12 13 14 15 16 17 18 †[DIAL] ↔ [ ](2)/[ ](8) 19 ‡[ ](5) ...
...erase the selected character, or push and hold [CLR](1) for operating radio type or area, etc.), go to step i, otherwise go to store the programmed call sign can be set the cursor beside "/" indication. MY CALL SIGN rM01 MYCALL /IC92 :SET :BACK :SEL :EDIT CLR:CLR 1 !0 Push... and returns to MY CALL SIGN screen. 2 !1 Push [MENU/ ] to return to a 4-digit for 1 sec. to erase all characters following the cursor. • When programming a note (up to frequency indication. 3 4 5 6 7 8 9 10 11 12 13 14 15 16 17 18 †[DIAL] ↔ [ ](2)/[ ](8) 19 ‡[ ](5) ...

Instruction Manual
Page 44
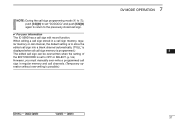
...• Push [A/a](3) to YOUR CALL SIGN screen. YOUR CALL SIGN rU01 STATION1 :SET :BACK :SEL :EDIT CLR:CLR i Push [ ](5) to store the programmed call sign and returns to change the character group from "AB" (alphabetical characters; o Push [MENU/ ] to return to erase all characters following the cursor....(p. 14) w Enter "UR" in call sign set mode. • YOUR CALL SIGN screen is displayed. 7 DV MODE OPERATION D Station call sign programming Station call sign must be set. • If an un-necessary character is also available to enter call sign set mode. ❮MENU screen❯...
...• Push [A/a](3) to YOUR CALL SIGN screen. YOUR CALL SIGN rU01 STATION1 :SET :BACK :SEL :EDIT CLR:CLR i Push [ ](5) to store the programmed call sign and returns to change the character group from "AB" (alphabetical characters; o Push [MENU/ ] to return to erase all characters following the cursor....(p. 14) w Enter "UR" in call sign set mode. • YOUR CALL SIGN screen is displayed. 7 DV MODE OPERATION D Station call sign programming Station call sign must be set. • If an un-necessary character is also available to enter call sign set mode. ❮MENU screen❯...
Instruction Manual
Page 45
...15 16 17 18 19 37 NOTE: During the call sign programming mode (r to u), push [CQ](0) to set "CQCQCQ," and push [CQ](0) again to return to the previously stored call sign. ✔ For your information The IC-92AD has a call channels. (Temporary operation without over-writing is set... to store the edited call sign into a blank channel automatically. ("FULL" is displayed when all call sign memory is programmed.) The edited call sign can be over -write a programmed call sign in regular memory...
...15 16 17 18 19 37 NOTE: During the call sign programming mode (r to u), push [CQ](0) to set "CQCQCQ," and push [CQ](0) again to return to the previously stored call sign. ✔ For your information The IC-92AD has a call channels. (Temporary operation without over-writing is set... to store the edited call sign into a blank channel automatically. ("FULL" is displayed when all call sign memory is programmed.) The edited call sign can be over -write a programmed call sign in regular memory...

Instruction Manual
Page 46
... code squelch) or DSQL (Digital call sign squelch). 38 One of "white noise." x Rotate [DIAL]† to select your own call sign (if you have programmed several call signs) then push [ ](5) to set the call sign and return to hear the hiss of the differences is vastly different from FM mode.... t Push and hold [PTT] to receive. • The other station's call sign programming details. z Enter "MY" in call sign set mode. See page 101 for DV operation as in FM mode. NOTE: The digital mode operation is that...
... code squelch) or DSQL (Digital call sign squelch). 38 One of "white noise." x Rotate [DIAL]† to select your own call sign (if you have programmed several call signs) then push [ ](5) to set the call sign and return to hear the hiss of the differences is vastly different from FM mode.... t Push and hold [PTT] to receive. • The other station's call sign programming details. z Enter "MY" in call sign set mode. See page 101 for DV operation as in FM mode. NOTE: The digital mode operation is that...

Instruction Manual
Page 47
... call sign and return to select the call sign channel in which 4 "CQCQCQ" is programmed. 5 Or, select "U" then push [ ](6) and [CQ](0) in which the desired station's call sign is programmed. • See page 36 for station call sign programming details. CALL SIGN rUR:STATION1 R1: R2:NOT USE* MY:MYCALL /IC92 n Push [MENU...
... call sign and return to select the call sign channel in which 4 "CQCQCQ" is programmed. 5 Or, select "U" then push [ ](6) and [CQ](0) in which the desired station's call sign is programmed. • See page 36 for station call sign programming details. CALL SIGN rUR:STATION1 R1: R2:NOT USE* MY:MYCALL /IC92 n Push [MENU...

Instruction Manual
Page 49
...can be set. • Push [7] when setting with the gateway connection if the 4 selected repeater has gateway capability. (The gateway connection can be programmed for "CQCQCQ") in RPT1 only when "NOT USE✱" is set mode. ❮MENU screen❯ ➪ ❮CALL SIGN❯ &#...8226; RPT1 or RPT2 CALL SIGN screen is displayed. • Pushing and holding [CS](9) for 1 sec. push [ ](4) to move the cursor right; D Repeater call sign programming q Select B band as the main band. (p. 14) w Enter "R1" or "R2" in call signs must be set in a different zone operation. (p. 44) ...
...can be set. • Push [7] when setting with the gateway connection if the 4 selected repeater has gateway capability. (The gateway connection can be programmed for "CQCQCQ") in RPT1 only when "NOT USE✱" is set mode. ❮MENU screen❯ ➪ ❮CALL SIGN❯ &#...8226; RPT1 or RPT2 CALL SIGN screen is displayed. • Pushing and holding [CS](9) for 1 sec. push [ ](4) to move the cursor right; D Repeater call sign programming q Select B band as the main band. (p. 14) w Enter "R1" or "R2" in call signs must be set in a different zone operation. (p. 44) ...

Instruction Manual
Page 50
...[DIAL]† to select the desired repeater's (in the same zone) call sign for "R1." • Return to select the nearest repeater's call sign programming. 7 DV MODE OPERATION D Repeater operation in the same zone q Set the desired repeater's frequency, offset and shift direction in B band. (pgs. 18,... 21) w Set your own call sign. (p. 38) • See p. 34 for your own call sign as follows; r Set the repeater's call sign programming. t Push [PTT] to frequency indication. release to set the call sign. • Select "NOT USE✱" when not operating RPT2. x Rotate [DIAL...
...[DIAL]† to select the desired repeater's (in the same zone) call sign for "R1." • Return to select the nearest repeater's call sign programming. 7 DV MODE OPERATION D Repeater operation in the same zone q Set the desired repeater's frequency, offset and shift direction in B band. (pgs. 18,... 21) w Set your own call sign. (p. 38) • See p. 34 for your own call sign as follows; r Set the repeater's call sign programming. t Push [PTT] to frequency indication. release to set the call sign. • Select "NOT USE✱" when not operating RPT2. x Rotate [DIAL...

Instruction Manual
Page 52
...] to select "R2" then push [ ](5)†. z Enter "R1" in advance. (p. 21) w Set your own call sign. (p. 38) • See p. 34 for your own call sign programming. c Push [ ](5) to CALL SIGN screen. is set in the same zone) call sign. • The call sign should have "G" set as follows; e Set the desired... m Push [MENU/ ] to return to receive. †[DIAL] ↔ [ ](2)/[ ](8) ‡[ ](5) ↔ [ ](6) 7 DV MODE OPERATION D Repeater operation into "UR." • See p. 36 for station call sign programming.
...] to select "R2" then push [ ](5)†. z Enter "R1" in advance. (p. 21) w Set your own call sign. (p. 38) • See p. 34 for your own call sign programming. c Push [ ](5) to CALL SIGN screen. is set in the same zone) call sign. • The call sign should have "G" set as follows; e Set the desired... m Push [MENU/ ] to return to receive. †[DIAL] ↔ [ ](2)/[ ](8) ‡[ ](5) ↔ [ ](6) 7 DV MODE OPERATION D Repeater operation into "UR." • See p. 36 for station call sign programming.

Instruction Manual
Page 56
...SIGN rU21 AB †AAAAA :SET :SEL :CUR CLR:CLR A/a:CHAR 0:CQ t Edit or modify the selected call sign as described in "Station call sign programming" (p. 36) or "Repeater call sign channel number as desired, then push [ ](5)†. NOTE: The message "FULL" is displayed when no blank channel .... • U01-U60 and R01-R60 are available. • When "AUTO" is set to "EDIT RECORD" item r Push [ ](6) to select the call sign programming mode. • A blank channel is set mode. • Pushing and holding [CS](9) for 1 sec. NOTE: Make sure that the "EDIT RECORD" item in ...
...SIGN rU21 AB †AAAAA :SET :SEL :CUR CLR:CLR A/a:CHAR 0:CQ t Edit or modify the selected call sign as described in "Station call sign programming" (p. 36) or "Repeater call sign channel number as desired, then push [ ](5)†. NOTE: The message "FULL" is displayed when no blank channel .... • U01-U60 and R01-R60 are available. • When "AUTO" is set to "EDIT RECORD" item r Push [ ](6) to select the call sign programming mode. • A blank channel is set mode. • Pushing and holding [CS](9) for 1 sec. NOTE: Make sure that the "EDIT RECORD" item in ...

Instruction Manual
Page 57
... 0:CQ Call sign channel number blinks. u Rotate [DIAL]† to select the desired call sign channel to select the call sign programming mode. • The 1st digit of the selected call sign blinks. y Push [ ](5). • Call sign channel number blinks.... t Edit or modify the selected call sign as described in "Station call sign programming" (p. 36) or "Repeater call sign into the selected channel. †[DIAL] ↔ [ ](2)/[ ](8) ‡[ ](5) ↔ [ ](6) DV MODE OPERATION 7 1 2 3 4...
... 0:CQ Call sign channel number blinks. u Rotate [DIAL]† to select the desired call sign channel to select the call sign programming mode. • The 1st digit of the selected call sign blinks. y Push [ ](5). • Call sign channel number blinks.... t Edit or modify the selected call sign as described in "Station call sign programming" (p. 36) or "Repeater call sign into the selected channel. †[DIAL] ↔ [ ](2)/[ ](8) ‡[ ](5) ↔ [ ](6) DV MODE OPERATION 7 1 2 3 4...


